🌕 Personal Life Support System Valve 🚀

Exploring the Lunar Lander’s Personal Life Support System Valve: A Journey into Spacecraft Technology

Welcome back, fellow space enthusiasts, to another thrilling episode of Spacecraft Guide! In this installment, we’re taking our lunar lander exploration a step further. Our focus today? The Personal Life Support System Valve, a tiny component with a big role in keeping astronauts safe in space. Prepare to be amazed!

🔧The Personal Life Support System Valve🔧

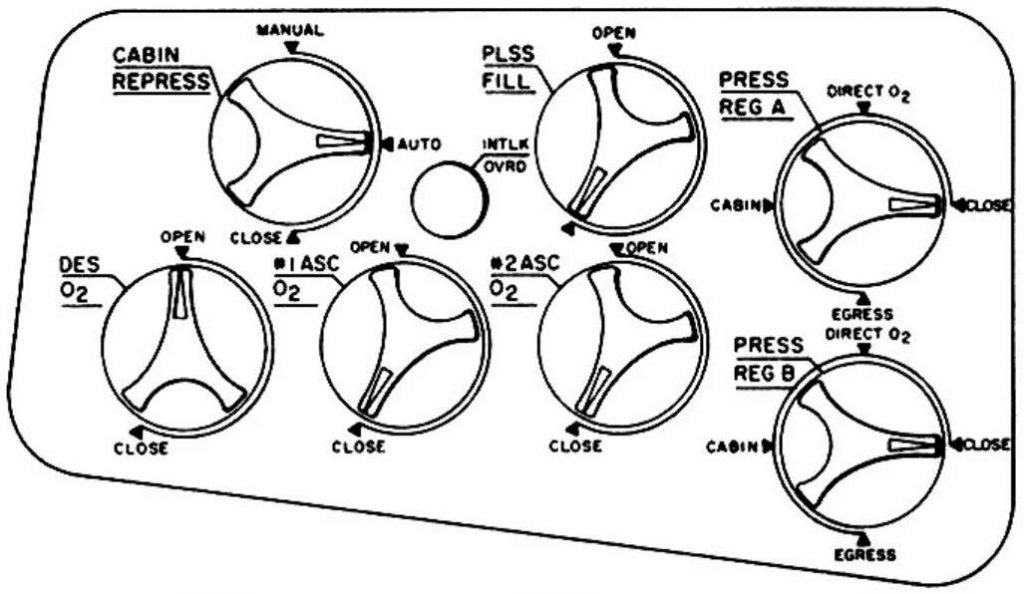
Imagine, if you will, a valve that regulates oxygen flow from the descent and ascent tanks to the Personal Life Support System. This unassuming component plays a vital role in ensuring astronauts have a steady supply of oxygen in the harsh lunar environment. With just a click on the on this valve in the Interactive VR Exhibit, you’re transported to a world of detailed information about its functions.

Open & Close: Oxygen Control

The Personal Life Support System Valve is no ordinary valve. It allows manual control over the flow of oxygen to the life support system. Want to increase the oxygen supply? Open it up. Need to conserve resources? Simply close the valve. It’s a lifeline for astronauts, and understanding its operation is crucial.

Delving into the Schematics 🔍

Ever wondered how this valve works on a technical level? Clicking on the schematics reveals the inner workings. You’ll see how the valve opens up a restriction, allowing oxygen to flow into the system. It’s a delicate dance of technology that ensures astronauts have the oxygen they need to explore the lunar surface safely.

🌌 Explore More with Interactive Virtual Reality 🌌

But wait, there’s more! Dive into our Interactive Virtual Reality exhibit to explore the command module, lunar module, and even the moon’s surface. It’s an immersive experience that puts you in the shoes of an astronaut, allowing you to discover the intricacies of lunar exploration firsthand.

Video Preview – https://youtu.be/3ZapyPIF9CQ?si=3FUBhoBxxGMHNZq-

💡 Join Our Patreon Community 💡

To access this incredible VR experience and support our mission to make space technology accessible to all, visit our Patreon page. Your contribution goes a long way in helping us continue our educational initiatives and share the wonders of space exploration.

Video Preview – https://youtu.be/3ZapyPIF9CQ?si=3FUBhoBxxGMHNZq-

That’s it for this week’s episode of Spacecraft Guide! We hope you enjoyed this deep dive into the Personal Life Support System Valve. Stay tuned for more exciting updates as we uncover the mysteries of historic spacecraft. Don’t forget to share this post with your fellow space enthusiasts – the cosmos awaits! 🚀🌠 #SpaceExploration #LunarLander #SpaceTech

Please help support this site by purchasing this e-book Apollo Spacecraft Intelligent Manual – Panoramic Edition

The Mysteries of Gimbal Lock

🚀 Unveiling the Mysteries of Gimbal Lock: A Deep Dive into Spacecraft Control 🛰️

Welcome back to the captivating world of spacecraft exploration! In this thrilling episode of the Spacecraft Guide, we’re delving into the intricate realm of panel three and its stabilizer control switches. But that’s not all – we’re unraveling the enigma of gimbal lock and its impact on spacecraft orientation. Let’s blast off into the cosmos of knowledge!

The Flight Director Attitude Indicator

🛠️ Panel Three and Its Switches 🛠️

This week, our spotlight is on panel three and its three essential switches: the dead band switch, gyro test switch, and gyro test signal switch. These switches are the vital conduits that ensure seamless communication between the spacecraft and the flight director attitude indicator. Join us as we navigate through these components, unlocking their roles in the spacecraft’s navigation.

🌐Exploring Gimbal Lock 🌐

Our journey takes a fascinating turn as we delve into the concept of gimbal lock. Watch our enlightening video as we explain how gimbal lock can affect spacecraft orientation. Learn about its visual cues and why it can momentarily confuse the spacecraft’s orientation sensors.

🔗 The Role of Gyroscopes🔗

Discover the intricate world of gyroscopes, devices that use centripetal force to maintain balance and orientation. Dive into their application as artificial horizons and stable platforms for spacecraft navigation.

🛰️ The Inertial Measuring Unit 🛰️

Uncover the power of the Inertial Measuring Unit – a device that measures orientation by utilizing gyroscopes. Learn how it forms a stable platform for measuring orientation changes as the spacecraft moves.

🔀 Navigating with Gimbals 🔀

Immerse yourself in the mechanics of gimbals – mechanical devices that allow movement along the x, y, and z axes. These gimbals enable the spacecraft to achieve a full range of motion, critical for navigating through space.

🎯 Understanding Gimbal Lock 🎯

Gimbal lock occurs when two gimbals align perfectly, causing confusion in orientation calculation. We break down the trigonometry behind it and explain why the computer’s answer is virtually “infinity.”

🔴 Apollo 13’s Struggle with Gimbal Lock🔴

Embark on a historic journey as we delve into the role of gimbal lock in the Apollo 13 mission. Explore how the spacecraft fought to stay out of the dreaded “red dot” on the flight director attitude indicator, signifying alignment of three gimbals.

Unlock the Apollo Exhibit

Want to explore more? Dive into our interactive Apollo spacecraft exhibit, where you can click on components to gain insights into this historic mission. Join our Patreon community and access this exclusive content!

Don’t miss our upcoming episodes as we continue to explore the intricacies of spacecraft technology. Stay curious and keep exploring the cosmos with us! 🌌 #SpaceExploration #GimbalLock #ApolloMission

See A video on this system here – https://youtu.be/zgvjAiCPkcI

🚀 Support Our Mission 🚀

Become a patron of the Spacecraft Interactive Virtual Museum to access our interactive exhibits and support our educational initiatives. Your contribution fuels our passion for sharing the wonders of space exploration.

Please visit our Sponsor

This image has an empty alt attribute; its file name is AMEX-Blue.png

Want to get miles on everything you buy without having to pay an annual fee? Check out the Delta SkyMiles Blue Card and Earn 2X Miles at restaurants worldwide (terms ap

Space Shuttle Main Landing Gear

Embark on an Immersive Space Odyssey: Unveiling the Main Landing Gear of the Space Shuttle

Greetings, fellow space enthusiasts! Prepare to be captivated as we delve deep into the heart of space exploration in this edition of the Spacecraft Guide. Our focus? A component of utmost importance – the main landing gear of the space shuttle. Brace yourself for an exhilarating journey through its intricate design, cutting-edge mechanics, and flawless operation. The path we’re about to tread is unlike any other, offering an immersive experience that promises to unveil the secrets of this vital piece of spacefaring history.

Unraveling the Mysteries with a Click

What sets our guide apart is its interactive nature. The moment you click on the main landing gear door, a world of boundless knowledge unfurls before your eyes. It’s not just information; it’s an exploration. Detailed diagrams come to life, accompanied by meticulous descriptions that leave no stone unturned. Step into the shoes of a space engineer, understanding the intricacies that make landing on solid ground possible.

A Legendary Voice: Fred Hayes

Prepare for an extraordinary feature that transcends the ordinary. Imagine having the privilege to hear firsthand accounts from a true space pioneer. Fred Hayes, a name synonymous with space history, lends his iconic voice to narrate video descriptions. As a test pilot who contributed to both the Space Shuttle program and the legendary Apollo 13 mission, his insights are unparalleled. Through his words, you’ll gain insight into the rigorous testing procedures that shaped the shuttle’s landing gear. It’s a rare chance to be mentored by a trailblazer who etched his legacy in the stars.

Navigating the Complexities: A Deeper Dive

As our guide unfolds, we navigate through the maze of landing gear configurations and protocols. Secure landings in the realm of space require a symphony of precision, and this guide orchestrates it all. Explore factors like airspeed, altitude, and hydraulic systems, intricately woven into the narrative. The level of detail is staggering, and it’s a testament to our commitment to plunging you into the heart of space shuttle technology.

Spread the Word and Join the Journey

We’re not just explorers; we’re a community of dreamers and seekers united by our passion for space. Join us on this enlightening voyage and immerse yourself in the marvels of space travel. Share the word with friends, family, and fellow enthusiasts. Help us build a constellation of curious minds who seek to unravel the mysteries of the cosmos.

Subscribe and Support

Your support fuels our mission. Every click, every share, every subscription propels us further into the unknown. Join us as we continue to bring you captivating insights into the realm beyond our blue planet. We thank you for being a part of this cosmic adventure.

Embark on this journey now: Interactive Virtual Reality ISS Spacecraft Exhibit

Ad astra,

Please visit our Sponsor

5 Pack Deal

The Explosive Device Master Arm Switch

Our journey into the explosive devices subsystem takes us to Panel 8, a place of intricate mechanisms and immense importance. Our spotlight shines on the Explosive Device Arm Switch – the linchpin that commands the orchestra of lunar exploration. Clicking on this switch unveils the Explosive Device Master Arm Switch, a triple-pole double-throw switch with a two-position lever locking toggle mechanism. This is no ordinary switch; it’s the key that ignites the magic.

Unraveling the Mechanism

This formidable switch holds the power to arm the explosive devices subsystem, a crucial step that sets the stage for what’s to come. In the “On” position, it grants access to the activation of all lunar module explosive devices. How does it do this, you ask? By actuating redundant relays that channel power to the Explosive Device System (EDS) buses. Remember, EDS stands for Explosive Device System buses – this is the lifeline that fuels the explosive power within the lunar lander.

The Explosive Device Master Arm Switch: A True Powerhouse

Let’s dive into the schematics to visualize how this switch amplifies lunar exploration. When the Master Arm Switch is toggled to “On,” a surge of power courses through the system. Imagine it as the ignition sequence that breathes life into every function within the explosive devices subsystem. The magic unfolds: landing gear deployment, propellant tank pressurization, descent propellant venting, and much more. Each switch and indicator draws its power from this master switch, creating a symphony of activity.

The Crucial Role of the Arm Position

Now, here’s where the significance becomes truly remarkable. Without the Master Arm Switch in the “Arm” position, none of these functions can be activated. The landing gear will remain in stasis, the propellant tanks won’t pressurize, and the lunar dreams remain tethered to Earth’s realm. This single switch, in its unassuming demeanor, holds the fate of lunar exploration in its hands.

Understanding the “Why” Behind the “Boom”

But why the explosive devices? It’s a natural question, and we have an answer waiting for you in our General section. Discover the reasoning behind this bold utilization of explosive power, as we shed light on the role it plays in astronaut safety and lunar conquest.

As we wrap up this exhilarating exploration of the Explosive Device Arm Switch, let’s remember that this switch isn’t just a mundane mechanism; it’s a lifeline, a conduit to exploration, a key to the cosmos. So, share this journey with fellow space aficionados, for the universe beckons us to unveil its secrets, one explosive device at a time.

Stay curious, stay electrified, and keep reaching for the stars!

Ad astra,

See A video on this system here – https://youtu.be/pU98Tkr5Wq8

See more of Lunar Module and Apollo at SpacecraftGuide.com

Please visit our Sponsor

This image has an empty alt attribute; its file name is AMEX-Blue.png

Want to get miles on everything you buy without having to pay an annual fee? Check out the Delta SkyMiles Blue Card and Earn 2X Miles at restaurants worldwide (terms apply)

The Explosive Devices System

Today, we embark on an electrifying odyssey to the heart of lunar exploration, where audacious astronauts defy celestial realms with the aid of invisible protectors. Join me as we unveil the enigma of the Explosive Devices System (EDS), an arena where raw power and meticulous precision propel humanity’s quest to touch the stars.

Imagine this: suspended in the lunar module, astronauts wield explosive devices as the keys to unlock vital equipment. The EDS plays conductor to this symphony, choreographing the dance of landing gear deployment, propellant tank pressurization, ascent and descent stage control, and even the ethereal venting of propellant tanks. These aren’t just cogs; they are lifelines that empower our cosmic pioneers.

Image Courtesy of NASA

Why Exploding Devices?

Now, naturally, a question emerges: why entrust the fate of these pivotal operations to explosive devices? The answer is profound and clear. As astronauts venture beyond the safety of Earth’s embrace, they are, in essence, on their own. Should a device falter, lives teeter on a precipice. Lunar aspirations, once radiant dreams, can swiftly cascade into treacherous nightmares.

Let’s dig into the machinery. Designed with an unyielding commitment to safety, the EDS follows the North Star of Fail-Safe principles. It leaves no room for coincidence; mechanical or electrical paths diverge only at the junction of mechanical actuation and explosive device switches. Every function is a high-stakes endeavor, recognizing the life-altering potential of its execution.

The Mechanics

Picture this: two parallel systems, A and B, where redundancy is paramount. The EDS operates as these twin arteries, pumping life into the mission’s heartbeat. Inside the humming explosive devices relay boxes A and B, each function is meticulously executed before the cosmic baton passes to the next act.

Landing gear deployment, akin to a celestial ballet, is poetry in detonation. Detonator cartridges take the stage, setting the lunar lander gently onto the moon’s surface. Each landing gear assembly enacts explosive precision, culminating in a gray crescendo that whispers victory.

And yet, there’s more. The EDS, with unwavering vigilance, manages the heartbeat of propulsion: propellant tank pressurization. It transforms fuel and oxidizer into cosmic courage, generating the force that propels our explorers towards the stars’ embrace.

Now, imagine the climax – stage separation. Explosive nuts and bolts unfurl the spacecraft’s wings, igniting a cosmic waltz. EDS, like a master conductor, guides the symphony of technology and human curiosity, ensuring the balance remains unbroken.

Dear readers, the narrative you hold is an ode to human brilliance and dreams that soar. It’s a tribute to those who push boundaries, boldly venturing into uncharted territories. The Explosive Devices System stands as both sentinel and enabler, guarding dreams and sculpting destinies.

Share this odyssey with kindred spirits, for the universe is vast, and the call of the stars compels us to rise higher, dream grander, and explore beyond.

Ad astra,

See more of Lunar Module and Apollo at SpacecraftGuide.com

Please visit our Sponsor

This image has an empty alt attribute; its file name is AMEX-Blue.png

Want to get miles on everything you buy without having to pay an annual fee? Check out the Delta SkyMiles Blue Card and Earn 2X Miles at restaurants worldwide (terms apply)

Landing Gear Deploy TalkBack

In this remarkable issue of the spacecraft guide, we once again journey into the heart of the lunar lander. However, this time, our gaze is fixed on a new frontier – Panel Eight. Yes, my friends, we’re delving into the explosive devices. And right now, I want to take you on a mesmerizing voyage into the very essence of lunar exploration. Let’s talk about the Landing Gear Deploy TalkBack.

Image Courtesy of NASA

Click on this pivotal term, and you’ll be transported to a page that unveils the intricate mechanics behind landing gear deployment. Picture this: for the telemetry code to materialize, all four landing gear assemblies must fully deploy. The gray display is a sign of success, signifying the landing gear is in their place on the Lunar Module. Conversely, the iconic barber pole display, right here, gracefully waving like a cosmic flag. It is indicating that the landing gear is stowed, nestled safely waiting to be extended.

And if your curiosity matches mine, you’ll undoubtedly venture into the schematics, like a seasoned explorer tracing constellations in the night sky. Here, in the functional diagram of the explosive device subsystem, you’ll find the Landing Gear Deploy TalkBack. When armed, as indicated here, and fired during the grand moment of landing gear deployment, it lights up to signal this celestial ballet of gears finding their lunar stance.

Schematics

But what is truly capturing my fascination lies deeper still. Navigate with me to the landing gear’s explosive device descriptions. Here, the story unfolds: the Landing Gear Up Lock and Cutter Assembly. This remarkable contraption holds within it the essence of lunar touch down. Imagine, my friends, the initiator’s command, a silent detonation, and as the cutter assembly is set free, the gears descend. It’s a moment of orchestrated magic, where the lunar surface is beckoning and the technology responds.

See the video on how it works here.

As we venture into these exquisite details, remember that space exploration is a journey that marries science with the art of human curiosity. These mechanisms, these explosive devices, they’re the cogs that turn the wheels of history. With every landing gear that makes contact with the lunar soil, humanity leaps further into the cosmos, leaving footprints of innovation and daring dreams.

So, my fellow explorers, let’s keep our eyes to the sky and our minds alight with curiosity. The lunar lander, with its Landing Gear Deploy TalkBack, stands as a testament to human capability, engineering brilliance, and the undying quest to reach for the stars.

Onward and upward,

Seeing more of Lunar Module and Apollo at SpacecraftGuide.com

Please visit our Sponsor

This image has an empty alt attribute; its file name is AMEX-Blue.png

Want to get miles on everything you buy without having to pay an annual fee? Check out the Delta SkyMiles Blue Card and Earn 2X Miles at restaurants worldwide (terms apply)

The Lunar Module Descent Vent Switch

If you look up at the night sky and felt the pull of the cosmos, this one’s for you. In this issue of Spacecraft Guide, I’m peeling back the curtain on a topic that’s bound to spark your curiosity – the Lunar Module’s explosive devices subsystems. Specifically, I’m diving into the nitty-gritty of a key player in this cosmic drama: the Lunar Module Descent Vent Switch.

Picture this. Neil Armstrong making his indelible mark on the lunar surface, history unfolding with each step, and the breathtaking unknown of space all around. But, my friends, what about the Lunar Module’s engines? How does NASA ensure they don’t roar to life at the wrong moment? Enter the Descent Vent Switch, an unassuming yet critical part of the puzzle.

Nestled within the Lunar Module’s explosive devices subsystems, the Lunar Module Descent Vent Switch is the ultimate safety valve. Its job? To oversee the venting of the descent propulsion section. Why is this crucial, you ask? Well, it’s the gatekeeper that ensures those engines won’t startle awake when they shouldn’t, keeping the lunar journey smooth and steady.

Peering Into the Mechanics

Now, let’s geek out a bit on the mechanics. When the main Master arm switch goes into “Fire” mode, the Lunar Module Descent Vent Valve springs into action. Wait, isn’t this counterintuitive? Shouldn’t a “Fire” position, well, ignite something? Here’s the magic: This action actually opens up valves that release helium in a controlled manner. This nifty venting mechanism prevents both the oxidizer and fuel from reaching the engine during those crucial surface operations.

A Journey of Confidence and Safety

Ladies and gentlemen, understanding the Descent Vent Switch isn’t just about delving into tech details. It’s about honoring the genius behind Apollo missions. Think of Neil Armstrong’s and Buzz Aldrin’s moonwalks – these explorers could focus on the lunar wonderland, knowing this switch had their backs against engine surprises.

This switch embodies the meticulous planning that fueled the Apollo program’s triumph. It’s a testament to the lengths humanity goes to safeguard its pioneers. So, as you reminisce about those iconic lunar moments, remember the Descent Vent Switch and the unsung heroes that kept history on course. 🚀🌕 And if you’re ready to explore the universe’s hidden gems, this is your boarding pass to adventure!

Want to see the video explaining how it works? Click Here – The Lunar Module Descent Vent Switch

Please visit our Sponsor

This image has an empty alt attribute; its file name is AMEX-Blue.png

Want to get miles on everything you buy without having to pay an annual fee? Check out the Delta SkyMiles Blue Card and Earn 2X Miles at restaurants worldwide (terms apply)

Assent Helium Isolation Switch

In this edition, we dive deeper into the lunar lander, focusing on Panel 8. It covers the Explosive Devices Subsystem. Specifically, we examine the Ascent Helium Isolation Switch, a critical component responsible for powering the ascent engine. This switch allows for isolation of defective helium tanks before the initial engine operation, ensuring a backup system is in place for added safety.

The Assent Helium Isolation Switch is a key feature. When you click on it, you’ll find options for the isolation valve for either Tank 1, 2, or both tanks. This redundancy ensures that, in case of a leak or malfunction in one tank, the other can be activated, providing a reliable backup solution. By analyzing the schematics, you can see how the switch functions and how it directs power to the selected tank or tanks, allowing the helium to flow into the system and power the ascent engine.

For a more detailed understanding, we delve even further into the ascent engine’s helium diagram. Here, you can observe both helium tanks and their corresponding isolation valves. Depending on the position of the Assent Helium Isolation Switch, power will be cut off to the selected tank. This preventing unwanted leaks or issues during crucial operations. By exploring the intricate workings of the lunar lander’s systems, you’ll gain a greater appreciation for the engineering brilliance behind space exploration. https://youtu.be/lXNGfWwRFMc

If you want to experience an interactive virtual reality exhibit on the Command Module, the Lunar Module, and the Moon’s surface, visit our Patreon page for more information. If you are joining today, you will get a week free! And you can cancel your subscription during the first week and pay nothing

What to use the Interactive Virtual Reality ISS Spacecraft Exhibit? Click here – https://www.patreon.com/SIVRMuseum . Thanks to NASA for the footage and the Smithsonian for the Images of the interior and Apollo Spacecraft.

Book Test

APOLLO 11 GUIDE©

How to use this iManual
Image TOC™ – Click on the Image to Activate. Then Pinch, Zoom, and Click on the Component to get Information.

Table of Contents
SECTION I SPACECRAFT
INTRODUCTION
Spacecraft Launch Vehicle and Booster Combination Diagram
LAUNCH VEHICLE AND BOOSTEER CONFIGURATION
Apollo Launch Vehicle Diagram
SATURN V LAUNCH VEHICLE
First Stage S-lC Booster
Second Stage S-II Booster
Third Stage S-IVB Booster
APOLLO SPACECRAFT CONFIGURATION
Block II Spacecraft Reference Stations Diagram
LAUNCH ESCAPE ASSEMBLY
Block II Spacecraft Configuration Diagram
Boost Protective Cover Diagram
COMMAND MODULE
Block II Command Module Diagram
CM External Compartments Diagram
Forward Compartment
Aft Compartment
Crew Compartment
Apollo Crew Compartment Diagram
Crew Compartment and Equipment Bays
CM Internal Configuration Diagrams
Protection Panels
Closeout and Protection Panels Diagram
Loose Equipment Stowage
Stowage Compartments and Lockers Diagram
SC Controls and Displays
Controls and Displays Panel Numbering System Diagram
CM Impact Attenuation System
External Attenuation
Internal Attenuation
Internal Attenuation System
Foldable Couch Structure
Apollo Foldable Crew Couch Structure Diagram
Description
Foldable Couch Components Diagram
Foldable Couch Positions Diagram
Seatpan, Legpan, Armrest, and Footpan Mission Positions
Seatpan, Legpan, Armrest, and Footpan Mission Positions Diagram
Foldable Couch Adjustments
Foldable Couch Adjustments Diagram
Foldable Couch Adjustment Procedures
Seat Pan Positions Diagram
Armrest Positioning Diagram
Legpan – Footpan Positions Diagram
Preparing Couches for EVA Procedures
Stowing the Center Couch Diagram
Folding the Seatpan Diagram
Y-Y Strut Retraction Diagram
Preparing Coach for EVA Diagram
CM Mechanical Controls
Side Access Hatch
CM Side Access Hatch Diagram
CM Hatch Counterbalance Schematic
Exterior Hatch Diagram
Forward Access Hatch
CM Forward Access Hatch
Windows and Shades
Crew Stations
Spacesuit
Restraints
Internal Sighting Aids
External Illumination Aids
Mission Operational Aids
Crew Life Support
Medical Equipment
Radiation Monitoring Equipment
Postlanding Recovery Aids
Stowage and Internal Configuration

CM Internal Configuration Diagram
SERVICE MODULE
Service Module Diagram
SPACECRAFT LM ADAPTER
Spacecraft LM Adapter Diagram
ABBREVIATIONS AND SYMBOLS
Bonus: Interactive iPoster™ of the Gemini Spacecraft Interior (From GeminiGuide.com©) (Internet connection needed)
Bonus: Interactive iManual© of the Space Shuttle (From SpaceShuttleGuide.com©) (Internet connection needed)
Bonus: Interactive Panoramic Image™ of the Apollo 11 (Internet connection needed)
Bonus: Web version of this e-book. This is the same manual with more information and more functionality (From SpacecraftGuide.com©). (Internet connection needed)
Copyright

SECTION I SPACECRAFT
INTRODUCTION
Spacecraft Launch Vehicle and Booster Combination Diagram
The Apollo Operations Handbook consists of two volumes, I and 2. Volume l is the Spacecraft Description and Volume 2 is the Operational Procedures, Volume I has three sections: section I describes Apollo spacecraft general structure and mechanical systems; section 2 describes the Apollo spacecraft systems; and section 3, the Apollo spacecraft controls and display. Volume 2 continues with two procedural sections: section 4 lists the steps of normal and backup procedures: of all mission phases; and section 5 contains the contingency procedures for aborts, malfunctions, and emergencies.
Section l first describes the launch vehicle boosters that propel the Apollo spacecraft and lunar module (LM) into earth orbit and translunar injection. This description is followed by a fore to aft description of the Apollo spacecraft, which includes the launch escape assembly, command module with mechanical systems, service module, and the spacecraft lunar module adaptor.
The spacecraft launch vehicle and booster combination have various designations. The following chart summarizes the mission letter designator, Apollo number, launch vehicle designator, and CSM number for the manned flights. A mission is defined and then given a letter I designator; thus, the Mission Letter Designator. The Apollo Number designates the numerical order 0f launching, manned or unmanned, and if used primarily as a news media reference. The Launch Vehicle Designator indicates the booster configuration of the launch vehicle. The 200 series designates the Saturn IB and the 500 series designates the Saturn V. The command service module (CSM) assigned to the mission has a CSM number designator of three digits.
Spacecraft Launch Vehicle and Booster Combination Diagram
Mission Letter Designator Apollo Number Launch Vehicle Designator CSM NUMBER
Mission C Apollo 7 Saturn 1B (205) 101
Mission D Apollo 8 Saturn V (503) 103
Mission E Apollo 9 Saturn V (504) 104
Mission F Apollo 10 Saturn V (505) 106
Mission G Apollo 11 Saturn V (506) 107
Mission H-1 Apollo 12 Saturn V (507) 108
Mission H-2 Apollo 13 Saturn V (508) 109
Mission H-3 Apollo 14 Saturn V (509) 110

When improvements to the spacecraft systems are made, the system is modified. Modifications take effect on different spacecraft so the term “effectively” is used. The effectivity of the Apollo spacecraft systems in this handbook is for GSM 106 and subsequent (subs) unless otherwise stated.
LAUNCH VEHICLE AND B00STEER CONFIGURATION
Apollo Launch Vehicle Diagram
SATURN V LAUNCH VEHICLE
First Stage S-lC Booster
Second Stage S-II Booster
Third Stage S-IVB Booster
The launch vehicle used in the Apollo program is illustrated in the Apollo Launch Vehicle Diagram. The Saturn V is programmed for earth orbital missions and/ or lunar missions. The general configuration of the launch vehicle boosters is summarized in the following paragraphs.
Apollo Launch Vehicle Diagram

SATURN V LAUNCH VEHICLE
The Saturn V is a three-stage vehicle consisting of an S-IC first stage, S-II second stage, and an S-IVB third stage.
First Stage S-lC Booster
The S-IC ls manufactured by the Boeing Company and uses five Rocketdyne F-1 engines. Each F-1 engine, burning RP-1 and liquid oxygen, produces 1,500,000 pounds of thrust for an overall first stage boost of 7,500,000 pounds of thrust. One engine will be rigidly attached at the stage centerline, while the others will gimbal for vehicle control.
Second Stage S-II Booster
The S-II, or second-stage, is manufactured by the Space Division 0f North American Rockwell Corporation. The second-stage employs five Rocketdyne J-2 engines.Each J-2 engine burns liquid hydrogen and liquid oxygen, and produce 200,000 pounds of thrust for an overall second-stage boost of 1,000,000 pounds. The gimbaled engines will be mounted in a square pattern, with the fifth engine rigidly mounted in the center.
Third Stage S-IVB Booster
The S-IVB Third-Stage is manufactured by McDonnell Douglas Corporation. The S-IVB employs a single Rocketdyne J-2 engine, burning liquid hydrogen and liquid oxygen to produce 200,000 pounds of thrust.
APOLLO SPACECRAFT CONFIGURATION
Block II Spacecraft Reference Stations Diagram
LAUNCH ESCAPE ASSEMBLY
Block II Spacecraft Configuration Diagram
Boost Protective Cover Diagram
COMMAND MODULE
Block II Command Module Diagram
CM External Compartments Diagram
Forward Compartment
Aft Compartment
Crew Compartment
Apollo Crew Compartment Diagram
Crew Compartment and Equipment Bays
CM Internal Configuration Diagrams
Protection Panels
Closeout and Protection Panels Diagram
Loose Equipment Stowage
Stowage Compartments and Lockers Diagram
SC Controls and Displays
Controls and Displays Panel Numbering System Diagram
CM Impact Attenuation System
External Attenuation
Internal Attenuation
Internal Attenuation System
Foldable Couch Structure
Apollo Foldable Crew Couch Structure Diagram
Description
Foldable Couch Components Diagram
Foldable Couch Positions Diagram
Seatpan, Legpan, Armrest, and Footpan Mission Positions
Seatpan, Legpan, Armrest, and Footpan Mission Positions Diagram
Foldable Couch Adjustments
Foldable Couch Adjustments Diagram
Foldable Couch Adjustment Procedures
Seat Pan Positions Diagram
Armrest Positioning Diagram
Legpan – Footpan Positions Diagram
Preparing Couches for EVA Procedures
Stowing the Center Couch Diagram
Folding the Seatpan Diagram
Y-Y Strut Retraction Diagram
Preparing Coach for EVA Diagram
CM Mechanical Controls
Side Access Hatch
CM Side Access Hatch Diagram
CM Hatch Counterbalance Schematic
Exterior Hatch Diagram
Forward Access Hatch
CM Forward Access Hatch
Windows and Shades
Crew Stations
Spacesuit
Restraints
Internal Sighting Aids
External Illumination Aids
Mission Operational Aids
Crew Life Support
Medical Equipment
Radiation Monitoring Equipment
Postlanding Recovery Aids
Stowage and Internal Configuration

CM Internal Configuration Diagram
SERVICE MODULE
Service Module Diagram
SPACECRAFT LM ADAPTER
Spacecraft LM Adapter Diagram

The Block II spacecraft consists of a launch escape assembly (LEA), command module (CM), service module (SM), the spacecraft lunar module adapter (SLA), and the lunar module (LM). The reference system and stations are shown in the Block II Spacecraft Reference Stations Diagram.
Block II Spacecraft Reference Stations Diagram

LAUNCH ESCAPE ASSEMBLY
The LEA (Block II Spacecraft Configuration Diagram) provides the means for separating the CM from the launch vehicle during pad or suborbital aborts. This assembly consists of a Q-ball instrumentation assembly (nose cone), ballast compartment, canard surfaces, pitch control motor, tower jettison motor, launch escape motor, a structural skirt, an open-frame tower, and a boost protective cover (BPC). The structural skirt at the base of the housing, which encloses the launch escape rocket motors, is secured to the forward portion of the tower. The BPC (Boost Protective Cover Diagram) is attached to the aft end of the tower to protect the CM from heat during boost, and from exhaust damage by the launch escape and tower jettison motors. Explosive nuts, one in each tower leg well, secure the tower to the CM structure
Block II Spacecraft Configuration Diagram

Boost Protective Cover Diagram

COMMAND MODULE
The CM (Block II Command Module Diagram), the spacecraft control center, contains necessary automatic and manual equipment to control and monitor the spacecraft systems; it also contains the required equipment for safety and comfort of the flight crew. The module is an irregular-shaped, primary structure encompassed by three heat shields (coated with ablative material and joined or fastened to the primary structure) forming a truncated, conic structure. The CM consists of a forward compartment, a crew compartment, and an aft compartment for equipment and a crew. (CM External Compartments Diagram)
Block II Command Module Diagram

CM External Compartments Diagram

The command module is conical shaped, 11 feet 1 .5 inches long, and 12 feet 6.5 inches in diameter without the ablative material. The ablative material is non-symmetrical and adds approximately 4 inches to the height and 5 inches to the diameter.
Forward Compartment
The forward compartment (CM External Compartments Diagram) is the area outside the forward access tunnel, forward of the crew compartment forward bulkhead and covered by the forward heat shield. Four 90-degree segments around the perimeter of the tunnel contain the recovery equipment, two negative pitch reaction control system engines, and the forward heat shield release mechanism. Most of the equipment in the forward compartment consists of earth landing (recovery) system (ELS) components.
The forward heat shield is made of brazed stainless steel honeycomb covered with ablative material. It contains four recessed fittings which permit the launch escape tower to be attached to the CM inner structure. Jettison thrusters separate the forward heat shield from the CM after entry or after the LEA 1s separated during an abort.
Aft Compartment
The aft compartment (CM External Compartments) is the area encompassed by the aft portion of the crew compartment heat shield, aft heat shield, and aft portion of the primary structure. This compartment contains ten reaction control engines, impact attenuation structure, instrumentation, and storage tanks for water, fuel oxidizer, and gaseous helium. Four crushable ribs, along the spacecraft +z axis, are provided as part of the impact attenuation structure to absorb energy during impact.
The aft heat shield, which encloses the large end of the CM, is a shallow, spherically contoured assembly. It is made of the same type of materials as the forward heat shield. However, the ablative material on this heat shield has a greater thickness for the dissipation of heat during entry. External provisions are made on this heat shield for connecting the CM to the SM storage tanks for water, fuel oxidizer, and gaseous helium. Four crushable ribs, along the spacecraft +z axis, are provided as part of the impact attenuation structure to absorb energy during impact.
The aft heat shield, which encloses the large end of the CM, is a shallow, spherically contoured assembly. It is made of the same type of materials as the forward heat shield. However, the ablative material on this heat shield has a greater thickness for the dissipation of heat during entry. External provisions are made on this heat shield for connecting the CM to tl1e SM.
Crew Compartment
The crew compartment or inner structure (Apollo Crew Compartment Diagram) is a sealed cabin with pressurization maintained by the environmental control system (ECS). The compartment, protected by a heat shield, contains controls and displays for operation of the spacecraft and spacecraft systems, crew couches and restraint harness assemblies, hatch covers, window shades, etc., and is provided with crew equipment, food and water, waste management provisions, and survival equipment. Access hatches, observation windows, and equipment bays are attached as part of the compartment structure. The interior volume is 366 cubic feet. However, the lower, right, and left equipment bays, lockers, couches, and crewman occupy 156 cubic feet, leaving a usable volume of 210 cubic feet.
Apollo Crew Compartment Diagram

The crew compartment heat shield (Block II Command Module Diagram) , like the forward heat shield, is made of brazed stainless – steel honeycomb and covered with ablative material . This heat shield, or outer structure , contains the SC umbilical connector outlet, ablative plugs, a copper heat sink for the optical sighting ports in the lower equipment bay, two side observation windows, two forward viewing windows, and the side access hatch.
Crew Compartment and Equipment Bays
Each crew member has personal and accessory equipment provided for his use in the crew compartment. Major items of personal equipment consist of a spacesuit assembly with attaching hose and umbilical, a communications assembly, biomedical sensors, and radiation dosimeters. Major items of accessory equipment shared by the crew consist of an in-flight tool set and a medical kit. For a detailed list of crew equipment, refer to section 2 .12. General items contained in the CM equipment and stowage bays are listed in CM Internal Configuration Diagram.

CM Internal Configuration Diagrams (Click on diagram to go to an image to pinch and zoom, web connection needed)

Protection Panels
The protection panels prevent loose equipment (tools, etc.) and debris from getting into the various nooks and crevices in the crew compartment. They also suppress fire by closing out the equipment bays with covers around the aft bulkhead, and protect the ECS tubing from the zero g activities of the crew and the prelaunch activities of ground personnel. The location and configuration of the protection panels are illustrated in the Closeout and Protection Panel Diagram.
Closeout and Protection Panels Diagram (Click on diagram to go to an image to pinch and zoom, web connection needed)

The protection panels (also referred to as close – out panels) are a series of aluminum panels and covers that fair the irregular structure to the equipment bays and wire troughs and covers. The panels vary in thickness and are attached to secondary structures by captivated fasteners. Access panels and penetrations are located at or over equipment and connectors needed for the mission.
Loose Equipment Stowage
The stowage of numerous items of personal and systems loose equipment is in compartments and lockers (Stowage Compartments and Lockers). Compartments are part of the crew compartment structure. Equipment is placed in “cushions” and inserted in to the compartments. The aluminum lockers are packed with equipment in an assembly building and are quickly attached to the aft bulkhead and equipment bays a short time before launch. This allows aft bulkhead access during spacecraft ground processing. The compartment and locker doors have squeeze-type latches and can be opened and closed with one hand.

Stowage Compartments and Lockers

SC Controls and Displays

The controls and displays (panels, switches, gages, valve handles, etc.) for operation of the spacecraft and its systems are located throughout the crew compartment. The location, nomenclature, function, and power source of the controls and displays are provided in section 3. The panel numbers indicate the equipment bay and area of location. The panel numbering system is shown in Controls and Displays Panel Numbering System. For instance, the 100 to 199 series will be located in the lower equipment bay (LEB). The LEB is divided into panel areas such as 100-119 in the upper left, 120 – 139 in the upper center, etc. The advantage of this system is (given a panel number and knowing the numbered areas) to enable the crew to pinpoint the area and locate the panel very quickly.

Controls and Displays Panel Numbering System Diagram

Crew Couches
The primary function of the couches is to support the crew during accelerations/decelerations up to 30 g forward and aft (±X), 18 g up and down (± Z), and 15 g laterally (±Y). Because the critical g-load is during landing, an attenuation system is used to reduce the deceleration load on the crew. There are two attenuation subsystems, external and internal. Secondary function of the crew couches is to position crew at duty stations and provide support for the translation and rotation hand controls, lights, and other equipment.

The couches are designated (structurally) as left, center, and right; by crew position they are (left to right) Command (CDR), CSM Pilot (CMP), and LM Pilot (LMP).

CM Impact Attenuation System
During a water impact, the CM deceleration force will vary from 12 to 40g, depending on wave shape and horizontal velocity at impact. The impact attenuation system reduces the impact forces on the crew to a value within their tolerance level. A major portion of the energy (75 to 90 percent) is absorbed by the impact surface (water) and the deformation of the CM structure. The impact system is divided into two subsystems: external and internal, which are described in the following paragraphs.

External Attenuation. The external attenuation subsystem consists of four crushable ribs installed in the aft compartment (External Attenuation System Diagram). The ribs, located between the inner and outer structure in the vicinity of the + Z axis, are constructed of bonded laminations of corrugated aluminum. The CM is suspended, during atmospheric descent, at a 27 .5-degree angle (hang angle) by the parachute subsystem. Because of the hang angle, the first point of contact at impact is in the area of the crushable ribs.

External Attenuation System Diagram

Internal Attenuation. Eight attenuation struts are provided for connecting the crew couches to the CM inner structure. Each strut is capable of absorbing energy at a predetermined rate through “cyclic struts.” The cyclic strut utilizes cyclic material deformation concept of energy absorption by rolling ductile metal torus elements (bracelets) in friction between a concentric rod and cylinder. The force applied to the struts causes the bracelets to roll, absorbing energy (Internal Attenuation System). Two Y – Y axis struts ·are located at the outer extremities of the couch assembly at the hip beam. The cylinder end of each strut is firmly attached to the unitized couch while the piston end, containing a flat circular foot , reacts against a flat bearing plate (attenuation panel) attached to the structure.

Internal Attenuation System

Two Z-Z axis struts are attached to the side stabilizer beams and the aft bulkhead of the structure, just below the side access hatch. Four X-X axis struts are attached to the forward CM structure and the beam extremities of the couch. These struts, except for the addition of a lockout mechanism, are basically the same as the Z – Z axis struts. A lockout mechanism is provided on each X-X strut to prevent any strut attenuation prior to landing (during normal mission flight loads). After deployment of the main parachute, the “lockouts” are manually unlocked.

After deployment of the main chutes and prior to landing, the “lockouts” are manually unlocked.

Foldable Couch Structure

The foldable couches are supported similarly to the unitized couch structure, but the individual couches differ. The back pan angle to the Y – Z plane (horizontal) has been increased to 4 degrees 30 minutes.

Description. The couch structure utilizes two strong side stabilizer beams for attachment of the foot XX and ZZ attenuator struts and a cross – member head beam for attachment of the head XX attenuator struts. The left, center, and right couches are attached to the head beam by a hinge/ pip pin and are attached to the side stabilizer beam by a large Marmon-type clamp (Apollo Foldable Crew Couch Structure Diagram).

Apollo Foldable Crew Couch Structure Diagram (Click on diagram to go to an image to pinch and zoom, web connection needed)

Each couch consists of a headrest, body support with backpan, seatpan, legpan , and footpan. The left couch has two controller supports/armrests, inboard and outboard. The right couch has only the inboard, or left, armrest. Support for the body is accomplished by a web or Armalon (multiple layers of fiberglass beta cloth, impregnated and covered with Teflon) over the support frame from the l1eadrest to the footpan (Foldable Couch Positions Diagram).

Foldable Couch Components Diagram

The Marmon clamps that attach to the side stabilizer are part of the hip Y – Y beam. ·The body support frame will rotate around it’s attach point on the head beam and can fold at the shoulder beam. The shoulder straps of the restraint harness and one-half of the lap belts are solidly attached to the shoulder beam.

Controller supports/ armrests rotate and are attached to the body support tubes in the area of the crewman’s elbow and have various positions. The left couch outboard armrest has 65-, 90-, 120 -, and
180-degree positions, measured from the backpan, and supports the translation control (Foldable Couch Positions Diagram). The other two armrests have 65-, 90-, 125-, and 180-degree positions. The armrests are held in position by a spring-loaded wedge into a slotted cam. The wedge is attached to a sleeve around the armrest. To rotate the armrest, the sleeve is lifted, the wedge pulled out of the cam, and the armrest rotated to the desired position. To extend the armrest, rotate the extension. The rotational and translation controls are locked on a dovetail by extending a pin; however, the controlling button extends into the center couch area. There is a danger of the center crewman bumping the control lock button and retracting the pin; therefore, a lock is on the shaft to prevent the button from being actuated accidentally.

Foldable Couch Positions Diagram

The control support (with dovetail) pitches up and down, and is locked and unlocked at its pivot by a cam lever. The control support pivots to allow the correct positioning of the translation or rotation control during docking and the normal mission phases.

The seatpan (seat) angles are 9, 85, 170, and 270 degrees. The 9 -degree position is held by a detent, the 85- and 170-degree positions are lockable, and the seat travel is stopped at 270 degrees. The seatpan controls are located on the body supports at each side of the hips. The seat locked position is with the lever footward; the unlocked position is with the lever headward. One-half of the lap belt is attached to the seatpan frame.

The seatpan is connected to the legpan frame at the knee beam in a 78-degree angle. The knee control on each side of the couch locks and unlocks the seatpan to legpan angle. Unlocked, the seatpan- to-legpan angle will go to 15 degrees (folded), and to 180 degrees (flat).

The footpan has two positions, 95 degrees and folded (O degrees). There are mechanical stops at each position. The footpan has two cleats and clamps which restrain the boots when properly engaged.

Seatpan, Legpan, Armrest, and Footpan Mission Positions. During the mission phases, there is a need to place the couch components into various positions. The following chart indicates the positions of the couch components during launch, boost, entry, and landing; egress-ingress to center couch to LEB and tunnel activities; EVA ingress or egress; and docking.

Seatpan, Legpan, Armrest, and Footpan Mission Positions Diagram
Mission Phases or Tasks (Foldable Couch Positions Diagram)
Launch, Boost, Entry and Landing Egress, Sleeping and Tunnel Activities EVA Ingress or Egress Docking
Seatpan angle 85° 170° 85°, 11° (cntr couch) 85°
Legpan angle 78° 78° 78°, 15° (cntr couch) 78°
Footpan angle 95° 95° 95°, 0° (cntr couch) 95°
Armrest angle outboard left couch 120° 120° 120° 65°
Armrest angle inboard left couch 90° 125° to 180° 125° 65°
Armrest angle inboard right couch 90° 125° to 180° 125° 65°
Control support pitch angle 0° 0° 0 -25°
Foot X-X struts Connected Connected Disconnected Connected
EVA stabilizer strut Stowed Stowed Connected Stowed

Foldable Couch Adjustments. The couch has many adjustments that can be performed during the mission. The following chart gives a step by step procedure for making the adjustments, beginning with the headrest and progressing to the footrest. Because the couches are actuated in training during 1 g, the 1-g procedures are given also.

Foldable Couch Adjustment Procedures

Task Procedure Results/ Remarks
NOTE
• Directions are for person lying on couch.
• Inboard/outboard movements – relative to couch.
A. Headrest adjustment, headward – footward movement of 6 .5 in.
(Seatpan Position Diagram)

  1. Lift control knob (gearshift) toward head.
  2. Hold gearshift knob in unlocked position and slide headrest to desired position.
  3. Release gearshift knob.
    1. Disengages lock.
  4. Lock is spring-loaded to locked position.

B. Armrest adjustments
B1. Armrest rotation or pitching
(Armrests lock in 65°, 90°, 120° (L) and 125 ° (R) positions)
(Armrest Position Diagram)

  1. Lift armrest handle.
  2. Rotate (pitch) armrest to desired position. (Wedge will engage at next slot unless handle is lifted continually.) 1. Disengages wedge from slotted cam.
  3. Wedge is spring-loaded to locked position.
    NOTE
    When rotating the outboard armrest of the left couch, caution should be exercised to prevent the positional control column from hitting the stowed O2 hose as damage may result to either object.
    B2. Armrest extension (0 – 3.75 in.) (Armrest Position Diagram)
  4. Rotate armrest extension lock ring away from couch.
  5. Extend control to desired position.
  6. Lock into position by rotating lock ring towards couch. 1. Full throw of about 160° will unlock sleeve.
  7. Pulls sleeve out of barrel.
  8. Cam will lock barrel to sleeve.
    B3. Control support pitching
    (Translation control pitch = 0 ° -55 °) (Rotational control pitch = 0 °-25 °) (Armrest Position Diagram)
  9. Move end of control support cam lever.
  10. Holding control or handle, pitch it to desired angle.
  11. Move end of cam lever down and outboard. 1. Unlocks control support.
    3 Locks control support.
    B4. Control attachment and locking, unlocking (Armrest Position Diagram)
  12. Press control lock button down and swing lock hook away.
  13. Press control lock button inboard.
  14. Slide control onto support dovetail.
  15. Press control lock button outboard.
  16. Swing lock hook to button and hock, on shaft (inboard armrests only). 1. Unlocks button so shaft can slide.
  17. Retracts control lock pin.
  18. Attaches control to support.
  19. Extends control lock pin, locking control onto support.
  20. Prevents control lock button from sliding to unlocked position.
    C. Seatpan adjustment
    C1. Zero g seatpan adjustment, mid mission application (Seatpan locks in 11°, 85°, 170°/stops at 270°.)
    (Seatpan Position Diagram)
  21. Place both seatpan handles in unlocked position (headward).
  22. Move seatpan to desired position.
  23. Place one handle in locked position (footward). 1. Disengages seatpan latches. Seatpan free to move.
    3 One lock is sufficient in zero g.
    C2. One g or greater seatpan adjustment, training, preflight,
    test, launch and entry application. (During one g, stand at LEB to adjust seatpan.)
    (Seatpan Position Diagram)
  24. Support seatpan (with hands or feet) and place both seatpan handles in unlocked position (headward).
  25. Move seatpan to desired position, maintain support.
  26. Place both seatpan handles in locked position (footward). 1. Damage may result to mechanisms if seatpan is allowed to drop to next position.
  27. Same as 1
  28. In one g or greater, both latches may be locked to reduce strain on mechanisms.
    D. Legpan to seatpan adjustment (15°, 78°) (During zero g, use one control. During one g or greater, use both controls and support legpan during movement.)
    (Legpan Footpan Position Diagram)
  29. Pull knee control out and up to unlocked position.
  30. Position legpan to desired position.
  31. Pull knee control out and down to locked position. 1. Retract knee control pin from slotted cam.

3 Extends knee control
E. Footpan adjustment (0°-95°)
(figure 1 – 18) 1. Swing footpan to desired position. 1. Mechanical stops at 0° 95°.
E1. Engaging-disengaging foot restraints (Legpan Footpan Position Diagram)

  1. Place both spacesuit boots or entry boots on footpan with heels together.
  2. Move boots outboard while heels slide on footpan.
  3. To disengage, move boots inboard while heels slide on footpan. 1. Pre positioning boots.
  4. Footpan cleats will engage boot heels.
  5. Cleats will disengage from boot heel.

Seat Pan Positions Diagram

Armrest Positioning Diagram

Legpan – Footpan Positions Diagram

Foldable Couch Mission Operations. During the mission, there are tasks into which the couches are integrated. The following table indicates some of those tasks and gives a step by step procedure. Figures are also referenced.

Task A, Preparing Couches for EVA, describes the folding of the L-shaped PGA stowage bag and the removing and stowing of the center couch in preparation for EVA. The removal and stowage of the center couch can also be performed when the center aisle needs to be cleared for intra vehicular maneuvering purposes. In addition to clearing the center aisle for EVA, the whole couch structure (couches plus side beams and head beam) have to be stabilized when the foot X-X struts are disconnected. This operation is described in task B.

Preparing Couches for EVA Procedures

Task Procedure Results/Remarks
A. Preparing couches for EVA
A1. Stow L PGA bag on aft Bulkhead 1. Remove PGA helmet shield and stow in helmet bag.

  1. Unstrap bag hip straps and detach couch clips.
  2. Fold lower half of bag flat, tucking sides.
  3. Fold top half of bag flat, tucking sides.
  4. Attach bag top straps to aft bulkhead fittings. 1. Empties PGA bag.
  5. Detaches forward top of bag from couch.
  6. Bag now flat on aft bulkhead.
  7. Bag now lashed to aft bulkhead.
    A.2 Remove center couch to aft bulkhead (Crewman standing in
    LEB) (Stowing Center Couch Diagram)

NOTE
If the center couch is to be removed during one g conditions, the outboard (left and right) couches should not be occupied. Otherwise, extreme difficulty will be experienced during the removal. 1. Fold footpan to 0 °, lock legpan to 15 °, and lock seatpan to 11 °. (figure below)

  1. Pull center couch hip clamp knobs down 2 in. (toward aft bulkhead).
  2. Using knob, unscrew shaft (CCW) until it is flush with trunnion.
  3. Swing knob towards LEB opening clamp.
  4. Retract one Y – Y strut. (Y-Y Strut Retraction Diagram)
    6a. During zero g, force center couch toward aft bulkhead and disengage couch from clamp plates. During one g, place.

6b. clamps in intermediate position as a caution. Hold center couch backpan firmly while forcing couch toward aft bulkhead until couch disengages. Fully open clamps and lower hip end of couch to aft bulkhead.

  1. Move headrest footward. (Seatpan Position Diagram)
  2. Pull head beam pip pins
    (2). (Seatpan Position Diagram)
  3. Lower couch to aft bulkhead on top of PGA bag. 1. Preparing couch.
  4. Knob engages shaft.
  5. Trunnion will be free to rotate.
  6. Relieves pressure on clamp plate.

6a. Frees footward end of couch from clamps. (Couch structure may have to be shaken.)

6b. Clamps in intermediate
Position will support couch if it slips. Outboard couches may have to be lifted to take pressure off center couch clamp plates.

  1. Prep for strapping
    under left couch.
  2. Disconnects headward
    end of couch from head beam
  3. Couch is now ready to stow.
    A3. Stow center couch under left couch 1. Obtain lower (3.5 ft x 2 in.) and upper (4 ft x 2 in.) restrainer straps from stowage locker.
  4. Thread lower strap hooks (2) through center couch hip holes from inside.
  5. Wrap upper strap around center couch headrest support bars and attach snap to ring.
  6. Verify left couch headrest fully headward.
  7. Position center couch under left couch, firmly pressing against tunnel hatch bag.
  8. Attach LOWER strap hooks to left couch D-rings.
  9. 7. Unsnap UPPER strap hook, resnap after wrapping around left couch headrest support bars.
  10. Preparing center couch to strap to left couch.
  11. Head-to-head, hip-to hip, and piggy back.
  12. Hip ends of couches now secured
  13. Head ends of couches now secured.

B. Preparing couch structure for EVA; (Preparing couch structure for EVA)

B1. Connect EVA stabilizer strut to couch. 1. Unstow EVA stabilizer strut by squeezing latch and pulling toward couch.

  1. Connect EVA stabilizer strut to couch structure at aft end ofright head strut. Engage stabilizer strut and press toward aft bulkhead. 1.
  2. With EVA stabilizer strut engaged, couch structure will be stabilized when foot struts are disconnected.
    B2. Disconnect foot attenuator struts and attach to forward equipment bays. 1. Grasp the quick disconnect hook assembly, pull lock pin actuator toward lower equipment bay.
  3. Pull lower end of foot attenuator strut (quick-disconnect hook assembly) firmly toward LEB until it disengages.
  4. Repeat for other foot X-X attenuator strut.
  5. Swing attenuator struts along side of forward equipment bay, and strap. Holding lock pin actuator in disengages lock pin.

Holds attenuator struts out
of the way .for increased
mobility in LEB.

Stowing the Center Couch

Folding the Seatpan Diagram

Y-Y Strut Retraction Diagram

Preparing Couch for EVA Diagram

CM Mechanical Controls
Mechanical controls are provided in the crew compartment for manual operation of the side access hatch covers, forward access hatch covers, and manual override levers for the ECS cabin pressure relief valve. Tools for emergency opening or securing the hatches and operating ECS manual backup valves are in the toolset punch in a locker on the aft bulkhead.

Side Access Hatch
Side access to the crew compartment is through an outward – opening single -integrated hatch assembly and adapter frame (CM Side Access Hatch Diagram). The hatch provides for primary structure pressure loads and supports the hatch thermal protection system. It includ.es a primary flexible thermal seal, hinges, and a latch and linkage mechanism. Provisions for a scientific airlock, window, or closeout adapter, a pressure dump valve, and a GSE cabin purge port are also incorporated. A secondary thermal seal is attached to the heat shield ablator around the hatch opening and bears against the inner structure. The adapter frame, which closes out the area between the inner and outer structure, provides the structural continuity for transmitting primary structure loads around the hatch opening without transmitting the tension or compression loads to the hatch. The inner structure adapter frame contains a single primary pressure seal.

CM Side Access Hatch Diagram

Hatch opening is accomplished by a manually driven mechanism which operates the latch and linkage mechanism. The latch and linkage mechanism provides a hatch lock for pressure loads and for pressure sealing of the crew compartment. (It does not provide shell continuity for hook tension or compression loads.) The door deployment mechanism is driven by a single handle with a ratchet mechanism. The initial lever operation is normal to the hatch with the inboard stroke driving the latches closed while the outboard stroke drives the latches open. The hatch will open 100 degrees minimum to provide clearance for the crewman past the scientific airlock when mounted on the hatch. A counter balance system is provided to assist in opening the hatch in both normal and emergency conditions and attenuate the opening and closing velocity of the hatch (CM Hatch Counterbalance Schematic).

CM Hatch Counterbalance Schematic

The hatch is normally latched and unlatched manually from the inside by an actuating handle permanently attached to the gear box (CM Side Access Hatch Diagram). Prior to handle actuation, the two control levers are positioned to the LATCH or UNLATCH positions as shown in view E and G. Both selectors are placed in identical positions when operating the latches. Next, the shear pin release lever is placed in
The UNLOCK position. This will extend the orange – yellows hear pin permitting free rotation of the gear box. When the latches are fully engaged, or the release lever is placed in the LOCKED position, the orange-yellow pin will retract, locking the gearbox. The shear pin may be sheared during an emergency opening of the hatch. A sheared condition is indicated by the protruding red pin, within the orange – yellow pin, as indicated in view E.

After the preceding steps have been performed, the handle is unstowed. This is accomplished by gripping the handle (which depresses the trip bar) and pumping approximately five 60-degree strokes. This will fully engage or disengage the latches.

External operations are accomplished by using GSE or flight tool through the penetration on the outside of the hatch. (See Exterior Hatch Diagram .)
Exterior Hatch Diagram

The crew hatch should not be closed from the outside of the CM with the handle control knob in the LATCH position (View G of CM Side Access Hatch Diagram). Always set the pawl control knob in the NEUTRAL or UNLATCH position. Located around the outer periphery are 15 mechanically actuated latches that engage the inner structure adapter. In the event of a linkage jam or if the hatch will not hold in the closed position, auxiliary devices are utilized to provide thermal protection and structural continuity during entry, and render the CM in a water-tight condition for limited flotation capability.

A manually operated vent valve is located in the hatch. The valve is capable of venting the cabin from 5 to 0.1 p sig in one minute. The valve may be operated from the inside or outside by a suited crewman. A tool interface on the hatch exterior is provided for preflight, space flight, and postflight operation.

The hatch has provisions for installation of a window assembly or scientific airlock. Depending on the mission, or spacecraft, the window or airlock may be attached using the appropriate adapter.

The hatch mechanism operates the boost protective cover (BPC) mechanism for normal and emergency modes, and is sequenced to ensure release of the BPC hatch prior to unlocking the CM hatch.

The BPC is hinged and retained with a tethering device when the combined unified and BPC hatch are opened. A permanent release handle (D-ring) is utilized on the outside of the BPC to manually unlatch the drive mechanism (Exterior Hatch Diagram).

The counterbalance assembly is a stored energy device capable of opening the unlatched CM and BPC hatches in a one g environment. It is mounted adjacent to the CM hatch and connected to the hatch deployment mechanism. CM Hatch Counterbalance Schematic illustrates schematically the mechanization of the counter balance assembly. To pressurize the system for normal pad operation, the number one bottle diaphragm is punctured utilizing a blade screwdriver. The charging and discharging handle is actuated and the gas bleeds into the cylinder. The high-pressure gas provides an opening force that will open the hatch when the latches are released. The cylinder must be vented after launch to adjust the system for zero g operation.

The counterbalance maintains an outward force on the hatch to balance the weight, overcome seal drag, and assist in opening the hatch when the latches are actuated. The ground crew can easily close the hatch by pushing it closed and recompressing the gas (nitrogen). In this manner the nitrogen is not vented. Additional nitrogen is introduced only if the cylinder pressure has decayed. A pressure indicator permits monitoring the system pressure.

The number two bottle may be punctured after landing by ratcheting the ratchet handle until the diaphragm is pierced. This bottle should not be punctured until ready to open the hatch.

Forward Access Hatch

The spacecraft utilizes a combined tunnel (forward) hatch. This single hatch serves as a pressure and thermal hatch. The hatch latching mechanism consists of six separate jointed latches whose linkage is driven by a pump handle from within the crew compartment. The latch operation from the inside is a 60 –degree compression stroke selected by rotating the handle to the latch or unlatch position. A sealed drive is provided through the hatch, making the mechanism operable from the outside. A pressure equalization valve is provided to equalize pressure in the tunnel and LM prior to hatch removal.

CM Forward Access Hatch Diagram

Windows and Shades

Five windows are provided through the inner structure and heat shield of the CM: two forward viewing and two side observation windows and a hatch window. (See Block II Command Module) During orbital flight, photographs of external objects will be taken through the viewing and observation windows. The inner windows are made of tempered silica glass with 0.25 – inch-thick double panes, separated by 0 .1 inch of space , and have a softening temperature point of 2000 °F . The outer windows are made of amorphous – fused silicon with a single 0.7-inch-thick pane. Each pane contains an anti -reflecting coating on the external surface, and has a blue -red reflective coating on the inner surface for filtering out most infrared and all ultraviolet rays. ·The glass has a softening temperature point of 2800 °F, and a melting point of 3110 °F.

Shades are provided for controlling external light entering the CM. These shades, individually designed for each window configuration, are made of aluminum sheet. The shades are opaque for zero- light transmittal, have a nonreflective inner surface, and are held in place by “wing” levers.

Crew Stations

The place of crew activity, the objects of crew activities, and crew activity requirements are referred to as “crew stations.” Generally, the term “crew stations” includes anything that supports the flight crew and is synonymous with crew systems and equipment; thus, the terms are generally interchangeable. A major distinction is that crew stations include controls and displays requirements, certain aspects of the environmental control system, and crew couches, whereas in crew systems and equipment they are not usually included.

Spacesuit

The spacesuit acts as a flexible environmental chamber in which the crewman is supplied a flow of pressurized oxygen. It includes undergarments, ventilation ducts, and the communication system. There are many accessories such as the oxygen hose, communication cables, couplings, screen caps, connector plugs, and maintenance kits.

Restraints
Crew restraints range from the restraint harness to restrain the crew in the couches to the zero g restraints, such as the sleep station restraints, hand-holds, and EVA guards. Equipment restraints include a number of snaps and Velcro patches on the crew compartment structure and utility straps which clasp to the snaps.

Internal Sighting Aids

Internal sighting aids are objects that assist the crew in controlling light or sighting. These include shades, mirrors, crewman optical alignment sight, lunar module active docking target, and window markings.

External Illumination Aids

The external illumination aids are lights or objects on the exterior of the Apollo spacecraft. They include the docking spotlight, running lights, radio-luminescent discs, the EVA floodlight, and rendezvous beacon.

Mission Operational Aids
Objects or devices that assist the crew in the mission and the operation of the spacecraft are operational aids. The aids are the flight-data file, tool set, cameras, and miscellaneous accessories.

Crew Life Support
Items included are drinking and food reconstitution water devices, food, waste management, and personal hygiene. Waste management consists of equipment for collecting, disinfecting, and storing the feces, and expelling urine overboard.

Medical Equipment

The medical requirements are filled by the bioinstrumentation harness that transmits the respiration and pulse of the crew to the communications system, and a medical kit that contains medication for contemplated contingencies.

Radiation Monitoring Equipment

The crew wears passive and active dosimeters for recording dosages. For measuring the radiation present in the crew compartment, a radiation survey meter and a Van Allen Belt dosimeter are stowed.

Postlanding Recovery Aids

Upon landing, the crew will deploy the dye marker for daytime signaling, or turn on the recovery beacon for night signaling, connect cloth ducts for air, deploy a grappling hook to snag a sea anchor line, and, if needed, use a seawater pump to acquire sea water for desalinization. In the event the crew would be forced to abandon the command module, the survival kit would be used for flotation and signaling.

Stowage and Internal Configuration

In the crew compartment, numerous items of equipment are stowed in lockers or compartments designed to withstand the landing impact. The interior configuration of the crew compartment is shown in CM Internal Configuration Diagram. The illustrations also show the equipment bays and spacecraft axes.

SERVICE MODULE

The service module is a cylindrical structure formed by 1-inch thick aluminum honeycomb panels. Radial beams, from milled aluminum alloy plates, separate the structure interior into six unequal sectors around a circular center section. Equipment contained within the service module is accessible through maintenance doors located around the exterior surface of the module. Service Module Diagram Specific items, such as propulsion systems (SPS and RCS) fuel cells, and most of the SC onboard consumables (and storage tanks) contained in the SM compartments, are listed in the Service Module Diagram. The service module is 12 feet 11 inches long (high) and 12 feet 10 inches in diameter.

Radial beam trusses on the forward portion of the SM structure provide a means for securing the CM to the SM. Alternate beams, one, three, and five, have compression pads for supporting the CM. Beams two, four, and six, have shear – compression pads and tension ties. A flat center section in each tension tie incorporates redundant explosive charges for SM- CM separation. These beams and separation devices are enclosed within a fairing (26 inches high and 13 feet in diameter) between the CM and SM.

Service Module Diagram

SPACECRAFT LM ADAPTER

The spacecraft LM adapter (SLA) (Spacecraft LM Adapter Diagram) is a large truncated cone which connects the CSM and S-IVB on the launch vehicle. It houses the lunar module (LM), the nozzle of the service propulsion system, and the high-gain antenna in the stowed position. The adapter, constructed of eight 2 – inch – thick aluminum panels is 154 inches in diameter at the forward end (CM interface) and 260 inches at the aft end. Separation of the CSM from the SLA is accomplished by means of explosive charges which disengage the four SLA forward panels from the aft portion. The individual panels are restrained to the aft SLA by hinges and accelerated in rotation by pyrotechnic – actuated thrusters. When reaching an angle of 45 degrees measured from the vehicles X-axis, spring thrusters (two per panel) jettison the panels. The panel jettison velocity and direction of travel is such as to minimize the possibility of recontact with the space craft or launch vehicle.

Spacecraft LM Adapter Diagram

Manual Thrust Vector Control
Manual control of the thrust vector utilizes crew commands via the RC to position the gimbaled SPS. There are two types of MTVC: M T VC with rate damping (rate command) and MTVC without rate damping (acceleration command). Either mode of MTVC is selectable by panel switching. In addition, TC-CW logic provides either an automatic transfer from a PGNCS-controlled delta V or from an SCS auto delta V. (TVC Switching Table)
In order to provide ease of manual control, a proportional plus integral amplifier is incorporated in the MTVC signal flow path. The operation of this circuit can be described by considering the response to a step input; the output will initially assume a value determined by the proportional gain and the input amplitude. It will then increase, from this value, as a straight-line function of time. The slope of the line is a function of the input amplitude and the integrator constant. When the input is removed, the output will then drop by the initial value. With no additional inputs the output will theoretically remain constant (in practice, it will slowly decay). The circuit (integrator) provides the following capabilities:
a. Maintain a gimbal deflection after returning the RC to rest.
b. Make corrections with the RC about its rest position, rather than holding a large displacement.
c. With no manual inputs, SC r ate is damped out in the RATE CMD configuration.
The selection between the RA TE CMD and ACCEL CMD configurations is made by enabling rate signals in the RATE CMD mode with the IGN 2 logic signal p resent (thrust on). This enables rate BMAG signals to be summed with RC inputs. The position of the BMAG MODE switch determines which rate source (BMAG 1 or 2) is summed, through its associated functional switch. Placing the SCS TVC switch in the ACCEL CMD position disables the rate command mode.
The RATE CMD configuration is analogous to the proportional rate capability described in the ACS (ATTITUDE CONTROL SUBSYSTEM) except there is no deadband. With no manual input, the thrust vector is under rate BMAG control. If there is an initial gimbal cg misalignment, an angular acceleration will develop. The rate BMAG, through the proportional gain, will drive the gimbal in the direction necessary to cancel this acceleration. With no integrator, a steady-state rate would be required to hold the necessary gimbal deflection (through cg). However, due to the integrator, the rate is driven to zero. When an RC input (manual) is present, a steady-state vehicle rate will be established so that the integrator input goes to zero when the output value is sufficient to place the thrust vector through the c g. When the manual input is removed the rate is driven to zero.
When rate feedback is inhibited by selecting ACCEL CMD, the RC input must be properly trimmed to position the thrust vector through the cg. However, positioning the thrust vector through the cg only drives the rotational acceleration to zero. Additional adjustments (RC trimming) are necessary to cancel residual rates and obtain the desired attitude and positioning vector.
Heat Exchangers
Each unit is a line-mounted, counterflow heat exchanger consisting of the helium pressurization line coiled helically within an enlarged section of the propellant supply line. The helium gas, flowing through the coiled line, approaches the temperature of the propellant prior to entry into the respective storage tanks, thus reducing pressure excursions to a minimum.
Nozzle Extension
The bell- contoured nozzle extension is bolted to the ablative thrust chamber exit area. The nozzle extension is radiant-cooled and contains an external stiffener to provide additional strength.
Engine (16)
1000-second service life, 750 seconds continuous, capable of 10,000 operational cycles. Expansion ratio 40 to 1 at nozzle exit. Cooling-film and radiation, injector type premix igniter, one on one unlike impingement, 8 fuel annulus for film cooling of premix ignitor, main chamber 8 on 8 unlike impingement, 8 fuel for film cooling of combustion chamber wall.
Nozzle exit diameter – 5. 6 inches
Fuel lead
Automatic coils – connected in parallel
Manual coils – connected in series
Weight – 4. 99 lb
Length – 13.400 in. maximum

Repressurization of the systems can be automatically or manually controlled by switch selection. The automatic mode is designed to give a single-phase reactant flow into the fuel cell and ECS feed lines at design pressures. The heaters and fans are automatically controlled through a pressure switch-motor switch arrangement. As pressure in the tanks decreases, the pressure switch in each tank closes to energize the motor switch, closing contacts in the heater and fan circuits. Both tanks have to decrease in pressure before heater and fan circuits are energized. When either tank reaches the upper operating pressure limit, that respective pressure switch opens to again energize the motor switch, thus opening the heater and fan circuits to both tanks. The O2 tank circuits are energized at 865 psia minimum and de- energized at 935 psia maximum. The Hz circuits energize at 225 psia minimum and de-energize at 260 psia maximum. The most accurate quantity readout will be acquired shortly after the fans have stopped. During all other periods partial stratification may degrade quantity readout accuracy.
When the systems reach the point where heater and fan cycling is at a minimum (due to a reduced heat requirement), the heat leak of the tank is sufficient to maintain design pressures provided flow is within the min dq/dm values shown in the preceding tabulation. This realm of operation is referred to as the min dq/dm region. The minimum heat requirement region for oxygen starts at approximately 45 percent quantity in the tanks and terminate at approximately 25 percent quantity. Between these tank quantities, minimum heater and fan cycling will occur under normal usage. The amount of heat required for repressurization at quantities below 25 percent starts to increase until below the 3 percent level practically continuous heater and fan operation is required. In the hydrogen system, the quantity levels for minimum heater and fan cycling are between approximately 53 and 33 percent, with continuous operation occurring at approximately 5 percent level.
Assuming a constant level flow from each tank (O2 – 1 lb/hr, H2 – 0.09 lb/hr) each successive repressurization period is of longer duration. The periods between repressurizations lengthen as quantity decreases from full to the minimum dq/dm level, and become shorter as quantity decreases from the minimum dq/dm level to the residual level. Approximate repressurization periods are shown in the following chart, which also shows the maximum flow rate in pounds per hour from a single tank with the repressurization circuits maintaining minimum design pressure.
The maximum continuous flow that each cyrogenic tank can provide at minimum design pressure is dependent on the quantity level and the heat required to maintain that pressure. The heat required to maintain a constant pressure decreases as quantity decreases from full to the minimum dq/dm point. As quantity decreases beyond the minimum dq/dm region, the heat required to maintain a constant pressure increases.
As fluid is withdrawn, a specific amount of heat is withdrawn. When the withdrawal rate exceeds the heat that can be supplied by the heaters, fan motors, and heat leak, there is a resultant pressure decrease below the minimum design operating level.
The ability to sustain pressure and flow is a factor of the amount of heat required versus the heat provided by heaters, fan motors, and heat leak. Since heat leak characteristics of each tank vary slightly, the flow each tank can provide will also vary to a small degree. Heat input from heaters, fan motors, and heat leak into an o2 tank is 595. 87 Btu/hour (113. 88 watt heaters supply 389.67 Btu, 52.8 watt fan motors supply 180. 2 Btu, and heat leak supplies 26 Btu). Heat input from similar sources into a H2 tank is 94. 6 Btu/hr (18.6 watt heaters supply 63.48 Btu, 7 watt fan motors supply 23.89 Btu, and heat leak supplies 7.24 Btu). These figures take into consideration the line loss between the power source and the operating component.
Quantity (Percent) Oxygen Hydrogen
Repressurization Time (Minutes) (865 to 935 psia) Flow at 865 psia Repressurization Time (Minutes) (225 to 260 psia) Flow at 225 psia
100 4.0 3.56 20.0 0.38
95 4.3 3.97 21.0 0.42
90 4.6 4.55 22.0 0.46
85 5.0 5.27 23.0 0.49
80 5.4 6.02 24.5 0.52
75 5.7 7.01 26.5 0.65
70 6.5 7.94 28.5 0.76
65 7.4 9.01 31.0 0.83
60 8.7 10.80 33.5 0.87
55 9.6 12.54 36.0 0.93
50 10.8 14.19 39.0 0.97
45 11.5 15.69 41.0 0.98
40 12.4 17.01 41.0 0.97
35 12.6 17.56 41.0 0.94
30 13.0 17.56 40.5 0.91
25 13.1 16.55 40.5 0.83
20 13.2 15.48 42.0 0.71
15 14.5 12.28 47.0 0.54
10 17.8 8.76 58.0 0.37
7.5 21.4 7.09 71.0 0.23
5 24.0 5.37 Continuous 0.16
To avoid excessive temperatures, which could be realized during continuous heater and fan operation at extremely low quantity levels, a thermal sensitive interlock device is in series with each heater element. The device automatically opens the heater circuits when internal tank shell temperatures reach +90°F, and closes the circuits at +70°F. Assuming normal consumption, oxygen temperature will be approximately – 157°F at mission termination, while hydrogen temperature will be approximately -385° F.
The manual mode of operation bypasses the pressure switches, and supplies power directly to the heaters and/or fans through the individual control switches. It can be used 1n case of automatic control failure, heater failure, or fan failure.
Tank pressures and quantities are monitored on meters located on MDC-2. The caution and warning system (CRYO PRESS) will alarm, when oxygen pressure in either tank exceeds 950 psia or falls below 800 psia. The hydrogen system alarms above 270 psia and below 220 psia. Since a common lamp is provided, reference must be made to the individual pressure and quantity meters (MDC-2) to determine the malfunctioning tank. Tank pressures, quantities, and reactant temperatures of each tank are telemetered to MSFN.
Oxygen relief valves vent at a pressure between 983 and 1010 psig and reseat at 965 psig minimum. Hydrogen relief valves vent at a pressure between 273 and 285 psig, and reseat at 268 psig n1inimum. Full fl ow venting occurs approximately 2 pounds above relief valve opening pressure.
All the reactant tanks have vac-ion pumps to maintain the integrity of the vacuum between the inner and outer shell, thus maintaining heat leak at or below the design level. SM main d-c bus A distributes power to the H2 tank 1 pump and bus B to the H2 tank 2 pump. F uses provide power source protection. These fuses are removed during prelaunch to disable the circuit for flight. Circuit breakers, O2 VAC ION PUMPS MNA – MNB (RHEB-229), provide power source protection for the CM main buses, which distribute power to the O2 vac-ion pumps. The circuit breakers allow u se of the O2 vac-ion pun1p circuits throughout flight, and provide a means of disabling circuit if necessary.
The most likely period of overpressurization in the cryogenic system will occur during operation in the minimum dq/dm region. The possibility of overpressurization is predicated on the assumption of a vacuum breakdown, resulting in an increase in heat leak. Also, under certain conditions, i.e., extremely low power levels and/or a depressurized cabin, demand may be lower than the minimum dq/dm flow necessary. Any of the preceding conditions would result in an increase of pressure within a tank.
Several procedures can be used to correct an overpressure condition in the oxygen system. One is to perform an unscheduled fuel cell purge. A second is to increase oxygen flow into the command module by opening the ECS DIRECT O2 valve. The third is to increase electrical loads, which may not be desirable because this method will also increase hydrogen consumption.
Increase of electrical loads is probably the least desirable method because of the increase in demand on both reactant systems, although an overpressure correction is required in only one reactant system.
A requirement for an overpressure correction in both reactant systems simultaneously is remote, since botl1 reactant systems do not reach the minimum dq/dm region in parallel.
During all missions, to retain a single tank return capability, there is a requirement to maintain a balance between the two tanks in each of the reactant systems. When a 2 to 4 percent difference is indicated on the oxygen quantity meters (MDC- 2), the Oz HEATERS switch (MDC-2) of the lesser tank is positioned to OFF until tank quantities equalize. A 3 percent difference in the hydrogen quantity meters (MDC-2) will require positioning the H2 HEATERS switch (MDC-2) of the lesser tank to OFF until tank quantities equalize. This procedure retains the automatic operation of the repressurization circuits, and provides for operation of the fan motors during repressurization to retain an accurate quantity readout in all tanks. The necessity for balancing should be determined shortly after a repressurization cycle, since quantity readouts will be most accurate at this time

Water Management
In preparing the spacecraft for the mission the potable and waste water tanks are partially filled to ensure an adequate supply for the early stages of the mission. From the time the fuel cells are placed in operation until CSM separation, the fuel cells replenish the potable water supply. A portion of the water is chilled and made available to the crew through the drinking fixture and the food preparation unit. The remainder is heated, and is delivered through a separate valve on the food preparation unit.
From the time the crew connects into the suit circuit until entry, the water accumulator pumps .are extracting water from the suit heat exchanger and pumping it into the waste water system. The water is delivered to the glycol evaporators through individual water control valves. Provision is made for dumping excess waste water manually when the tank is full.
Bacteria from the waste water system can migrate through the isolating valves into the potable water system. A syringe injection system is incorporated to provide for periodic injection of bactericide to kill bacteria in the potable water system.
ECS Radiator Control
Each coolant loop includes a radiator circuit (ECS Radiator Subsystem Diagram). The primary radiator circuit consists basically of two radiator panels, in parallel with a flow- proportioning control for dividing the flow between them, and a heater control for adding heat to the loop. The secondary circuit consists of a series loop utilizing some of the area of both panels, and a heater control for adding heat to the loop.
Antenna Equipment
The antenna equipment can be divided into three groups: VHF antennas and ancillary equipment, S-band antennas and ancillary equipment, and. beacon antenna. Their overall function is to propagate and receive RF signals from and to the RF equipment. The ancillary equipment includes two RF switches, 2 triplexers, and the servo-drive system for the high-gain antenna.
*Resets previously set relays so that equipment returns to mode shown on control panels.
Unified S-Band Equipment Diagram

The USBE tracking method employed is the two-way or double-doppler method. In this technique, a stable carrier of known frequency is transmitted to the SC where it is received by the phase-locked receiver, multiplied by a known ratio, and then re- transmitted to the MSFN for comparison. Because of this capability, the USBE is also referred to as the S-band transponder.
For determining SC range, the MSFN phase-modulates the transmitted carrier with a pseudo-random noise (PRN) binary ranging code. This code is detected by the SC USBE receiver and used to phase-modulate the carrier transmitted to the MSFN. The MSFN receives the carrier and measures the amount of time delay between transmission of the code and reception of the same code, thereby obtaining an accurate measurement of range. Once established, this range can be continually updated by the double-doppler measurements discussed earlier. The MSFN can also transmit up-data commands and voice signals to the SC USBE by means of two subcarriers: 70 kc for up- data and 30 kc for up-voice.
The USBE transponder is a double-superheterodyne phase-lock loop receiver that accepts a 2106.4-mc, phase-modulated RF signal containing the up-data and up-voice subcarriers, and a pseudo-random noise (PRN) code when ranging is desired. This signal is supplied to the receiver (S-Band Receiver Schematic) via the triplexer in the S-band power amplifier equipment and presented to three separate detectors: the narrow band loop phase detector, the narrow band coherent amplitude detector, and the wide band phase detector. In the wide band phase detector, the 9.531-mc IF is detected; and the 70-kc up-data and 30-kc up-voice subcarriers are extracted, amplified, and routed to the up-data and up-voice discriminators in the PMP equipment. Also, when operating in a ranging mode, the PRN ranging signal is detected, filtered, and routed to the USBE transmitter as a signal input to the phase modulator. In the loop-phase detector, the 9. 531-mc IF signal is filtered and detected by comparing it with the loop reference frequency. The resulting d-c output is used to control the frequency of the 19.0625-mc voltage-controlled oscillator (VCO). The output of the VCO is used as the reference frequency for receiver circuits as well as for the transmitter.
Tone Frequency Max. Deg. Phase Shift
200 cps ±0.69°
6.4 kcs ±1.0°
204.8 kcs ±3°
AGC monitor 0 to 4.5 volts
Frequency lockup search 0±0.4 volts dc
Transponder mode 4.5 volts dc ±10 percent

Forward Heat Shield (Apex Cover)
Section 1 includes a description of the forward heat shield structure; automated and manual controlled circuits for jettisoning this heat shield are included in the integrated MESC, ELSC, and LDEC. Mechanization of apex cover jettison is accomplished by the use of thrusters and a drag parachute. When gas pressure is generated by the pressure cartridges, two pistons will be forced apart and a tension tie will be broken. The lower piston will be forced against a stop and the upper piston will be forced out of its cylinder. The piston rod ends are fastened to forward heat shield fittings and the apex cover is forced away from the CM. Only two of the thruster assemblies have breeches and pressure cartridges installed and plumbing connects the breeches to thrusters mounted on diametrically opposite CM structural members; this constitutes redundancy.
Angle of Attack Monitor. (Zones 35 through 37-E and -F)
A Q-ball mounted above the LES motors, provides an electrical signal input to the LV AOA/SPS Pc indicator and an electrical signal input to ground control via telemetry. The Q-ball has eight static ports for measuring ΔP which is a function of angle of attack. The pitch and yaw ΔP signals are electronically vector-summed in the Q-ball and displayed on the indicator. The indicator is monitored for the LV AOA function during ascent when the LV is at or near the max Q region. This is a time-shared instrument with the service propulsion system (SPS), and the 150-percent graduation is because of SPS start transients. Use of the scale during the LV AOA period will be as a trend indicator only with abort limits established in mission rules.
Canard Deploy and ELSC Arm
Eleven seconds after the initiation of any LES ABORT, canard deployment is automated, zones 25 and 26-C and -D. This relay logic will also arm the ELSC, zone 10-D. Contacts of the CANARD DEPLOY relay are incorporated parallel to the ELS LOGIC switch (S44) which must be in the OFF position during the launch and ascent phases of a mission. When arming of the ELSC is automated, through 3.0-second time delays, the same functions which are described in Arm ELSC will result.

Tower Jettison Motor
The TJM is intended to provide thrust capability, under normal mission operation, to effect adequate separation of the LES from the CM, while the latter is undergoing acceleration by the second stage booster; and, under abort conditions, to achieve adequate separation of the LES from the CM after LEM burn out. The propellant charge of the T JM consists of a case-bonded, star grain employing a polysulfide ammonium perchlorate formulation.

Launch Escape Motor
The LEM in conjunction with the PCM, is intended to provide capability for the safe removal of the crew, inside the CM, from a malfunctioning LV at any time from access arm retraction until successful completion of second-stage ignition. The propellant of the LEM consists of a case-bonded, eight-point star grain employing a polysulfide ammonium perchlorate formulation.
Pitch Control Motor
The PCM in conjunction with the LEM, is employed to place the LEV in the correct flight attitude for a successful escape during mode 1A aborts. The propellant of the PCM consists of a case-bonded, 14-point star grain employing a polysulfide ammonium perchlorate formulation.
Urine Subsystem
The urine subsystem has two contending urine collection devices for collecting and transferring urine, the Urine Transfer System (UTS) and the Urine Receptacle. The remainder of the urine subsystem is a 120-inch flexible urine hose (capable of reaching a crewman in a couch), and a filter.
Gemini Urine Transfer System (UTS)
The components of the urine transfer system (UTS) are a rollon, receiver, valve with a manifold, collection bag, and a 3/8-inch quick-disconnect (QD). The rollon is a rubber tube that functions as an external catheter between the penis and the receiver/valve. The rollon is used approximately one day (5 to 6 urinations) and then replaced. Ten additional rollons per crewman are in a stowed rollon cuff assembly coded red, white, and blue. The rollon attaches to the urine receiver. The receiver is a short tube that contains a low-pressure differential check valve (0.038 psi), a low pressure differential bypass valve, and screws onto the valve manifold. The collection valve has two positions, OPEN and CLOSED, and allows urine to flow into the manifold. The other end of the valve manifold has a 3/8-inch QD and the collection bag throat is teed into the manifold. The urine collection bag is rectangular in shape with a capacity of approximately 1200 ccs. Each crewman will have his personal UTS for sanitary reasons.
Urine Receptacle With Plenum
The urine receptacle is a relief tube with a valve on the exit end. Both ends have threaded sections. The diaphragm assembly will screw on the receiving (front) end and the plenum will screw on the exit (rear) end. The urine receptacle valve opens when turned 90 degrees counterclockwise and closes 90 degrees clockwise. The relief tube body has slanted holes downstream of the diaphragm and upstream of the valve that allows gas to bypass the diaphragm when attached to the penis. There is one urine receptacle per spacecraft.
The diaphragm assembly is a short cylinder with a stretched diaphragm over the upstream or receiving end. The diaphragm has a hole in the center through which the penis is placed. The diaphragm is attached to a collar that moves along the outside of the cylinder and stretches the diaphragm. The collar is moved by a wishbone fitting. The diaphragm attaches to the ‘receptacle by screwing. Each crewman will have his personal diaphragm marked L, C, or R. Each diaphragm will have a plastic cap cover with a strap handle and a snap. The diaphragms are stowed in a beta cloth container with compartments marked L, C, and R.
The plenum chamber attaches to the receptacle exit threaded section and is sealed with an 0-ring. An enclosed cylinder with a capacity of 780 cc, it receives the urine from the receptacle. Attached to the bottom of the plenum is an open end stand pipe with holes at the top, middle, and lower end. This allows gas to always mix with the urine and assure an adequate flow. The exit end of the plenum has a QD that attaches to the urine hose.
The diaphragm-receptacle-plenum, or urine receptacle assembly will receive and transfer urine at a maximum rate of 40 cc per second. The urine subsystem has a capacity of 1200 cc at the rat e of 40 cc per second. The assembly will be stowed in an aft bulkhead locker for launch and entry. During the mission, it will be stowed on the aft bulkhead cableway, by the WMS panel 252 with the aid of a strap. It should always be stowed with a diaphragm and cover attached to restrict debris.
Urine Hose and Filter
The urine hose is silicon rubber with a Beta cloth cover which will withstand a 6-psi differential pressure and is flexible to facilitate easy routing and handling a t zero g. The spacesuit urine QD is located approximately 20 inches from the urine QD and is teed into the hose. The panel QD end of the hose connects to a 215-micron (0.009 inch) filter with a QD which mates with the waste management system (WMS) panel QD. The urine is filtered to prevent clogging the 0.055-inch orifice in the urine dump nozzle. In the event the OVBD (overboard) DRAIN valve leaks, the panel QD can be disconnected to prevent loss of oxygen.
Operation
Urine is dumped in one of the following ways: urination and dumping simultaneously, urination and dumping separately, or draining (dumping) the spacesuit urine collection and transfer assembly (UCTA). There is also an auxiliary dump method which will be described later.
One of the two urine dump nozzle heaters should be on at all times during the mission. The URINE DUMP HTR switch, on panel 101 of the LEB, has three positions: HTR A, HTR B, and OFF. Select HTR A or HTR B. The circuit breakers for this switch are the ECS STEAM/URINE DUCT HTR MNA/MNB circuit breakers on MDC-5 (lower center).
Urine Transfer System, Urinating and Dumping Simultaneously. Connect the panel end of the urine hose (with filter) to the WMS panel QD. Connect the hose urine QD to the urine transfer system (UTS) QD. Next, turn the OVBD DRAIN valve to DUMP. Attach the UTS to the penis by the rollon. Turn the UTS valve handle to OPEN (it will cover the word “0PEN”) and urinate. The receiver low pressure differential check valve (0.038 psi) is opened. During this operation, 200 to 300 cc of urine will flow into the urine hose and gradually fill the lines. When the flow decreases, the UTS bag will begin to fill. The 5-psi pressure differential between cabin and space will cause gas and urine to dump overboard. (With the penis connected, the bypass valve in the receiver prevents a pressure differential on the penis). When urination is complete, roll the rollon back onto the receiver and remove the penis. Place the finger over the bypass valve, thus sucking urine on the outside of the receiver into the receiver flapper valve and preventing it from leaking into the cabin. Close the UTS valve and allow the bag to completely vacuate. Then open the UTS valve and allow a minute purge to clear the urine hose, and then close the valve. Disconnect the UTS QD and stow. Turn the OVBD DRAIN valve to OFF, remove the hose, and stow.
Urine Transfer System, Urinating and Dumping Separately. To urinate and dump separately, unstow the UTS and attach to the penis by the rollon. Turn the UTS valve to OPEN and urinate. The urine will pass through the receiver low-pressure differential flapper valve, through the valve, and into the bag. When urination is complete, remove the UTS by rolling the rollon back to the receiver. A little urine may be clinging to the receiver. Attach a filter to the collection bag QD and then attach the UTS and filter to the WMS panel QD. {This can be accomplished when convenient.) Open the OVBD DRAIN valve and the UTS valve. When the bag is empty (flat), allow 30 seconds for purging before closing the UTS valve and OVBD DRAIN valve. Disconnect UTS QD from the filter QD and stow.
Urinating Using the Urine Receptacle Assembly
The use of the urine receptacle necessitates urinating and dumping simultaneously. To use, obtain the urine receptacle assembly from the mission stowage position and attach personal diaphragm. Remove diaphragm cover and stow. Connect the assembly to the urine hose, rotate WMS OVBD DRAIN valve to DUMP, and rotate the urine receptacle valve 90 degrees counterclockwise until it stops . The system is vented to space and has a 5-psi differential. Open the diaphragm hole, insert penis, urinate, and remove penis. When the plenum empties, allow 60 seconds for the hose and lines to clear, then close urine receptacle valve and OVBD DUMP valve, respectively. Place cover on diaphragm, and stow.
Snagging Line
In the event the CM lands beyond the recovery force helicopter range, a recovery aircraft will drop a sea anchor device, consisting of two sea anchor s at the ends of a 600-foot floating line. The crew will deploy a snagging line hook through the side hatch pressure equalization valve port after removing the valve. The snagging line is restrained by a plate bolted to the port. As the CM drift s over the sea anchor line, the snagging line hook snags the line, and the CM drift speed is then retarded.
Forward Tunnel Hatch
The forward hatch in the CM tunnel enables crew access to the LM-CM interface and may be used for emergency egress after postlanding. The hatch is removable only into the crew compartment. The reinforced flange on the forward tunnel ring for the pressure seal and latch engagement prevents an outward removal. The hatch is retained at the forward end of the CM tunnel by six separate jointed latches whose linkage is driven by an actuating handle from within the crew compartment. A drive is provided on the LM side (outside) opposite the actuating handle drive, permitting hatch removal by using the B tool of the in-flight tool-set. A pressure equalization valve, which can be opened or closed from either side, is provided on the hatch. This valve is used to equalize pressure in the tunnel and LM prior to hatch removal.

APOLLO 11 OPERATIONS HANDBOOK BLOCK II SPACECRAFT
Caution and Warning System

CAUTION AND WARNING SYSTEM
INTRODUCTION
FUNCTIONAL DESCRIPTION
MAJOR COMPONENT/SUBSYSTEM DESCRIPTION
Electrical Power Distribution
C&WS Power Distribution Diagram
OPERATIONAL LIMITATIONS AND RESTRICTIONS
C&WS General Data
System Status Light Data
Systems Data Diagram

CAUTION AND WARNING SYSTEM
INTRODUCTION
The caution and warning system (C&WS) monitors critical parameters of most of the systems in the CM and SM. When a malfunction or out- of-tolerance condition occurs in any of these systems, the crew is immediately alerted in order that corrective action may be taken.
FUNCTIONAL DESCRIPTION
Upon receipt of malfunction or out-of-tolerance signals, the C&WS simultaneously identifies the abnormal condition and alerts the crew to its existence. Each signal will activate the appropriate systems status indicator and a master alarm circuit. The master alarm circuit visually and aurally attracts the crew’s attention by alarm indicators on the MDC and by an audio tone in the headsets. Crew acknowledgment of an abnormal condition consists of resetting the master alarm circuit, while retaining the particular systems status malfunction indication. The capability exists for the crew to select several modes of observing systems status and master alarm indicators and of monitoring CM or SM systems.
MAJOR COMPONENT/SUBSYSTEM DESCRIPTION
The C&WS consists of one major component, the detection unit. It is located behind MDC-3, and therefore is neither visible nor accessible to the crew during the mission. The balance of the system is made up of visual indicators, aural alerting and associated circuits, and those switches required to control the various system functions. Visual indicators include the two uppermost fuel cell electromechanical event devices on MDC-3, as well as all systems status and master alarm lights.
The detection unit circuits consist of comparators, logic, level detectors, lamp drivers, and a master alarm and tone generator. Also incorporated are two redundant power supplies that furnish regulated +12 and -12 dc voltages for the electronics.
Inputs to the detection unit consist of both analog and event-type signals. The analog signals are in the 0- to-5 volt d-c range. Alarm 1 limits for these signals trigger voltage comparators, which, in turn, activate logic and lamp-driver circuits. This causes activation of the master alarm circuit and tone generator, illumination of applicable systems status lights on MDC-2, and for certain measurements, activation of applicable electromechanical event indicators on MDC-3. Several event inputs are monitored by the C&WS detection unit. These signals originate from solid state and mechanical switch closures in malfunction sensing devices. Certain signals will directly illuminate applicable system status lights and, through logic circuitry, activate the master alarm circuit and tone generator. Other event signals directly illuminate the system status lights, but require level detectors to activate the master alarm circuit. One event signal, originating within the detection unit, directly illuminates the C/W light, but activates only the MASTER ALARM switch lights of the master alarm circuit. One event signal, referred to as “CREW ALERT,” originates from ground stations and enters through the UDL portion of the communications system. This system status light can only be extinguished by a second signal originating from the ground.
The master alarm circuit alerts crewmembers whenever abnormal conditions are detected. This is accomplished visually by the illumination of remote MASTER ALARM switch-lights on MDC-1 and -3, and the MASTER ALARM switch-light on LEB-122. An audio alarm tone, sent to the three headsets, aurally alerts the crew. The output signal of the tone generator is a square wave that is alternately 750 and 2000 cps, changing at a rate of 2. 5 times per second. Although the tone is audible above the conversation level, it does not render normal conversation indistinct or garbled. When the crew has noted the abnormal condition, the alarm lights arid the tone generator are deactivated and reset by pressing any one of the three MASTER ALARM switch-lights. This action leaves the systems status lights illuminated and resets the master alarm circuit for alerting the crew if another abnormal condition should occur. The individual systems status lights will remain illuminated until the malfunction or out-of-tolerance condition is corrected.
The C &WS power supplies include sensing and switching circuitry that ensure unit self-protection should high-input current, or high- or low-output voltage occur. Any of tl1ese conditions will cause the illumination of the master alarm lights and the C/W system status light. The tone generator, however, will not be activated because of requiring the 12-volt output from the malfunctioned power supply for its operation. The crew must then manually select the redundant power supply to return the C&WS to operation. This is accomplished by repositioning the CAUTION/ WARNING-POWER switch on MDC-2. In so doing, the C/W status light is extinguished, but the master alarm circuit remains activated, thus requiring it to be reset.
Incorporated into the C&WS is the capability to test the lamps of systems status and master alarm lights. Position l of the CAUTION/ WARNING-LAMP TEST switch tests the illumination of the left-hand group of status lights on MDC-2 and the MASTER ALARM switchlight on MDC-1. Position 2 tests the MASTER ALARM switch-light on MDC-3 and the right-hand group of status lights on MDC-2. The third MASTER ALARM light is on LEB-122, and is tested by placing the CONDITION LAMPS switch on LEB-122 to TEST.
The position of the CAUTION/WARNING – CSM-CM switch (MDC-2) establishes the systems to be monitored. Before separation and entry, systems in both the CM and SM are monitored for malfunction or out-of-tolerance conditions with this switch in the CSM position. Positioning the switch to CM deactivates systems status lights and event indicators associated with SM systems.
The CAUTION/WARNING – NORMAL-BOOST-ACK switch (MDC-2) permits three modes of status and alarm light illumination. For most of the mission, the switch is set to the NORMAL position to give normal C&WS operation; that is, upon receipt of abnormal condition signals, all 1 systems status lights and master alarm lights are capable of illumination. During the ascent phase, the switch is set to the BOOST position, so that although all other C&WS lights operate normally, the MASTER ALARM switch-light on MDC-1 will not illuminate. This prevents possible confusion on MDC-1 between the red MASTER ALARM light and. the adjacent red ABORT light. The ACK switch position is selected when the crew desires to adapt their eyes to darkness, or if a continuously illuminated systems status light is undesirable. While in this mode, incoming Signals will activate only the master alarm lights and the tone generator. To determine the abnormal condition, the crew must press either MASTER ALARM switch-light on the MDC. This illuminates the applicable systems status light, and deactivates and resets the m aster alarm circuit. The systems status light will remain illuminated only as long as the switch-light is depressed. However, it may be re-called as I long as the abnormal condition exists by a gain pressing either switch-light.
A stowable tone booster is added to the caution and warning system to allow all three astronauts to sleep simultaneously with the headsets removed. Stowage of this unit during non-use periods will be under locker A3.
The unit consists of a power plug, tone booster, and a photosensitive device which can be used on the left or right side of the command module. The power connection is made to the UTILITY receptacle on MDC-15 or 16. The tone booster, which provides an audible signal, is mounted by velcro pad to the left-hand or right- hand girth shelf. The photo-sensitive device, whi.ch is sensitive only to the MASTER ALARM lamp, is mounted on the left- or right-hand crew couch so it monitors the MASTER ALARM on MDC-1 or 3.
Since the MASTER ALARM is triggered by any caution/warning monitored symptom, it will activate the tone booster until the MASTER ALARM is extinguished by a manual reset. In the event of a caution/ warning system power supply failure, this unit will provide the audio alarm.
Electrical Power Distribution
The C&WS receives power from MNA & MNB buses. (See the C&WS Power Distribution Diagram) Two circuit breakers are located on MDC-5. Closure of either circuit breaker will allow normal system operation.
C&WS Power Distribution Diagram

OPERATIONAL LIMITATIONS AND RESTRICTIONS
C&WS General Data
With the CAUTION/WARNING – NORMAL-BOOST-ACK switch in the BOOST position during ascent, the MASTER ALARM switch-light on MDC-1 will not illuminate should a malfunction occur. The master alarm circuit reset capability of the light is also disabled during this time. This require s the MASTER ALARM switch-light on MDC-3 to be used exclusively for monitoring and resetting functions during boost. Several peculiarities should be noted in regard to the CAUTION / WARNING POWER switch. Whenever this switch is moved from or through the OFF position to either power supply position, the master alarm circuit is activated, which then requires it be reset. Also, switching from one power supply to another (when there is no power supply failure) may cause the C/W system status light to flicker as the switch passes through the OFF position.
Should the redundant power supply also fail, the C&WS is degraded to the extent that the complete master alarm circuit, as well as those system status lights that illuminate as the result of analog-type input signals, are rendered inoperative. This leaves only those status lights operative that require event-type input signals. They include the following SM and CM lights: CMC, ISS, BMAG 1 TEMP, BMAG 2 TEMP, SPS ROUGH ECO, PITCH GMBL 1, PITCH GMBL 2, YAW GMBL 1, YAW G M BL 2, Oz FLOW HI, FC BUS DISCONNECT, AC BUS 1, A C BUS 1 OVERLOAD, AC BUS 2, AC BUS 2 OVERLOAD, MN BUS A UNDERVOLT, MN BUS B UNDERVOLT, and CREW ALERT. The C/W light will be operative only while the CAUTION/WARNING POWER switch is in position 1 or 2.
The CAUTION/WARNING – CSM-CM switch must be in the CSM position in order to conduct a lamp test of those system status lights associated with SM systems. The status lights of CM systems may be tested with the switch in either position. Circuit design permits a complete lamp test to be conducted with the CAUTION/WARNING switch in the NORMAL or ACK position only. In the BOOST position, all lamps except those of the MAST ER ALARM light on MDC-1 may be tested.
Normally, each abnormal condition signal will activate the C&WS master alarm circuit and tone generator, and illuminate the applicable systems status light. One exception to this concept is when a system status light has been activated by one of several signals and the MASTER ALARM has been reset. Any additional out-of-tolerance condition or malfunction, associated with the same system status light, will not activate the MASTER ALARM unless the first condition has been previously corrected.
Each crewmember has a power switch on his audio control panel which will enable or prevent the tone signal from entering his headset. The AUDIO-TONE position allows the signal to pass on to the headset while the AUDIO position inhibits the signal.
System Status Light Data
The following list provides the lamp trigger values and associated information for all system status lights on MDC-2.
Systems Data Diagram
System Status Lights Trigger Values Other Indications (Lights, Gauges, Meters, etc. ) CM or SM Remarks
BMAG 1 1. Any BMAG < 168 °F none CM If activated, the BMAG POWER switch should be left in WARM UP until light is extinguished. 2. Any BMAG >172°F
BMAG 2 Same as BMAG 1
CO2 PP HI At 7.6 mm Hg PART PRESS CO2 meter (MDC – 2) CM
PITCH GMBL 1 Overcurrent conditions dependent on time and temperature. none SM
YAW GMBL 1 Same as PITCH GMBL 1 none
PITCH GMBL 2 Overcurrent conditions dependent on time and temperature. none SM
YAW GMBL 2 Same as PITCH GMBL 2 none
CRYO PRESS 1. Tank 1 O2 <800 psia CRYOGENIC TANKS PRESSURE-O2 – 1 meter (MDC-2) SM 2. Tank 1 O2 >950 psia
3. Tank 2 02 – Same as tank 1 O2 CRY0GE0NC TANKS PRESSURE-02- 2 meter (MDC-2)
4. Tank 1 H2 <220 psia CRYOGENIC TANKS PRESSURE -H2-1 , meter (MDC – 2) 5. Tank 1 H2 >270 psia
6. Tank 2 H2 – Same as tank 1 H2 CRYOGENIC TANKS PRESSURE- H2- 2meter (MDC-2)
GLYCO T EMP LOW At – 30°F ECS RADIATOR TEMP – PRIM-OUTLET meter (MDC- 2) CM indication is for primary water glycol system only.
CM RCS 1 1. He manf press < 260 psia CM RCS – PRESS- MANF meters (MDC- 2) CM Light functional only when CAUTION/WARNING – CSM -CM Switch is in CM position 2.. He manf press >330 psia
CM RCS 2 Same as CM RCS 1
SM RCS A 1. Pkg temp <75 °F SM RCS – TEMP PKG 1meter (MDC-2) SM 2. Pkg temp > 205°F
3. Sec fuel press <145 psia SM RCS-PRESS-SEC-FUEL mete r (MDC-2) 4. Sec fuel press >215 psia
SM RCS B Same as SM RCS A
SM RCS C Same as SM RCS A
SM RCS D Same as SM RCS A
FC 1 1. H2 flow >0 .16 Lb/hr FUEL CELL – FLOW-H2 – O2 indicator (MDC -3) SM Event indicators (elec/ mech) pH H1, and FC RAD TEMP LOW are activated a lamp trigger values .
2. 02 flow >1.27 lb/hr
3. Skin temp <360°F FUEL CELL – MODULE TEMPSKIN indicator (MDC -3) 4. Skin temp >475°F
5. Cond exh <155°F FUEL CELL – MiODULE TEMPCOND EXH indicator (MDC- 3) 6. Cond exh >L 75°f
7. At pH factor of 9 pH HI event indicator (MDC-3)
8. Rad out temp below – 30°F FC RAD TEMP LOW event indicator (MDC-3)
FC 2 Same as FC 1
FC 3 Same as FC 1
INV 1 TEMP HI At >190° F None CM
INV 2 TEMP HI Same as INV 1 TEMP HI
INV 3 TEMP HI Same as INV 1 TEMP HI
SPS PRESS 1. Fuel tk He press <157 psia SPS PRPLNT TANKS – PRESS-FUEL meter (MDC-3) SM 2. Fuel tk He press > 200 psia
3. Ox tk He press – Same as fuel tank He press SPS PRPLNT TANKS – PRESS- OXID meter (MDC- 3)
AC BUS 1 1. At 95±3 vac < AC VOLTS meter (MDC-3) CM 2. At 130±2 vac > Overvoltage disconnects inverter from bus.
AC BUS 2 Same as AC BUS 1
FC BUS DISCONNECT 1. Forward current >75 amps DC INDICATORS FC 1 , 2 & 3 (MDC-3) SM DC AMPS meter (MDC-3)
2. Reverse current >4 amps for 1 to 10 seconds
AC BUS 1 OVERLOAD 1. 30 at 27 amps for 15±5 seconds AC VOLTS meter (MDC- 3) CM
2. 10 to 11 amps for 5±1 seconds
AC BUS 2 OVERLOAD Same as AC BUS 1 OVERLOAD
CMC 1. Loss of prime power – CREW ALERT
1 MN BUS A UNDER VOLT
MN BUS B UNDERVOLT CMC light illuminated (LEB-122) CM Items 5 through 11 will cause restart in the CMC.
2. Scaler fail – if scaler stage 17 fails to produce pulses RESTART & PGNS lights illuminated if restart and standby exist in CMC
3. Counter fail – continuous requests or fails to happen following increment request
4. SCADBL – 100 pps scaler stage >200 pps
5. Parity fail – accessed word, whose address is octal 10 or greater, contains even number of ones
6 . Interrupt too long or infrequent – 140 to 300 ms
7. TC trap – too many TC or TCF instructions, or TCF instructions too infrequent
8. Night watchman – computer fails to access address 67 within 64 to l .92 seconds
9. V fail – 4v supply >4.4v
4v supply <3.6v 14v supply >16.Ov
14v supply <12.5v
28v supply <22.6v

 10. If oscillator stops          

CREW ALERT Activated by real-time command from ground stations through the UDL none N/A System status light must be extinguished by ground command
MN BUS A UNDER VOLT At 26.25±0.1 vdc DC VOLTS meter (MDC-3) CM
MN BUS B UNDERVOLT Same as MN BUS A UNDER VOLT
ISS 1. IMU fail ISS light illuminated (LEB-122) CM IMU fail signal inhibited by CMG when in coarse align mode
a. IG servo error >2.9 mr for 2 seconds
b. MG servo error >2.9 for 2 seconds
c. OG servo error >2.9 mr for 2 seconds
d. 3200 cps <50% e. 800 wheel supply <50% 2. PIPA fail PIPA fail will also illuminate PGNC lights and PROGRAM light on DSKY PIPA fail signal inhibited by CMC except during CMC controlled translation or thrusting. a. No pulse during 312.5-ms period b. If both + and – pulses occur during 312.5 – ms period c. If no + and – pulses occur between 1 .28 to 3.84 seconds 3. CDU fail a. CDU fine error >1.0v rms
b. CDU coarse error >2.Sv rms
c. Read counter limit >160 cps
d. Cos (Θ – Φ,) <2.0v
e. +14 de supply <50%
C/W 1. At +11.7 or -11.7 vdc None CM Alarm tone inoperative.
2. At +13.9 or – 13.9 vdc
02 FLOW HI 1.0 lb/hr for 16 sec 02 FLOW meter (MDC-2) CM
SUIT COMPRESSOR ΔP across inlet and outlet <0 .22 psi SUIT COMPR ΔP meter (MDC-2)

APOLLO 11 OPERATIONS HANDBOOK BLOCK II SPACECRAFT
CREW PERSONAL EQUIPMENT
INTRODUCTION
SPACESUITS
Spacesuit Assembly (Intravehicular)
Spacesuits Diagram
Bioinstrumentation Harness and Biomed Belt
Shirtsleeve Environment lntravehicular Apparel
Fecal Containment System
Urine Collection and Transfer Assembly and UCO Clamps
Constant Wear Garment (CWG)
Flight Coveralls
Communication Soft Hat, Lightweight Headset, and Eartube
Constant Wear Garment (CWG) “T” Adapter
Communications Cable With Control Head
Pressure Garment Assembly (PGA)
Intravehicular Spacesuit Diagram
PGA and Helmet Stowage Bags Diagram
Personal Equipment Diagram
PGA Donning and Doffing
Operational Modes
Miscellaneous Personal Equipment
Spacesuit Related Equipment
Oxygen Hose Assembly
Oxygen Hose Assembly and Accessories Diagram
Oxygen Hose Coupling
Oxygen Hose Screen Caps
EMU Maintenance Kit
Extravehicular Spacesuit
Liquid Cooled Garment
Extravehicular Mobility Unit (EMU)
CREWMAN RESTRAINTS
“g”Load Restraints
Crewman Restrain Harness
Crewman Restraint Harness Subsystem With Heel Restraints
Restraint Harness Buckle Stowage Straps Diagram
Operation
Handholds
Handholds, Hand Straps and Hand Bar Diagram
Hand Bar
Heel Restraints
Zero-g Restraint
Hand Straps
Guidance and Navigation Station Restraint
Sleep Station Restraints
Sleep Station Restraints Diagram
Flight Data Restraints
Flight Data Restraint Diagram
Restraint Straps
Special Straps Diagram
Center Couch DPS Burn Straps
Center Couch Stow Straps
Center Couch Restraint Straps Diagram
Cable Retainer Straps
Drogue Stow Straps
Probe and Drogue Stowage Straps Diagram
Utility Straps
Utility Straps Diagram
MDC Glareshade Straps
Velcro and Snaps Retainer Locations
Tunnel Hatch Stow Bag
Sleep Restraint Tie down Ropes
SIGHTING AND ILLUMINATION AIDS
Internal Sighting and Illumination Aids
Internal Sighting and Illumination Aids Diagram
Window Shades
Window Shades and Mirrors Diagram
Internal Viewing Mirrors
Crewman Optical Alignment Sight (COAS)
Crewman Optical Alignment Sight System Diagram
COAS Description
COAS Operation
Additional Uses
LM Active Docking Target
LM Active Docking Target Diagram
Operation
Window Markings
CM Window Markings Diagram
Center (Hatch) Window Frame Markings
Right Rendezvous Window Frame Markings
Monocular
Miscellaneous Internal Sighting and Illumination Aids Diagram
Couch Floodlight Glareshield
Miscellaneous Internal Sighting and Illumination Aids Diagram
MDC Glareshades
Eyepatch
Telescope Sun Filters
Meter Covers (Altimeter and Accelerometer)
External Sighting and Illumination Aids
External Illumination Aids Diagram
Docking Spotlight
Docking Spotlight Diagram
Running Lights
Running Lights Diagram
EVA Handles With RL Disks
EVA Handles With RL Disks Diagram
EVA Floodlight
EVA Floodlight Diagram
Rendezvous Beacon
Rendezvous Beacon Diagram
MISSION OPERATIONAL AIDS
Mission Operational Aids Diagram
Flight Data File
Flight Data File Diagram
LM Pilot’s Flight Data File
Data File Clip
Crewman Toolset
CREW PERSONAL EQUIPMENT Diagram
General
Toolset Description and Use
Toolset Pouch
Tool B – Emergency Wrench
Crewman Toolset Usage Chart
Tool E
Tool F
Tool L
Tool R
Tool V
Tool W
NOTE
Tool W
Tool 1
Tool 2
Tools 3 and 4 Number 8 and 10 Torque Set Drivers
Tether
Jackscrew
Tool H – 10-inch Driver
Cameras
16 mm Data Acquisition Camera
16 mm Data Acquisition Camera Diagram
Power Cable
16 mm Film Magazine
Lenses
5 mm f/2
10 mm
18 mm T/2
18 mm Kern
75 mm f/2.5
75 mm Kern
Right Angle Mirror
Ring Sight
Data Acquisition Camera Bracket
16 mm Camera Operation
70 mm Hasselblad Electric Camera and Accessories
70 mm Hasselblad Electric Camera and Accessories Diagram
80 mm f/2 .8 Lens
250 mm f/5 .6 Lens
500 mm f/8 Lens
Remote Control Cable
70 mm Film Magazines
Lunar Surface 70 mm Film Magazine
70 mm Magazine LM Transfer Bag
70 mm Camera Mount for 80 and 250 mm Lens
70 mm Camera Mount for 500 mm Lens
Intervalometer
Automatic Spotmeter
Spotmeter Diagram
Accessories and Miscellaneous Equipment
Temporary Stowage Bags
Accessory and Miscellaneous Equipment Diagram Sheet 1
Pilot’s Preference Kits
Accessories and Miscellaneous Equipment Diagram 3
Fire Extinguisher
Oxygen Masks
Inflight Exerciser
Accessory and Miscellaneous Equipment Diagram Sheet 2
Tape Roll
Two-Speed Timer
Accessory Bag
Headrest Pad
Grounding Cable
Voice Recorder, Cassettes, and Battery Packs
Decontamination Bags
Accessories and Miscellaneous Equipment Decontamination Equipment Diagram
Vacuum Cleaning Hose and Brushes
Flag Kit
Containers
Utility Outlets
Utility and Scientific Electrical Outlet Diagram
Scientific Instrumentation Outlets
CREW LIFE SUPPORT
Crew Water
Drinking Water Subsystem
Drinking Water Subsystem Diagram
Operational Use
Food Preparation Water
Food Preparation Water System Diagram
Gas/Water Separation
Gas/Water Separation Diagram
Operation
Gas Separator Drying
The Galley System
The Galley System Diagram
Food
Frozen Food Container
Food Warmer
Food Warmer Operation
Hot Food Holder
Stowage
Contingency Feeding System
Food Restraint Pouch
Contingency Feeding Adapter
Waste Management System and Supplies
General Description
Waste Management System Diagram
Urine Subsystem
Urine Subsystem Components Diagram
Gemini Urine Transfer System (UTS)
Urine Receptacle With Plenum
Urine Hose and Filter
Operation
Urinating Using the Urine Receptacle Assembly
Draining the UCTA While in the Spacesuit
Draining the UCTA After Removal From Spacesuit
Auxiliary Dump System
Auxiliary Dump Nozzle Operations Diagram
Fecal Subsystem
Operation
Waste Stowage Vent System
Waste Stowage Vent System Diagram
Vacuum QD (Cabin Vent QD)
Personal Hygiene
Personal Hygiene Items Diagram
Oral Hygiene Set – Cleansing of Teeth
Wet Cleansing Cloth
Dry Cleansing Cloth
Utility Towels
Tissue Dispensers
MEDICAL SUPPLIES AND EQUIPMENT
Bioinstrumentation Harness Assembly
Bioinstrumentation Harness Diagram
Personal Biomedical Sensors Instrument Assembly
Biomedical Signal Conditioner Assembly
Bioinstrumentation Accessories or Spares
Medical Accessories Kit Diagram
RADIATION MONITORING AND MEASURING EQUIPMENT
Radiation Monitoring and Measuring Equipment Diagram
Passive Dosimeters
Personal Radiation Dosimeter (PRD)
Radiation Survey Meter (RSM)
Van Allen Belt Dosimeter (VABD)
Nuclear Particle Detection System (NPDS)
POSTLANDING RECOVERY AIDS
Postlanding Ventilation (PLV) Ducts
Postlanding Ventilation Ducts Diagram
Swimmer Umbilical and Dye Marker
Swimmer Umbilical and Dye Marker Diagram
Recovery Beacon
Recovery Beacon Diagram
Snagging Line
Snagging Line Diagram
Sea Water Pump
Sea Water Pump Diagram
Survival Kit
Survival Kit Diagram
Survival Light Assemblies
Desalter Kits
Machetes
Sunglasses
Water Cans
Sun Lotion
Rucksack 2
EQUIPMENT STOWAGE

CREW PERSONAL EQUIPMENT
INTRODUCTION
This section contains the description and operation of Contractor and NASA-furnished crew personal equipment and miscellaneous stowed equipment that is not described in other sections of this handbook. All major items are identified as Contractor-furnished equipment (CFE) or Government-furnished (NASA) property (GFP – synonymous with GFE).
The crew equipment will be presented in the general order of operational usage. A brief outline is as follows:
A. Spacesuits

  1. Intravehicular Spacesuit Assembly
    (a) Biomedical Harness and Belt
    (b) Constant Wear Garment (CWG)
    (c) Flight Coveralls
    (d) Pressure Garment Assembly (PGA)
    (e) Associated Umbilicals, Adapters , and Equipment
  2. Extravehicular Spacesuit Assembly
    (a) Liquid-Cooled Garment (LCG)
    (b) PGA with Integrated Thermal Meteroid Garment (ITMG)
    (c) Associated Equipment
    B. G – Load Restraints
  3. Crewman· Restraint Harness
  4. Interior Handhold and Straps
  5. Hand Bar
    C. Zero-g Restraints
  6. Rest Stations
  7. Velcro and Snap Restraint Areas
  8. Straps
    D. Internal Sighting and Illumination Aids
  9. Window Shades
  10. Mirrors
  11. Crewman Optical Alignment Sight (COAS)
  12. LM Active Docking Target
  13. Window Markings
  14. Miscellaneous Aids
    E. External Sighting and Illumination Aids
  15. Exterior Spotlight
  16. Running Lights
  17. EVA Floodlight
  18. EVA Handles with RL Disks
  19. Rendezvous Beacon
    F. Mission Operational Aids
  20. Flight Data File
  21. Inflight Toolset
  22. Cameras
  23. Accessories & Miscellaneous
    (a) Waste Bags
    (b) Pilot’s Preference Kits (PPKs)
    (c) Fire Extinguishers
    (d) Oxygen Masks
    (e) Utility Outlets
    (f) Scientific Instrumentation Outlets
    G. Crew Life Support
  24. Water
  25. Food
  26. The Galley System
  27. Waste Management System
  28. Personal Hygiene
    H. Medical Supplies and Equipment
    I. Radiation Monitoring and Measuring Equipment
    J. Post Landing Recovery Aids
  29. Postlanding Ventilation Ducts
  30. Swimmer Umbilical and Dye Marker
  31. Recovery Beacon
  32. Snagging Line
  33. Seawater Pump
  34. Survival Kit
    K. Equipment Stowage
    On the following pages is an alphabetical listing of the stowable Apollo crew personal and miscellaneous equipment that will be described in this section. Miscellaneous spacecraft equipment that is mounted on spacecraft structure internally or externally is described in this section but is not listed in the following chart.
    Item CFE GFP Qty Dimensions Total Wt (Lb) Wt Each (Lb) Paragraph
    L W H
    Adapter, CWG electrical, w bag X 4 2.12.2
    Adapter, contingency feeding X 1 2.16.2
    Adapter, gas sep drying X 1 1.5” 2.16.2
    Adapter, urine hose to UCTA X 1 5” 1”D 2.16.2
    Bag accessory X 3 .60 .20 2.12.5
    Bag, helmet stowage X 3 .99 .33 2.12.2
    Bag, PGA stowage X 1 32” 18” 2” 4.3 2.12.2
    Bag , gas separator X 1 7” 4” 1.5” 2.12.6
    Bags, temp stowage X 3 36” 13” 1” 5.1 1.7 2.12.5
    Bag, tunnel hatch X 1 28”D 2.12.3
    Battery, voice recorder X 5 2.0” 1.8” 0.65” 2.12.5
    Bracket, 16mm DAC X 1 7” 0.7 0.7 2.12.5
    Brush, vac cleaning X 2 1.63” 1.8”D 2.12.5
    Cable, aux dump nozzle htr X 1 108” 0.2 2.12.6
    Cable, grounding X 1 2.12.5
    Camera, 70 mm electric Hasselblad X 1 5” 4” 5” 4.04 2.12.5
    Camera, 16 mm data acquisition with power cable X 1 7” 4” 2” 1.93 2.12.5
    Cap, hose screen, w bag X 3 1.00 0.20 2.12.2
    Cap, gas sep nozzle X 1 1” 2.12.6
    Cap, aux dump nozzle pressure X 1 0.20 2.12.6
    Cassette, 70 mn1 camera film X *
    Clamps, UCTA X 3 0.03 0.01 2.12.2
    Cloth, dry cleansing X * 2” 2” 2.12.6
    Cloth, wet cleansing X 2” 2” 2.12.6
    Communication cable X 2 74” 7.8 3.9 2.12.2
    Communication cable w control head, w bag X 2 121” 8.4 4.2 2.12.2
    Communication carrier (snoopy helmet) X 3 2.12.2
    Coupling, oxygen hose w bag X 3 1.1 2.0 2.12.2
    Container , decontamination, CU cam cassette X 1 2.12.5
    Container, decontamination, LSR X 1 2.12.5
    Container, decontamination, LSR (rock box), large X 1 2.12.5
    Container, decontamination, 70 mm Hblad mag X 1 2.12.5
    Container, Frozen Food X 1 2.12.6
    Cover, meter X 2 3”D 2.12.4
    Cover, PGA elec conn protective X 3 2.12.3
    Coveralls, inflight X 3 9.7 3.2 2.12.2
    Diaphragm, w cover X 3 3” 3”D 2.12.6
    Dishes X 3 6” 5” 2.12.6
    Docking target, LM active X 1 8” 8” 1.8 2.12.4
    Dosimeters, passive X 9 0.18 0.02 2.12.8
    Dosimeters, personal X 3 1.14 0.38 2.12.8
    Ducts, postlanding ventilation (PLV) w bag X 3 0.60 0.10 2.12.9
    Eartube, universal X 3 0.03 0.01 2.12.2
    Exerciser, inflight X 1 1.22 2.12.5
    Eyepatch X 1 2.12.4
    Fecal collection assy X 30 8” 3” 1” 4.20 0.14 2.12.4
    Fecal containment system X 3 1.50 0.50 2.12.2
    Filter , red (Hblad cam) X 1 0.05 2.12.5
    Filter, high density, sun X 2 2.8 1.4 2.12.4
    Filter , Photar (HEC cam) X 1 0.05 2.12.5
    Filter , QD gas & liq X 2 1.0 0.5 2.12.6
    Fire extinguisher X 1 8.5” 5”D 7.5 2.12.5
    Flight data file with locker R12 X X * 20.0 2.12.5
    Food set X 1 40.0 2.12.6
    Food set, w hygiene items X 1 30.8 2.12.6
    Food warmer X 1 10 6 7 2.12.6
    Garment, constant wear (CWG) X 6 Folded 12” 6” 2” 5.6 0.8 2.12.2
    Garment, liquid cooled X 2 8.18 4.13 2.12.2
    Glareshade, MDC X 3 2.12.4
    Glareshield, floodlight w bag X 2 2.12.4
    Gloves, IV (pr) X 1 2.12.2
    Handholds X 2 2.12.3
    Handbar X 1 2.12.3
    Hand straps X 8 2.12.3
    Harness, crewman restraint X 3 2.12.3
    Harness assy, bioinstrumentation X 3 3.3 1.1 2.12.7
    Headrest, pad X 3 3.0 1.0 2.12.5
    Headset, lightweight X 3 0.9 0.3 2.12.2
    Heel restraint, pr X 3 4” 3.5 1.0” 3.3 1.0 2.12.5
    Helmet, shield X 1 0.79 2.12.2
    Hook, line snagging w bag X 1 1.7 1.9 2.12.9
    Hose, vac cleaning X 1 41.5” 2.12.5
    Hose assy, oxygen X 2 72” 10.6 5.3 2.12.2
    Hot pad X 1 9” 4” 2.12.6
    Hygiene, oral assembly X 1 1.0 0.3 2.12.6
    Intervalometer X 1 0.25 2.12.5
    Kit, EMU maintenance X 1 0.38 2.12.2
    Kit, medical X 1 7” 5” 5” 3.0 2.12.7
    Kit, pilot’s preference X 3 1.5 0.5 2.12.5
    Lens , 5 mm ( 16 mm camera (with cover) X 1 0.68 2.12.5
    Lens , 18 mm ( 16 mm camera) X 1 0.56 2.12.5
    Lens , 18 mm Kern (16 mm cam X 1 0.48 2.12.5
    Lens, 75 mm (16 mm camera) X 1 0.53 2.12.5
    Lens, 75 mm Kern (16 mm cam) X 1 0.50 2.12.5
    Lens, 250 mm (70 mm Hasselblad) X 1 6.2” 3.1” 3.1” 2.10 2.12.5
    Lens, 500 mm (70 mm (Hblad) X 1 12.5” 3.5” 2.12.5
    Life vest X 3 7.5 2.5 2.12.2
    Magazines, 70 mm camera film X * 3.82” 3.6” 1.86” 0.76 2.12.5
    Magazines, lunar surface Hasselblad X 1 1.75 2.12.5
    Magazines, 16 mm OAC X * 0.97 2.12.5
    Masks, oxygen whose X 3 3.60 1.30 2.12.5
    Meter, radiation survey X 1 1.60 2.12.8
    Mirror assy, internal viewing X 3 4.25 3.5 2.12.4
    Mirror, 16 mm camera right angle X 1 0.16 2.12.5
    Monocular X 1 0.75 2.12.4
    Mount, 70 mm Hblad X 1 9” 2.12.5
    Pencil X 3 0.15 0.05 2.12.2
    Penlights X 6 7” 1.5” 2.04 0.34 2.12.2
    Pen, marker X 3 0.15 0.05 2.12.2
    Pens, data recording X 3 0.15 0.05 2.12.2
    Pouch, food retainer X 2 2.12.6
    Pump, sea water X 1 1.60 2.12.9
    QD, aux dump nozzle X 1 4” 1”D 0.20 2.12.6
    QD, water (waste) panel X 1 4.5” 1”D 0.30 2.12.6
    Restraint, sleep station X 3 10.8 3.60 2.12.3
    Ring sight X 1 1.26” 1.2” 0.64” 0.08 2.12.5
    Rollon cuff assembly X 3 2.12.6
    Ropes, sleep restraint tiedown X 5 10’ 0.3”D 3.5 0.7 2.12.3
    Scissors (large) X 3 8” 2” 1.62 0.53 2.12.2
    Separator, gas X 2 6” 2.12.6
    Shades, rendezvous window X 2 13” 8” 0.24 0.12 2.12.4
    Shade, side hatch X 1 10”D 1.4 2.12.4
    Shades, side viewing window X 2 13” 13” 3.4 1.7 2.12.4
    Sight, crew optical alignment (COAS) w filter X 1 8” 2”D 1.5 2.12.4
    Spacesuit, intravehicular X 1 35.61 2.12.2
    Spacesuit, extravehicular X 2 94.72 47.36 2.12.2
    Spotmeter, automatic X 1 7” 4” .94 2.12.5
    Straps, utility X 13 12” 0.39 0.03 2.12.3
    Strap, center couch DPS burn X 1 0.2 2.12.3
    Straps, center couch stow X 2 2.12.3
    Straps, control cable X 4 11” 2.12.3
    Straps, drogue stow X 3 2.12.3
    Straps, glareshade X 4 5.5” 2.12.3
    Straps, probe stowage X 2 2.12.3
    Straps, cable routing X 3 5.5” 2.12.3
    Sunglasses with pouch X 3 0.06 0.02 2.12.2
    Survival rucksack 1 X 1 18.0” 6.0” 6.0” 34.9 2.12.9
    Survival rucksack 2 X 1 18.0” 6.0” 6.0” 34.9 2.12.9
    Tape cassette, voice recorder X 5 3.9” 25” 0.4” 0.5 0.1 2.12.5
    Tape ( roll) X 1 6”D .88 2.12.5
    Timer, two speed X 1 0.4 0.4 2.12.5
    Tissue dispensers X 7 8” 4” 3” 0.39 1.42 2.12.6
    Toolset, inflight X 1 4.6 2.12.5
    Towels, utility (pack) X 3 2.49 0.83 2.12.6
    Urine collection & transfer assembly X 3 1.29 0.43 2.12.2
    Urine hose X 1 120” 1”D 1.30 1.30 2.12.6
    Urine transfer system (Gemini) X 3 12” 9” 1” 1.3 2.12.6
    Uri ne receptacle assy X 1 2.12.6
    Vacuum brush X 2 1.63” 2.12.5
    Vacuum hose X 1 39” 2.12.5
    Vacuum QD (cabin vent) X 1 5” 1.5”D 2.12.6
    Voice recorder X 1 5.3” 1.2 1.2 2.12.5
    Watch with watchband X 3 0.45 0.15 2.12.2
    Water metering dispenser X 1 9” 1.5 2.12.6

SPACESUITS
A spacesuit is an enclosed unit that provides a crewman with a life supporting atmosphere and protective apparel in a space environment. It will be considered in two conditions: intra vehicular and extravehicular.
In the intravehicular condition, the apparel is called the intravehicular spacesuit and consists of the bioinstrumentation harness assembly, a constant wear garment (CWG), a pressure garment assembly (PGA) with intravehicular cover (IC), and associated equipment (contained on or within the spacesuit). The adapters and umbilical hoses that connect the space suit to the spacecraft systems are also described in this subsection.
In the extravehicular condition, the apparel is called the extravehicular mobility unit (EMU) and consists of a fecal containment system, a urine collection and transfer assembly (UCTA), the bioinstrumentation harness assembly, a liquid-cooled garment (LCG), communications soft hat, an extravehicular spacesuit, a portable life support system (PLSS), oxygen purge system (OPS), integrated thermal micrometeoroid garment (ITMG), an extravehicular visor assembly (EV visor), and associated equipment contained on or within the EMU. The PLSS and OPS will not be described in this handbook.
Spacesuit Assembly (Intravehicular)
The intra vehicular spacesuit is depicted in Spacesuits Diagram. The intravehicular condition has two subconditions, unsuited and suited. In the unsuited condition or “shirtsleeve environment, ” the crewman breathes the oxygen in the spacecraft cabin and wears a bioinstrumentation harness, a communication soft hat for communication, a constant wear garment (CWG) for comfort, flight coveralls for warmth, and booties for zero-g restraint. A CWG adapter is used to connect the communications soft hat (CSH) and the bioinstrumentation harness signals to the communications cable. The comm cable attaches to connectors between panels 300 and 301 to complete the signal flow to the audio center.
Spacesuits Diagram

In the suited condition, the crewman wears his bioinstrumentation harness, a communication soft hat, a CWG, a pressure garment assembly (PGA) with IC, and breathes oxygen within the garment. An oxygen hose assembly delivers the oxygen to the suit and returns it to the ECS. The comm cable connects directly to the PGA for telecommunications signal flow. In this condition there are two ECS modes of operation, ventilated and pressurized.
Bioinstrumentation Harness and Biomed Belt (Shirtsleeve Environment lntravehicular Apparel).
Shirtsleeve Environment lntravehicular Apparel

The purpose of the bioinstrumentation harness is to furnish the biomedical signals to monitor the crews’ physical condition, and consists of sensors, signal conditioners, a biomed belt, and wire signal carriers. For a complete description, refer to Medical Supplies and Equipment.
Each crewman will have sensors attached to his skin for the entire mission. These sensors have wire leads encased in plastic with a small connector at the other end. The connectors are inserted through the CWG and connected to the signal conditioners in the biomed belt. The biomed belt is cloth, has four pockets, and snaps in the corners to attach to the CWG.
There are three signal conditioners: one for ECG, one for the impedance pneumograph (ZP), and one dc-dc converter which fits into pockets on the biomed belt, located around the abdomen. The signal conditioners are interconnected by a wire harness which has a 9-socket connector.
Fecal Containment System
The fecal containment system (FCS) is a chemically treated under pant worn under the LCG during periods of extravehicular activity (EVA). In the event of an uncontrolled bowel movement, the chemicals in the underpant will neutralize the feces. At launch and entry, the fecal containment systems are stowed. Spacesuits Diagram
Urine Collection and Transfer Assembly and UCO Clamps
The urine collection and transfer assembly (UCTA) functions to transfer the urine from the suited crewman to the suit during emergency urinations Spacesuits Diagram. This condition could occur during a “hold” on the launch pad or EVA.
The UCTA consists of a belt, shaped bladder, roll-on (external catheter), and a tube leading to the spacesuit urine collection QD.
The UCTA is donned over the fecal containment system. When doffing the UCTA, the UCD clamps are used to seal urine in the tube to prevent leakage into the crew compartment. The urine in the UCTA can be drained while it is in the spacesuit or after it is removed. For the procedure, refer to Crew Life Support .
Constant Wear Garment (CWG) (Shirtsleeve Environment lntravehicular Apparel)
The constant wear garment (CWG) is used as an undergarment for the PGA and provides warmth for the crewman while unsuited in the shirtsleeve environment. As an additional purpose, this garment provides an attach point for the biomed belt.
The CWG is a porous cloth, one-piece garment similar to long underwear. It has a zipper from the waist to the neck for donning and doffing. An opening in front is for urination and one in the rear for defecation, without CWG removal. There are snaps at the mid-section to I attach the biomed belt with signal conditioners, and pockets for film packet passive dosimeters at the ankles, thighs, and chest. It also has integral socks.
The CWG can be worn for 6 to 7 days before a change is required. Three CWGs will be worn aboard by the crew with three being stowed in a locker, allowing one CWG change each.
Flight Coveralls (Shirtsleeve Environment lntravehicular Apparel)
The flight coveralls help keep the CWG clean, provide additional crewman warmth,· and provide stowage for miscellaneous personal equipment while in a shirtsleeve environment. It is a two-piece garment and 1s stowed at launch and entry. Accessories include a pair of booties with Velcro patches on the soles for restraint.
Communication Soft Hat, Lightweight Headset, and Eartube (Shirtsleeve Environment lntravehicular Apparel)
The communication soft hat is worn at all times, in or out of the PGA, for the purpose of communications. Alternate names for it is communications carrier (comm carrier) or “Snoopy” helmet.
The comm soft hat has two earphones and two microphones, with voice tubes on two mounts that fit over the ears. The hat or helmet is cloth and has lacing to adjust the fit to the individual crewman. A chin strap secures the hat to the head. A small pocket on the inside near the right temple will hold a passive dosimeter film packet. An electrical cable with a 21-socket connector will connect to the CWG adapter or PGA.
The lightweight headset is a single microphone and earpiece held on the head by a head band. It can be used in place of the comm carrier while in a shirtsleeve environment.
The universal ear tube attaches to the lightweight headset earphone. The ear tube is a short length of plastic tube with an ear fitting that conducts sound from the earphone to the ear. It is stowed in a pocket of the in-flight coverall.
Constant Wear Garment (CWG) “T” Adapter (Shirtsleeve Environment lntravehicular Apparel)
Communications and bioinstrumentation signals are transmitted to the communications cable by the CWG T-Adapter; it is used when in the shirtsleeve environment.
The CWG T-Adapter has a 6 1-socket connector pull in the middle, and two pigtails, one with a 9-pin connector and one with a 21-pin connector.
There are three CWG “T” Adapters which are stowed when not in use plus a spare.
Communications Cable With Control Head
The communications cable, or comm cable, transmits voice communications and bioinstrumentation signals from the adapters and crew to the spacecraft bulkhead connectors. It also carries electrical power and the caution warning (C/W) system audible alarm signal.
The comm cable consists of a control head and a cable. The control head has a 61-pin connector, a rocker switch and a 37-pin connector. The cable has a 37-pin connector at one end and a 37-pin connector with a lanyard pull at the spacecraft bulkhead end. The cables for the Commander and CM Pilot are 74 inches long. The LM Pilot’s cable is 121 inches in length, which allows it to be used for crew transfer through the tunnel into the LM. One spare control head and cable (121 inches) is carried in the event of a malfunction.
Pressure Garment Assembly (PGA) (Intravehicular Spacesuit Diagram)
Intravehicular Spacesuit Diagram

The major component of the spacesuit is the pressure garment assembly (PGA). The A7L pressure garment assembly (PGA) provides a mobile life support chamber that can be pressurized separately from the cabin inner structure in case of a leak or puncture. The PGA consists of a helmet, gloves, and torso and limb assembly. It requires an oxygen hose for oxygen and electrical cable for telecommunications.
The blue torso has a neck ring for securing the helmet and wrist rings for securing the gloves. It is constructed of Beta cloth (a fiberglasstype material). A double zipper runs from the crotch area along the back to the neck ring for donning and doffing. Snaps are located on the upper chest for securing the life vest. The right wrist area has a pressure gage with a range of 2 to 5 psia. Two cables run laterally from the chest, around the biceps, to the spine as an anti-ballooning device, and are attached and detached at the chest. Two adjustment straps restraining the neck ring are located in the front (sternal area) and rear (spinal area).
On the right chest area is a 61 -pin telecommunications connector. When not in use and during stowage, the connector is protected by a PGA electrical connector protective cover. The inside telecommunications harness splits to a 9-pin connector (bioinstrumentation) and a 21-pin connector (communications). On the left chest area is a connector for the FLSS liquid system. Inside, it has a supply hose and a return hose with connectors that connect to the liquid cooled garment (LCG) when worn in place of the CWG.
Two sets of oxygen hose connectors are located on the left and right lower rib cage area. A set consists of a blue supply connector and red return connector. The left connector set is normally for the PLSS hoses and the right set for the CM ECS hoses, but the oxygen hose connectors will fit either set. To prevent an alien object from entering and damaging a spacesuit O2 hose connector, a PGA gas connector plug (Intravehicular Spacesuit Diagram) is inserted when an O2 connector is not in use. The gas connector plugs are color coded red and blue to match the O2 connectors. To insert, fit the plug into the connector and press until it clicks. It mechanically locks in place. To remove, unlock the plug by pressing the gold lockpin, then lift the locking tabs, rotate the locking ring, and pull the plug. The intravehicular PGA or spacesuit has only one set of hose connectors on the right side as there is no extravehicular or FLSS requirement.
Leg pockets are placed in accordance with the defined locations. These are used to contain the numerous personal items. Additional pockets are strapped on the legs to hold other miscellaneous items. The boots are integral to the torso and the soles have Velcro patches for restraint. The boot heels have partial steel plates to wedge in the couch footpan cleats for restraining the feet. The gloves secure to the wrist ring with a slide lock and rotate by means of a ball bearing race.
The intravehicular cover (IC) is for added wear protection of the torso. It is also Beta cloth, with external teflon patches at maximum wear points. The cover will be laced over the torso and limbs for operational use and intravehicular (IV) gloves will be worn to protect the PGA gloves when performing rough handling tasks. The PGA with the intra vehicular cover is commonly called an intravehicular spacesuit. The PGA with the integrated thermal micrometeoroid garment (ITMG) is termed the extravehicular spacesuit. For mission or operational purposes, the spacesuit includes the PGA and the IC or ITMG.
The helmet is a plastic bubble. It secures to the torso neck ring with a slide lock. A slot channel at the rear of the neck ring receives oxygen from the torso ventilation duct and directs it to a one-half-inch-thick foam plastic manifold. The manifold lays on the aft quarter of helmet, terminating at the top. Numerous slits in the manifold direct the oxygen across the face, purging the helmet of carbon dioxide. On the left side, near the mouth, is a feed port and a feed port cover. A contingency feeding valve adapter is provided with the food set and will attach to the feed port to provide a method of emergency nourishment. Only drinks will pass through. The helmet shield (HS) (Intravehicular Spacesuit Diagram) is a plastic cover to be used during intra vehicular activities (remove /replace probe or tunnel hatch) to prevent damage to the PGA helmet. Only one shield is provided per spacecraft.
Additional subassemblies or accessories are donning lanyards for doffing/donning, a neck dam for restricting water during post recovery CM egress, and strap-on leg pockets for scissors, checklists, and data lists.
After attaining earth orbit, the PGA is stowed in two parts: torso (with gloves) and the helmet. The torso (with gloves) fits into an L-shaped, expandable bag (3 PGA capacity), and is attached to the aft bulkhead and the center c ouch by hooks. (See the PGA and Helmet Stowage Bags Diagram). The helmet shield and inflight coveralls are also stowed in the PGA stowage bag.
PGA and Helmet Stowage Bags Diagram

The PGA helmet stowage bag is made of Beta cloth. The “dome” end 1s closed, and the open end has a draw string for closure. Four straps with snaps and Velcro are attached for restraints (Personal Equipment Diagram). At launch the helmet bags are collapsed and stowed. When the helmet is doffed it is placed in a helmet bag, the draw strings are tied and attached to the right and left-hand equipment bays by the snaps on the straps. For entry, the helmet bags are again collapsed and stowed after the helmet is donned or left on the stowed helmet in the event of an unsuited entry.
Personal Equipment Diagram

PGA Donning and Doffing.
In the event the command module inner structure loses pressure, the ECS can maintain a pressure of 3.5 psia for 15 minutes to allow the crewmen to don their PGAs.
To don the PGA, clear the legs and arms of obstructions, and verify the zippers are run to the neck ring with lanyards attached and oxygen hoses are connected. Place the legs in the boots and legs of the torso and connect the bioinstrumentation and communication harness. Place arms in torso arms and the head through neck ring. Pull the lanyard connected to the inner zipper and outer zipper to crotch, closing the stress relieving and pressure seals. Connect and lock shoulder cables.
Don the helmet by connecting it to ·torso neck ring and rotate the neck ring lock. Complete the donning by putting the gloves on and locking. Adjust the ECS suit flow regulator.
To doff the PGA, remove the gloves and helmet, unzip from the crotch to the neck ring, and withdraw neck and arms. Disconnect the bioinstrumentation and communication harness, and remove legs from the torso.
Operational Modes
In the suited condition, there are two modes: the normal or “ventilated” and “pressurized.” In both cases, the helmet is on and locked.
In the ventilated mode sometimes referred to as “vented,” the cabin is pressurized at 5 psi and the suit is 5.072 psi, or a positive pressure differential of 2 inches of water in the suit. This state allows comfort and maximum mobility for the crewman. The flow rate through the suit will be approximately 7 to 11 cubic feet per minute.
The oxygen is delivered by the oxygen supply hose, routed to the helmet and midsection to be purged to the extremities, and returned via ventilation tubes to the midsection return connector and oxygen hose.
In the event the cabin pressure decreases to 3.5 psia or lower, the ECS will maintain 3.7 psia in the PGA. This mode is “pressurized,” and the flow rate will be more than 12.33 pounds per hour and less than 17 pounds per hour. The crewmen will have to overcome the pressurized balloon effect and mobility will be more restricted than the vented mode.
Miscellaneous Personal Equipment
Personal items of equipment that are used many times and must be immediately accessible are stowed in spacesuits, pockets or attachable pockets. These items must also be transferred to the flight coveralls after doffing the spacesuit. The following is the nomenclature and description of these items. (See Personal Equipment Diagram)

  • Penlight – Small, two-cell unit used for portable lighting
  • Sunglasses with pouch
  • Personal Radiation Dosimeter – A cigarette package shaped unit, battery powered dosimeter which indicates accumulated dosage (rads) by its register readout
  • Chronograph With Watchband – 11Accutron Astronaut” watch featuring sweep second hand, stopwatch control, and changeable time zone dial
  • Marker Pen – Felt-tip pen used for marking sanitation bag assemblies, refuse bags, and Log Book
  • Pencil
  • Data Recording Pens – Pressurized ball point pens for writing
  • Scissors – Surgical scissors, used for cutting food bags, pouches, etc.
  • Life Vest – Attacl1ed to PGA during boost and entry; stows on the PGA stowage bag during the remainder of the mission
  • Slide Rule – Standard slide rule, 6 inches long, aluminum.
  • Motion Sickness Bag – A plastic emesis bag in a small wrapper.
    Spacesuit Related Equipment
    Oxygen Hose Assembly (Oxygen Hose Assembly and Accessories Diagram)
    The oxygen hose assembly conducts oxygen to the PGA under pressure from the ECS, and returns contaminated oxygen from the suit to the ECS. A secondary use is to deliver oxygen from the ECS to the cabin atmosphere.
    Oxygen Hose Assembly and Accessories Diagram

The oxygen hoses are flexible silicon rubber hoses with a convoluted wire reinforcement and 1.25-inch inside diameter. Each assembly has two hoses, a double “D” section and connector at the ECS end, and two separate connectors at the suit end (supply and/or return). The assembly is covered with beta cloth and the hoses are fastened together with keepers every 12 inches. Also, at 12-inch intervals along the hose, cloth straps with fasteners for securing the comm cable are provided. When coupled together as a unit, the hose and cable is referred to as an umbilical assembly.
The hoses for the left and center crewman are 72 inches long and the right crewman’s hose is 119 inches in length.
When the oxygen hose is not connected to the PGA, the ECS end will remain attached to the valve at the left-hand forward equipment bay and the oxygen hose will be stowed. Straps on the CM structure will aid in routing the hoses across the forward bulkhead and right-hand forward equipment bay.
Oxygen Hose Coupling (Oxygen Hose Assembly and Accessories Diagram)
To prevent fresh oxygen from returning through the exhaust or return end of the O2 hose while the suit circuit return valve is open, a coupling is placed over the return end. It is a 5-inch aluminum tube with a web seal in the middle and hose connectors at each end. During an EVA, both nozzles (supply and return) are plugged into the coupling connectors, thus sealing both nozzles.
Oxygen Hose Screen Caps (Oxygen Hose Assembly and Accessories Diagram)
In the shirtsleeve environment, the crew compartment oxygen returns to the ECS suit loop through the suit circuit return valve which has a screen cover functioning as a preliminary debris trap. The screen has to be cleaned periodically but the task is difficult because of obstructions. By placing the screen caps on the oxygen return nozzles (red), placing the flow control valves on panels 300, 301, and 302 in the CABIN FLOW position, the return oxygen is split between the oxygen hoses and the suit circuit return valve. The oxygen is screened for debris at the cap screens, which is accessible and easy to clean but also greatly reduces the flow. Therefore, the oxygen hose screen caps are used to delay the cleaning of the suit circuit return valve. A screen cap on an oxygen return hose nozzle (red) can also be used for vacuuming debris in the crew compartment.
The screen cap is a fluorel tube with a monel screen (#30 mesh) at one end and an internal ridge at the other. It slides over the return nozzle and engages a groove to retain it. There are three screen caps per spacecraft.
When the screen cap becomes clogged with debris, it can be cleaned by using a small piece of utility tape to blot the screen. The tape can be inserted in a utility bag, food bag, or waste bag for disposal.
EMU Maintenance Kit
In the event the spacesuit PGA is damaged, it can be repaired by use of the EMU maintenance kit. The kit is approximately 8 x 6 x 1. 5 inches and weighs 0.38 pound. There is one kit aboard the CM, stowed in a locker on the aft bulkhead.
Extravehicular Spacesuit (Spacesuits Diagram)
The extravehicular spacesuit is identical to the intra vehicular space suit with the exception of the oxygen connectors, the cover, and the substitution of the LCG for the CWG. There are two sets of oxygen connectors, on the left chest and on the right chest of the extravehicular space suit PGA. These are necessary because the commander (CDR) and lunar module pilot (LMP) transfer to the LM ECS while CM oxygen hoses are attached to their spacesuit.
The cover, or integrated thermal micrometeoroid cover (ITMG), is similar to the IC but is thicker and heavier. It consists of an outer protective layer with scuff patches at the knees and elbows, seven alternating layers of beta cloth felt (micrometeoroid protection) and silverized mylar (thermal protection), and a liner. The ITMG is also laced on the PGA for the mission.
Liquid Cooled Garment (LCG) (Spacesuits Diagram)
The LCG is worn in place of the CWG when the CDR and LMP transfers to the LM or performs EVA. The LCG contains small plastic tubes (0.125-inch diameter) sewn to a netting that covers the crewman’s body through which water circulates, absorbing body heat. The water is transported to the FLSS where the sublimator expels the heat. The LCG has a thin cloth lining that prevents the hands and feet from entangling the plastic tubes when donning.
Two LCGs are vacuum packed and stowed in a locker on the aft bulkhead. They are fully charged with water and, when donning, must be connected to the EV spacesuit multiple water connector. When the CDR and LMP return to the CSM after LM or extravehicular activities, the LCG must be disconnected, doffed, folded, and stowed in a locker.
Extravehicular Mobility Unit (EMU)
For clarity, the EMU will be briefly described. Most of the components, other than the EV spacesuit, are stowed aboard the LM. As stated in the SPACESUITS section, the EMU consists of a FCS, UCTA, bioinstrumentation harness assembly, LCG, EV spacesuit, a FLSS, OPS, EVVA, EV gloves, and a pair of lunar overshoes (LO).
The portable life support system (FLSS) is a “backpack” unit that I furnishes oxygen for breathing, cooled water for the LCG, and communications while the crew is on the lunar surface or performing EVA. It has a 4-hour oxygen supply and can be recharged from the LM. One of its LiOH canisters will be returned in the CM for analyzing. The PLSS water subsystem is part of the heat exchanging system. The heat is lost by sublimation. The communications system allows the lunar explorer to communicate to the LM or CSM which will relay to earth.
Two PLSSs are stowed in the LM at launch. They will be donned and checked out prior to EVA. One or both PLSSs will be left on the lunar surface to lighten the LM ascent vehicle or left in the LM.
The oxygen purge system (OPS) is a small oxygen unit that furnishes emergency oxygen to the crewman during EVA. It is about the size of a 2-pound loaf of bread and has a 30-minute oxygen supply. It attaches to the top of the PLSS or in the stomach area by straps. Oxygen is delivered through a hose into the PGA oxygen connector, purges the helmet with oxygen, and exits through the suit outlet connector and purge valve.
Two OPSs are stowed aboard the LM at launch and both will be returned to the LM from lunar exploration. If not needed for extravehicular transfer, they will be l eft on the LM. If used for EVA transfer, the OPS will be jettisoned.
The extravehicular visor assembly (EVVA) is a double-shelled visor that fits over the PGA helmet and is used for EVA. The outer shell is vacuum deposited gold plated. The EVVA is stowed aboard the LM at launch and left aboard the LM in lunar orbit or jettisoned.
The EV gloves and lunar overshoes (LO) are used for EVA and lunar exploration. They are aboard the LM at launch and are left aboard the LM in lunar orbit or jettisoned.
CREWMAN RESTRAINTS
“g”Load Restraints
Crewman Restrain Harness (Crewman Restraint Harness Subsystem With Heel Restraints)
There are three restraint harnesses per spacecraft, one for each crewman. The harnesses are attached to the crew couches. The restraint harness consists of a lap belt and two shoulder straps interfacing the lap belt at the buckle. The lap belt straps are connected to the seat pan and back pan. This configuration provides adequate hip support. The shoulder straps are connected to shoulder beam of the couch.
Crewman Restraint Harness Subsystem With Heel Restraints

The lap belt buckle is a lever-operated, three-point release mechanism. By pulling a lever, the shoulder straps and right- lap belt strap will be released. The strap ends are equipped with snaps which may be fastened to mating snaps on the couch and struts when not in use. The restraint harness buckle can be restrained when not in use by attaching it to the translation or rotation control stow straps (Restraint Harness Buckle Stowage Straps Diagram). This also prevents the buckles and attachments from floating free during zero-g and striking a crewman or equipment.
Restraint Harness Buckle Stowage Straps Diagram

Operation
The harness will be on and locked during all maneuvers when g-loads are expected such as launch, delta V, docking, entry, and landing. The harness can be tightened and loosened readily by adjusting the length of the strap. Pull on the hand grip to tighten. To loosen, rotate the adjuster, allowing it to unlock and the strap can be lengthened.
Handholds (Handholds, Hand Straps and Hand Bar Diagram)
The function of the handholds is to aid in the maneuverability of the, crew. The handholds are aluminum handles bolted to the longerons. There are two handholds, one on each longeron by the side windows, located close to the MDC.
Handholds, Hand Straps and Hand Bar Diagram

Hand Bar (Handholds, Hand Straps and Hand Bar Diagram)
The hand bar is located on the MDC near the side hatch and has two positions, stowed and extended. A lever at one end releases the detent for moving from one position to the other. The hand bar furnishes a place to hold when ingressing or egressing from the CM side hatch. It will support the weight of a suited astronaut in 1 g. In zero g during extravehicular activity or transfer, the hand bar can also be used for ingressing or egressing through the side hatch.
Heel Restraints
During the CM landing, the legs and feet of the crewman may jostle about unless restrained to the couch footpan. If in the spacesuit, the boot heels and couch footpan interconnect and restrain the feet and legs. However, if entry and landing is in shirtsleeves, or inflight coveralls, the feet are held to the couch footpans by heel restraints.
The heel restraints are hollow aluminum blocks that attach to the heels of the crewman’s booties by means of straps and Velcro. The restraints connect to the footpan in the same manner as the spacesuit booties.
Zero-g Restraint
Hand Straps (Handholds, Hand Straps and Hand Bar Diagram)
The hand straps serve as a maneuvering aid during a g-load or zero-g condition.
The hand s traps are of fluorel covered cloth and are attached by brackets at each end. There a r e five hand straps behind the MDC and one on the left-hand equipment bay over the ECS filter access panel and one each on the foot X -X struts. These straps lie flat against the structure when not in use.
The hand straps are of fluorel covered cloth and are attached by brackets at each end. There are five hand straps behind the MDC and one on the left-hand equipment bay over the ECS filter access panel and one each on the foot X-X struts. These straps lie flat against the structure when not in use.
Guidance and Navigation Station Restraint
Two positions may be utilized at the G&N station: standing position or center couch G&N position. The astronaut will restrain himself in the standing position by fastening his booties or boots to the aft bulkhead and using the handholds on the G&N console.
The astronaut will restrain himself in the center couch at the G&N station by positioning the couch to a 170-degree hip angle and restraining his feet in the couch footpans.

Sleep Station Restraints (Sleep Station Restraints Diagram)
The crewman’s sleeping positions will be in the right couch and under the left and right couch with the head toward the hatch. He will be restrained in position by the crewman sleep station restraint.
Sleep Station Restraints Diagram

The three restraints are beta fabric, lightweight sleeping bags 64 inches long, with zipper openings for the torso and 7-inch-diameter neck openings. The two sleep restraints under the couches are supported by two longitudinal straps. The two asleep restraints under the couches are supported by two longitudinal straps that attach to the CO2 absorber stowage boxes on one end (LEB), and to the CM inner structure at the other end. To restrain the foot end, an additional strap on each side attaches to the CO2 absorber stowage box brackets. The third restraint, for the right couch is just the sleeping bag with no straps.
During the mission and shirtsleeve environment, a crewman can unzip the restraint and slide in with his flight coveralls on. However, if an emergency exists, and the crew are in their spacesuits, they will be too large to enter the sleep restraint. In that case, the crewman will lie on top of the restraint and hold himself in place by the strap around the middle of the sleep restraint. In that case, the crewman will lie on top of the restraint and hold himself in place by the strap around the middle of the sleep restraint.
The sleep restraint will be rolled and strapped against the side wall and aft bulkhead at launch. When needed, they will be unrolled and attached to the CO2 absorber stowage boxes near the LEB or placed in the right couch. During preparations for entry, two sleep restraints will be stowed in its stowed position against the side wall. The other sleep restraint will be detached from the side wall and placed in the center aisle, head end toward the LEB. Three spacesuits will be stowed lengthwise in the restraint, alternating the head-boot directions. The upper (or forward) spacesuit will be stowed with the helmet on and protruding from the restraint neckring. The spacesuit and the sleep restraint will be lashed to the bulkhead using 5 ropes and brackets on the aft bulkheads and lockers.
Flight Data Restraints (Flight Data Restraint Diagram)
The purpose of the flight data restraint, or bungee system, is to position and retain the flight data charts, maps, and manuals so the crew can view them during the mission. The system includes long and short data-retention snap assemblies (bungees), long and short data-retention hook assemblies (bungees), Calfax adapter plates, data card clips, food door clips, data book spring clips, temporary stowage pouches, and a debris closeout with pockets.
The bungees (retention snap and hook assemblies) are 0.25-inch-diameter steel springs, the “short” being 4 inches long and the “long” being 8 inches long. The short bungees will stretch to 14 inches, and the long will stretch to 34 inches for use. Attached at each end of the bungee spring is a 3-inch length of Beta cloth with a female snap or clip and a snap. The snap-type bungee attaches to bonded male snaps (studs) on the panels or closeouts so they lie parallel and close to the panel. The hook-type bungees hook on doors or switch wickets, whichever is the most useful. The manuals or charts are slid between the bungee spring and the panel and will stay in place.
There are four Calfax adapter plates that attach to Calfax fittings adjacent to the G&N panel 122 with the use of the E tool. Each adapter plate has two male snaps to which the snap-type bungees will connect.
A data card clip is a small, steel clip with a female snap on the rear. It attaches to a male stud on the panels or closeouts and. will hold data cards.
The food door clips fasten to the B1 or L3 compartment door. Bungees can be attached to and stretched between the c lips for retention of flight data.
A female snap on the data book spring clips fastens to any one of numerous male studs on the panels. The spring clip allows a rapid exchange of manuals or data.
The number of restraints may vary from spacecraft to spacecraft. The following list is approximate:

  • Snap bungees, short • • • • • • • • • • 6
  • Snap bungees, long • • • • • • • • • • 6
  • Hook bungees, short • • • • • • • • • • 2
  • Hook bungees, long • • • • • • • • • • 2
  • Calfax adapter plate, left • • • • • • • • 2
  • Calfax adapter plate, right • • • • • • • 2
  • Data card clip • • • • • • • • • • • • • • 8
  • Food door clip • • • • • • • • • • • • • •6
  • Data book spring clip • • • • • • • • • • 8
    To verify the number, refer to the applicable spacecraft “Apollo Stowage List (NASA document).”
    Small, temporary stowage pouches (2), 15 inches in length and have female snaps that attach to studs, in the crew compartment, are made of Beta cloth with a bungee-type closure, and. have small plastic viewing windows. The bungees, clips, and adapter plates are stowed in the pouches prior to use and during entry.
    The debris closeout with pockets has two purposes: to restrict debris from entering the gaps after the lunar return containers (rock boxes) replace the LiOH canisters in B5 and B6, and is the flight data temporary stowage position after removing the data from the compartment. The closeout is 42 inches long, has four pockets, is Beta cloth, and attaches to the LEB with snaps. When removing LiOH boxes and installing the rock boxes, remove only half of the closeout. When the temporary stowage pouches are not being used, they can be stowed in the closeout pockets with the flight data.
    Flight Data Restraint Diagram

Restraint Straps
There are a number of straps used for restraint purposes during zero g. The couch, probe, drogue, glare shield, control cable, and cable routing straps have specific uses, whereas the utility straps have numerous uses. Most of the straps are made of beta cloth and use snaps as a rest raining method. The snaps have a male (stud) and female (socket) component.
Control Cable Straps (Special Straps Diagram). The rotation control cables exit the junction box on the aft bulkhead and are routed along the 22 attenuator struts to the couch side stabilizer beams. The control cables are held to the 22 struts by the control cable straps, two on each strut. The straps are 1 inch wide and 11 inches long. Each has four snaps, a pair to snap around the strut and a pair to hold the cable.
Special Straps Diagram

Center Couch DPS Burn Straps
(Center Couch Restraint Straps Diagram). The center couch has to be stowed for a LM DPS burn and EVA. For a LM DPS burn, the seat and legpan is lowered to the aft bulkhead while the body support stays hinged at the headbeam. The folded seat-legpan must be restrained to the aft bulkhead by the DPS burn strap. The couch DPS burn strap is 29 inches long, with one snap (stud) at one end and 6 snap sockets at the other end. It attaches to a “D” ring on the A1 storage locker and around the knee control handle. When not in use, the s trap is stowed in a locker.
Center Couch Stow Straps
(Center Couch Restraint Straps Diagram). During the preparation for EVA, the center couch is removed from its center position and stowed under the left couch. The center couch is restrained to left couch by the two center couch stow straps.
Center Couch Restraint Straps Diagram

The “upper” center couch stow strap routes around the headrest support bars and connects to itself. It is 24 inches long, has a “D” ring at one end, a center flat rubber bungee section, and a snap-hook at the other end.
The “lower” center couch stow strap routes through two holes in the center couch body support at the seatpan. It is 43 inches long, has a 12-inch bungee section, and a hook at each end which attaches to “D” rings on the left couch body support near the seatpan. When not in use, the straps are stowed.
Cable Retainer Straps
(Special Straps Diagram). The cable retainer strap is 5.5 inches long with a back-to-back socket and stud at one end and a socket at the other end. The socket/stud will attach to studs bonded on the structure and when the socket is attached to the strap stud/ socket, it forms a loop. This facilitates routing the TV camera cable and the translation control cable. When not in use, the straps are left attached to a wall stud.
Drogue Stow Straps
(Probe and Drogue Stowage Straps Diagram). When required, the probe is stowed under the seatpan and the drogue under the backpan of the right couch. The two drogue stow straps are attached to the right body support by one strap each. When not in use, the free end of the straps are attached to the couch also.
Probe and Drogue Stowage Straps Diagram

Straps
Utility Straps
(Utility Straps Diagram). The utility straps are named for their versatility. They are used for holding looped straps and cables in stowage lockers or compartments and for restraining other equipment to the structure during the mission.
Utility Straps Diagram

The utility straps are 12.5 inches long with two studs and two sockets positioned so as to form two loops when snapped. One loop will wrap around a piece of equipment and the other loop around structure or will attach to structure by the snap.
MDC Glareshade Straps (Special Straps Diagram)
The MDC glareshade straps retain the MDC glareshades in their R4 stowage compartment. The straps are 5 inches long with sockets at both ends that snap onto studs bonded to the structure. One end of the strap always stays attached.
Velcro and Snaps Retainer Locations
There are numerous 1-inch square patches of Velcro located in the crew compartment. They are bonded to the structure and control panels in accordance with crew and crew support requirements. Each CM has a “Velcro and Snaps Map” designating the location of all retainers. The drawing number is V36-6300XX, the XX being the CM numerical designation plus 4. Example, the “Velcro and Snaps Map” for CM 112 is V36-630016.
Tunnel Hatch Stow Bag (Center Couch Restraint Straps Diagram)
The tunnel hatch must also be stowed when required. However, due to some remotely flammable materials, the hatch must be stowed in a beta cloth bag with a circumferential zipper. The bag is lashed under the left couch by straps and remains there. When the center couch is stowed under the left couch, the stow bag is collapsed between the couches.
Sleep Restraint Tie down Ropes
During entry preparation for an unsuited entry, the spacesuits are stowed in a sleep restraint and lashed down in the center aisle by ropes.
A rope is a PBI (polybenzimidazole) fiber, 10-feet long, and has plastic ferrules on the ends to prevent fraying, there are five ropes stowed.
SIGHTING AND ILLUMINATION AIDS
Sighting and illumination aids are those devices, lights, or visual systems that aid the crew in the accomplishment of their operational mission. This handbook describes the internal sighting aids first and the external second. The crew compartment floodlights and panel lighting is described in the electrical power system Electrical section of this handbook.
Internal Sighting and Illumination Aids (Internal Sighting and Illumination Aids Diagram)
Internal Sighting and Illumination Aids Diagram

Internal sighting and illumination aids include window shades for controlling incoming light, internal viewing mirrors, the crewman I optical alignment sight for docking and aiming the data acquisition camera, a LM active docking target for LM to CM docking, window markings for monitoring entry, a monocular for lunar survey, and some miscellaneous items such as floodlight glareshields, MDC glareshades, and an eyepatch.
Window Shades (Window Shades and Mirrors Diagram)
The CSM has five windows: two triangular-shaped rendezvous windows, two square-shaped side windows, and a hatch window. Periodically, the light coming through these windows has to be restricted. This is accomplished by window shades (Window Shades and Mirrors Diagram).
Window Shades and Mirrors Diagram

The window shades are aluminum sheets held on by “wing” latches. The shades are 0.020-inch thick with a frame of 0.250 inch. The shade has a gasket on the “light” side which seats against the window. Each window frame has three wing latches, or two latches and a clip, that res train the shade on the window. The shades are stowed in a stowage bag in the upper equipment bay.
Internal Viewing Mirrors

When the astronaut is in a pressurized spacesuit on the couch, his field of vision is very limited. He can see only to the lower edge of the main display console (MDC), thus “blanking out” his stomach area where his restraint harness buckling and adjustment takes place. The function of the internal viewing mirrors is to aid the astronaut in buckling and adjustment of the restraint harness, locating couch controls and spacesuit connectors. By positioning all the mirrors to view the MDC from the LEB, the CMP can periodically monitor the instruments while in lunar orbit.
There are three mirrors, one for each couch position. The mirrors for the left and right astronaut are mounted on the side of the lighting and audio control console above the side viewing window and fold. The center astronaut’s mirror is mounted on the right X-X head attenuator strut.
The mirror assembly consists of a mounting base, a two-segmented arm, and a mirror. The mirror is rectangular (4.25 by 3.5 inches), flat, and steel with an aluminized surface. The two-segmented arm allows a reach of approximately 22 inches from the mount. The arms have swivel joints with a friction adjustment to position the mirrors in the desired angles. The friction is adjusted with tool R, a torque set driver. The mirrors are locked in position by a clamp during boost and entry.
Crewman Optical Alignment Sight (COAS) (Crewman Optical Alignment Sight System Diagram)
Crewman Optical Alignment Sight System Diagram

The primary function of the crewman optical alignment sight (COAS) is to provide range and range rate to the CM or LM pilot during the docking maneuver. The closing maneuver, from 150 feet to contact, is an ocular kinesthetic coordination of the astronaut controlling the CM with economy of fuel and time.
A secondary function of the sight is to provide the crewman a fixed line -of-sight attitude reference image which, when viewed through the rendezvous window, appears to be the same distance away as the target. This image is boresighted (by means of a sight mount) parallel to the centerline (X-axis of the CM) and perpendicular to the Y- Z plane.
COAS Description
The crewman optical alignment sight (COAS) is a collimator device, similar to the aircraft gunsight, weighing approximately 1-1/2 pounds, is 8 inches long and requires a 28-vdc power source. The COAS consists of a lamp with an intensity control, reticle, barrelshaped housing, mount, combiner assembly, filter, and a power receptacle. The reticle consists of a 10-degree circle (figure 2. 12-20), vertical and horizontal cross hairs with 1-degree marks, and an elevation scale (on the side) of -10 to +31. 5 degrees. The elevation scale is seen through an opening or window.
The COAS is stowed in amount by the left side window at launch and entry, and other periods as the mission requires. Two spare lamps are stowed in U 3. The COAS can be mounted on the right or left rendezvous window.
COAS Operation
The receptacle is de-energized by placing switch on panel 16 (right) or 15 (left) to the OFF position. If sighting at extremely bright sunlight, the filter is unstowed, and installed between the barrel and combiner by looping tether around the barrel, positioning the filter approximately parallel with the combiner, and pressing onto barrel by engaging clips. Do not slide filter on combiner frame or damage may result to clips. Install COAS on the window mount and energize circuit by placing switch to ON.
For the left window operations, the barrel index is matched with LW by unlocking the barrel lock and rotating the barrel until the detent seats. For right window operations, use the RW index mark. There may be a little play when the detent seats. To duplicate the bore sighted condition, the barrel must be snugged or rotated against the detent. The direction of rotation is on the sidewall near each COAS mount.
To turn lamp on, turn intensity control clockwise until the reticle appears on the combiner glass at the required brightness. The actual usage and visual presentations will be discussed in Docking and Transfer.
Additional Uses
While photographing activities or scenes outside the spacecraft with the 16 mm data acquisition camera, the COAS is used to orient the spacecraft and aim the camera. The camera will be mounted in the right window at a 90-degree angle to the X – axis, and will be shooting out the right rendezvous window, via a right angle mirror assembly.
A constant angle on a star during a differential velocity maneuver (MTVC) can be maintained by use of the elevation scale. The barrel lock is lifted and turned so the barrel can be rotated, and will hold in an intermediate position by friction. The elevation will be read on the elevation scale using the horizontal “line” of the reticle as the index.
LM Active Docking Target (LM Active Docking Target Diagram)
LM Active Docking Target Diagram

After lunar rendezvous and acquisition, the LM approaches the CM from the forward end. At 50 feet, the LM pitches 90 degrees for the final approach, during which the LM Commander will sight through the overhead window, using the LM COAS for alignment. The LM overhead window will align on the CM right rendezvous window. The LM docking target will be placed in the CM right rendezvous window to function as a guide to the LM Commander.
The LM active docking target is a collapsible target of similar configuration as the LM docking target but approximately half the size. The base is 8 inches in diameter with green electroluminescent (EL) lamps and a black stripe pattern on the front. The airplane, or stand-off cross, is lit by a red incandescent lamp and its support strut folds for stowing. When folding the strut, failure to slide the nut more than 1 /2 inch from the pivot point may result in damage to the face of the target. The adapter support strut is removable, fits into the base slotted stud, and is secured by a 1-inch nut that should be hand tightened only. When assembling the adapter support strut to the base, align the white indices on the base and adapter.
The base has a power cord for connection to panel 16 near the right-side viewing window. It operates on ac, and is powered from the LIGHTING RUN/EVA/TGT-AC2 right CB on auxiliary CB panel 226. The light is controlled by the DOCKING TARGET switch on MDC-16 and has three positions: OFF, DIM, and BRIGHT.
For support during usage, the mounting support strut slides into the right COAS mount on the right rendezvous window frame. The target is stowed in U3 Locker on the side wall near the aft bulkhead and side hatch.
Operation
Remove the target from the U3 locker, extend the strut, and lock in place with locknut. Remove the adapter support strut from U3 and attach to the base. Verify right LIGHTING RUN/EVA/ TGT-AC2 CB on panel 226 is closed and the DOCKING TARGET switch on MDC – 2 is OFF. Insert target mount strut slide into COAS mount until it seats fully. When fully seated, the power connector will be mated.
To activate target, turn DOCKING T ARGET switch to requested brightness, DIM or BRIGHT. To deactivate target, turn switch to OFF. To remove target and stow, reverse the installation procedure.
Window Markings (CM Window Markings Diagram)
CM Window Markings Diagram

The left rendezvous, right rendezvous, and hatch windows have markings to aid the crew in monitoring the entry maneuver and also function as a visual reference for orientation during a manually controlled entry. After SM separation, the CM will be oriented to a “bottom” forward entry attitude with the crew’s heads and Z-axis pointing ” down.” The X-axis will make an angle of approximately 31.7 degrees with the “aft” horizon during most of the entry, so as the commander views the horizon through the left rendezvous window, it will appear 31.7 degrees from the X-axis. During the entry roll program, the actual roll can be approximated by markings on the window periphery that have been precalculated by computers.
Being a method that requires a fixed-eye position to avoid parallax, the 80th-percentile crewman eye position is used – his eyes are 15 inches aft of the 31.7-degree mark on the inner rendezvous windows. If a crewman is other than the 80th percentile, he will have to adjust his head/eye position.
Left Rendezvous Window Markings. The commander, viewing through the left rendezvous window, has window marks that are yellow epoxy ink applied externally on the glass. The index marks are every 5 degrees from -5 degrees to +35 degrees.
Center (Hatch) Window Frame Markings
Entry begins at 400,000 feet (75 miles). When .05 g is sensed, the G&N system computes the entry path to land at a certain location. The entry involves rolling the command module to control the lift vector. The CMP in the center couch can monitor the entry roll program. At 400,000 feet, the horizon will appear across the 0° ROLL marks. As the CM is rolled, there are 55° R&L, 90° R&L roll marks to compare to the horizon and estimate roll.
The black roll marks are on the hatch window frame.
Right Rendezvous Window Frame Markings
The LMP will also monitor the entry but in a limited degree. The right rendezvous window frame only has the 5 ° and 35 ° markings in black.
Monocular (Miscellaneous Internal Sighting and Illumination Aids Diagram)
Miscellaneous Internal Sighting and Illumination Aids Diagram

The monocular is used during lunar orbit to identify lunar points of interest. It is one half of a 10 x 40 (8 power) binocular and consists of the right barrel and the focusing mechanism. The monocular is 5.56 inches long and weighs 0.75 pound.
Couch Floodlight Glareshield (Miscellaneous Internal Sighting and Illumination Aids Diagram)
Miscellaneous Internal Sighting and Illumination Aids Diagram

The glareshields are used to diffuse the light from the two couch floodlights when they are required for operations. They fold open for stowage and are held around the floodlights by snaps. The glareshields are bronze screen coated with flourel and have tape hinges.
MDC Glareshades (Miscellaneous Internal Sighting and Illumination Aids Diagram)
In the event the crew does not use the window shades to black out the light, the MDC glareshades are used to shade selected vital displays on the MDC panels l and 2.
The glareshades have a molded fiberglass base with sponge flourel rubber panel sides. A Velcro hook is bonded on the base flanges as a method of restraint. The shades are labeled DSKY, MISSION TIMER, and EMS DELTA V.
Shortly after entering earth orbit, the glareshades are removed from stowage and placed over the display keyboard (DSKY – panel 2), mission timer (MISSION TIMER – panel 2), and the entry monitor system display delta V /ranging (EMS DELTA V – panel 1). The displays have Velcro pile for restraint. They are left emplaced the remainder of the mission.
Eyepatch (Miscellaneous Internal Sighting and Illumination Aids Diagram)
During the preparation to use the sextant or telescope, the LMP or other crewman must condition his eye for “night vision” when he anticipates viewing the darkness. He will wear an eyepatch that will shut out ambient light.
Telescope Sun Filters (Miscellaneous Internal Sighting and Illumination Aids Diagram)
When sighting the G&N telescope toward the sun, the sun rays are attenuated by the use of the telescope sun filters. There are two sun filter assemblies, one that is used on the long eyepiece for suited operations, and one that is u s e d on the standard (short) eyepiece for unsuited or shirtsleeve operations.
The standard eyepiece sun filter is 3 inches in diameter, 0.6 inch thick, and has an eye guard or eye cup. The long eyepiece sun filter is. 3.5 inches in diameter and 0.9 inch thick. Both filters have similar mechanisms for attachment. They are rocker-arm levers 180 degrees apart, that seat a shoe in a grove on the eyepiece.
To install the standard eyepiece sun filter, the eyepiece eyeguard must be removed by unscrewing and stowing. Then, align the filter to the eyepiece, press the levers, slide on eyepiece, release levers, and seat the shoes. The long eyepiece filter installs directly on the long eyepiece in the same manner.
Meter Covers (Altimeter and Accelerometer) (Miscellaneous Internal Sighting and Illumination Aids Diagram)
Reflected light from meter s is another annoying occurrence to the crew. To limit the reflection from the altimeter and accelerometer (MDC- 1) which are inactive most of the mission, the crew places covers over them.
The covers are flat, circular, sheet metal, 3 inches and 4 inches in diameter for the accelerometer and altimeter, respectively. They have a ring on one side for handling and a patch of Velcro hook on the other side for restraint.
External Sighting and Illumination Aids (External Illumination Aids Diagram)
External Illumination Aids Diagram

External illumination aids are those de vices or lights located on the exterior surface of the CSM that furnish the visual environment to perform operational activities. The aids will be described in the order of their operational usage during a normal mission as follows: external spotlight used during transposition and docking, running lights for CSM gross attitude determination during lunar rendezvous, EVA handles and radioluminescent (RL) disks for lunar rendezvous CSM forward end identification and EVA activities, EVA floodlight used during EVA and retrieval of exterior paint samples, and the rendezvous beacon for backup to the rendezvous radar transponder (RRT).
Docking Spotlight (Docking Spotlight Diagram)
Docking Spotlight Diagram

During the transposition and docking phase of the mission (or simulation), the CSM separates from the spacecraft LM adapter (SLA) and S-IVB, translates forward 100 to 150 feet, pitches 180 degrees, rolls 60 degrees, and translates toward the LM/SLA/S-IVB for docking. During the translation toward the LM/SLA/S-IVB, it is desirable to light the LM so the proper perspective is maintained and excessive maneuvering is decreased, thus minimizing SM RCS propellant usage. The lighting of the LM/SLA is accomplished by use of the docking spotlight.
The spotlight is mounted behind the left rendezvous window on the door of a concealed compartment in the CM/SM fairing. The door is spring-loaded to the deployed position and is held flush by a pin extended from an actuator. To deploy the spotlight/door, on MDC-2 (upper l eft) place the EXTERIOR LIGHTS- RNDZ SPOT S\1/itch in the SPOT position. The spotlight door initiator /actuator receives 28 vdc, its pin-retention wire melts, pulling the spring-loaded pin and releases the door. The spring-loaded door swings to the deployed position and is held there by a hinge-brace. As the switch is placed in the SPOT position, it simultaneously applies 115 vac to the spotlight, turning it on.
When docking has been completed and the spotlight is no longer needed, the switch is placed in the OFF position, ren1oving power from the spotlight. The compartment door remains open, or deployed, for the remainder of the mission. If the spotlight is required again, place the switch in the SPOT position.
The circuit breakers for the spotlight are on panel 226. The a-c circuit breaker is labeled RUN/EVA/TGT-AC2 and the d – c circuit breaker is labeled COAS/TUNNEL/RNDZ/SPOT-MNB.
Running Lights (Running Lights Diagram)
Running Lights Diagram

The lunar rendezvous and docking phase, or simulation, require a “gross attitude” determination by the LM crew after CSM acquisition at a distance of approximately 2000 feet. This is achieved by viewing the CSM running lights.
The running lights consist of eight lights on the service module exterior: two red, two green, and four amber. Four of the lights are on the fairing, just forward of the SM forward bulkhead and approximately halfway between the axes. The remaining four are on the aft end of the SM, 6 inches forward of the aft bulkhead and also halfway between the axes. The two lights on the upper right quadrant are green, the two lights on the upper-left quadrant are red, and the four lights on the lower quadrants are amber. The light fixtures contain four or six colored lamps and are wired in series -parallel for redundancy.
When required or requested, the CM pilot can turn on tl1e running lights by placing the EXTERIOR LIGHTS-RUN/EVA switch on MDC- 2 (upper left) in. the RUN/EVA position. A-C power is applied to the lights via a transformer, stepping the power down to 3.6 volts. The lights are turned off by placing the switch to the OFF position.
The circuit breakers for the running and EVA lights are on panel 226 and labeled LIGHTING-RUN/EVA/TGT-AC 1 and AC 2. The EVA floodlight and docking target are also powered by AC 1 and AC 2
EVA Handles With RL Disks (EVA Handles With RL Disks Diagram)
EVA Handles With RL Disks Diagram

During the lunar rendezvous and docking phase, or simulation, after the II gross attitude II has been determined by viewing the running lights, the LM must approach the CSM from the forward end of the CSM which is accomplished by viewing the radiolurninescent (RL) disks in the ring handle. RL disks are also located in other EVA handles.
The remainder of the handles are on the hatch side of the CM exterior. From forward to aft, on the forward heat shield is an extendable (pop-up) handle that is collapsed until the boost protective cover is jettisoned with the launch escape tower. Fixed handles are located a long-side the right rendezvous window, hatch, and positive pitch CM RCS engines.
The fixed handles are aluminum, oval-shaped tubes 12 inches long with a support fitting at each end. The handles are used for EVA maneuvering. The hatch has a smaller fixed handle near the latch mechanism that is used for opening the hatch. All the handle supports are bolted into fiberglass inserts into the ablative material. They may or may not burn off on entry.
The handle supports have a small bar to which the EVA tether can be attached. The handle supports also contain the RL disks for illumination. The disks are approximately 5 /8 inch in diameter. They are mounted in 0.730-inch-diameter retainers which are held in the handle supports by spring clips. The RL disks are slightly radioactive and light (glow) in the dark.
There are RL disks mounted in the hatch ablative material: two adjacent to the (dump) valve latch drive and four adjacent to the pressure equalization. These function to locate the latch and valve in the dark.
EVA Floodlight (EVA Floodlight Diagram)
EVA Floodlight Diagram

During EVA, while the hatch area is dark, additional light is available from the EVA floodlight. It is boom-mounted and is located on the SM fairing aft of the CM right-side viewing window. The cork-covered boom is deployed as the boost protective cover jettisons with the launch escape system, pulling a pin that holds the boom in its stowed position. The light fixture is similar to the running lights; the exception is six white lamps wired in series – parallel.
The EVA floodlight is on the running lights circuit and is turned on by the EXTERIOR LIGHTS-RUN/EVA switch on MDC-2 (upper left). The circuit breaker is located on panel 226 and labeled LIGHTING-RUN/EVA/ TGT-AC 1 and AC 2.
Rendezvous Beacon (Rendezvous Beacon Diagram)
Rendezvous Beacon Diagram

In the event the LM rendezvous radar or the CSM rendezvous radar transponder malfunctions during the lunar rendezvous, visual tracking is required as a backup. Fox, night (lunar darkness) tracking, the LM crew will use the alignment optical telescope (AOT) to view the CM rendezvous beacon.
The beacon is mounted on the CSM fairing approximately 10 inches from the CSM umbilical fairing (+Z) in the -Y direction. The beacon beam is canted forward so the center of the 120-degree beam is at an angle of 60 degrees from the X (longitudinal) axis. The light has the brightness of a third magnitude star, capable of being seen at 160-nautical miles by telescope or 60-nautical miles by the unaided eye. When turned on, the rendezvous beacon will flash at a rate of l flash per second.
The light is controlled from the MDC-2 (upper left) EX TERIOR LIGHTS-RNDZ/SPOT switch. The switch is placed in the RNDZ position when the beacon is needed. The circuit breaker is located on panel 226 and is marked LIGHTING-COAS/TUNNEL/RNDZ/SPOT – MNB.
MISSION OPERATIONAL AIDS (Mission Operational Aids Diagram)
Mission Operational Aids Diagram

Mission operational aids are those stowed devices, apparatus, and paraphernalia the crew utilizes to perform the required mission. Normal, backup, and emergency requirements are accomplished by these items. Miscellaneous items that are not related to other spacecraft systems or subsystems are also included and described in this category.
Flight Data File (Flight Data File Diagram)
Flight Data File Diagram

The flight data file is a mission reference data file that is available to the crewmen within the command module. The file contains checklists, manuals, charts, a data card kit, and LMP data file. It weighs approximately 20 pounds.
LM Pilot’s Flight Data File
The LM pilot’s data file is an aluminum container and is stowed in compartment R3 in the RHFEB at launch and entry. The data file contains a crew log, charts and graphs, systems data, and malfunction procedures. It is attached on the right girth shelf near the LM pilot’s right shoulder after orbit for accessibility.

Data File Clip
The data file clip function is to attach the handbooks to the structure for accessibility. It is a metal clamp (clipboard type) with a patch of Velcro on one side.
Crewman Toolset (CREW PERSONAL EQUIPMENT Diagram)
CREW PERSONAL EQUIPMENT Diagram

General
The crewman toolset provides multipurpose tools and/or attachments for mechanical actuations and valve adjustments. The toolset contains the following items: a pouch, an emergency wrench, an adapter handle, an adjustable end wrench, a U-joint driver, a torque set driver, a CPC driver, 3 jack screws, and a 20-inch tether. Each tool has a tether ring and is designated with a letter of the alphabet. All tools are capable of being used with a PGA gloved hand.
The adapter handle (tool E) is most often used. Therefore, if the tool required is other than tool E, a placard will indicate the correct tool and the direction of rotation. For specific tool usage, refer to tool usage chart. During February 1969, a group of tools associated with the probe were added.
Toolset Description and Use
Tools B, E, and V have small 5/32-inch and large 7/16-inch hex drives similar to allen-head wrenches. The small drive is primarily used for mechanical fastener and ECS valve operation. The large drive is used for large torque requirements and connecting to drivers. Drivers, such as tools L, R, and V, have 7/16-inch Hex sockets that receive the large drives.
Toolset Pouch
The toolset pouch is a tool retention device made of beta cloth. The pouch has pockets with retention flaps and Velcro tabs. For zero-g stowage, it has Velcro hook patches so it can be attached to the CM structure. For launch and entry stowage, it rolls and fits into a stowage locker on the aft bulkhead. The pouch will stow all of the tools. However, some crewman may elect to stow the adapter handle E in the spacesuit, or in a more accessible compartment.
Tool B – Emergency Wrench
The emergency wrench is 6.25-inches long with a 4.25-inch drive shaft. The drive shaft has a large drive only. The wrench is capable of applying a torque of 1475-inch pounds, a11d has a ball-lock device to lock it in a socket. It is essentially a modified allenhead L-wrench. An additional tool B is aboard the LM.
Crewman Toolset Usage Chart
S L E A A T U M 3/8 ¼ N N
M A M D D O I R R
A R E A J R J D S S 8 10
L G R P Q O G O C
E = Emergency, or Backup, Tool Usage L E E U I E C R T T
P = Primary Tool Usage W H N E N T K E O O
D D R A D T E W R R
R R E N S R T Q Q
I I N D W E D A D U U
V V C L R T R T R E E
E E H E E I C I
N D V H V S S
T (2) C R E E E E E
I H I R T R T T
P V
E
R
Function
Tool Designator B
E
F
R
V
W
1
2
3
4

A. Environmental Control System X P

  1. Open/close ECS valves on oxygen, water, coolant control, girth shelf ECS, and LHEB ECS panels.
  2. Operate secondary cabin temperature valve (LHFEB). X P
  3. Operate CM/tunnel LM PRESSURE EQUALIZATION valve (from LM side) X P
  4. Unlatch/latch fasteners of access panels to filter and coolant controls (LHEB). X P
  5. Unlatch/latch fasteners of access panel to X p cabin atmosphere recirc system (LHFEB). X P
  6. Position PRIM ACCUM FILL valve OPEN/CLOSE X P
  7. Open hatch dump valve (from outside EVA). X P
  8. Unlatch/latch fasteners of access panel to waste water line filter. P

B. Guidance and Control System
Tool Designator B
E
F
R
V
W
1
2
3
4

  1. R/R G&N handles (2) on G&N panel (LEB). X P
  2. Adjust scanning telescope shaft and trunnion axis (emergency mode) (LEB Panel 121). X E
    E
  3. Open/close EMS pot GTA cover and adjust EMS pot on MDC-1 during prelaunch checklist by backup crew. X P

C. Mechanical Systems – Inside CM
Tool Designator B
E
F
R
V
W
1
2
3
4

  1. Install /remove survival beacon connector (5/8) hex. X P
  2. Any drive screw or fastener with a 5/32″ internal hex. X P
  3. Adjust mirror U-joints P
    P
  4. R/R sea water access tube plug (LHEB). X P
  5. Tighten/loosen sea water teflon guide plug (3/4″ hex). P
  6. R/R stowage lockers. X P
  7. Manually remove forward tunnel hatch latch pivot pin E
    E
    E
  8. Tighten lightweight headset mic boom. E
    E
  9. Adjust window shade latches. E
    E
  10. Backup for “R” tool. E
    E
    E
  11. Manually release docking ring latches E

D.
Tool Designator B
E
F
R
V
W
1
2
3
4

  1. R/R bell crank. X E
  2. Operate unified hatch latch drive (from inside). X E
  3. Isolate latch linkage. X E
  4. Actuate latches (backup adjustment 11/16 flats). E
  5. Disconnect/remove hinges.
    E. Probe and Tunnel Equipment
    Tool Designator B
    E
    F
    R
    V
    W
    1
    2
    3
    4
  6. Remove nuts and bolts from ends of shock struts (emergency probe collapse and removal). E
    E
    E
  7. Remove fairings from docking ring latches (prior to manual release of docking ring latches). E
    E
    E

Tool E
Adapter Handle. The adapter handles are approximately 3.5-inches long and 1.5-inches in diameter. Each has a large and small drive and fits all drivers. A ball detent will assist in maintaining contact with the drivers. It is used similar to a screwdriver.
Tool F
End Wrench. There is one adjustable end wrench per toolset, a 10-inch crescent wrench. The end wrench is used to install and remove the survival beacon connector and emergency activation of the hatch latches.
Tool L
Cold P l ate Clamp Driver. The CLP driver is 5 inches long with a 7/32 -inch hex at one end and the 7/16- inch socket at the other. It is used to remove the waste water servicing plug on the water panel (352) in preparation for partial dump of waste water tank.
Tool R
Torque Set Driver. The tor que set driver is 4 inches long with a 7/16-inch socket at one end, as haft in the center, and a No. 10 torque set screwdriver at the other end. It is used primarily to adjust the mirror universal joints that may come out of adjustment during vibration loads.
Tool V
U-Joint Driver. The U-joint driver has a 7/16-inch driver socket at one end and a universal joint with a small and a large hex drive at the other end. The U-joint driver will rotate up to an angle of 30°. It is used to gain access to the “hard to get at” fasteners.
NOTE
The following five tools (W, 1, 2, 3, 4) are referred to as “docking probe tools” but their capability is greater than emergency probe disassembly. The tools are all modified SNAP ON tools and have Velcro patches for restraint. The attachment tools have 1 /4 -inch drive sockets.
Tool W
Midget Ratchet Wrench. The midget ratchet wrench is 6.62 inches in length, has a 1/4-inch drive with an R/L ratchet controlled by a pawl on one end, and a 1-inch cylindrical handle on the other. The handle has a 2-1/2- inch length of Velcro hook for restraint. Its function is to drive attachment tools 1, 2, 3, and 4.
Tool 1
3/8-Inch Socket. Tool 1 is 2 inches long, has a 1/4-inch drive socket on one end, and a 3/8-inch 12-point socket on the other. It is used to remove the nuts from the bolts that retain the shock strut to the probe supports.
Tool 2
Screw Driver. A 1/4-inch flat screw driver 2.8 inches long is tool number 2. It is used to torque any slotted screws or bolts and those listed in the tool usage chart.
Tools 3 and 4 Number 8 and 10 Torque Set Drivers
The torque set drivers are 1.6 inches long. The numbers 8 and 10 indicate the number 8 and 10 torque set tips. They are used to remove number 8 and 10 torque set screws (some of which are listed in the tool usage chart) and as a backup for tool R, the 5-inch torque set driver.
Tether
The tether is a strap 14 inches long with a snap hook at one end and a loop at the other. The hooks can be snapped into the tool tether ring to secure it to the crewman when moving about the CM.
Jackscrew
The jackscrew is approximately 4 inches long with a wing nut on one end. The opposite end has a trunnion, about which a lever rotates, and through which a hook shaft slides. When the wing nut is turned clockwise, it draws the hook shaft into the barrel.
In the event the side hatch is deformed and the hatch latch mechanism will not engage the hatch frame, the jackscrew is used to draw the hatch to the position the latch mechanism will engage. If the latch will not engage, the screwjacks will hold the hatch closed so that it will withstand the thermal load of entry. However, it may not be pressure-tight.
To use, engage the lever into the three catches on the hatch frame (two on right, one on left). Next, engage the hook into the three catches on the hatch and screw the wing nut clockwise, taking care to tighten evenly in increments. That is, a couple of turns on one jackscrew, then a couple of turns on the next jackscrew (next clockwise position), etc., until the hatch is snug.
Tool H – 10-inch Driver
The 10 – inch driver has a 7/16-inc h driver socket at one end and a 9-inch shaft with a 5/32-inch hex drive (small tip). It is used to disconnect and connect the fasteners holding the food freezer in its stowage position.
Cameras
Two basic types of operational cameras and associated accessories are furnished to facilitate in-flight photography: a 16 mm cine /pulse camera and a 70 mm still camera. Photography assignments vary from mission to mission and hardware requirements vary accordingly. Spacecraft crew equipment stowage lists reflect camera equipment configuration. Typical mission photography task assignments include the following: synoptic terrain and weather studies, LM docking, crew operations, crew EVA, and targets of opportunity. Later manned flights will provide for specific scientific experiments and will require specialized equipment. A brief description of the two basic operational cameras and their accessories follows.
16 mm Data Acquisition Camera (16 mm Data Acquisition Camera Diagram)
16 mm Data Acquisition Camera Diagram

The data acquisition camera is a modified movie camera and is an improved version of the earlier Gemini-type 16 mm sequence camera equipped with new-type external film magazines which greatly enhance the photographic capabilities. Primary use of the camera will be to obtain sequential photographic data during manned flights. It will be used for documentary photography of crew activity within the CM and for recording scenes exterior to the spacecraft. Bracketry installations at each rendezvous window facilitate use of the camera for CSM-LM docking photography to recording engineering data. An additional hatch-mounted bracket facilitates use of the camera for EVA photography. Camera modes of operation (frame rates) are variable as follows: Time, 1 frame per second (fps), 6 fps, 12 fps, and 24 fps. Shutter speeds are independent of frame rate and include 1/60 second, 1/125 second, 1/250 second, 1/500 second and 1/1000 second. Camera power is obtained from spacecraft electrical system via panel-mounted 28-vdc utility receptacles. Camera operation is manually controlled by an ON-OFF switch located on the front of the camera. Camera weight, less film magazine, is 1.8 pounds. When bracket-mounted at either spacecraft rendezvous window, the camera line of sight is parallel (±2 degrees) to vehicle X-axis. Camera accessories include a power cable, film magazines, lenses, right angle mirror, and a ring sight, which are described in the following paragraphs.
Power Cable
The power cable provides the necessary connection between the spacecraft electrical power system and the 16 mm camera. The cable is approximately 108 inches long and weighs approximately 0.23 pound. Built-in electrical lamps are energized automatically during camera operation and serve as visual indication that the mechanism is working. Utility receptacles, 28 vdc, are located on spacecraft panels 15, 16, and 100.
16 mm Film Magazine
Film for each mission is supplied in preloaded film magazines that may be easily installed and/or removed from the camera by a gloved crew member. Film capacity is 130 feet of thin base film. Total weight of magazine with film is approximately one pound. Magazine run time versus frame rate is from 87 minutes at one frame per second to 3.6 minutes at 24 frames per second. Each magazine has a “film remaining” indicator plus an “end of film” red indicator light. Future plan s include film magazines of 400- foot capacity. Quantity and type of film supplied is determined by mission requirements.
Lenses
Four lenses of different focal length, which are provided for use on the 16 mm camera, are described herewith.
5 mm f/2
An extreme wide-angle lens designed for wide- angle photography. Primary use will be for close interior photography of crew activity within the spacecraft and for EVA photography. Viewing angle of 80 degrees (vertical) by 117 degrees (horizontal) on a 16 mm format. Weight of lens with protective cover is approximately 0.69 pound.
10 mm
(SEB 33100010) a medium wide-angle lens, the field of view being 41.1 degrees x 54.9 degrees. It will be used for internal crew activities and equipment when details are required. Focus is from 6 inches to infinity with aperture openings from f 1.8 to 22. It is similar in size to the 5 mm lens and has two spike-like handles for setting f stop and distance with the gloved hands.
18 mm T/2
(SEB 33100023) a lens of slightly wide-angle design and high optical quality. Primary use is for vehicle-to-vehicle photography while bracket-mounted at left or right rendezvous window. It is also the widest angle lens that may be used with the right-angle mirror. This lens is usually stowed on the camera. Viewing angle of 24 degrees x 32 degrees and weight is approximately 0. 57 pound.
18 mm Kern
(SEB 33100018) the newest 18 mm lens model for general photography of intra vehicular and extravehicular activities. It is slightly larger and longer than the former lens and is distinguished by its two spike-like handles for setting the f stop and distance with the gloved hand. This improved lens has larger numbers for reading while in the EV spacesuit.
75 mm f/2.5
(SEB 33100078) a medium telephoto lens design with excellent optical properties. Primary use is for photography of distant objects and ground terrain. Usually used on the bracket-mounted camera. Viewing angle of 6 degrees x 8 degrees, weight is approximately 0.53 pound.
75 mm Kern
(SEB 33100019) the newest 75 mm lens model for DAG telephotos. This lens is similar in appearance to the new 18 mm lens, having two handles for f stop and distance gloved hand settings and larger printed numbers. It also has a sun shade.
Right Angle Mirror
This accessory, when attached to the bracketmounted 16 mm camera and lens, facilitates photography through the spacecraft rendezvous windows along a line of sight parallel to vehicle X-axis with a minimum of interference to the crewmen. It adapts to the 18 mm, 75 mm, and 200 mm lenses by means of bayonet fitting s.
Ring Sight
An accessory used on the 16 mm camera as an aiming aid when the camera is hand-held. The concentric light and dark circular rings, as seen superimposed on the view, aid the user in deter mining the angular field of view of the sight. It is attached to the camera by its shoe sliding into a C rail. It is also used on the 70 mm camera.
Data Acquisition Camera Bracket
This device facilitate s in-flight mounting of the 16 mm camera at spacecraft left or right rendezvous windows. The bracket is a quick-disconnect hand-grip that may be attached to a dovetail adapter at either rendezvous window. The camera attaches to the bracket by means of a sliding rail. Two marked locating stops are provided for correct positioning of the camera at a window, one for the 18 mm lens and one for the 75 mm lens only. Bracketry alignment is such that installed camera/lens line of sight is parallel to spacecraft X -axis, ±1 degree.
16 mm Camera Operation
Remove camera bracket (grip) from stowage and attach it to dovetail at appropriate rendezvous window. Unstow 16 mm camera and accessories as required. Attach selected lens. Install right-angle mirror on lens (optional). Install ring sight on camera for hand-hold use (optional). Install film magazine on camera. Determine correct exposure. Set lens aperture and focus. Set camera mode (frame rate) and shutter speed. Install power cable on camera. Install camera 1n mounting bracket (optional) at window. On spacecraft MDC panels 15 and 16, verify UTILITY POWER receptacle switch is in OFF position. Mate camera power cable to appropriate receptacle. Place switch to POWER position and verify green operate light on camera is illuminated steadily for approximately 3 seconds to indicate electrical circuit operation. Filming operation can be started by pressing the operate button (switch) on front of camera. To stop, press operate button again.

70 mm Hasselblad Electric Camera and Accessories (70 mm Hasselblad Electric Camera and Accessories Diagram)
70 mm Hasselblad Electric Camera and Accessories Diagram

80 mm f/2 .8 Lens
Standard or normal lens for the 70 mm camera with 2-1/4 x 2-1/4-inch film format. Used for general still photography when a wide angle or telephoto view is not required. Focuses from 3 feet to infinity. Has built-in shutter with speeds from 1 second to 1/500 second. Field of view, each side, is approximately 38 degrees x 38 degrees.
250 mm f/5 .6 Lens
A telephoto lens that is primarily used for photography of terrain and distant objects. It produces a 3X magnification over the standard 80 mm lens. The relatively narrow view of this lens necessitates careful aiming of the camera to insure the desired scene is photographed. A mount is available for mounting the camera and lens at the right rendezvous window to view parallel to vehicle X-axis. The lens focuses from 8.5 feet to infinity, and. has built- in shutter with speeds from 1 second to 1/500 second. Field of view, each side, is approximately 13 degrees x 13 degrees. Weight of lens is 2.06 pounds.
500 mm f/8 Lens. (70 mm Hasselblad Electric Camera and Accessories Diagram)
The 500 mm lens 1s used for telephotography such as lunar landscape, lunar mapping, and targets of opportunity. It produces a 6X magnification over the standard 80 mm lens and its field of vie”” is 7 x 7 degrees. The 500 mm lens focuses from 28 feet to infinity but because of mounting limitation s in the crew compartment and lens travel toward the window during focusing, its mounted focusing capability is approximately 100 feet to infinity. The lens has a built in shutter with speeds from 1 second to 1/500th of a second.
Photar 2A Filter
(SEB 33100050- 206) The Photar filter replaces the haze filter for Hasselblad Electric Camera and is used with color film to produce good color rendition and improved contrast in photographs of the earth. It can be used with the 80 mm and 250 mm lens.
Remote Control Cable (70 mm Hasselblad Electric Camera and Accessories Diagram)
The function of the remote control cable is to actuate the shutter from the left couch while sighting targets through the COAS in the left rendezvous window. The cable is 48 inches long with a handle and button at one end and a connector at the other.
70 mm Film Magazines
Two types of film magazines are used, one for standard-base film, the other for thin-base film. Either film magazine attaches to rear of camera and is locked in place by a lever-actuated clamp. The type 100 film magazine is for standard-base film and capacity is 1002-1/4 x 2-1/4 inch frames. The type 200 film magazine is for thinbase film and capacity is 200 2-1/4 x 2-1/4 inch frames. Each film magazine contains gross-film indicators for frame count.
Lunar Surface 70 mm Film Magazine
The lunar surface 70 mm film magazines are standard 70 mm magazines that have a thermal protective coating. They are stowed in the 70 mm magazine LM transfer bag.
70 mm Magazine LM Transfer Bag
The 70 mm magazine LM transfer bag is beta cloth, has a capacity of 3 magazines, and a flap cover to restrain them. The magazine bag with exposed 70 mm magazines is transferred from the LM to the CM for entry and retrieval.
70 mm Camera Mount for 80 and 250 mm Lens
For the purpose of photographing parallel to the X-axis, the camera mount is used. It is T-shaped, the stem being 7 inches long and the bar 6 inches. The stem inserts into a socket mount along the right or left side of the hatch frame, marked EHC MOUNT ATTACH (80 MM/ 250MM LENS, approximately 7 inches from the TV socket mount. The T bar portion has two quick couplings (lower and upper) that attaches to the camera. The lower quick coupling is for use of the camera with the 250 mm lens and will align the camera parallel with the X-axis. The upper quick coupling is for use of the camera with the 80 mm lens and is pitched upward 12±2° from the X-axis during prelaunch alignment to give the camera an unobstructed view.
To use the mount, the 70 mm camera is assembled, adjusted, and set. The camera can be attached to the appropriate mount quick coupling by sliding it to the stop and locking by rotating the (flag) lever 90 degrees. Failure to position the camera all the way to the stop before locking may result in the window aperture obstructing the camera view. The stem is inserted into the socket mount near the hatch frame until the latches snap in. (Caution should be exercised because of the close proximity of the lens to the window.) The intervalometer cable is then attached. The camera is sighted by using the COAS and orienting the CSM X-axis toward the target. To use the 80 mm lens, the COAS elevation scale is set to +12 degrees. The camera can be momentarily displaced (swung out of the way) by pressing the latch levers and rotating until the latches reseat.
70 mm Camera Mount for 500 mm Lens (70 mm Hasselblad Electric Camera and Accessories Diagram)
The camera mount is L-shaped with a quick coupling on one end and a round stem with a latch at the other. The mount stem will insert in the socket marked EHC MOUNT ATTACH (500 MM LENS) adjacent to the right side of the hatch frame on the girth ring. When installed with the camera, the 500 mm lens centerline will be aligned 10 ±1 degrees off the X-axis toward the – Z direction.
For 70 mm camera operations using the 500 mm lens, the lens is attached to the camera and the settings are adjusted. The camera is attached to the mount. The quick coupling is similar to the 80/250 mm lens mount type. In addition, it has a positive latch with a button that must be depressed to remove the camera from the mount. The right couch headrest is adjusted to the footward position when the mount is attached to the girth ring socket.
To sight the camera using the COAS, the COAS barrel is rotated to +10 degrees on the elevation scale. The COAS centerline is then aligned parallel with the camera and lens centerline.
Intervalometer
The intervalometer is a remote control device for taking sequential pictures. It is extremely useful for making a strip map (vertical stereo strip from rendezvous window, oblique stereo strip from side windows, etc.). Its control box is 2.5 x 2.5 x 1 inches and has an ON/OFF switch. A 120-inch cable connects it to the camera accessory connector. The intervalometer is preset at 20-second intervals and is powered from the Hasselblad. Electric Camera battery pack.
Automatic Spotmeter (Spotmeter Diagram)
Spotmeter Diagram

This meter replaces the earlier model spotmeter and greatly enhances the crewman’s ability to obtain accurate exposure information with a minimum of expended time and. effort. The unit is a completely automatic CdS reflectance light meter with a very narrow angle of acceptance (one degree). The meter scales are automatically rotated to indicate the correct camera shutter speed/lens aperture values for the selected photographic subject. Brightness range is from 0.32 to 5000 foot-lamberts, with an extended range to 20,000 foot-lamberts by use of accessory neutral density filter. ASA range is from 3 to 25,000 and the weight of meter is 1.9 pounds.
Accessories and Miscellaneous Equipment
Temporary Stowage Bags (Accessory and Miscellaneous Equipment Diagram Sheet 1)
Accessory and Miscellaneous Equipment Diagram Sheet 1

The temporary stowage bags are used for temporary stowage of small items and permanent stowage of dry refuse or “trash.”
The waste bag, nicknamed the “VW” bag, is a two-pocket unit. The outer pocket is deep, about 3 feet by 1 foot by 3 inches and is held shut by a bar spring. The inner pocket is flat, about 1 by 1 foot and is held shut by a rubber bungee. The bags are attached to the girth shelf and LEB by snaps.
The outer bag is for dry uncontaminated waste matter and the inner bag serves as temporary stowage for small items.
There are three waste bags, one for each crewman. The Commander’s bag attaches to the left girth shelf, the LM pilot’s to the right girth shelf, and the CM pilot’s, the LEB. They are stowed in a stowage locker at launch and entry.
Pilot’s Preference Kits (Accessories and Miscellaneous Equipment Diagram 3)
Accessories and Miscellaneous Equipment Diagram 3

The pilot’s preference kits are small beta cloth containers 7x4x2 inches, and weigh 0.5 of a pound. Each crewman will pack it with personal equipment or equipment of his choice.
Fire Extinguisher (Accessory and Miscellaneous Equipment Diagram Sheet 1)
A fire in the cabin, or behind the closeout or protection panels, is extinguished by a small fire extinguisher. One fire extinguisher, on locker A3 near the LEB, is provided.
The extinguisher weighs 8 pounds and is about 10 inches high with a 7-inch nozzle and handle. The tank body is a cylinder with a dome, and is made of stainless steel. The extinguishing agent is an aqueous gel (hydroxymethyl cellulose) which expels 2 cubic feet of foam for approximately 30 seconds under 250 psi at 140 °F. The expulsion agent is Freon and is separated from the gel by a polyethylene bellows. The nozzle, handle, and actuator button are insulated against sparking. As a safety measure against overheating, a disk will rupture between 350 and 400 psi, allowing the gel to expel.
To operate, pull the safety pin in the handle, point at the fire or insert in a FIRE PORT, and press the button.
Oxygen Masks (Accessory and Miscellaneous Equipment Diagram Sheet 1)
In the event of smoke, toxic gas, or hostile atmosphere in the cabin during the shirtsleeve environment, three oxygen masks are provided for emergency breathing.
The mask is a modified commercial type (GFP) with headstraps to hold it on. A utility strap is attached to the mask muzzle for inflight stowage. The oxygen is supplied at 100 psi through a flexible hose from the emergency oxygen/repressurization unit on the upper equipment bay by actuating the emergency oxygen valve handle on panel 600. The mask has a demand regulator that supplies oxygen when the crewman inhales.
The three masks are stowed in a beta cloth bag on the aft bulkhead below and aft of the emergency oxygen/repressurization unit. The masks are removed by pulling the center tape loop handle to disengage the snap fasteners restraining the cover. For inflight accessibility, the oxygen masks are stowed along the girth ring near the side hatch by attaching its utility strap snap socket to a stud.
Inflight Exerciser (Accessory and Miscellaneous Equipment Diagram Sheet 2)
Accessory and Miscellaneous Equipment Diagram Sheet 2

An inflight exerciser, similar to the “Exergenie,” is provided for daily exercise. It will be stowed in a small beta cloth container inside a stowage locker on the aft bulkhead.
Tape Roll (Accessories and Miscellaneous Equipment Diagram 3)
A 6-inch diameter roll of 1-inch wide tape is provided for utility purposes.
Two-Speed Timer (Accessories and Miscellaneous Equipment Diagram 3)
The two-speed timer is a two-mode kitchen timer. It is used by the crew to time short period events such as fuel cell purge. The face markings are 0 to 6. The two modes are 6 minutes and 60 minutes and are set by positioning a lever on the face to X1 or X10. To operate, set the mode, turn the pointer to the desired time setting, and an alarm bell will ring when the time elapses.
Accessory Bag (Accessory and Miscellaneous Equipment Diagram Sheet 2)
There are three accessory bags stowed in the PGA helmet bags at launch. They will be used for utility purposes. The bags are beta cloth, flat (15 x 10 inches) and the open end has a drawstring closure.
Headrest Pad (Accessory and Miscellaneous Equipment Diagram Sheet 2)
During an unsuited entry, the crew will need pads on the couch headrest to ease landing impact to the head and to raise the head to the helmeted eye position. Therefore, there are three headrest pads stowed at launch that are attached to the couch headrests at entry.
The headrest pads are 5 x 13 x 2 inches and are a black, fluorel sponge. They have pockets on the ends to slip over the headrests and restrain them.
Grounding Cable (Accessory and Miscellaneous Equipment Diagram Sheet 2)
Static electricity is generated by crew activity in the crew compartment. The CO2 canisters must be grounded when removing them from the stowage locker or compartment to the ECS filter. The canisters have a jack in the center to receive a plug when removing and replacing the canisters.
The grounding cable is sixty inches long with a plug at each end. It is stowed at launch. When using, ground it by inserting one plug in a jack on locker A3. The opposite end inserts into the CO2 canister jack.
Voice Recorder, Cassettes, and Battery Packs (Accessories and Miscellaneous Equipment Diagram 3)
The voice recorder is a small (5 x 4 inches) battery-powered unit used to record data pertinent to the crew log. The recording element is a tape cassette. It is stowed with a battery and a cassette installed, ready for operation. For the number of batteries and cassettes aboard the spacecraft, refer to the stowage list or drawing.
Decontamination Bags (Accessories and Miscellaneous Equipment Decontamination Equipment)
Accessories and Miscellaneous Equipment Decontamination Equipment

When returning items and equipment from the moon, precautions are taken to minimize lunar contamination to the CM and earth. The items are vacuumed, placed in decontamination bags (containers) aboard the LM, and the outer surface of the bags vacuumed. The items with decontamination bags are then transferred.
The items requiring decontamination bags are the two lunar sample return containers (LSRC), the contingency lunar sample return container (CLSRC), 70 mm magazine container, and the lunar close-up camera cassette. The PGA bag will be used for the CDR and LMP space suit return container as it can be readily attached and. detached from the CM aft bulkhead.
The decontamination bags are Beta cloth with zipper closures and fit snuggly over the item and its container.
The decontamination bags are stowed in a CM aft bulkhead locker and transferred into the LM after lunar rendezvous.
Vacuum Cleaning Hose and Brushes (Accessories and Miscellaneous Equipment Decontamination Equipment)
The vacuum cleaning hose and two brushes are stowed in an aft bulkhead locker of the CM at launch. The hose and one brush are transferred to the LM after lunar rendezvous to vacuum the return items. The brush functions as a vacuum head and the hose is connected to the LM ECS return hose during vacuuming. The vacuumed lunar dust and particles are trapped in the LM ECS LiOH canister. The brush and hose are left in the LM at separation.
The vacuum cleaning hose is similar to the oxygen hoses, 41.5 inches in length, and covered with a Beta cloth sleeve. It has a 90-degree elbow at the brush end. The brushes fit on the elbow and have a screen filter on the inside. One brush is left a board the CM for utility vacuuming as needed.
Flag Kit (Accessory and Miscellaneous Equipment Diagram Sheet 2)
The flag kit is a Beta cloth bag containing the American flag, which is returned from the LM.
Containers (Accessories and Miscellaneous Equipment Diagram 3)
Containers are located inside stowage lockers and compartments. The aluminum type are usually boxes with a door entry for containment of stowable items. The cloth or soft type, are Beta cloth, and have flap closures held, by snaps or Velcro.
Utility Outlets (Utility and Scientific Electrical Outlet Diagram)
Utility and Scientific Electrical Outlet Diagram

The crew compartment has three electrical utility outlets of 28 volts dc. The outlets are disbursed for accessibility and are located near the left side window (MDC 15), the right side window (MDC 16), and on the lower equipment bay panel 100. Each outlet or receptacle has an adjacent UTILITY switch with a POWER and OFF position. The circuit breakers for the utility outlets are on panel 229 and marked UTILITY R/L STA for MDC 15 and 16, and UTILITY LEB for panel 100.
Scientific Instrumentation Outlets (Utility and Scientific Electrical Outlet Diagram)
For supplying 28 vdc to scientific experiments, there are receptacles on panels 162 and 163 of the LEB and panel 227 on the right girth shelf. Each outlet has an adjacent switch with a POWER and OFF position. The circuit breaker for the receptacles are on panel 5 and marked INSTRUMENTS/SCI EQUIP/NONESS/SEB-2 for panels 162 and 163. The CB for panel 227 is on MDC 5 and marked NONESS/HATCH. The nonessential bus 2 must be powered by the switch on MDC 5 marked NONESS BUS MNA-OFF-MNB.
Panels 162 and 163 are behind the LEB closeout panels and compartment BS, respectively. If the mission does not indicate usage, the switch will be safety wired to the OFF position.
CREW LIFE SUPPORT
Crew Water
Drinking Water Subsystem (Drinking Water Subsystem Diagram)
Drinking Water Subsystem Diagram

The source of cold water for drinking and food preparation is the water chiller. The line is routed to the cold water valve of the FOOD PREPARATION WATER tank; and has a maximum pressure of 48 psi, a minimum pressure of 18 psig, and a nominal working pressure of 22 to 27 psig. The crewman drinking water line is teed off, and routed through a shutoff valve to the water dispenser located beneath the main display panel structure.
The water dispenser assembly consists of an aluminum mounting bracket, a coiled viton rubber hose with a QD, and a water dispenser in the form of a lever- actuated pistol. The water pistol delivers approximately 8 milliliters of water per second (ml/s) when actuated. It has a QD at the bottom of the handle for connecting to the coiled hose. The handle contains a fire extinguishing valve that delivers water at the rate of 38 ml/s in a 60 degree cone when actuated. The pistol is identical to the LM water pistol.
The uncoiled hose will reach 72 inches, and when the pistol is returned to the mount, the hose will re-coil into the housing. The pistol is stowed in the mounting bracket and is held in place by a retainer lever or attached to the crew compartment structure.
Operational Use
The shutoff valve on panel 304 is opened during the countdown to activate the system. This is accomplished with the valve handle. The shutoff valve will be open for the entire mission unless the pistol or dispenser assembly develops a leak or malfunctions.
The pistol with the gas separator is placed in the mouth and the actuator lever pressed.
After landing, the potable water supply will be used for drinking until depleted. Then, the sea water can be converted to potable water by a device in the survival kit.
Food Preparation Water (Food Preparation Water System)
Food Preparation Water System

The food preparation water is metered from the FOOD PREPARATION WATER supply on the LHFEB (panel 305), and is used to reconstitute the food. It meters cold water at 50 °F and hot water at 154 °F to 1-ounce aliquots.
There are two syringe-type valves, and a water nozzle with a protective cover and lanyard. The hot water tank capacity is 38 ounces (slightly more than a quart) and is heated by 25- and 20-watt calrod heaters controlled by three thermostats. The thermostats are powered through the POT H20 HTR, MNA and MNB circuit breakers on MDC-5.
To operate, remove nozzle protective cover by pulling and attach gas separator slowly, engaging the bayonet fittings. Secure food bag and cut protective cover from the food bag valve. Push food bag valve on the separator nozzle, verifying the food bag valve is open. Pull the syringe handles and release (1 cycle) as many times for as many ounces of water needed. Do not overfill as backpressure may cause the gas separator to leak. When finished, pull the food bag valve off nozzle and replace cover.
Gas/Water Separation (Gas/Water Separation Diagram)
Gas/Water Separation Diagram

The swallowing of water with excessive gas is uncomfortable. During the production of water by the fuel cells, hydrogen is in solution and under a pressure of 64 psi which is partially removed by the hydrogen gas separator prior to entering the potable water tank. As the pressure is reduced to 25 psi in the potable water tank, the hydrogen and oxygen gases increase in volume and. migrates through the bladder. Further reduction of pressure at the water pistol outlet to 5 psi frees more of the hydrogen and oxygen from solution. The function of the gas/water separator is to separate the hydrogen and oxygen from the drinking water and food preparation water and vent it into the crew compartment. Two gas/water separators, a drying adapter, a nozzle cap, and a stowage bag are provided.
The gas separator is a cylinder 6 inches long with a female (inlet) fitting at one end and a nozzle (outlet) at the other end. The inlet fitting has a bayonet key and will fit and lock up the food preparation water nozzle on panel 305 or fit on the water pistol barrel. The separator outlet nozzle will interface with a food bag or can be inserted in the mouth for drinking.
Water from the pistol or food preparation water unit enters the inner chamber and is routed through holes in the upper end into the outer chamber. The water flows along a teflon hypophobic membrane that allows gas to permeate the membrane and pass through slots in the cylinder wall.
A t the outlet end the water passes through a hypophilic stainless steel fine mesh screen chemically treated to transmit water readily. The water then flows through the outlet nozzle.
Operation
The separator membrane has to be pre -wet before using. Attach a separator to the water pistol barre l by rotating and pushing slowly until seated. Caution should be exercised when handling the separator as getting the outside surface of the membrane wet will cause it to leak and lose its effectiveness as a gas separator. When seated, the water pistol actuator is triggered in short bursts until water is observed at the outlet nozzle. Ten minutes for membrane wetting is allowed. The gas separator is carefully removed from the water pistol by twisting and pulling. The food preparation water nozzle cover is removed and the pre-wet separator is slid onto the nozzle. The bayonet key is engaged to the nozzle studs and turned, to lock on the separator. The food preparation water unit is then ready for use. Care must be taken when filling a food bag, to ensure the bag is not folded or the sides stuck together and from excessive fil ling as a slight backpressure will result in water breakthrough of the membrane and destroy its effectiveness as a gas separator. After each use, water on the exterior of the separator should be dried with a tissue (handy wipe).
For the water pistol, the pre-wetting procedure is repeated before use. After each use of the water pistol separator, it is removed from the pistol, the nozzle is blown through (backflushed). The water pistol is removed and stowed before each SPS firing.
Before entry, the separators are placed in the stowage bag and stowed.
Gas Separator Drying
In the event of water break breakthrough, a gas separator must be dried. A gas separator adapter and a nozzle cap a r e provided and stowed, in the gas separators stowage bag.
The gas separator is removed from the food preparation water nozzle or water pistol and dried carefully with a utility towel (caution should be exercised as the membrane can be damaged with pencils or tools). The nozzle cap is placed on the separator nozzle to seal it. Access is gained to the QD panel behind WMS panel 252. The m a le QD cap is removed and the gas separator adapter is attached to the panel QD. The separator inlet (female) port is mated to the adapter male port. Cabin gas flows through the membrane, through the separator inlet, and. into the waste water dump line to space. A ten- minute f low for drying is allowed, The separator, adapter, and nozzle cap are removed, the panel QD cap is replaced and the panel is closed. The separator adapter, nozzle ca p, gas separator are stowed or the gas separator is pre- wet and used.
The Galley System (The Galley System Diagram)
The Galley System Diagram

The galley system provid.es for cold or ambient stowage, heating, and serving food. It consists of food, a frozen food container (freezer), a food warmer (hotplate), a hot food holder (hot pad), stowage compartments and lockers.
Food
The food furnishes a balanced diet of approximately 2500 calories per day to each crew member and is contained in food sets or separate packages. The food sets are stowed in two prepacked food boxes for compartments B1 and L3. Oral hygiene assemblies for brushing the teeth and. spoons for eating are also included. Miscellaneous food packages are stowed in aft bulkhead lockers and the freezer.
There are several forms of food such as freeze-dried food in bags, wet packs, frozen food packs, dried fruit packs, beverages in bags, bread packs, and canned food.
Wet packs are frankfurters or a meat and gravy combination such as ham, turkey, and beef. They are packaged in aluminum dishes with a peel-away cover and are eaten with a spoon.
The frozen food packs are of the TV dinner type with a limited selection of breakfast, lunch, and. dinner. They are also packaged in aluminum dishes with a peel-away cover and eaten with a spoon.
Standard dried fruits are vacuum-packed in plastic bags for cutting open and eating.
Freeze-dried beverages and fruit juices are packaged in the same type of plastic bags as the freeze-dried food. They can be used for supplementary liquid meals in emergencies.
Bread is vacuum-packed in plastic bags and are spread with ham, chicken, or tuna salad from cans which have plastic, snap off lids.
The freeze-dried food is usually a meat combination dish, soup, or combination salad and is vacuun1-packed in plastic bags. The food bag has a one-way poppet valve through which the food p reparation water supply or gas separator nozzle is inserted. The bag has a second valve through which the food passes into the mouth. Approximately one-half of the food is packaged in Kel F plastic bags to make one meal for each astronaut. There are meal bags for breakfast, lunch, and dinner. Cleansing cloths are also included for each meal. The meal bags have red, white, and blue patches to identify them for the individual crewman.
The freeze-dry food is reconstituted by adding hot or cold water through the one way valve on the food bag neck. It is then kneaded by hand for approximately 3 to 5 minutes. When reconstituted, the neck is cut off with scissors and placed in the mouth. A squeeze on the bag forces food into the mouth. When finished, a germicide tablet, attached to the bag, is slipped through the mouthpiece to prevent fermentation and gas. The bag is then rolled as small as possible, taped, and returned to the food stowage compartment.
Frozen Food Container
The function of the frozen food container (freezer) is to maintain frozen food packs at a temperature of -100°F to +15°F for 12 days, opening a maximum of once a day for 2 minutes.
The freezer is essentially a large vacuum bottle. The capacity is one cubic foot and will hold 24 food packs weighing a total of 18 pounds. It is an oval shaped cylinder 18.6 inches wide and 18 inches long and weighs approximately 55 pounds without food. It has a 6-inch opening at one end and 4 attachment fittings (Calfax) on the underside. The freezer is stowed on the aft bulkhead for launch and entry, adjacent to lockers A4 and A5 on the +Z centerline. The freezer is removed and replaced with the use of tools E and H.
During the mission, the freezer is stowed in the upper equipment bay (right) adjacent to locker U3 with two straps, the access door forward. Once a day, the crew withdraws the desired frozen food packages and h eats the1n by placing them in the food warmer.
Food Warmer (The Galley System Diagram)
Another unit of the galley system is the food warmer, or hotplate. Its function is to warm foods from a frozen state to 130±10 °F in 20 minutes or less. It is stowed in locker A5 for launch and entry.
The food warmer consists of an enclosed electrical power unit, three dishes, and a power cable. The oven unit is 9. 3 x 6. 8 x 5. 8 inches, weighs 6 pounds, has a control panel, cover, and requires 300 watts to operate. The warmer cover is spring-loaded open and when closed, presses on the food and warming dish to maintain contacts in the dish well. An interlock switch deactivates the heating circuit when the cover is open. A moat around the edge of the dish well will collect moisture from cooking food packs. The warmer control panel has two lights, two switches, and a receptacle. The receptacle receives the power cable connector. The HEATING CYCLE switch has a LONG position to be used when warming frozen food packs (20 minutes) and a SHORT position for wet and dry food packs (10 minutes). The RESET switch is momentary and starts the timer and. the warming cycle. The indicator lights are marked COMPLETED and HEATING. A thermal switch provides automatic shutoff to prevent the dish from over heating in addition to a timer shutoff. A strap with snaps is attached to restrain the warmer in its using position on the right side of panel 10 in the tunnel area.
The warmer dishes are insulated steel bowls about 6 x 5 x 1 inches with internal heating elements and external contacts and hold frozen, wet, or dry food packs. One dish is stowed in the warmer and two are stowed in a container on locker A3. After heating, they may be used to contain the opened food pack during eating. The frozen food pack is designed so its cover may be peeled back as the meal is eaten to contain the uneaten portion.
Food Warmer Operation
The warmer, dish, power cable, and holder are removed from stowage. The warmer is mounted to the right of panel 10 by its strap and snaps. The FOOD WARMER switch on panel 201 should be OFF, and the power cable connectors attached to the receptacles on the warmer and panel 201. The CABIN FAN 2 switch on panel 2 should be OFF as simultaneous operation may trip the CABIN F AN 2 AC 2 circuit breakers (2 amps) on panel 5.
The food pack to be heated is procured and placed in the warmer dish; the cover is closed, and latched. The FOOD WARMER switch on panel 201 is set to ON; the warmer HEATING CYCLE mode switch is set to the applicable LONG or SHORT position; the warmer RESET switch is momentarily set to RESET. The HEATING light should be on to indicate the cycle has begun. The HEATING light will turn on and off 48 times as the power is applied to the dish (power is applied intermittently to prevent scorching the food). The dish and food will be warmed when the COMPLETED light turns on. The warmer dish and food pack are removed using the holder. The moisture is wiped from the warmer dish well and moat.
In the event the warmer dish gets soiled, a tissue is dampened and the dish is wiped clean and dried with a utility towel.
During preparation for entry, the food warmer, dish, holder, and power cable are disassembled and stowed.
The power cable is 34 inches long with a connector at each end. The 90-degree elbow end connects to the warmer receptacle and the straight end to the panel 17 receptacle for electrical power.
Hot Food Holder (The Galley System Diagram)
To handle frozen and hot food pack, a hot food holder (hot pad} is provided. It is 9 inches long, fabricated of Beta cloth, insulated with Beta felt, and fits either hand. It is stowed with the food warmer when not in use.
Stowage (The Galley System Diagram)
Food is stowed in two areas: the food stowage compartment (2125 cubic inches) in the lower equipment bay (LEB), and the food stowage compartment (2947 cubic inches) in the left-hand equipment bay (LHEB). Combined, they offer approximately 5072 cubic inches of food storage volume, which is sufficient for a 10.6-day mission.
The LEB compartment door is held closed with a “dog ear” latch (squeeze latch). The door is held by a slide and bell-crank detent, and acts as a food shelf. When opened, the door inner surface has patches of Velcro hook. The food box, located in side, is fiberglass with an open end, covered with Beta cloth held on by snaps. The cloth is detached to gain access to the food packages.
The LHEB food compartment (L3) has two doors. Each door has a squeeze latch and is hinged at the top. The food box is similar to the LEB food box.
Contingency Feeding System
In the event the cabin is depressurized, the crew will be in their spacesuits and pressurized. Feeding will therefore have to be through the helmet feed port with use of the contingency feeding adapter. However, the backpressure from the spacesuit into the food bag may rupture the bag so it must have a protective cover-the food restraint pouch. Only fluids, primarily fruit drinks and punches will be drunk under these conditions as the solid food is too large to pass through the adapter. This condition could last five or less days.
The contingency feeding adapter and food restraint pouch are Kel F package and stowed in the LEB food compartment B1.
Food Restraint Pouch
The food restraint pouch is a strong nylon bag that fits over the food bag and prevents its rupture. While it contains the food bag, it can be compressed, forcing drinks from the bag, through the adapter into the mouth of the crewman.
Contingency Feeding Adapter
Nicknamed the “pon” tube, the contingency feeding adapter is a tube like device that inserts into, and opens, the food bag valve. It also inserts through the PGA helmet feed-through port and into the crewman’s mouth.
Waste Management System and Supplies
The function of the Waste Management System (WMS) is to control and/or dispose of crew waste solids, liquids, and waste stowage gases. The major portion of the system is located in the RHEB. The basic requirements of the system are ease of operation, accessible supplies, collection and stowage of feces, urine collection and overboard dump, removal of urine from the PGA, urination while in the couches, venting of waste stowage gases, and vacuuming waste liquids overboard. The WMS contains a urine, fecal, waste stowage vent, and vacuum subsystem with their associated supplies and equipment.
General Description (Waste Management System Diagram)
Waste Management System Diagram

The WMS contains a urine transfer system (UTS), or urine receptacle, urine hose , a vacuum fitting, a fecal collection device, fecal stowage compartment, a WMS panel with two QD’s, a control valve, a urine dump line with a special dump nozzle and an auxiliary dump nozzle. Opening the control valve on the WMS panel subjects the system to a 5-psi differential pressure, crew compartment to space. The dump nozzle contains an exit orifice of 0.055 inch that restricts gas flow to a maximum of 0.4 cfm and liquid flow to 1 pound per minute. The gas flow is limited to prevent excessive loss of cabin oxygen during system usage. To prevent the formation of ice at the dump nozzle, which could block flow, the dump nozzle contains two 5.7-watt heaters controlled from panel 101 (LEB). A switch selects the dump nozzle heater to be enabled. Two 2-Watt heaters are on the urine line just inboard of the nozzle and are operating continuously.
The battery vent/waste water dump subsystem parallels the urine dump line. It routes outgassing and emergency relief of fluids from the batteries to the WMS panel (252), through the battery vent valve to the ECS water panel 352 where the waste water vent line T’s into it. From panel 352, it is routed through a 215-micron filter on the aft bulkhead, through a penetration fitting in the sidewall, to the waste .water dump nozzle. The temperatures of both dump nozzles (0 to 100 degrees F) are telemetered to earth to provide an indication of impending nozzle freezing. In the event that either dump nozzle freezes or clogs, the dump lines can be interconnected. To interconnect, open the door below panel 252, exposing a flex line connected to a stowage QD. Disconnect the flex line and connect to the QD 2 inches to the right marked TO WASTE WATER NOZZLE. The interconnecting allows fluids to flow out the “open” (unrestricted) dump nozzle.
The battery vent line contains a pressure transducer that has a readout on the SYSTEMS TEST meter (position 4A) on panel 101 (LEB). A periodic check of the battery vent line pressure will indicate freezing or clogging of the waste water dump nozzle. (This is not likely to occur if the waste water tank is drained periodically.) Place the BATTERY VENT valve (panel 252) in the VENT position, thus sensing the battery vent and waste water dump line. Plugging of the nozzle will be indicated by a rise in pressure. If the waste water dump nozzle becomes plugged, interconnect the urine dump line and check the urine dump nozzle. Insert the cabin nitrogen purge (vacuum) fitting into the WMS panel QD, pressurize the lines (5 psi) by opening the OVBD DRAIN valve (to DUMP), closing the valve, and monitor the battery vent line pressure. If the pressure drops to zero, the urine line and nozzle are clear. If the system remains pressurized, both nozzles are plugged. The auxiliary dump system should then be used and is described in subsequent paragraphs.
Urine Subsystem (Urine Subsystem Components Diagram)
Urine Subsystem Components Diagram

The urine subsystem has two contending urine collection devices for collecting and transferring urine, the Urine Transfer System (UTS) and the Urine Receptacle. The remainder of the urine subsystem is a 120-inch flexible urine hose (capable of reaching a crewman in a couch), and a filter.
Gemini Urine Transfer System (UTS)
The components of the urine transfer system (UTS) are a rollon, receiver, valve with a manifold, collection bag, and a 3/8-inch quick-disconnect (QD). The rollon is a rubber tube that functions as an external catheter between the penis and the receiver/valve. The rollon is used approximately one day (5 to 6 urinations) and then replaced. Ten additional rollons per crewman are in a stowed rollon cuff assembly coded red, white, and blue. The rollon attaches to the urine receiver. The receiver is a short tube that contains a low-pressure differential check valve (0.038 psi), a low pressure differential bypass valve, and screws onto the valve manifold. The collection valve has two positions, OPEN and CLOSED, and allows urine to flow into the manifold. The other end of the valve manifold has a 3/8-inch QD and the collection bag throat is teed into the manifold. The urine collection bag is rectangular in shape with a capacity of approximately 1200 ccs. Each crewman will have his personal UTS for sanitary reasons.
Urine Receptacle With Plenum
The urine receptacle is a relief tube with a valve on the exit end. Both ends have threaded sections. The diaphragm assembly will screw on the receiving (front) end and the plenum will screw on the exit (rear) end. The urine receptacle valve opens when turned 90 degrees counterclockwise and closes 90 degrees clockwise. The relief tube body has slanted holes downstream of the diaphragm and upstream of the valve that allows gas to bypass the diaphragm when attached to the penis. There is one urine receptacle per spacecraft.
The diaphragm assembly is a short cylinder with a stretched diaphragm over the upstream or receiving end. The diaphragm has a hole in the center through which the penis is placed. The diaphragm is attached to a collar that moves along the outside of the cylinder and stretches the diaphragm. The collar is moved by a wishbone fitting. The diaphragm attaches to the ‘receptacle by screwing. Each crewman will have his personal diaphragm marked L, C, or R. Each diaphragm will have a plastic cap cover with a strap handle and a snap. The diaphragms are stowed in a beta cloth container with compartments marked L, C, and R.
The plenum chamber attaches to the receptacle exit threaded section and is sealed with an 0-ring. An enclosed cylinder with a capacity of 780 cc, it receives the urine from the receptacle. Attached to the bottom of the plenum is an open end stand pipe with holes at the top, middle, and lower end. This allows gas to always mix with the urine and assure an adequate flow. The exit end of the plenum has a QD that attaches to the urine hose.
The diaphragm-receptacle-plenum, or urine receptacle assembly will receive and transfer urine at a maximum rate of 40 cc per second. The urine subsystem has a capacity of 1200 cc at the rat e of 40 cc per second. The assembly will be stowed in an aft bulkhead locker for launch and entry. During the mission, it will be stowed on the aft bulkhead cableway, by the WMS panel 252 with the aid of a strap. It should always be stowed with a diaphragm and cover attached to restrict debris.
Urine Hose and Filter
The urine hose is silicon rubber with a Beta cloth cover which will withstand a 6-psi differential pressure and is flexible to facilitate easy routing and handling a t zero g. The spacesuit urine QD is located approximately 20 inches from the urine QD and is teed into the hose. The panel QD end of the hose connects to a 215-micron (0.009 inch) filter with a QD which mates with the waste management system (WMS) panel QD. The urine is filtered to prevent clogging the 0.055-inch orifice in the urine dump nozzle. In the event the OVBD (overboard) DRAIN valve leaks, the panel QD can be disconnected to prevent loss of oxygen.
Operation
Urine is dumped in one of the following ways: urination and dumping simultaneously, urination and dumping separately, or draining (dumping) the spacesuit urine collection and transfer assembly (UCTA). There is also an auxiliary dump method which will be described later.
One of the two urine dump nozzle heaters should be on at all times during the mission. The URINE DUMP HTR switch, on panel 101 of the LEB, has three positions: HTR A, HTR B, and OFF. Select HTR A or HTR B. The circuit breakers for this switch are the ECS STEAM/URINE DUCT HTR MNA/MNB circuit breakers on MDC-5 (lower center).
Urine Transfer System, Urinating and Dumping Simultaneously. Connect the panel end of the urine hose (with filter) to the WMS panel QD. Connect the hose urine QD to the urine transfer system (UTS) QD. Next, turn the OVBD DRAIN valve to DUMP. Attach the UTS to the penis by the rollon. Turn the UTS valve handle to OPEN (it will cover the word “0PEN”) and urinate. The receiver low pressure differential check valve (0.038 psi) is opened. During this operation, 200 to 300 cc of urine will flow into the urine hose and gradually fill the lines. When the flow decreases, the UTS bag will begin to fill. The 5-psi pressure differential between cabin and space will cause gas and urine to dump overboard. (With the penis connected, the bypass valve in the receiver prevents a pressure differential on the penis). When urination is complete, roll the rollon back onto the receiver and remove the penis. Place the finger over the bypass valve, thus sucking urine on the outside of the receiver into the receiver flapper valve and preventing it from leaking into the cabin. Close the UTS valve and allow the bag to completely vacuate. Then open the UTS valve and allow a minute purge to clear the urine hose, and then close the valve. Disconnect the UTS QD and stow. Turn the OVBD DRAIN valve to OFF, remove the hose, and stow.
Urine Transfer System, Urinating and Dumping Separately. To urinate and dump separately, unstow the UTS and attach to the penis by the rollon. Turn the UTS valve to OPEN and urinate. The urine will pass through the receiver low-pressure differential flapper valve, through the valve, and into the bag. When urination is complete, remove the UTS by rolling the rollon back to the receiver. A little urine may be clinging to the receiver. Attach a filter to the collection bag QD and then attach the UTS and filter to the WMS panel QD. {This can be accomplished when convenient.) Open the OVBD DRAIN valve and the UTS valve. When the bag is empty (flat), allow 30 seconds for purging before closing the UTS valve and OVBD DRAIN valve. Disconnect UTS QD from the filter QD and stow.
Urinating Using the Urine Receptacle Assembly
The use of the urine receptacle necessitates urinating and dumping simultaneously. To use, obtain the urine receptacle assembly from the mission stowage position and attach personal diaphragm. Remove diaphragm cover and stow. Connect the assembly to the urine hose, rotate WMS OVBD DRAIN valve to DUMP, and rotate the urine receptacle valve 90 degrees counterclockwise until it stops . The system is vented to space and has a 5-psi differential. Open the diaphragm hole, insert penis, urinate, and remove penis. When the plenum empties, allow 60 seconds for the hose and lines to clear, then close urine receptacle valve and OVBD DUMP valve, respectively. Place cover on diaphragm, and stow.
Draining the UCTA While in the Spacesuit
To drain the spacesuit urine collection and transfer assembly (UCTA) through the spacesuit urine transfer QD, proceed as follows. Connect the UTS or urine receptacle to the hose, and the hose to the panel QD. Then connect the hose spacesuit urine QD to the spacesuit urine transfer QD. Position the OVBD DRAIN valve to DUMP. .The hose internal pressure is then zero and the spacesuit pressure of 5 psi compresses the UCTA bladder, forcing the urine into the urine hose and overboard dump line. When the bladder has been emptied, open the UTS or urine receptacle valve for approximately a minute to purge the urine hose and line. After closing the UTS or urine receptacle valve, disconnect the urine hose from the spacesuit and UTS or urine receptacle and stow.
Draining the UCTA After Removal From Spacesuit
It is difficult to drain the UCTA while it is attached to a stowed spacesuit. Therefore, remove the UCTA from the suit by verifying the rollon is clamped and disconnecting the UCTA QD. The urine hose to UCTA adapter is a small tube with a urine hose QD on one end and. a UCTA QD on the other. (The UCTA adapter is attached. to the urine hose for mission stowage by a strap.} Connect the adapter to the UC TA and the hose spacesuit urine QD. Attach the UTS or urine receptacle assembly to the urine hose, and open the OVBD DRAIN valve and the UTS or receptacle valve. Gas will now flow through the urine hose. Gently compress the UCTA to force urine into the urine hose. When the UCTA is empty, allow 60 seconds purge before closing the UTS or receptacle valve and OVBD DRAIN valve. Disconnect the UCTA from the adapter and attach to the spacesuit.
In the event the cabin is depressurized, and emptying the UCTA is mandatory the UCTA is connected to the urine hose by the UCTA adapter. After opening the OVBD DRAIN valve, the UCTA is firmly compressed, forcing the urine into the hose, lines, and. overboard through the dump nozzle.
Auxiliary Dump System (Auxiliary Dump Nozzle Operations Diagram)
Auxiliary Dump Nozzle Operations Diagram

An alternate method of dumping urine is through the auxiliary dump nozzle in the side hatch. Before launch, the nitrogen purge fitting in the hatch is replaced with an auxiliary urine dump nozzle. The nozzle body passes through the hatch, protrudes slightly inside the hatch and has a pressure plug, electrical connector, and a stowage cover. To prepare for use, remove the auxiliary dump nozzle stowage cover with tool E (small tip). Carefully pull the wires with the connector from inside the stowage cover. Remove the wires from the slot enough to allow clearance for installation of the auxiliary dump nozzle QD. With tool E (small tip) remove the pressure plug (about 20 inchpounds) and retain. Crew compartment oxygen begins flowing through the dump nozzle. Immediately install the auxiliary dump nozzle QD and hand tighten. Stow the pressure plug and connect the auxiliary dump nozzle power cable to the nozzle connector and to a utility connector on panels 15 or 16. Turn the UTILITY switch to POWER, applying 28 vdc to the two 5.7-watt heaters in the auxiliary dump nozzle. Allow 5 to 10 minutes for the nozzle to warm. The UTS can be dumped by connecting a urine filter to the UTS QD and then attaching it directly to the auxiliary dump nozzle QD. The 5-psi differential pressure will force urine from the UTS bag and overboard through the heated nozzle. When the UTS bag is empty, open the UTS valve for 10 to 20 seconds to purge.
Urination and simultaneous dumping through the auxiliary dump nozzle can be accomplished by connecting the urine hose with filter to the UTS or urine receptacle assembly and the auxiliary urine dump nozzle QD. Apply the rollon or diaphragm to the penis, open the UTS or receptacle valve, and urinate. When completed, remove the penis and allow a 10- to 20-second purge before closing the UTS or receptacle valve.
Fecal Subsystem (Waste Management System Diagram)
The fecal subsystem consists of a fecal collection assembly, tissue dispensers, stowage compartment, and a waste stowage compartment.
The fecal collection assembly contains a Gemini fecal bag and an outer fecal emisis (FE) bag bound together with a plastic wrapper. The Gemini fecal bag is a plastic sack with a flange at the opening and a finger tube in the center. The flange has a surface of stomaseal tape for adhering to the skin. There is a pocket on the outside of the lower end in which is stowed a wet cleansing cloth and a germicide pouch. The outer FE bag is used for stowage of the used fecal bags and is transparent. It has internal and external seals at its mouth which makes it capable of containing a differential 5-psi internal gas pressure.
The tissue dispensers contain tissue (Kleenex) for wiping, are approximately 8x4x3 inches, and weigh approximately a half pound a piece. They are stowed in an aft bulkhead locker, and one dispenser is attached to the back of the center couch footpan so it will be available for use.
The fecal collection assemblies are stowed in the RHIEB R 10 compartment in the aft stowage box. The stowage box is fiberglass and has an end door for greater accessibility.
The entry to the waste stowage compartment is through the door R 9 in the RHIEB. This compartment has a capacity of 1600 cubic inches and is part of the Waste Stowage Vent System.
Operation
Retrieve a fecal collection assembly from stowage, remove the wrapper, obtain the Gemini fecal bag, and remove protector strips covering the stomaseal on the flanges. Press the flange to the buttocks and defecate. The finger tube may be used to dislodge any feces adhering to the buttocks. When finished, remove the fecal bag, wipe with tissue, clean with a wet cleansing cloth, remove germicide pouch outer cover and place in the fecal bag. Gently force gas out of the bag, seal the flange opening, locate and rupture the germicide pouch by squeezing. Place the used Gemini fecal bag into the outer FE bag, remove the protective strip from the inner stomaseal surface, press gas from the FE bag and seal. Remove the protective strips from the outer stomaseal surfaces, fold, seal, and knead thoroughly until the blue germicide permeates the feces. Roll into the smallest volume and place in the waste stowage compartment. A split membrane inside the WASTE DISPOSAL door will prevent the fecal bags from “floating” back through the door opening when released.
Waste Stowage Vent System (Waste Stowage Vent System Diagram)
Waste Stowage Vent System Diagram

In the event that several fecal bags rupture during the mission, the waste stowage compartment could emit fecal odors. A bladder has been placed in the compartment with an overboard vent system consisting of a 215 micron filter, check- relief valve, and a vent valve to the urine overboard dump line.
During boost the waste stowage vent valve is open to purge nitrogen from the crew compartment. However, the crew compartment pressure decreases faster than the waste stowage compartment and at a differential pressure of 2 psi, the check valve vents into tl1e crew compartment. During the mission, after the vent valve has been closed, if ruptured fecal bags create an overpressure of 2 psi, the check valve vents, the crew will smell fecal odor and can momentarily turn the waste stowage vent valve to VENT, venting the odor overboard at periodic intervals. Each entry of a fresh fecal bag into the waste stowage compartment would be preceded by an overboard vent action. The waste stowage door forms a pressure seal when “closed.” During entry, the crew compartment pressure increases faster than the stowage compartment. A small poppet valve that opens from 0.072 to 0.1 psi is in the waste stowage door and allows the pressure to bleed into the waste stowage compartment.
Vacuum QD (Cabin Vent QD)
In the event waste liquids escape and pool on the aft bulkhead, they can be “vacuumed” and dumped overboard by use of the vacuum QD and the waste management system. The vacuum QD (V36-612547- 11), also called “cabin purge QD,” is a 215-micron (0.0086 inch) filter with a Q D and 90-degree elbow. The QD will mate to the urine hose.
To vacuum liquid, attach vacuum QD to the urine hose, open WMS OVBD DRAIN valve (panel 251) and use as vacuum cleaner.
The vacuum QD will be stowed when not in use.
Personal Hygiene (Personal Hygiene Items Diagram)
Personal Hygiene Items Diagram

Personal hygiene items consist of an oral hygiene assembly, utility towels, and wet and dry cleansing cloths.
Oral Hygiene Set – Cleansing of Teeth
The maintenance of oral health in space flight requires aids which will cleanse the mouth of food debris and bacterial plagues. These aids will be provided each crewmember on an individual basis according to his needs. The oral hygiene set consists of a toothbrush and consumable toothpaste or ingestible gum. The required set will be stored in the first day’s food stowage compartment B1, to be used for the entire mission.
Wet Cleansing Cloth
Wet cleansing cloths will be used for postmeal and postdefecation hygiene. The cloths are 4 by 4 inches, folded into a 2-inch square and sealed in plastic. They are saturated with a germicide and water.
The cloths for postmeal cleansing are stored, along with the dry cleansing cloth, in the food containers for easy accessibility. The postdefecation cloths are part of the fecal collection assembly.
Dry Cleansing Cloth
The dry cleansing cloths will be alternated with the wet cleansing cloths for postmeal cleanup. They are the same size and texture; however, they do not contain water and a germicide. They are also packaged with the food.
The wet and dry cleansing cloths will be placed in the food packages and be part of the “Food Set.”
Utility Towels
The towels are used for utility cleanup and use. They are 12 x 12 inches and similar to a washcloth, sterile, and packaged in plastic containers. The containers have Velcro patches and stow in an aft bulkhead locker.
Tissue Dispensers
The tissue dispensers contain tissues (Kleenex) for utility-wipe and clean-up purposes. The dispenser consists of a container and tissues. The container is Beta cloth, approximately 9 x 4 x 2 inches, weighs 1. 4 pounds with tissues, and has Velcro patches for restraint during the mission. Approximately seven dispensers are stowed in aft bulkhead lockers at launch.
MEDICAL SUPPLIES AND EQUIPMENT
The medical equipment is used to monitor current physiological condition of the crewmen, and to furnish medical supplies for treatment of crewmen inflight medical emergencies.
The medical equipment is subdivided into two functional types: monitoring equipment and emergency medical equipment. The monitoring equipment consists of personal biomedical sensors assembly and a biomedical signal conditioner instrument assembly. The emergency medical equipment is in the medical accessories kit. This kit also contains spares for the bioinstrumentation equipment and harnesses.
Bioinstrumentation Harness Assembly (Bioinstrumentation Harness Diagram)
Bioinstrumentation Harness Diagram

The current physical condition is of great importance to the mission monitoring flight surgeon. The heartbeat, by electrocardiograph (ECG) and the respiration, via impedance pneumograph (ZP), are monitored continually throughout the mission. The ECG and ZP are telemetered continuously for all three crewmen simultaneously.
The bioinstrumentation harness is the crewman’s personal harness consisting of a sensors assembly and signal conditioner assemblies.
Personal Biomedical Sensors Instrument Assembly
The personal biomedical sensors instrument assembly consists of four or more electrodes (silver chloride), signal wire, and accessories, such as paste and application tape.
The sensors (electrodes) are attached to the body of the astronaut, using paste and tape, at areas of sparse muscles (to reduce artifact level), and remain throughout the mission. The sensor assembly consists of two harnesses, a sternal harness attached to the breastbone and an axillary harness attached to ribs near the armpits. The harnesses terminate in connectors that attach to the signal conditioners.
Biomedical Signal Conditioner Assembly
Because of their weak signal level, the sensor signals have to be amplified before being telemetered. Thus function is performed by the signal conditioners.
The signal conditioners are 2.3 x 0.46 x 1.5 inches and weigh about 55 grams. They operate through a signal range of plus to minus 5 volts and are powered by a de-to-de converter which requires 16.8 vdc. This input power is supplied through the SUIT POWER switch on each of the audio control panels (MDC 6, 9, 10). There are two signal conditioners (ECG and ZP) and the dc to dc converter.
The signal conditioners fit into pockets in the bioinstrumentation belt which snaps on the CWG at the stomach. Wire leads connect to the sensors, which act as an electrode for the ECG and ZP conditioners. The difference of resistance between two electrodes is measured. Muscle activity (breathing) changes the skin resistance and this change is amplified and transmitted to the telemetry system. Each signal conditioner has an output connector that attaches to the harness leading to the CWG adapter or spacesuit harness.
Bioinstrumentation Accessories or Spares
Spares will be located in the medical accessories kit. The kit has spare electrodes, micropore discs, electrolyte paste, stomaseal disks, and a sternal and axillary harness.
Medical Accessories Kit (Medical Accessories Kit Diagram)
Medical Accessories Kit Diagram

The medical supplies are oral drugs, injectable drugs, dressings, topical agents, and eyedrops. The contents of the medical kit are as follows;

  • Oral Drugs and Pills
    o Pain capsules
    o Stimulant
    o Antibiotic
    o Motion sickness
    o Diarrhea
    o Decongestant
    o Aspirin
  • Injectable Drugs
    o Pain injectors
    o Motion sickness injectors
  • Dressings
    o Compress bandage
    o Band-Aids
  • Topical Agents
    o Skin cream
    o Anti biotic ointment
  • Eye Drops
  • Nasal Emollient
  • Sternal harness
  • Axillary harness
  • Electrode Assemblies
  • Thermometer
  • Ph paper
  • UCTA rollons
    The kit is contained in a beta cloth bag with a cloth closure. Inside are leaves with pockets and pouches in which the contents are stowed. The medical accessories kit is stowed in the RHIEB in compartment R8.
    In the event the astronauts have to evacuate the command module during the recovery phase, the medical kit will be removed from stowage and carried overboard into the liferafts.
    RADIATION MONITORING AND MEASURING EQUIPMENT (Radiation Monitoring and Measuring Equipment Diagram)
    Radiation Monitoring and Measuring Equipment Diagram

The system devices that measure the radiation accumulated dose received by the crew are the passive dosimeters and the personal radiation dosimeters, while the Van Allen Belt dosimeter and the radiation survey meter monitor the ambient strength of the radiation field. In addition, the nuclear particle detection system measures the particle flux of the radiation field.
Passive Dosimeters
Four passive dosimeters (film packs) are worn by each crewman in form film packs which are processed in the laboratory after recovery to determine total dosage received. The dosimeters are located inside the communication hat by the temple and in CWG pockets on the chest, the thigh, and the ankle. When CWGs are changed, the film packs must be respectively switched (Radiation Monitoring and Measuring Equipment Diagram).
Personal Radiation Dosimeter (PRD)
Each crewman will wear one personal radiation dosimeter which is battery-powered and the size of a package of cigarettes. The PRDs register readout indicates the accumulated dosage received by the crewman during the mission. The PRD is worn on the PGA or flight coveralls at all times.
Radiation Survey Meter (RSM)
The radiation survey meters used to determine the magnitude of the immediate radiation field. It is a flashlight-like, self-contained unit about 10 inches long and 2 inches in diameter. The RSM has an ON-OFF switch, direct readout dial calibrated in rads/hr, and is battery powered and manually operated.
The RSM is clamped in a bracket mounted on the G&N signal conditioning panel.
Van Allen Belt Dosimeter (VABD)
The Van Allen Belt dosimeter is designed to measure dose rates to the skin and to blood-forming organs (depth dose measurement) in the command module. The VABD consists of two individual dosimeters (skin and depth), which have ionization chambers as sensors. The d-c voltage outputs of the VABD are telemetered to ground real time, and these voltage outputs are calibrated to dose rates (rads/hr).
The VABD and its filter module is mounted in the command module on the girth ring between longeron No. 4 (right side) and the hatch.
Nuclear Particle Detection System (NPDS)
Th e NPDS measures proton and alpha particle rates in seven differential energy bands and one integral energy band ( 8 channels: 4 proton, 3 alpha, and 1 integral proton). The instrument consists of a detector assembly (DA), in the form of a telescope arrangement, and a signal analyzer assembly (SA). The pulse rate from the DA at which particles enter the various energy intervals are converted to d-c voltage levels by ratemeters in the SA; the outputs of the ratemeters are then teletmetered to ground.
The NPDS is located in the adapter section between the command module and the service module.
POSTLANDING RECOVERY AIDS
The postlanding recovery of the crew and CM may last 48 hours. The recovery aids will assist the crew in signaling the recovery forces and survival.
Postlanding Ventilation (PLV) Ducts (Postlanding Ventilation Ducts Diagram)
Postlanding Ventilation Ducts Diagram

Shortly after landing, the POST LDG VENT VALVE UNLOCK handle in the upper center of MDC-2 is pulled, unlocking the PLV valves on the forward bulkhead. Then the POSTLANDING-VENT HIGH switch on MDC-15 is positioned to VENT HIGH, forcing air into the CM cabin. The PLV ducts are unstowed and distributed. The crew installs the PLV ducts on the PLV manifold. Each crewmember places a head strap around the back of his head, and lies in his couch. The PLV ducts direct the flow of incoming air to the crewmen. The right- and center-couch crewmen use the short ducts and the left-couch crewman uses the long duct.
The ducts are 3.25 inches in diameter, 15 inches or 35 inches long, and are made of cloth with stiffeners every 5 inches. One end has a head s trap and the other end an internal circumferential s trip of Velcro for attaching to the PLV manifold. The ducts com press, accordian style, into small volumes that are stowed easily.
Swimmer Umbilical and Dye Marker (Swimmer Umbilical and Dye Marker Diagram)
Swimmer Umbilical and Dye Marker Diagram

For daylight visual acquisition during the recovery phase, dye marker is deployed. The CM equipment consists of a dye marker and swimmer umbilical deployment mechanism located on the forward bulkhead and a power control.
The swimmer umbilical and dye marker is spring- loaded and held by a hot wire actuator pin. When the crew determines that the dye marker is required, the DYE MARKER switch is activated to the DYE MARKER position. The POST LANDING switches are located on MDC-15. The DYE MARKER switch is the center switch of the three POST LANDING switches. The circuit breaker is on MDC-8 and marked FLOAT BAG – 3 – FLT/PL. The current melts the actuator hot wire, retracting the pin and releasing the dye marker umbilical. It falls in the sea on the end of the 12-foot swimmer umbilical; the dye colors 1000 square feet of sea for 12 hours. When the pararescue personnel arrive, they uncap the swimmer umbilical and plug in a jack, connecting their headset-microphone to the audio center intercomm system, allowing them to communicate with the crew.
Recovery Beacon (Recovery Beacon Diagram)
Recovery Beacon Diagram

In the event that crew and CM recovery are not effected during daylight, there is a visual acquisition method for night operations. The CM equipment consists of a flashing light (or beacon) located near the tunnel that is turned on by the crew when needed.
Deployment of the beacon begins when the main parachute deploys. A lanyard, attached to the main chute risers, actuates two reefing line cutters that sever a cord holding the recovery beacon arm in the stowed position. A spring rotates the arm in an upright (deployed) position and a latch locks it in place.
The CM has a dual mode recovery beacon and the d-c power source is the SC flight and postlanding bus. The POSTLANDING switches are located on MDC-15. Its circuit breaker is labeled FLOAT BAG 3 FLT /PL and located on MDC-8.
When the pararescue team is ready for deployment the request for the high rate will be made. The BCN LT switch is then placed in the HI position. The beacon will flash with a low intensity twice every second or 120 FPM. In the high (HI) mode, the operating time is 4 hours.
Snagging Line (Snagging Line Diagram)
Snagging Line Diagram

In the event the CM lands beyond the recovery force helicopter range, a recovery aircraft will drop a sea anchor device, consisting of two sea anchor s at the ends of a 600-foot floating line. The crew will deploy a snagging line hook through the side hatch pressure equalization valve port after removing the valve. The snagging line is restrained by a plate bolted to the port. As the CM drift s over the sea anchor line, the snagging line hook snags the line, and the CM drift speed is then retarded.
Sea Water Pump (Sea Water Pump Diagram)
Sea Water Pump Diagram

The sea water pump is used for pumping salt water into the CM for desalting and drinking in the event the CM drinking water system is inoperable after landing and the survival hot water has been depleted. The sea water pump is stowed in a beta cloth container in a locker on the aft bulkhead.
The sea water pump consists of an intake hose, a guide fitting, a bellows pump with one way valves, and a discharge hose.
To operate, retrieve the steam vent line sea water pump from stowage. Access to the sea water access plug is through a panel in the LHEB. Tool E will remove the panel with tool B, insert into hex plug, torque CCW breaking the safety wire and remove plug. Insert sea water pump hose immediately (as sea water may be in the steam vent line) and screw the guide fitting into the boss as tight as possible with the fingers. To feed the intake hose through the fitting, unscrew the teflon guide plug. When the hose is in the sea water outside the CM, tighten the teflon guide plug. Obtain a desalting kit from the survival kit, operate the bellows pump by hand and fill the kit bag.
Survival Kit (Survival Kit Diagram)
Survival Kit Diagram

The survival kits function is to provide the equipment necessary for 48-hour crew survival in the water after landing. There are some items that can be used inside the CM such as the water and de salter kits.
The survival kit is s towed in the RHFEB structure in two rucksacks. To remove, open the SURVIVAL KITS door and pull the rucksacks inboard. The rucksacks will have an interconnecting mooring lanyard, and a man-line lanyard.
Survival Light Assemblies
The survival light is a three-units- in one device as it contains three compartments. The whole device is waterproof. The controls for the lights are on the bottom.
This first unit is a flashlight. The second unit is a strobe light f or night signaling. Tl1e third unit is a waterproof compartment containing a fish hook and line, a sparky kit (striker and pit h balls), needle and thread, and whistle. The top of the unit is a compass. On one side is a folding signal mirror.
Desalter Kits
The desalter kits contain a desalter process bag, desalter tablets, and bag repair tape. The desalter bags are plastic with a filter at the bottom. Approximately one pint of water is put into a bag and one tablet added. After one hour, drinking water may be taken through a valve on the bottom of the bag.
Machetes
The two machetes are protected with a cloth sheath. The knives are very thin with razor edges. The back edge is a saw.
Sunglasses
For protection of the eyes against the sun and glare, three sun glasses are included. They are a polarized plastic sheet with Sierra Coat III, a gold coating that reflects heat and radio waves.
Water Cans
For drinking water there are three aluminum cans, with drinking valve, each containing approximately 5 pounds of water.
Sun Lotion
Two containers of sun lotion are for protection of the skin.
Rucksack 2
Rucksack 2 contains the flotation gear in the form of a three-man life raft with an inflation assembly and CO2 cylinder. In addition, it contains a sea anchor, dye marker, lanyards, and a sunbonnet for each crewman.
EQUIPMENT STOWAGE
The numerous activities of the crew make housekeeping very necessary. All equipment must be stowed at launch and entry, and provisions must be made to restrain loose equipment during the mission.
Patches of Velcro hook are conveniently located on the CM interior structure for stowage of loose equipment, which will also have patches of Velcro pile. Mechanical fasteners (snaps, straps, etc.) will also be used for mission restraint.
Movable or loose equipment is stowed in compartments and lockers located in the equipment bays, on the crew couch, on the aft bulkhead, or sidewalls. The compartments have load bearing doors, internal foam blocks, or boxes to hold and position equipment. On the aft bulkhead, rigid aluminum boxes or reinforced bags are provided for stowage.
Each spacecraft is stowed in accordance with its field installation stowage drawing. Stowage differs from spacecraft to spacecraft because of mission requirements and crew desires.

APOLLO 11 OPERATIONS HANDBOOK BLOCK II SPACECRAFT
Docking and Transfer

DOCKING AND TRANSFER
INTRODUCTION
Docking Operational Sequence
SIV B Ignition Diagram
Transposition and Docking Diagram
LM Removal Diagram
CSM-LM Docked Crew Activities Diagram
LM Separation From CSM Diagram
LM Ascent Stage Lunar Launch Diagram
Post Lunar Docking Crew Transfer Diagram
LM Ascent Phase Separation From CSM Diagram
CSM Transearth Injection Diagram
FUNCTIONAL DESCRIPTION
Docking System – Major Assemblies Diagram
COMPONENT DESCRIPTION
CM Docking Ring
Automatic Docking Latches Diagram
Docking Latches
Docking Probe Assembly
Probe Assembly Docking System Diagram
Support Structure
Probe Operational Positions Diagram
Pitch Arms and Tension Linkages
Exploded View – Probe Assembly Diagram
Shock Attenuators
Docking Probe Attenuator Assembly Diagram
Probe Body-Extension Latch Assembly
Extension Latch Assembly Diagram
Probe Head-Capture Latches
Probe Capture Latch Assembly Diagram
Aft View Docking Probe Diagram
Capture Latch Release Diagram
Ratchet Assembly
Integrated Ratchet Assembly Diagram
Integrated Ratchet Assembly Operation Diagram
Retraction System
Probe Retraction System Diagram
Probe Umbilicals
Tunnel Lighting and Electrical System Diagram
Drogue Assembly
Drogue Assembly Diagram
Vehicle Umbilicals
Forward Tunnel Hatch
Forward Pressure Hatch Diagram
LM Tunnel Hatch

DOCKING AND TRANSFER
INTRODUCTION
This section contains the information identifying the physical characteristics of the docking system and the operations associated with docking and separation.
Docking Operational Sequence
The following sequence of docking illustrations and text describes in general the functions that are performed during docking. These activities will vary with the different docking modes.
After the spacecraft and third stage have orbited the earth, possibly up to three revolutions, the third stage is reignited (SIV B Ignition Diagram) to place the spacecraft on a translunar flight.
SIV B Ignition Diagram

Shortly after translunar injection, the spacecraft transposition and docking phase takes place (Transposition and Docking Diagram). When the CSM is separated from the third stage, docking is achieved by maneuvering the CSM close enough so that the extended probe (accomplished during earth orbit) engages with the drogue in the LM. When the probe engages the drogue with the use of the capture latches, the probe retract system is activated to pull the LM and CSM together.
Transposition and Docking Diagram

Upon retraction, the LM tunnel ring will activate the 12 automatic docking ring latches on the CM and effect a pressure seal between the modules through the two seals in the CM docking ring face. After the two vehicles are docked, the pressure in the tunnel is equalized from the CM through a pressure equalization valve. The CM forward hatch is removed and the actuation of all 12 latches is verified. Any latches not automatically actuated will be cocked and latched manually by the crewman. The LM to CM electrical umbilicals are retrieved from their stowage position in the LM tunnel and connected to their respective connectors in the CM docking ring.
The vehicle umbilicals supply the power to release the LM from the SLA. Once the hold-down straps are severed, four large springs located at each attachment point push the two vehicles apart (LM Removal Diagram) and the combined CSM/ LM continues towards the moon.
LM Removal Diagram

Once in lunar orbit, the tunnel is repressurized. The probe assembly and drogue assembly are removed from the tunnel and stowed in the CM. The pressure in the LM is equalized through the LM hatch valve. With the pressure equalized, the LM hatch is opened and locked in the open position to provide a passageway between the two modules. (CSM-LM Docked Crew Activities Diagram)
CSM-LM Docked Crew Activities Diagram

After two crewmen transfer to the LM, the CM crewman retrieves the drogue from its stowage location in the CM, passes it through the tunnel, and helps to install and lock it in the tunnel. The drogue may be installed and locked by the LM crewmen, if they choose. The probe assembly is then retrieved from its stowage location in the CM and installed and preloaded to take all the load between the modules. This accomplished, the LM hatch is closed by the LM crewmen. The 12 docking latches are released and cocked by the crewman in the CM so that the latches are ready for the next docking operation. The CM forward hatch is reinstalled and checked to assure a tight seal. The modules are now prepared for separation.
The probe EXTEND RELEASE/RETRACT switch in the CM (MDC-2) is placed in the EXTEND position, energizing the probe extend latch. The probe extends and during extension will activate a switch energizing an internal electric motor to unlock the capture latches. After the probe extends, the LM pulls away from the CM (LM Separation From CSM Diagram) and descends to the lunar surface.
LM Separation From CSM Diagram

After landing, it will be several hours before the first man steps foot on the moon. They spend the first couple of hours checking the LM ascent stage. This completed, the cabin is depressurized and one of the crewmen descends to the lunar surface and walks on the moon. Following a period of crew transfer, the second crewman descends to the surface. They have many tasks to perform, including sample collections, photograpl1y, exploration of the lunar surface up to about 1/4 mile from the LM, and erection of a station that will continue to send scientific data to earth after they leave.
Following completion of the lunar surface exploration the ascent engine is fired using the depleted descent stage as a launch platform (LM Ascent Stage Lunar Launch Diagram).
LM Ascent Stage Lunar Launch Diagram

After rendezvous and docking in lunar orbit, the LM crewmen transfer back to the CM (Post Lunar Docking Crew Transfer Diagram). After the CSM and LM pressures have equalized the LM crew opens the LM hatch while the CM pilot removes the tunnel hatch. The drogue and probe are removed and stowed in the LM. Lunar samples, film and equipment to be returned to earth are transferred from the LM to the CM; equipment in the CM that is no longer needed is put into the LM, and the LM hatch is closed, the CM hatch is replaced, and the seal checked.
Post Lunar Docking Crew Transfer Diagram

The LM is then released by firing the separation system (detonating cord) located around the circumference of the docking ring, thus severing the ring and separating the LM (LM Ascent Phase Separation From CSM Diagram.) This completed, the CM SPS engine is fired placing the spacecraft in a return trajectory toward the earth (CSM Transearth Injection Diagram).
LM Ascent Phase Separation From CSM Diagram

CSM Transearth Injection Diagram

FUNCTIONAL DESCRIPTION
The docking system is a means of connecting and disconnecting the LM/CSM during a mission and of providing for intravehicular transfer between the CSM and LM of the flight crew and transferable equipment.
The crew transfer tunnel, or CSM/LM interlock area, is a passage way between the CM forward bulkhead and the LM upper hatch. The hatch relationship with the docking hardware is shown in the Docking System – Major Assemblies Diagram. (The figure does not show the installed positions.) For descriptive purposes that portion of the interlock area above the CM forward bulkhead to the docking interface surface is referred to as the CM tunnel. The CM tunnel incorporates the CM forward hatch, probe assembly, docking ring and seals, and the docking automatic latches. That portion of the interlock outboard of the LM upper hatch extending to the docking interface surface is referred to as the LM tunnel and contains a hinged pressure hatch, drogue support fittings, drogue assembly, drogue locking mechanism, and LM/ CM electrical umbilicals.
Docking System – Major Assemblies Diagram

COMPONENT DESCRIPTION
CM Docking Ring
The docking ring is mounted and bolted to the forward ring of the CM tunnel. The docking ring is capable of withstanding all interface loads and maintains the docked alignment of the modules.
The docking ring also serves as a support for the probe, the 12 automatic docking latches (Automatic Docking Latches Diagram), a pyrotechnic charge, passageway for the electrical harness, and the two interface seals. A continuous wire passageway and attachment covers are provided in the docking ring. The passageway is covered by a protective cover with an opening to allow the individual harnesses to enter or exit the passageway. The two concentric interface seals will enable pressurization of the crew tunnel and vented spacesuit operation within the tunnel. The docking seals are round and hollow; the inner seal is vented to the crew compartment pressure, and the outer seal is vented to ambient pressure. The seals are of sufficient size to allow for maximum warpage/waviness gap between the flanges. To remove the docking ring and attached hardware during CSM/ LM final separation, or should an abort be initiated, a detonating fuse (MDF) is fired to sever the docking ring. During an abort, the severed ring and attached parts will be pulled away from the CM by the launch escape system (LES). The charge is initiated by a switch on the main display console (MDC) within the CM.
Automatic Docking Latches Diagram

Docking Latches
Twelve automatic locking latches are equally spaced about the inner periphery of the docking ring. When latched, they provide a means of effecting structural continuity and pressurization capability between the CSM and LM in the docked configuration. The docking latches will automatically self-seek and engage the LM docking flange back surface upon activation of the latch trigger mechanism when making contact with the LM docking flange. Should a latch be inadvertently triggered, the latch components will not prevent a successful LM and CM docking and sealing operations. A red button will protrude out of the handle indicating an unlocked condition. Any three latches located approximately 120 ° apart engaged and latched will hold the CSM and LM together with the tunnel pressurized. The individually triggered latch may later be rearmed and released manually by the crewman for CM to LM engagement. The latch mechanism will exert a preload or hook pulling force of 2700 pounds minimum. This preload force will retract the hook, seat the hook on the back of the LM docking flange, accommodate for flange warpage/waviness, and compress the docking seals. Release of the latch will be accomplished by the crewman pulling the individual latch handle for a double throw. The release of the latch will also cock the latch for the next docking engagement. Fairings are installed in the area between the latches providing a smooth inner mold line.
Docking Probe Assembly
The primary function of the docking probe assembly is to provide initial vehicle CSM/ LM coupling and attenuate impact energy imposed by vehicle contact. The docking probe assembly (Probe Assembly Docking System Diagram) consists of a central body, probe head and capture latches, pitch arms and tension linkages, s hock attenuators, ratchet assembly, support structure, extension latch and preload torque shaft, probe retraction system, probe electrical umbilicals, and the electrical circuitry necessary to accomplish the functions described herein. The docking probe may be folded for removal and stowage and is capable of being removed from either end of the crew transfer tunnel.
Probe Assembly Docking System Diagram

Support Structure
The probe is tripod-mounted to the docking ring by a support structure attached to the outer collar of the probe. The supports are designed to collapse (fold) to allow removal of the probe from either module. (Probe Operational Positions Diagram.) Collapse of the probe consists of reducing the diameter of the three mount legs to approximately 24-3/4 inches in diameter making the probe small enough for passage. This is accomplished by unlatching the collar with the ratchet handle and allowing the collar to slide aft approximately 9-1/4 inches on the probe cylinder. Connected between each support leg and the probe cylinder is a semi-rigid shock strut assembly (see Probe Operational Positions Diagram). The strut assemblies contain Bellville washers which help in attenuating the high lateral loads. The washers are concave in shape and are arranged to provide a rigid strut in tension and a high r ate of spring action in compression. One of the support legs is marked yellow to correspond with a matching color on the docking ring socket fairing. The probe installation support strut is stowed on the yellow support beam, whereas the other two support leg s contain stowage receptacles for the probe umbilicals.
Probe Operational Positions Diagram

Pitch Arms and Tension Linkages
The pitch arms will make contact with the drogue surface during the probe retraction cycle if the CM and LM tend to jackknife. The tension links transmit the pitch arm loads and torque loads to the probe outer cylinder during an axial displacement. Together the pitch arms and tension linkage induce the required kinematics causing compression of the shock attenuators, attenuating the loads necessary to meet the docking requirements (Exploded View – Probe Assembly Diagram).
Exploded View – Probe Assembly Diagram

Shock Attenuators
The shock attenuators are piston, variable-orifice, fluid-displacement type units (Docking Probe Attenuator Assembly Diagram). The attenuators are attached to the probe assembly so that all axial loads or side loads will be attenuated to or below the required level for the docking mechanism. The attenuator cylinders are filled with an Orinite 70 fluid at a temperature of 70±3 °F.
Docking Probe Attenuator Assembly Diagram

With the piston assembly extended a mixture of argon and helium gas is inserted through a plug located under the rod end. The gas is injected with the aid of a hyperdermic needle to a pressure of 30±3 psig at 70±5 °F. The purpose for pressurizing with gas is to provide an air spring and pressure for attenuator extension. This stored energy within the attenuators will cause the collar assembly to move aft when released, pulling the support structure from its mount.
Probe Body-Extension Latch Assembly
The probe body consists of an inner and outer cylinder, sized to allow a 10-inch maximum travel of the inner cylinder (Probe Assembly Docking System Diagram). Attached to the probe body is an extension latch which will engage and retain the probe in the fully retracted position (Extension Latch Assembly Diagram). The large coil spring located within the inner cylinder will extend the probe upon release of the extension latch.
Extension Latch Assembly Diagram

Prior to separation in lunar orbit the probe is pre-loaded with the extend latch assembly to maintain tunnel pressurization while the 12 docking latches are released and cocked. To preload the probe the ratchet selector is positioned on the preload handle so that the ratchet will rotate clockwise. The handle is ratcheted until the load limiter releases.
Probe Head-Capture Latches
The probe head is self- centering and is gimbal-mounted to the piston of the probe assembly (Probe Capture Latch Assembly Diagram). It houses the capture latches and is designed so that the probe head will deflect toward the drogue socket through all contact attitudes within the design parameters. The capture latches will automatically engage the drogue socket when the probe head centers and bottoms in the drogue. The capture latches are capable of remote and manual release from the CM side, and manual release from the LM side. Release of the capture latches will permit withdrawal or insertion of the probe head assembly.
Probe Capture Latch Assembly Diagram

Electrical release is accomplished by switching power through probe umbilicals to motors within the probe body (Exploded View – Probe Assembly Diagram) causing the torque shaft to rotate and allow release of the latches. Manual release of the capture latches from the CM side is accomplished by a built-in release knob and handle on the CM side of the probe. (See Aft View Docking Probe Diagram.) In unlocking the capture latches, the capture latch release knob and handle is pulled aft 1/2 inch and rotated 180 degrees CW. This can be accomplished only with the probe piston in the retract position.
Aft View Docking Probe Diagram

When the probe is being collapsed, the probe collar contacts the release handle, which in turn will telescope and remain operable with the probe installed or folded. (Capture Latch Release Diagram.) The capture latch release handle must be rotated fully CCW to an indicating arrow to make the capture latches “cocked,” This means the capture latches will capture when all three latches have penetrated the drogue ring simultaneously. Release of the capture latches from the CM side is accomplished by depressing the capture latch release plunger approximately 5/16-inch below, flush with the probe head by using tool B of the CM-LM tool set.
Capture Latch Release Diagram

If the retracted position is selected on the RETRACT EXTD/REL switch located on MDC-2, capture latch engagement will close a switch within the probe, initiating operations of the retraction mechanism.
Ratchet Assembly
The integrated ratchet assembly provides a handhold for handling the probe, assists in installing and removing the probe assembly, and performs the ratcheting operation that slides the collar forward or aft, extending or collapsing the probe pitch and support arms (Integrated Ratchet Assembly Diagram). The ratchet assembly will lock/unlock the sliding collar by pivoting the handle away from the probe centerline either from the CM or LM side. The jack handle is stowed and locked by a lug which engages the handle on the CM side. A release button is provided on the CM handle and a trigger release on the LM handle to unlock the ratchet assembly.
Integrated Ratchet Assembly Diagram

The Integrated Ratchet Assembly Operation Diagram shows the various ratchet handle positions for probe removal and installation. View A shows the jack handle and ratchet assembly in the locked and stowed position. View B shows the 30-degree stroke required to unlock the sliding collar from the CM side. To unlock the sliding collar from the CM side, grasp the jack handle at the CM end, depress the slide release button, and pull the handle all the way aft. Secondly, push the handle forward to the first detent and swing the handle out 30 degrees from the probe centerline. In the last 5 degrees of pivoting, the pawls are lifted from the rack, the collar will slide aft, and the probe will collapse because of the spring and attenuators stored energy. View C shows the unlocking operation from the LM side. First, depress the release button on the LM side of the jack handle and push aft to the first detent. Second, unstow the foldable lever by pulling on the handle knob and rotate the lever upward against the stop. Third, rotate the handle assembly inboard until the collar is released. Again hold the knob until the probe folds. View D shows the 25-degree stroke used when installing the probe. After the probe is locked in the drogue, unstow the support strut located on the support beam, and position against the ledge on the tunnel hatch seal ring. Pull the jack handle to its extreme aft position. Grasp the support handle with the left hand and with the right hand jack the probe collar forward extending the support legs into the three support sockets in the CM clocking ring. While pulling the handle, maintain a thrust load on the tunnel ring through the support strut. The maximum push force on the handle should not exceed 60 pounds for the working stroke of 25 degrees. Installation is complete when the collar uncovers a cross-hatched area on the probe conduit. To ensure the operator that the pawls are seated in the rack, a pawl indicator is located on the ratchet mechanism. (See Integrated Ratchet Assembly Diagram.) Operation is complete when the indicating button is flush with the housing. With the probe installed, stow the handle by holding it parallel with the centerline of the probe and by depressing the button release while thrusting the handle toward the probe head. The socket of the handle will lock on a lug and prevent further handle movement.
Integrated Ratchet Assembly Operation Diagram

Retraction System
The retraction system consists of a cold gas system pressurized from four hermetically sealed nitrogen bottles located inside the probe body (Probe Retraction System Diagram). Gas pressure is released when pyrotechnic ignition is initiated manually by a crewman within the CM or automatically by capture latch action. Releasing the nitrogen gas causes the inner piston to retract. The retraction force is sufficient to draw the modules together, compress the interface seals, and allow engagement of the automatic locking latches.
The residual gas will be bled off by the astronaut allowing the probe to extend when the extend-latch is energized. Pressure release is accomplished by a manual relief valve located as part of the gas manifold. This valve is opened by depressing a red thumb button on the aft end of the probe. The button and pyro components are protected from handling damage by a protective cover.
Probe Retraction System Diagram

Probe Umbilicals
Two microdot connectors and harness assemblies are provided for probe instrumentation and probe logic power, The connectors are installed normal to the docking ring so they are visible and can be demated and mated from either the CM side or the LM side of the combined vehicles (Tunnel Lighting and Electrical System Diagram). The connectors utilize a notched handle that will provide a positive grip for twist and pull action. Part of the connector and the probe harness may protrude into the tunnel when the probe is installed, but when the probe is removed the fixed portion of the connector will be covered by a hinged protective cover. This provides a smooth surface for crewman passage through the tunnel. When disconnecting or reconnecting the probe electrical connectors from the CM side, the EXT/REL-OFF-RETRACT switch should be in the OFF position, and CB2 on panel 276 open, to assure that no instrumentation power exists.
Tunnel Lighting and Electrical System Diagram

Drogue Assembly
The drogue assembly consists of an internal conical surface facing the CM, a support structure and mounting provisions that interface with three mounts in the LM tunnel. One of the tunnel mounts contains a locking mechanism to secure the drogue and prevent it from turning during the docking maneuvers. Unlocking and removing the drogue may be accomplished from either end of the crew transfer tunnel. To aid in the removal and installation, three handles are provided on the LM side (Drogue Assembly Diagram).
Drogue Assembly Diagram

Vehicle Umbilicals
Two electrical umbilicals are installed in the LM tunnel at launch. One end is attached to the LM connectors, the other end routed and attached to stowage connectors on the LM tunnel wall. These stowage connectors are physically clear of the drogue supports and probe supports and pitch arms. The connectors are accessible from the CM tunnel between the drogue periphery and the LM tunnel wall. In this manner CM connections can be accomplished after transposition and docking, without requiring probe or drogue removal. (See Tunnel Lighting and Electrical System Diagram.)
Forward Tunnel Hatch
The forward hatch in the CM tunnel enables crew access to the LM-CM interface and may be used for emergency egress after postlanding. (See Forward Pressure Hatch Diagram.) The hatch is removable only into the crew compartment. The reinforced flange on the forward tunnel ring for the pressure seal and latch engagement prevents an outward removal. The hatch is retained at the forward end of the CM tunnel by six separate jointed latches whose linkage is driven by an actuating handle from within the crew compartment. A drive is provided on the LM side (outside) opposite the actuating handle drive, permitting hatch removal by using the B tool of the in-flight tool-set. A pressure equalization valve, which can be opened or closed from either side, is provided on the hatch. This valve is used to equalize pressure in the tunnel and LM prior to hatch removal.
Forward Pressure Hatch Diagram

LM Tunnel Hatch
The LM hatch is not removable but is hinged to open 75 degrees into the LM crew compartment. (See Docking System – Major Assemblies Diagram.) A hatch operating handle is provided on each side of the hatch on a common shaft. The LM upper hatch is opened by rotating the handle approximately 90 degrees clockwise from the CM side, counterclockwise from the LM side. Handle rotation in the opposite direction is required to re-engage the latching mechanism. A pressure dump (equalization) valve, manually operable from either side, is provided in the LM upper hatch. This valve is basically required for pressure dump capability from the LM cabin.

APOLLO 11 OPERATIONS HANDBOOK BLOCK II SPACECRAFT
VOLUME l SPACECRAFT DESCRIPTION

ELECTRICAL POWER SYSTEM
INTRODUCTION
Electrical Power Subsystem Block Diagram
FUNCTIONAL DESCRIPTION
Energy Storage
Power Generation
Power Conversion
Power Distribution
MAJOR COMPONENT /SUBSYSTEM DESCRIPTION
Cryogenic Storage
Cryogenic Storage Subsystem (Oxygen) Schematic
Cryogenic Storage Subsystem (Hydrogen) Schematic
Cryogenic Pressurization and Quantity Measurement Devices Diagram
Batteries
Fuel Cell Power Plants
Fuel Cell Schematic
Component Description
KOH H20 Phase Diagram
Oxygen Gas Purity Level by Volume Graph
Fuel Cell Loading
OXYGEN GAS PURITY LEVEL (% BY VOLUME) Graph
H2 Gas Purity Effect on Purge Interval Graph
Power Up
Power Down
Fuel Cell Disconnect
Inverters
Inverter Block Diagram
Battery Charger
Battery Charger Block Diagram
Battery Charger and CM D-C Bus Control Circuits Schematic
Battery Charger Output (Amperes) Graph
Power Distribution
D-C Power Distribution Diagram
D-C and A-C Voltage Sensing Schematic
A-C Power Distribution Diagram
PERFORMANCE AND DESIGN DATA
AC and DC Data
OPERATIONAL LIMITATIONS AND RESTRICTIONS
Fuel Cell Power Plants
Cryogenic Storage Subsystem
Additional Data
SYSTEMS TEST METER
COMMAND MODULE INTERIOR LIGHTING
CM Interior Lighting Diagram
Floodlight System
CM Floodlight Configuration Diagram
CM Floodlight System Schematic
Integral Lighting System
CM Integral/Numerics Illumination System Diagram
Integral and Numerics Panel Lighting Schematic
Numerics Lighting System
Tunnel Lighting
Tunnel Lighting Schematic

ELECTRICAL POWER SYSTEM

INTRODUCTION
The electrical power subsystem (EPS) consists of the equipment and reactants required to supply the electrical energy sources, power generation and controls, power conversion and conditioning, and power distribution to the electrical buses (Electrical Power Subsystem Block Diagram). Electrical power distribution and conditioning equipment beyond the buses is not considered a part of this subsystem. Power is supplied to fulfill all command and service module (CSM) requirements, as well as to the lunar module (LM) for operation of heater circuits after transposition and docking.
Electrical Power Subsystem Block Diagram

The EPS can be functionally divided into four major categories:

  • Energy storage: Cryogenics storage, entry and postlanding batteries, pyrotechnic batteries.
  • Power generation: Fuel cell power plants.
  • Power conversion: Solid state inverters, battery charger.
  • Power distribution: d-c and a-c power buses, d-c and a-c sensing circuits, controls and displays.
    In general, the system operates in three modes: peak, average, and minimum mission loads. Peak loads occur during performance of major delta V maneuvers, including boost. These are of relatively short duration with d-c power being supplied by three fuel cell power plants supplemented by two of three entry batteries. A-C power is supplied by two of three inverters.
    The second mode is that part of the mission when power demands vary about the average. During these periods d-c power is supplied by three fuel cell power plants and a -c power by one or two inverters.
    During drifting flight when power requirements are at a minimum level, d-c power is supplied by three fuel cell powerplants. A-C power is supplied by one or two inverters. In all cases, operation of one or two inverters is dependent on the total cryogen available. Two inverter operation results in a slight increase of cryogenic usage because of a small reduction in inverter efficiency due to the lesser loads on each inverter. However, two inverter operation precludes complete loss of a-c in the event of an inverter failure.
    FUNCTIONAL DESCRIPTION
    Energy Storage
    The primary source of energy is provided by the cryogenic gas storage system that provides fuel (H2) and oxidizer (02) to the power generating system. Two hydrogen and two oxygen tanks, with the associated controls and plumbing, are located in the service module. Storage of reactants is accomplished under controlled cryogenic temperatures and pressures; automatic and manual pressure control is provided. Automatic heating of the reactants for repressurization is dependent on energy demand by the power generating and/or environmental control subsystems. Manual control can be used when required.
    A secondary source of energy storage is provided by five silver oxide-zinc batteries located in the CM. Three rechargeable entry and postlanding batteries supply sequencer logic power at all times, supplemental d-c power for peak loads, all operating power required for entry and postlanding, and can be connected to power either or both pyro circuits. Two pyro batteries provide energy for activation of pyro devices throughout all phases of a mission.
    Power Generation
    Three Bacon-type fuel cell power plants, generating power through electrochemical reaction of H2 and 02, supply primary d-c power to spacecraft systems until CSM separation. Each power plant is capable of normally supplying from 400 to 1420 watts at 31 to 27 vdc (at fuel cell terminals) to the power distribution system. During normal operation all three power plants generate power, but two are adequate to complete the mission. Should two of the three malfunction, one power plant will insure successful mission termination; however, spacecraft loads must be reduced to operate within the limits of a single powerplant.
    Normal fuel cell connection to the distribution system is: Fuel cell 1 to main d-c bus A; fuel cell 2 to main d-c bus A and B; and fuel cell 3 to main d-c bus B. Manual switch control is provided for power plant connection to the distribution system, and manual and/ or automatic control for power plant isolation in case of a malfunction.
    During the CSM separation maneuver the power plants supply power through the SM buses to two SM jettison control sequencers. The sequencers sustain SM RCS retrofire during CSM separation and fire the SM positive roll RCS engines two seconds after separation to stabilize the SM during entry. Roll engine firing is terminated 7. 5 seconds after separation. The power plants and SM buses are isolated from the umbilical through a SM deadface. The sequencers are connected to the SM buses when the CM/SM SEP switch (MDC-2) is activated; separation occurs 100 milliseconds after switch activation.
    Power Conversion
    Primary d-c power is converted into a-c by solid state static inverters that provide 115/200-volt 400-cps 3-phase a-c power up to 1250 volt- amperes each. A-C power is connected by motor switch controls to two a-c buses for distribution to the a-c loads. One inverter has the capability of supplying all spacecraft primary a-c power. One inverter can power both buses while the two remaining inverters act as redundant sources. However, throughout the flight, each bus is powered by a separate inverter. Provisions are made for inverter isolation in the event of malfunctions. Inverter outputs cannot be phase synchronized, therefore interlocked motorized switching circuits are incorporated to prevent the connection of two inverters to the same bus.
    A second conversion unit, the battery charger, assures keeping the three entry and postlanding batteries in a fully charged state. It is a solid state device utilizing d-c from the fuel cells and a-c from the inverter to develop charging voltage.
    Power Distribution
    Distribution of d-c power is accomplished via two redundant d-c buses in the service module which are connected to two redundant buses in the command module through a SM deadface, the CSM umbilical, and a CM deadface. Additional buses provided are: two d-c buses for servicing non-essential loads; a flight bus for servicing inflight telecommunications equipment; two battery buses for distributing power to sequencers, gimbal motor controls, and servicing the battery relay bus for power distribution switching; and a flight and postlanding bus for servicing some communications equipment and the postlanding loads.
    Three phase a-c is distributed via two redundant a-c buses, providing bus selection through switches in the a-c operated component circuits.
    Power to the lunar module is provided through two umbilicals which are manually connected after completion of transposition and docking. An average of 81 watts d-c is provided to continuous heaters in the abort sensor assembly (ASA), and cycling heaters in the landing radar, rendezvous radar, S-band antenna and inertial measurement unit (IMU). Power consumption with all heaters operating simultaneously is approximately 309 watts. LM floodlighting is also powered through the umbilical for use during manned lunar module operation while docked with the CSM.
    A d-c sensing circuit monitors voltage on each main d-c bus and an a-c sensing circuit monitors voltage on each a-c bus. The d-c sensors provide an indication of an undervoltage by illuminating a warning light. The a-c sensors illuminate a warning light when high- or low-voltage limits are exceeded. In addition, the a-c sensors activate an automatic disconnect of the inverter from the a-c bus during an overvoltage condition. A-C overload conditions are displayed by illumination of an overload warning light and are accompanied by a low voltage light. Additional sensors monitor fuel cell overload and reverse current conditions, providing an automatic disconnect, together with visual indications of the disconnect when never either co11dition is exceeded.
    Switches, meters, lights, and talk-back indicators are provided for controlling and monitoring all functions of the EPS.
    MAJOR COMPONENT /SUBSYSTEM DESCRIPTION
    The subsequent paragraphs describe the cryogenic storage subsystem, and each of the various EPS components.
    Cryogenic Storage
    The cryogenic storage subsystem (Cryogenic Storage Subsystem (Oxygen) and Cryogenic Storage Subsystem (Hydrogen) Schematic) supplies hydrogen to the EPS, and oxygen to the EPS, ECS, and for initial LM pressurization. The two tanks in the hydrogen and oxygen systems are of sufficient size to provide a safe return from the furthest point of the mission on the fluid remaining in any one tank. The physical data of the cryogenic storage subsystem are as follows:
    Weight of usable Cryogenics (lb/Tank) Design Storage Pressure (psia) Minimum Allowable Operating Pressure (pisa) Approximate Flow Rate at Min dq/dm (+145 degrees F Environment) (lb/hr 2-tanks) Approximate Quantities at Minimum Heater & Fan Cycling (Per Tank) Min dq/dm)
    O2 – 320 (min) 900 +/- 35 150 1.710 45 to 25 %
    H2 – 28 (min) 245 (+15, -20) 100 0.140 53 to 33 %

Cryogenic Storage Subsystem (Oxygen) Schematic

Cryogenic Storage Subsystem (Hydrogen) Schematic

Initial pressurization from fill to operating pressures is accomplished, by GSE. After attaining operating pressures, the cryogenic fluids are in a single-phase condition, therefore completely homogeneous. This avoids sloshing which could cause sudden pressure fluctuations, possible damage to internal components, and prevents positive mass quantity gauging. The single-phase expulsion process continues at nearly constant pressure and increasing temperature above the 2- phase region.
Two parallel d-c heaters in each tank supply the heat necessary to maintain design pressures. Two parallel 3-phase a-c circulating fans circulate the fluid over the heating elements to maintain a uniform density and decrease the probability of stratification. A typical heater and fan installation is shown in the Cryogenic Pressurization and Quantity Measurement Devices Diagram . Relief valves provide overpressure relief, check valves provide tank isolation, and individual fuel cell shutoff valves provide isolation of malfunctioning power plants. Filters extract particles from the flowing fluid to protect the ECS and EPS components. The pressure transducers and temperature probes indicate the thermodynamic state of the fluid. A capacitive quantity probe indicates quantity of fluid remaining in the tanks.
Cryogenic Pressurization and Quantity Measurement Devices Diagram

Repressurization of the systems can be automatically or manually controlled by switch selection. The automatic mode is designed to give a single-phase reactant flow into the fuel cell and ECS feed lines at design pressures. The heaters and fans are automatically controlled through a pressure switch-motor switch arrangement. As pressure in the tanks decreases, the pressure switch in each tank closes to energize the motor switch, closing contacts in the heater and fan circuits. Both tanks have to decrease in pressure before heater and fan circuits are energized. When either tank reaches the upper operating pressure limit, that respective pressure switch opens to again energize the motor switch, thus opening the heater and fan circuits to both tanks. The O2 tank circuits are energized at 865 psia minimum and de- energized at 935 psia maximum. The H2 circuits energize at 225 psia minimum and de-energize at 260 psia maximum. The most accurate quantity readout will be acquired shortly after the fans have stopped. During all other periods partial stratification may degrade quantity readout accuracy.
When the systems reach the point where heater and fan cycling is at a minimum (due to a reduced heat requirement), the heat leak of the tank is sufficient to maintain design pressures provided flow is within the min dq/dm values shown in the preceding tabulation. This realm of operation is referred to as the min dq/dm region. The minimum heat requirement region for oxygen starts at approximately 45 percent quantity in the tanks and terminate at approximately 25 percent quantity. Between these tank quantities, minimum heater and fan cycling will occur under normal usage. The amount of heat required for repressurization at quantities below 25 percent starts to increase until below the 3 percent level practically continuous heater and fan operation is required. In the hydrogen system, the quantity levels for minimum heater and fan cycling are between approximately 53 and 33 percent, with continuous operation occurring at approximately 5 percent level.
Assuming a constant level flow from each tank (O2 – 1 lb/hr, Hz – O. 09 lb/hr) each successive repressurization period is of longer duration. The periods between repressurizations lengthen as quantity decreases from full to the minimum dq/dm level, and become shorter as quantity decreases from the minimum dq/dm level to the residual level. Approximate repressurization periods are shown in the following chart, which also shows the maximum flow rate in pounds per hour from a single tank with the repressurization circuits maintaining minimum design pressure.
The maximum continuous flow that each cryogenic tank can provide at minimum design pressure is dependent on the quantity level and the heat required to maintain that pressure. The heat required to maintain a constant pressure decreases as quantity decreases from full to the minimum dq/dm point. As quantity decreases beyond the minimum dq/dm region, the heat required to maintain a constant pressure increases.
As fluid is withdrawn, a specific amount of heat is withdrawn. When the withdrawal rate exceeds the heat that can be supplied by the heaters, fan motors, and heat leak, there is a resultant pressure decrease below the minimum design operating level.
The ability to sustain pressure and flow is a factor of the amount of heat required versus the heat provided by heaters, fan motors, and heat leak. Since heat leak characteristics of each tank vary slightly, the flow each tank can provide will also vary to a small degree. Heat input from heaters, fan motors, and heat leak into an O2 tank is 595. 87 Btu/hour (113. 88 watt heaters supply 389.67 Btu, 52.8 watt fan motors supply 180. 2 Btu, and heat leak supplies 26 Btu). Heat input from similar sources into a H2 tank is 94. 6 Btu/hr (18.6 watt heaters supply 63.48 Btu, 7 watt fan motors supply 23.89 Btu, and heat leak supplies 7.24 Btu). These figures take into consideration the line loss between the power source and the operating component.
Quantity (Percent) Oxygen Hydrogen
Repressurization Time (Minutes) (865 to 935 psia) Flow at 865 psia Repressurization Time (Minutes) (225 to 260 psia) Flow at 225 psia
100 4.0 3.56 20.0 0.38
95 4.3 3.97 21.0 0.42
90 4.6 4.55 22.0 0.46
85 5.0 5.27 23.0 0.49
80 5.4 6.02 24.5 0.52
75 5.7 7.01 26.5 0.65
70 6.5 7.94 28.5 0.76
65 7.4 9.01 31.0 0.83
60 8.7 10.80 33.5 0.87
55 9.6 12.54 36.0 0.93
50 10.8 14.19 39.0 0.97
45 11.5 15.69 41.0 0.98
40 12.4 17.01 41.0 0.97
35 12.6 17.56 41.0 0.94
30 13.0 17.56 40.5 0.91
25 13.1 16.55 40.5 0.83
20 13.2 15.48 42.0 0.71
15 14.5 12.28 47.0 0.54
10 17.8 8.76 58.0 0.37
7.5 21.4 7.09 71.0 0.23
5 24.0 5.37 Continuous 0.16
To avoid excessive temperatures, which could be realized during continuous heater and fan operation at extremely low quantity levels, a thermal sensitive interlock device is in series with each heater element. The device automatically opens the heater circuits when internal tank shell temperatures reach +90°F, and closes the circuits at +70°F. Assuming normal consumption, oxygen temperature will be approximately – 157°F at mission termination, while hydrogen temperature will be approximately -385° F.
The manual mode of operation bypasses the pressure switches, and supplies power directly to the heaters and/or fans through the individual control switches. It can be used 1n case of automatic control failure, heater failure, or fan failure.
Tank pressures and quantities are monitored on meters located on MDC-2. The caution and warning system (CRYO PRESS) will alarm, when oxygen pressure in either tank exceeds 950 psia or falls below 800 psia. The hydrogen system alarms above 270 psia and below 220 psia. Since a common lamp is provided, reference must be made to the individual pressure and quantity meters (MDC-2) to determine the malfunctioning tank. Tank pressures, quantities, and reactant temperatures of each tank are telemetered to MSFN.
Oxygen relief valves vent at a pressure between 983 and 1010 psig and reseat at 965 psig minimum. Hydrogen relief valves vent at a pressure between 273 and 285 psig, and reseat at 268 psig n1inimum. Full flow venting occurs approximately 2 pounds above relief valve opening pressure.
All the reactant tanks have vac-ion pumps to maintain the integrity of the vacuum between the inner and outer shell, thus maintaining heat leak at or below the design level. SM main d-c bus A distributes power to the H2 tank 1 pump and bus B to the H2 tank 2 pump. Fuses provide power source protection. These fuses are removed during prelaunch to disable the circuit for flight. Circuit breakers, O2 VAC ION PUMPS MNA – MNB (RHEB-229), provide power source protection for the CM main buses, which distribute power to the O2 vac-ion pumps. The circuit breakers allow u se of the O2 vac-ion pun1p circuits throughout flight, and provide a means of disabling circuit if necessary.
The most likely period of overpressurization in the cryogenic system will occur during operation in the minimum dq/dm region. The possibility of overpressurization is predicated on the assumption of a vacuum breakdown, resulting in an increase in heat leak. Also, under certain conditions, i.e., extremely low power levels and/or a depressurized cabin, demand may be lower than the minimum dq/dm flow necessary. Any of the preceding conditions would result in an increase of pressure within a tank.
Several procedures can be used to correct an overpressure condition in the oxygen system. One is to perform an unscheduled fuel cell purge. A second is to increase oxygen flow into the command module by opening the ECS DIRECT O2 valve. The third is to increase electrical loads, which may not be desirable because this method will also increase hydrogen consumption.
Increase of electrical loads is probably the least desirable method because of the increase in demand on both reactant systems, although an overpressure correction is required in only one reactant system.
A requirement for an overpressure correction in both reactant systems simultaneously is remote, since botl1 reactant systems do not reach the minimum dq/dm region in parallel.
During all missions, to retain a single tank return capability, there is a requirement to maintain a balance between the two tanks in each of the reactant systems. When a 2 to 4 percent difference is indicated on the oxygen quantity meters (MDC-2), the O2 HEATERS switch (MDC-2) of the lesser tank is positioned to OFF until tank quantities equalize. A 3 percent difference in the hydrogen quantity meters (MDC-2) will require positioning the H2 HEATERS switch (MDC-2) of the lesser tank to OFF until tank quantities equalize. This procedure retains the automatic operation of the repressurization circuits, and provides for operation of the fan motors during repressurization to retain an accurate quantity readout in all tanks. The necessity for balancing should be determined shortly after a repressurization cycle, since quantity readouts will be most accurate at this time
Batteries
Five silver oxide-zinc storage batteries are incorporated in the EPS. These batteries are located in the CM lower equipment bay.
Three rechargeable entry and postlanding batteries (A, B, and C) power the CM systems after CSM separation and during postlanding. Prior to CSM separation, the batteries provide a secondary source of power while the fuel cells are the primary source. The entry batteries are used for the following purposes:

  • Provide CM power after CSM separation
  • Supplement fuel cell power during peak load periods (Delta V maneuvers)
  • Provide power during emergency operations (failure of two fuel cells)
  • Provide power for EPS control circuitry (relays, indicators, etc.)
  • Provide sequencer logic power
  • Provide power for recovery aids during postlanding
  • Batteries A, B, or C can power pyro circuits by selection.
    Each entry and postlanding battery is mounted in a vented plastic case and consists of 20 silver oxide-zinc cells connected in series. The cells are individually encased in plastic containers which contain relief valves that open at 35±5 psig, venting during an overpressure into the battery case. The three cases can be vented overboard through a common manifold, the BATTERY VENT valve (RHEB-252), and the ECS waste water dump line.
    Since the BATTERY VENT is closed prior to lift-off, the interior of the battery cases is at a pressure of one atmosphere. The pressure is relieved after earth orbit insertion and completion of cabin purge by positioning the control to VENT for 5 seconds. After completion the control is closed, and pressure as read out on position 4A of the System Test Meter (LEB-101) should remain at zero unless there is battery outgassing. This outgassing can be caused by an internal battery failure, an abnormal high-rate discharge, or by overcharging. If a pressure increase is noted on the system test meter, the BATTERY VENT is positioned to VENT for 5 seconds, and reclosed. Normal battery charging procedures require a check of the battery manifold after completion of recharge.
    Since the battery vent line is connected to the waste water dump line, it provides a means of monitoring waste water dump line plugging, which would be indicated by a pressure rise in the battery manifold line when the BATTERY VENT control is positioned to VENT.
    Each battery is rated at 40-ampere hours (AH) minimum and will deliver this at a current output of 35 amps for 30 minutes and a subsequent output of 2 amps for the remainder of the rating.
    At Apollo mission loads each battery is capable of providing 45 AH and will provide this amount after each complete recharge cycle. However, 40 AH is used in mission planning for inflight capability, and 45 AH for postlanding capability of a fully charged battery.
    Open circuit voltage is 37. 2 volts. Sustained battery loads are extremely light (2 to 3 watts); therefore a battery bus voltage of approximately 34 vd-c will be indicated on the spacecraft voltmeter, except when the main bus tie switches have been activated to tie the battery outputs to the main d-c buses. Normally only batteries A and B will be connected to the main d-c buses. Battery C is isolated during prelaunch by opening the MAIN A-BAT C and MAIN B-BAT C circuit breakers (RHEB-275). Battery C will therefore provide a backup for main d-c bus power in case of failure of battery A or B or during the time battery A or B is being recharged. The two-battery configuration provides more efficient use of fuel cell power during peak power loads and decreases overall battery recharge time. The MAIN A – and MAIN B-BAT C circuit breakers are closed prior to CSM separation or as required during recharge of battery A or B.
    Battery C, through circuit breakers BAT C to BAT BUS A and BAT C to BAT BUS B (RHEB-250), provides backup power to the respective battery bus in the event of failure of entry battery A or B. These circuit breakers are normally open until a failure of battery A or B occurs. This circuit can also be used to recharge battery A or B in the event of a failure in the normal charging circuit.
    The two pyrotechnic batteries supply power to initiate ordnance devices in the SC. The pyrotechnic batteries are isolated from the rest of the EPS to prevent the high-power surges in the pyrotechnic system from affecting the EPS, and to ensure source power when required. These batteries are not to be recharged in flight. Entry and postlanding battery A, B, or C can be used as a redundant source of power for initiating pyro circuits in the respective A or B pyro system, if either pyro battery fails. This can be performed by proper manipulation of the circuit breakers on RHEB-250. Caution must be exercised to isolate the failed battery prior to connecting the replacement battery.
    Performance characteristics of each SC battery are as follows:
    Battery Rated Capacity Per Battery Open Circuit Voltage {max.) Nominal Voltage Minimum Voltage Ambient Battery Temperature
    Entry and Postlanding, A, B, and C (3) 40 amp-hrs (25 ampere rate) 37. 8 vdc max. (37. 2 vdc in flight) 29 vdc (35 amps load) 27 vdc (35 amps load) 50° to 110°F
    Pyro A and B (2) 0. 75 amp- hrs (75 amps for 36 seconds) 37. 8 vdc max. (37. 2 vdc in flight) 23 vdc (75 amps load) 20 vdc (75 amps load) (32 vdc open circuit) 60 ° to 110 ° F
    NOTE: Pyro battery load voltage is not measurable in the SC due to the extremely short time they power pyro loads.
    Fuel Cell Power Plants
    Each of the three Bacon-type fuel cell power plants is individually coupled to a heat rejection (radiator) system, the hydrogen and oxygen cryogenic storage systems, a water storage system, and a power distribution system. A typical power plant schematic is shown in figure Fuel Cell Schematic.
    Fuel Cell Schematic

The power plants generate d-c power on demand through an exothermic chemical reaction. The by-product water is fed to a potable water storage tank in the CM where it is used for astronaut consumption and for cooling purposes in the ECS. The amount of water produced is equivalent to the power produced which is relative to the reactant consumed.
REACTANT CONSUMPTION AND WATER PRODUCTION
Load (amps) O2 lb/hr H2 lb/hr H20 lb/hr cc/hr
0.5 0.0102 0.001285 0.01149 5.21
1 0.0204 0.002570 0.02297 10.42
2 0.0408 0.005140 0.04594 20.84
3 0.0612 0.007710 0.06891 31.26
4 0.0816 0.010280 0.09188 41.68
5 0.1020 0.012850 0.11485 52.10
6 0.1224 0.015420 0.13782 62.52
7 0.1428 0.017990 0.16079 72.94
8 0.1632 0.020560 0.18376 83.36
9 0.1836 0.023130 0.20673 93.78
10 0.2040 0.025700 0.2297 104.20
15 0.3060 0.038550 0.34455 156.30
20 0.4080 0.051400 0.45940 208.40
25 0.5100 0.064250 0.57425 260.50
30 0.6120 0.077100 0.68910 312. 60
35 0.7140 0.089950 0.80395 364.70
40 0.8160 0.10280 0.91880 416.80
45 0.9180 0.11565 1.03365 468.90
50 1.0200 0.12850 1.1485 521.00
55 1.1220 0.14135 1.26335 573.10
60 1.2240 0.15420 1.3782 625.20
65 1.3260 0.16705 1.49305 677.30
70 1.4280 0.17990 1.6079 729.40
75 1.5300 0.19275 1.72275 781.50
80 1.6320 0.20560 1.83760 833.60
85 1.7340 0.21845 1.95245 885.70
90 1.8360 0.23130 2.06730 937.90
95 1.9380 0.24415 2. 18215 989.00
100 2.0400 0.25700 2.2970 1042.00
FORMULAS:
O2 = 2.04 x 10⁻² I
H2 = 2.57 x 10⁻³ I
H20 = 10. 42 cc/amp/hr
H2O = 2. 297 x 10- 2 lb/amp/hr
Component Description
Each power plant consists of 31 single cells connected in series and enclosed in a metal pressure jacket. The water separation, reactant control, and heat transfer components are mounted in a compact accessory section attached directly above the pressure jacket.
Power plant temperature is controlled by the primary (hydrogen) and secondary (glycol) loops. The hydrogen pump, providing continuous circulation of hydrogen in the primary loop, withdraws water vapor and heat from the stack of cells. The primary bypass valve regulates flow through the hydrogen regenerator to impart exhaust heat to the incoming hydrogen gas. Flow is regulated in accordance with skin temperature. The exhaust gas flows to the condenser where waste heat is transferred to the glycol; the resultant temperature decrease liquefying some of the water vapor. The motor-driven centrifugal water separator extracts the liquid and feeds it to the potable water tank in the CM. The cool gas is then pumped back to the fuel cell through the primary regenerator by a motor-driven vane pump, which also compensates for pressure losses due to water extraction and cooling. Waste heat, transferred to the glycol in the condenser, is transported to the radiators located on the fairing between the CM and SM, where it is radiated into space. Individual controls (FUEL CELL RADIATORS, MDC- 3), can bypass 3/8 of the total radiator area for each power plant. Radiator area is varied dependent on power plant condenser exhaust and radiator exit temperatures which are relevant to loads and space environment. Internal fuel cell coolant temperature is controlled by a condenser exhaust sensor, which regulates flow through a secondary regenerator to maintain condenser exhaust within desired limits. When either condenser exhaust or radiator exit temperature falls below tolerance limits (150° and – 30°F respectively), the respective FUEL CELL RADIATORS switch is positioned to EMERG BYPASS to decrease the radiator area in use, thus decreasing the amount of heat being radiated. Since the three power plants are relatively close in load sharing and temperature operating regimes, the effect on the other power plants must be monitored. Generally simultaneous control over all three power plants will be required. Use of the bypass should be minimal because of power plant design to retain heat at l ow loads and expel more heat at higher loads. The bypass is primarily intended for use after failure of two power plants. Heat radiation effects on the single power plant require continuous use of the bypass for the one remaining power plant.
Reactant valves provide the interface between the power plants and cryogenic system. They are opened during pre-launch and closed only after a power plant malfunction necessitating its permanent isolation from the d-c system. Prior to launch, the FC REACS VALVES switch (MDC – 3) is placed to the LATCH position. This applies a holding voltage to the open solenoids of the Hz and Oz reactant valves of the three power plants.
This voltage is required only during boost to prevent inadvertent closure due to the effects of high vibration. The reactant valves cannot be closed by use of the REACTANTS switches {MDC-3) with the holding voltage applied. The FC REACS VALVES switch is positioned to NORMAL after earth orbit insertion. During prelaunch, after power plant activation, the three FC REACS circuit breakers (RHEB-226) are opened to prevent valve closure through inadvertent REACT ANTS switch activation.
N2 gas is individually stored in each power plant at 1500 psia and regulated to a pressure of 53±3 psia. Output of the regulator pressurizes the electrolyte in each cell, the coolant loop through an accumulator, and is coupled to the O2 and H2 regulators as a reference pressure.
Cryogenic oxygen, supplied to the power plants at 900±35 psia, absorbs heat in the lines, absorbs additional heat in the preheater, and reaches the oxygen regulator in a gaseous form at temperatures above 100°F. The differential regulator reduces oxygen pressure to 9.5 psia above the N2 reference, thus supplying it to the fuel cell stack at 62.5±2 psia. Within the porous oxygen electrodes, the O2 reacts with the H2O in the electrolyte and the electrons provided by the external circuit to produce hydroxyl ions (O2 + 2H20 + 4e = 40H-).
Cryogenic hydrogen, supplied to the power plants at 245 (+15, -20) psia, is heated in the same manner as the oxygen. The differential hydrogen regulator reduces the pressure to 8. 5 psia above the reference N2, thus supplying it in a gaseous form to the fuel cells at 61. 5±2 psia. The hydrogen reacts in the porous hydrogen electrodes with the hydroxyl ions in the electrolyte to produce electrons, water vapor, and heat (2 H2+ 40H- = 4H20 + 4e + heat). The nickel electrodes act as a catalyst in the reaction. The water vapor and heat is withdrawn by the circulation of hydrogen gas in the primary loop and the electrons are supplied to the load.
Each of the 31 cells comprising a power plant contains electrolyte which on initial fill consists of 83 percent potassium hydroxide (KOH) and 17 percent water by weight. The power plant is initially conditioned to increase the water ratio, and during normal operation, water content will vary between 23 and 28 percent. At this ratio, the electrolyte has a critical temperature of 300°F (KOH H20 Phase Diagram). It solidifies at an approximate temperature of 220° F. Power plant electrochemical reaction becomes effective at the critical temperature. Bringing power plants to critical temperature is performed by GSE and cannot be performed from SC power sources. Placing a load on the power plant will maintain it above the critical temperature. The automatic in-line heater circuit will maintain power plant temperature at 385°F with no additional loads applied.
KOH H20 Phase Diagram

Purging is a function of power demand and gas purity. O2 purging requires 2 minutes and H2 purging 80 seconds. A hydrogen purge is preceded by activation of the H2 PURGE LINE HTR switch (MDC-3) 20 minutes prior to the purge. The purge cycle is determined by the mission power profile and gas purity as sampled after spacecraft tank fill. OXYGEN GAS PURITY Effect on Purge Interval Graph and H2 Gas Purity Effect on Purge Interval Graph can be used to calculate the purge cycles, dependent on gas purity and load. A degradation purge can be performed if power plant current output decreases approximately 3 to 5 amps during sustained operation. The O2 purge has more effect during this type of purge, although it would be followed by an Hz purge if recovery to normal was not realized after performing an O2 purge. If the pH talk back indicator (MDC-3) is activated, a hydrogen purge will not be performed on the fuel cell with the high pH. This prevents the possibility of clogging the hydrogen vent line.
OXYGEN GAS PURITY Effect on Purge Interval Graph

H2 Gas Purity Effect on Purge Interval Graph

Fuel Cell Loading
The application and removal of fuel cell loads causes the terminal voltage to decrease and increase, respectively. A decrease in terminal voltage, resulting from an increased load, is followed by a gradual increase in fuel cell skin temperature which causes an increase in terminal voltage. Conversely, an increase in terminal voltage, resulting from a decreased load, is followed by a gradual decrease in fuel cell skin temperature which causes a decrease in terminal voltage.
The range in which the terminal voltage is permitted to vary is determined by the high and low voltage input design limits of the components being powered. For most components the limits are 30 volts de and 25 volts dc. To remain within these design limits, the d-c bus voltage must be maintained between 31.0 and 26.2 volts dc. To compensate for cyclic loads, it is recommended sustained bus voltage be maintained between 26.5 and 30.0 vd-c. Bus voltage is maintained within prescribed limits by the application of entry and postlanding batteries during load increases (power up). Load increase or decrease falls well within the limits of power supply capability and, under normal conditions, should not require other than normal checklist procedures.
Power Up
Powering up spacecraft systems is performed in one continuous sequence providing the main bus voltage does not decrease below 26.5 volts. If bus voltage decreases to this level, the power up sequence can be interrupted for the time required for fuel cell temperatures to increase with the resultant voltage increase or the batteries can be connected to the main buses thus reducing the fuel cell load. In most cases, powering up can be performed in one continuous sequence; however, when starting from an extremely low spacecraft load, it is probable that a power up interruption or earlier battery coupling may be required. The greatest load increase occurs while powering up for a delta V maneuver.
Power Down
Powering down spacecraft systems is performed in one continuous sequence providing the main bus voltage does not increase above 31.0 volts. Powering down from relatively high spacecraft load levels, i.e. , following a delta V, the sequence may have to be interrupted for the time required for fuel cell temperature, and as a result, bus voltage to decrease. To expedite power down, one fuel cell can be disconnected from the buses increasing the loads on the remaining fuel cells and decreasing bus voltage, thus allowing continuation of the power down sequence.
Fuel Cell Disconnect
If the requirement arises to maintain a power plant on open circuit, temperature decay would occur at an average rate of approximately 6° /hr., with the automatic in-line heater circuit activating at a skin temperature of 385° F and maintaining power plant temperature at 385°F. In-line heater activation can be confirmed by a 4.5 to 6 amp indication as observed on the d-camps meter (MDC-3) with the d-c indicator switch positioned to the open circuited fuel cell position. Reactant valves remain open. Fuel cell pumps can be turned off until the in-line heater circuit activates, at which time they must be on.
Closing of reactant valves during a power plant disconnect is dependent on the failure experienced. If power plant failure is such as to allow future use, i.e., shutdown due to partially degraded output, it is recommended the reactant valves remain open to provide a positive reactant pressure. The valves should be closed after power-plant skin temperature decays below 300°F. The reactant valves are closed during initial shutdown, if the failure is a reactant leak, an abnormally high regulator output pressure, or complete power-plant failure.
Prior to disconnecting a fuel cell, if a single inverter is being used, each of the remaining power plants is connected to both main d-c buses to enhance load sharing since bus loads are unbalanced. If two inverters are being used, main d-c bus loads are relatively equal; therefore, each of the remaining power plants is connected to a separate main d-c bus for bus isolation. If one power plant had been placed on open circuit for an extended period of time, prior to powering up to a configuration requiring three power plants, reconnecting is accomplished prior to the time of heavy load demands. This permits proper conditioning of the power plant which has been on open circuit. The time required for proper conditioning is a function of skin temperature increase and the load applied to the power plant.
Inverters
Each inverter (Inverter Block Diagram) is composed of an oscillator, an eight-stage digital countdown section, a d-c line filter, two silicon-controlled rectifiers, a magnetic amplifier, a buck-boost amplifier, a demodulator, two d-c filters, an eight-stage power inversion section, a harmonic neutralization transformer, an a-c output filter, current sensing transformers, a Zener diode reference bridge, a low-voltage control, and an overcurrent trip circuit. The inverter normally uses a 6.4-kHz square wave synchronizing signal from the central timing equipment (GTE) which maintains inverter output at 400 Hz. If this external signal is completely lost, the free running oscillator within the inverter will provide pulses that will maintain inverter output within ±7 Hz. The internal oscillator is normally synchronized by the external pulse. The subsequent paragraphs describe the function of the various stages of the inverter.
Inverter Block Diagram

The 6. 4-kHz square wave provided by the GTE is applied through the internal oscillator to the eight-stage digital countdown section. The oscillator has two divider circuits which provide a 1600-Hz signal to the magnetic amplifier.
The eight-stage digital countdown section, triggered by the 6 .4- kHz signal, produces eight 400-Hz square waves, each mutually displaced one pulse-time from the preceding and following wave. One pulse-time is 156 microseconds and represents 22. 5 electrical degrees. The eight square waves are applied to the eight-stage power inversion section.
The eight-stage power inversion section, fed a controlled voltage from the buck-boost amplifier, amplifies the eight 400- Hz square waves produced by the eight-stage digital countdown section. The amplified square waves, still mutually displaced 22.5 electrical degrees, are next applied to the harmonic neutralization transformer.
The harmonic neutralization section consists of 31 transformer windings on one core. This section accepts the 400-Hz square-wave output of the eight-stage power inversion section and transforms it into a 3-phase 400-Hz 115-volt signal. The manner in which these transformers are wound on a single core produces flux cancellation which eliminates all harmonics up to and including the fifteenth of the fundamental frequency. The 22.5-degree displacement of the square waves provides a means of electrically rotating the square wave excited primary windings around the 3-phase, wye-connected secondary windings, thus producing the 3-phase 400Hz sine wave output. This 11 5-vol t signal is then applied to the ac output filter.
The a-c output filter eliminates the remaining higher harmonics. Since the lower harmonics were eliminated by the harmonic neutral transformer, the size and weight of this output filter was reduced. Circuitry in this filter also produces a rectified signal which is applied to the Zener diode reference bridge for voltage regulation. The amplitude of this signal is a function of the amplitude of a-c output voltage. After filtering, the 3-phase 115-volt a-c 400-Hz, sine wave is applied to the a-c buses through individual phase current sensing transformers.
The current-sensing transformers produce a rectified signal, the amplitude of which is a direct function of inverter output current magnitude. This d-c signal is applied to the Zener diode reference bridge to regulate inverter current output; it is also paralleled to an over current sensing circuit.
The Zener diode reference bridge receives a rectified d-c signal, representing voltage output, from the circuitry in the a-c output filter. A variance in voltage output unbalances the bridge, providing an error signal of proper polarity and magnitude to the back-boost amplifier via the magnetic amplifier. The buck-boost amplifier, through its bias voltage output, compensates for voltage variations. When inverter current, output reaches 200 to 250 percent of rated current, the rectified signal applied to the bridge from the current sensing transformers is of sufficient magnitude to provide an error signal causing the buck-boost amplifier to operate in the same manner as during an overvoltage condition. The bias output of the buck-boost amplifier, controlled by the error signal, will be varied to correct for any variation in inverter voltage or a beyond tolerance increase in current output. When inverter current output exceeds 250 percent of rated current, the overcurrent sensing circuit is activated.
The overcurrent sensing circuit monitors a rectified d-c signal representing current output. When total inverter current output exceeds 250 percent of rated current, this circuit will illuminate an overload lamp in 15±5 seconds. If current output of any single phase exceeds 300 percent of rated current, this circuit will illuminate the overload lamp in 5±1 seconds. The AC BUS 1 OVERLOAD and AC BUS 2 OVERLOAD lamps are in the caution/warning matrix on MDC-2.
D-C power to the inverter is supplied from the main d-c buses through the d-c line filter. The filter reduces the high frequency ripple in the input, and the 25 to 30 volts de is applied to two silicon-controlled rectifiers.
The silicon-controlled rectifiers are alternately set by the 1600-Hz signal from the magnetic amplifier to produce a d-c square wave with an on-time of greater than 90 degrees from each rectifier. This is filtered and supplied to the buck-boost amplifier where it is transformer-coupled with the amplified 1600-Hz output of the magnetic amplifier, to develop a filtered 35 volts de which is used for amplification in the power inversion stages.
The buck-boost amplifier also provides a variable bias voltage to the eight-stage power inversion section. The amplitude of this bias voltage is controlled by the amplitude and polarity of the feedback signal from the Zener diode reference bridge which is referenced to output voltage and current. This bias signal is varied by the error signal to regulate inverter voltage and maintain current output within tolerance.
The demodulator circuit compensates for any low-frequency ripple (10 to 1000 Hz) in the d-c input to the inverter. The high-frequency ripple is attenuated by the input filters. The demodulator senses the 35-volt d-c output of the buck-boost amplifier and the current input to the buck-boost amplifier. An input d-c voltage drop or increase will be reflected in a drop or increase in the 35-volt d-c output of the buck-boost amplifier, as well as a drop or increase in current input to the buck-boost amplifier. A sensed decrease in the buck-boost amplifier voltage output is compensated for by a demodulator output, coupled through the magnetic amplifier to the silicon-controlled rectifiers. The demodulator output causes the SCRs to conduct for a longer time, thus increasing their filtered d-c output. A sensed increase in buck-boost amplifier voltage output, caused by an increase in d-c input to the inverter, is compensated for by a demodulator output coupled through the magnetic amplifier to the silicon-controlled rectifiers causing them to conduct for shorter periods; thus producing a lower filtered d-c output to the buck-boost amplifier. In this manner, the 35-volt d-c input to the power inversion section is maintained at a relatively constant level irrespective of the fluctuations in d-c input voltage to the inverter.
The low-voltage control circuit samples the input voltage to the inverter and can terminate inverter operation. Since the buck-boost amplifier provides a boost action during a decrease in input voltage to the inverter, in an attempt to maintain a constant 35 volts dc to the power inversion section and a regulated 115-volt inverter output, the high boost required during a low-voltage input would tend to overheat the solid state buck-boost amplifier. As a precautionary measure, the low-voltage control will terminate inverter operation by disconnecting operating voltage to the magnetic amplifier and the first power inversion stage when input voltage decreases to between 16 and 19 volts dc.
A temperature sensor with a range of +32° to +248°F is installed in each inverter and provides an input to the C&WS which will illuminate a light at an inverter overtemperature of 190° F. Inverter temperature is telemetered to MSFN.
Battery Charger
A Constant voltage solid-state battery charger (Battery Charger Block Diagram), located in the CM lower equipment bay, is incorporated into the EPS. The BATTERY CHARGER selector switch (MDC-3) controls power input to the charger, as well as connecting the charger output to the selected battery (Battery Charger and CM D-C Bus Control Circuits Schematic). When the BATTERY CHARGER selector switch is positioned to entry battery A, B, or C, a relay (Kl) is activated completing circuits from a-c and d-c power sources to the battery charger. Battery charger output is also connected to the selected battery to be charged through contacts of the MAIN BUS TIE motor switch. Positioning the MAIN BUS TIE switch (A/C or B/C) to OFF for battery A or B, and both switches to OFF for battery C will disconnect main bus loads from the respective batteries and also complete the circuit from the charger to the battery.
Battery Charger Block Diagram

Battery Charger and CM D-C Bus Control Circuits Schematic

The battery charger is provided 25 to 30 volts from both main d-c buses and 115 volts 400-Hz 3-phase from either of the a-c buses. All three phases of ac are used to boost the 25 to 30-volt d-c input and produce 40 volts de for charging. In addition, phase A of the ac is used to supply power for the charger circuitry. The logic network in the charger, which consists of a two-stage differential amplifier (comparator), Schmitt trigger, current sensing resistor, and a voltage amplifier, sets up the initial condition for operation. The first stage of the comparator is in the on mode, with the second stage off, thus setting the Schmitt trigger first stage to on with the second stage off. Maximum base drive is provided to the current amplifier which turns the switching transistor to the on mode. With the switching transistor on, current flows from the transformer rectifier through the switching transistor, current sensing resistor, and switch choke to the battery being charged. Current lags voltage due to switching choke action. As current flow increases, the voltage drop .across the sensing resistor increases, and at a specific level sets the first stage of the comparator to off and the second stage to on. The voltage amplifier is set off to reverse the Schmitt trigger to first stage off and second stage on. This sets the current amplifier off, which in turn sets the switching transistor off. The switching transistor in the off mode terminates power from the source, causing the field in the choke to continue collapsing, discharging into the battery, then through the switching diode and the current sensing resistor to the opposite side of the choke. As the EMF in the choke decreases, current through the sensing resistor decreases, reducing the voltage drop across the resistor. At some point, the decrease in voltage drop across the sensing resistor reverses the comparator circuit, setting up the initial condition and completing one cycle of operation. The output load current, due to the choke action, remains relatively constant except for the small variation through the sensing resistor. This variation is required to set and reset the switching transistor and Schmitt trigger through the action of the comparator.
Battery charger output is regulated by the sensing resistor until battery voltage reaches approximately 37 volts. At this point, the biased voltage sensor circuit is unbiased, and in conjunction with the sensing resistor provides a signal for cycling the battery charger. As battery voltage increases, the internal impedance of the battery increases, decreasing current flow from the charger. At 39.8 volts, the battery is fully charged and current flow becomes negligible. (Battery Charger Output (Amperes) Graph.) Recharging the batteries until battery amp hour input equates amp hours previously discharged from the battery assures sufficient battery capacity for mission completion. The MSFN will monitor this function. If there is no contact with the MSFN, battery charging is terminated when the voltmeter indicates 39. 5 vdc with the DC INDICATORS switch set to the BAT CHARGER position.
Battery Charger Output (Amperes) Graph

Charger voltage is monitored on the DC VOLTS METER (MDC -3). Current output is monitored on the inner scale of the DC AMPS meter (MDC-3) by placing the DC INDICATORS switch (MDC-3) to the BAT CHARGER position. Battery charger current output is telemetered to the MSFN.
When charging battery A or B, the respective BAT RLY BUSBAT A or B circuit breaker (MDC-5) is opened to expedite recharge. During this period, only one battery will be powering the battery relay bus. Relay bus voltage can be monitored by selecting positions 4 and B on the Systems Test Meter (LEB-101) and from the couches by the Fuel Cell-Main Bus B-1 and Fuel Cell – Main Bus A-3 talk back indicators (MDC-3) which will be barber-poled. If power is lost to the relay bus, these indicators will revert to the gray condition indicating loss of power to the relay bus and requiring remedial action.
Recharge of a battery immediately after it is exposed to any appreciable loads requires less time than recharge of a battery commencing 30 minutes or more after it is disconnected from these loads. Therefore, it is advantageous to connect batteries to the charger as soon as possible after they are disconnected from the main buses since this decreases overall recharge time.
Power Distribution
D-C and a-c power distribution to components of the EPS is provided by two redundant buses in each system. A single -point ground on the spacecraft structure is used to eliminate ground loop effects. Sensing and control circuits are provided for monitoring and protection of each system.
Distribution of d-c power (D-C Power Distribution Diagram) is accomplished with a two-wire system and a series of interconnected buses, switches, circuit breakers, and isolation diodes. The d-c negative buses are connected to the vehicle ground point (VGP). The buses consist of the following:

  • Two main d-c buses (A and B), powered by the three fuel cells and/ or entry and postlanding batteries A, B, and C.
  • T wo battery buses (A and B ), each powered by its respective entry and postlanding battery A and B. Battery C can power either or both buses if batteries A and/ or B fail.
  • Flight and postlanding bus, powered through both main d-c buses and diodes, or directly by the three entry and postlanding batteries, A, B, and C, through dual diodes.
  • Flight bus, powered through both main d-c buses and isolation diodes.
  • Nonessential bus, powered through either d-c main bus A or B.
  • Battery relay bus, powered by entry and postlanding batteries through the individual battery buses and isolation diodes.
  • Pyro buses, isolated from the main electrical power system when powered by the pyro batteries. A capability is provided to connect either entry battery to the A or B pyro system in case of loss of a pyro battery.
  • SM jettison controllers, powered by the fuel cell power plants and completely isolated from the main electrical power system until activated during CSM separation.
    D-C Power Distribution Diagram

Power from the fuel cell power plants can be connected to the main d-c buses through six motor switches (part of overload/reverse current circuits in the SM) which are controlled by switches in the CM located on MDC- 3. Fuel cell power can be selected to either or both of the main d-c buses. Six talk back indicators show gray when fuel cell output is connected and striped when disconnected. When an overload condition occurs, the overload-reverse current circuits in the SM automatically disconnect the fuel cell power plants from the overloaded bus and provide visual displays (talk-back indicator and caution and warning lamp illumination) (FC BUS DISCONNECT) for isolation of the trouble. A reverse current condition will disconnect the malfunctioning power plant from the d-c system. D-C undervoltage sensing circuits (D-C and A-C Voltage Sensing Schematic) are provided to indicate bus low-voltage conditions. If voltage drops below 26. 25 volts d-c, the applicable d-c undervoltage light on the caution and warning panel (MDC-2) will illuminate. Since each bus is capable of handling all EPS loads, an undervoltage condition should not occur except in an isolated instance; if too many electrical units are placed on the bus simultaneously or if a malfunction exists in the EPS. A voltmeter (MDC-3) is provided to monitor voltage of each main d-c bus, the battery charger, and each of the five batteries. An ammeter is provided (MDC-3) to monitor current output of fuel cells 1, 2, 3, batteries A, B, C, and the battery charger.
D-C and A-C Voltage Sensing Schematic

During high power demand or emergencies, supplemental power to the main d-c buses can be supplied from batteries A and B via the battery buses and directly from battery C (Battery Charger and CM D-C Bus Control Circuits Schematic). During entry, spacecraft power is provided by the three entry and postlanding batteries which are connected to the main d-c buses prior to CSM separation; placing the MAIN BUS TIE switches (MDC-5) to BAT A / C and BAT B/C provides this function after closing the MAIN A-BAT C and MAIN B-BAT C circuit breakers (RHEB-275). The switches are manually placed to OFF after completion of RCS purge and closing the FLIGHT AND POST LDGBAT B US A, BAT BUS B, and BAT C circuit breakers (RHEB-275) during main chute descent. The AUTO position provides an automatic connection of the entry batteries to the main d-c buses at CSM separation. The auto function is used only on the launch pad after the spacecraft is configured for a LES pad abort.
A nonessential bus, as shown on D-C Power Distribution Diagram permits isolating nonessential equipment during a shortage of power (two fuel cell power plants out). The flight bus distributes power to in-flight telecommunications equipment. The flight and postlanding bus distributes power to some of the in-flight telecommunications equipment, float bag No. 3 controls, the ECS postlanding vent and blower control, and postlanding communications and lighting equipment. In flight, the postlanding bus receives power from the fuel cells and/or entry and postlanding batteries through the main d-c buses. After completion of RCS purge during main chute descent, the entry batteries supply power to the postlanding bus directly through individual circuit breakers. These circuit breakers (FLIGHT & POST LANDING-BAT BUS A, BAT BUS B, and BAT C – RHEB-275) are normally open in flight and closed during main chute descent just prior to positioning the MAIN BUS TIE switches to OFF.
Motor switch contacts which close when the MAIN BUS TIE switches are placed to ON, complete the circuit between the entry and postlanding batteries and the main d-c buses, and open the connection from the battery charger to the batteries. The battery relay bus provides d-c power to the a-c sensing units, the fuel cell and inverter control circuits, fuel cell reactant and radiator valves and the fuel cell-main BUS A and B talk-back indicators on MDC-3. The pyrotechnic batteries supply power to ordnance devices for separation of the LES, S-IVB, forward heat shield, SM from CM, and for deployment and release of the drogue and main parachutes during a pad abort, high-altitude abort, or normal mission progression. The three fuel cell power plants supply power to the SM jettison controllers for the SM separation maneuver.
Distribution of a-c power (A-C Power Distribution Diagram) is accomplished with a four-wire system via two redundant buses, a-c bus l and a-c bus 2. The a-c neutral bus is connected to the vehicle ground point. A-C power is provided by one or two of the solid-state 115/200-volt 400-Hz 3-phase inverters. D-C power is routed to the inverters through the main d-c buses. Inverter No. 1 is powered through d-c main bus A, inverter No. 2 through d-c main bus B, and inverter No. 3 through either d-c main bus A or B by switch selection. Each of these circuits has a separate circuit breaker .and a power control motor switch. Switches for applying power to the motor switches are located on MDC- 3. All three inverters are identical and are provided with overtemperature circuitry. A light indicator, in the caution/warning group on MDC-2, illuminates at 190° to indicate an overtemperature situation. Inverter output is r outed through a series of control motor switches to the a-c buses. Six switches (MDC-3) control motor switches which operate contacts to connect or disconnect the inverters from the a-c buses. Inverter priority is 1 over 2, 2 over 3, and 3 over 1 on any one a-c bus. This indicates that inverter two cannot be connected to the bus until the inverter 1 switch is positioned to OFF. Also, when inverter 3 switch is positioned to ON, it will take inverter 1 off the bus before inverter 3 connection will be per formed. The motor switch circuits are designed to prevent connecting two inverters to the same a-c bus at the same time. A-C loads receive power from either a-c bus through bus selector switches. In some instances, a single phase is used for operation of equipment and in others all three. Overundervoltage and overload sensing circuits (D-C and A-C Voltage Sensing Schematic) are provided for each bus. An automatic inverter disconnect is effected during an overvoltage. A-C bus voltage fail and overload lights in the caution/ warning group (MDC-2) provide a visual indication of voltage or overload malfunctions. Monitoring voltage of each phase on each bus is accomplished by selection with the AC INDICATORS switch (MDC-3). Readings are displayed on the AC VOLTS meter (MDC-3). Phase A voltage of each bus is telemetered to MSFN stations.
A-C Power Distribution Diagram

Several precautions should be taken during any inverter switching. The first precaution is to completely disconnect the inverter being taken out of the circuit whether due to inverter transfer or malfunction. The second precaution is to insure that no more than one switch on AC BUS 1 or AC BUS 2 (MDC-3) is in the up position at the same time. These precautions are necessary to assure positive power transfer since power to any one inverter control motor switch is routed in series through the switch of another inverter. A third precaution must be exercised to preclude a motor switch lockout when d-c power to inverter 3 is being transferred from d-c main bus A to d-c main bus B, or vice versa. The AC INVERTER 3 switch (MDC-3) should be held in the OFF position for one second when performing a power transfer operation from one main d-c bus to the other.
PERFORMANCE AND DESIGN DATA
AC and DC Data
AC and DC performance and design data for the EPS is as follows:
AC
Phases 3

Displacement 120±2 degrees

Steady-state voltage 115.5 (+l, -1.5) vac (average 3 phases)

Transient voltage 115 (+35, -65) vac

Recovery To 115±10v within 15 ms, steady state witl1in 50 ms

Unbalance 2 vac (worst phase from average)

Frequency limits Normal (synchronized to central timing equipment)
400±3 Hz
Emergency (loss of central timing equipment) 400±7 Hz

Wave characteristics (sine wave)
Maximum distortion 5 percent
Highest harmonic 4 percent
Crest factor 1.414±10 percent

DC
Steady-state voltage limits Normal 29±2.0 vdc

Minimum CM bus 26.2 vdc
Min Precautionary CM bus 2 6. 5 vdc (allows for cyclic loads)

Maximum CM bus 31. 0 vdc
Max Precautionary CM bus 30. 0 vdc (allows for cyclic loads)

During postlanding and preflight checkout periods 27 to 30 vdc

Ripple voltage 1v peak to peak

OPERATIONAL LIMITATIONS AND RESTRICTIONS
Fuel Cell Power Plants
Fuel cell power plants are designed to function under atmospheric and high-vacuum conditions. Each must be able to maintain itself at sustaining temperatures and minimum electrical loads at both environment extremes. To function properly, fuel cells must operate under the following limitations and restrictions:
External nonoperating temperature -20° to +140° F

Operating temperature inside SM +30 ° to 145°F

External nonoperating pressure Atmospheric

Normal voltage 27 to 31 vdc

Minimum operating voltage at terminals
Emergency operation 20. 5 vdc at 2295 watts (gross power level)
Minimum operating voltage at terminals
Normal operation 27 vdc
Maximum operating voltage at terminals 31. 5 vdc

Fuel cell disconnect overload 75 amperes no trip, 112 amperes
disconnect after 25 to 300 seconds
Maximum reverse current 1 second minimum before disconnect

Minimum sustaining power/fuel cell power-plant (with in-line heater. OFF) 420 watts
In-line heater power (sustain F/C skin temp above 385°F min) 160 watts (5 to 6 amps)
Maximum gross power under emergency
conditions 2295 watts at 20.5 vdc min.
Nitrogen pressure 50.2 to 57.5 ps1a (53 psia, nominal)
Reactant pressure Oxygen 58.4 to 68.45 ps1a (62.5 psia, nominal)

Hydrogen 57. 3 to 67. 0 psia (61. 5 psia, nominal)

Reactant consumption/fuel cell power plant
Hydrogen PPH= Amps x (Z.57 x 10-3 )
Oxygen PPH = Amps x (2. 04 x 10-2)

Minimum skin temperature for self-sustaining operation +385° F
Minimum skin temperature for recovery in flight +360°F
Maximun1 skin temperature +500°F

Approximate external -260° to environment temperature range outside SC (for radiation) +400°F
Fuel cell power plant normal operating temperature range +385° to +450°F
Condenser exhaust normal operating temperature + 150° to + 175°F
Purging nominal frequency Dependent on mission load profile and reactant purity after tank fill.
O2 purge duration 2 minutes

H2 purge duration 80 seconds

Additional flow rate while purging
O2 Up to 0.6 lb/hr
H2 Up to 0.75 lb/hr (nominal 0.67 lb/hr)

Cryogenic Storage Subsystem
The cryogenic storage subsystem must be able to meet the following requirements for proper operation of the fuel cell power plants and the ECS:
Minimum usable quantity
Oxygen 320 lbs each tank (min)
Hydrogen 28 lbs each tank (min)
Temperature at time of fill
Oxygen -297°F (approx.)
Hydrogen -423°F (approx.)
Operating pressure range
Oxygen
Normal 865 to 935 psia
Minimum 150 psia
Hydrogen
Normal 225 to 260 psia
Minimum 100 psia
Temperature probe range
Oxygen -325° to +80° F
Hydrogen -425° to -200°F
Maximum allowable difference in quantity balance between tanks
Oxygen tanks No. 1 and 2 2 to 4%
Hydrogen tanks No. 1 and 2 3%
Pressure relief valve operation
Crack pressure
Oxygen 983 psig min.
Hydrogen 273 psig min.
Reseat pressure
Oxygen 965 psig min.
Hydrogen 268 psig min.
Full flow, maximum relief
Oxygen 1010 psig max.
Hydrogen 285 psig max.

Additional Data
Additional data about limitations and restrictions may be found in the CSM/LM Spacecraft Operational Data Book SNA-8-D-027
SYSTEMS TEST METER
The SYSTEMS TEST meter and the alphabetical and numerical switches, located on panel 101 in the CM LEB, provide a means of monitoring various measurements within the SC, and verifying certain parameters displayed only by event indicators. The following can be measured using the SYSTEMS TEST meter, the respective switch positions, and the range of each sensor. Normal operating parameters of measurable items are covered in the telemetry listing.
Systems Test Indication (Telemetry Identity and Code No.) Switch Positions Sensor Range
Numerical Select Alphabetical Select
N2 pressure, psia 0 to 75 psia
F/C 1 SC 2060P 1 A
F/C 2 SC 2061P 1 B
F/C 3 SC 2062P 1 C
02 pressure, psia 0 to 75 psia
F/C 1 SC 2066P 1 D
F/C 2 SC 2067P 2 A
F/C 3 SC 2068P 2 B
H2 pressure, psia 0 to 75 psia
F/C 1 SC 2069P 2 C
F/C 2 SC 2070P 2 D
F/C 3 SC 2071P 3 A
EPS radiator outlet temperature – 50° to +300° F
F/C 1 SC 2087T 3 B
F/C 2 SC 2088T 3 C
F/C 3 SC 2089T 3 D
Battery manifold pressure, psia 4 A 0 to 20 psia
Batt relay bus CC0232V 4 B 0 to +45 vdc

LM power 4 D

SPS oxidizer line temperature SP 0049T 5 A 0 to +200°F
CM-RCS oxidizer valve temperature -50° to +50°F
-P engine, sys A CR 2100T 6 B
+Y engine, sys B CR 2116T 5 D
-P engine, sys B CR 21101 5 C
CW engine, sys B CR 2119T 6 D
CCW engine, sys A CR 2114T 6 A

  • Y engine, sys A CR 2103T 6 C
    Pwr output XPNDR A >1.0 vdc (nominal)
    AGC signal XPNDR B Test >1.0 vdc Operate 0.0 to 4.5 vdc
    Phase Lockup XPNDR C Lock ed >4.0 vdc Unlocked <0.8 vdc

NOTE; Position 7 on the numerical selector switch is an off position.
Conversion of the previously listed measurements to the SYSTEMS TEST meter indications are listed in the following chart. The XPNDR measurements are direct readouts and do not require conversion.
COMMAND MODULE INTERIOR LIGHTING
The command module interior lighting system (CM Interior Lighting Diagram) furnishes illumination for activities in the couch, lower equipment bay and tunnel areas, and back-lighted panel lighting to read nomenclature, indicators, and switch positions. Tunnel lighting is provided on SC which will be concerned with LM activity.
CM Interior Lighting Diagram

Floodlighting for illumination of work areas is provided by use of fluorescent lamps. Integral panel and numerics lighting is provided by electroluminescent materials. Tunnel lights are incandescent. Pen flashlights are provided for illuminating work areas which cannot be illuminated by the normal spacecraft systems, such as under the couches.
Electroluminescence (EL) is the phenomena whereby light is emitted from a crystalline phosphor (ZNS) placed as a thin layer between two closely spaced electrodes of an electrical capacitor. One of the electrodes is a transparent material. The light output varies with voltage and frequency and occurs as light pulses, which are in-phase with the input frequency, : Advantageous characteristics of EL for spacecraft use are: an “after-glow” of less than one second, low power consumption, and negligible heat dissipation.
Systems Test Meter Display N2, O2, H2 Pressure (PSIA) EPS Radiator Outlet Temperature (°F) CM-RCS Oxidizer Valve Temperature (°F) LM Power (AMPS) SPS Temperature (°F) Battery Manifold Pressure (PSIA) Battery Relay Bus (VDC)
0.0 0 -50 -50 0.0 0 0.00 0.0
0.2 3 -36 -46 0.4 8 0.80 1.8
0.4 6 -22 -42 0.8 16 1.60 3.6
0.6 9 -8 -38 1.2 24 2.40 5.4
0.8 12 +6 -34 1.6 32 3.20 7.2
1.0 15 +20 -30 2.0 40 4.00 9.0
1.2 18 +34 -26 2.4 48 4.80 10.8
1.4 21 +48 -22 2.8 56 5.60 12.6
1.6 24 +62 -18 3.2 64 6.40 14.4
1.8 27 +76 -14 3.6 72 7.20 16.2
2.0 30 +90 -10 4.0 80 8.00 18.0
2.2 33 +104 -6 4.4 88 8.80 19.8
2.4 36 +118 -4 4.8 96 9.60 21.6
2.6 39 +132 0 5.2 104 10.40 23.4
2.8 42 +146 4 5.6 112 11.20 25.2
3.0 45 +160 10 6.0 120 12.00 27.0
3.2 48 +174 14 6.4 128 12.80 28.8
3.4 51 +188 18 6.8 136 13.60 30.6
3.6 54 +202 22 7.2 144 14.40 32.4
3.8 57 +216 26 7.6 152 15.20 34.2
4.0 60 +230 30 8.0 160 16.00 36.0
4.2 63 +244 34 8.4 168 16.80 37.8
4.4 66 +258 38 8.8 176 17.60 39.6
4.6 69 +272 42 9.2 184 18.40 41.4
4.8 72 +286 46 9.6 192 19.20 43.2
5.0 75 +300 50 10.0 200 20.00 45.0

Floodlight System
The interior floodlight system consists of six floodlight fixture assemblies and three control panels (CM Floodlight Configuration Diagram). Each fixture assembly contains two fluorescent lamps (one primary and one secondary) and converters. The lamps are powered by 28 vdc from main d-c buses A and B (CM Floodlight System Schematic). This assures a power source for lights in all areas in the event either bus fails, The converter in each floodlight fixture converts 28 vdc to a high voltage pulsating d-c for operation of the fluorescent lamps.
CM Floodlight Configuration Diagram

CM Floodlight System Schematic

Floodlights are used to illuminate three specific areas: the left main display console, the right main display console, and the lower equipment bay. Switches on MDC-8 provide control of lighting of the left main display console area. Switches on MDC-5 provide control of lighting of the right main display console area. Switches for control of lighting of the lower equipment bay area are located on LEB-100. Protection for the floodlight circuits is provided by the LIGHTING – MN A and MN B circuit breakers on RHEB-226.
Each control panel has a dimming (DIM-1-2) toggle switch control, a rheostat (FLOOD-OFF-BRT) control, and an on/off (FIXED-OFF) toggle switch control. The DIM-1 position provides variable i11tensity control of the primary flood lamps through the FLOOD-OFF-BRT rheostat, and on-off control of the secondary lamps through the FIXED-OFF switch. The DIM-2 position provides variable intensity control of the secondary lamps through the FLOOD- OFF-BRT rheostat, and on-off control of the primary lamps through the FIXED-OFF switch. When operating the primary lamps under variable intensity control (DIM-1 position), turn on of the lamps is acquired after the FLOOD-OFF-BRT rheostat is moved past the mid point. In transferring variable intensity control to the secondary lamps, the FLOOD-OFF-BRT rheostat should first be rotated to the OFF position before placing the DIM switch to the DIM-2 position. The rheostat is then moved to the full bright setting and should remain i n this position unless dimming is desired. Dimming of the secondary flood lamps should not be used unless dimming control of the primary floodlights is not available. Dimming of the secondary lamps results in approximately a 90-percent reduction in l amp life. The range of intensity variation is greater for the primary tha11 the secondary floodlights.
The commander’s control panel (MDC-8) has a POST LANDINGOFF – FIXED switch which connects the flight and post landing bus to his floodlights (CM Floodlight System Schematic). The POST LANDING position provides single intensity lighting to the commander’s primary or secondary lamps as selected by the DIM-1 or DIM-2 position respectively. It is for use during the latter stages of descent after main d-c bus power is disconnected, and during post landing.
Integral Lighting System
The integral lighting system controls the EL lamps behind the nomenclature and instrument dial faces on all MDC panels, and on specific panels in the lower equipment bay, left hand equipment bay and right hand equipment bay (CM Integral/Numerics Illumination System Diagram and Integral and Numerics Panel Lighting Schematic). The controls (CM Integral/Numerics Illumination System Diagram) are rotary switches controlling variable transformers powered through the appropriate a-c bus. Each rotary control switch has a mechanical stop which prevents the switch being positioned to OFF. Disabling of a circuit because of malfunctions is performed by opening the appropriate circuit breaker on RHEB- 226. The INTEGRAL switch on MDC-8 controls the lighting of panels viewed by the commander, MDC-1, 7, 8, 9, 15, and the left half of 2. The INTEGRAL switch on MDC-5 controls the lighting of panels viewed by the L M pilot, MDC-3, 4, 5 and 6, 16, RHEB-229 and 275, and the right half of MDC-2. The INTEGRAL switch on LEB-100 controls the lighting of MDC-10, LEB-100, 101, 122 and the DSKY lights on 140, RHEB-225, 226 and LHEB 306. Intensity of the lighting can be individually controlled in each of the three areas.
CM Integral/Numerics Illumination System Diagram

Integral and Numerics Panel Lighting Schematic

Numerics Lighting System
Numerics lighting control is provided over all electroluminescent digital readouts. The NUMERICS rotary switch on MDC-8 controls the off/intensity of numerals on the DSKY and Mission Timer on MDC-2, and the range and delta V indicators of the Entry Monitor System of MDC-1. The switch on LEB-100 controls the off/intensity of the numerals on the LEB-140 DSKY and the Mission Timer on LHEB-306. Protection for the integral and numerics circuits is provided by the LIGHTING-NUMERICS/ INTEGRAL-LEE AC 2, L MDC AC l, and R MDC AC 1 circuit breakers on RHEB-226. These circuit breakers are used to disable a circuit in case of a malfunction. The L MDC AC 1 circuit breakers also feed the EMS roll attitude and scroll incandescent lamps.
Tunnel Lighting
The six light fixtures in the CM tunnel provide illumination for tunnel activity during docking and undocking. Each of the fixtures, containing two incandescent lamps, is provided 28 vdc through a TUNNELLIGHTS-OFF switch on MDC-2 (Tunnel Lighting Schematic). Main d-c bus A distributes power to one lamp in each fixture, and main d-c bus B to the other lamp. Protection is provided by the LIGHTING/COAS/TUNNEL/ RNDZ/SPOT MN A and MN B circuit breakers on RHEB-226.
Tunnel Lighting Schematic

The EV gloves and lunar overshoes (LO) are used for EVA and lunar exploration. They are aboard the LM at launch and are left aboard the LM in lunar orbit or jettisoned.

APOLLO 11 OPERATIONS HANDBOOK BLOCK II SPACECRAFT
VOLUME l SPACECRAFT DESCRIPTION

ENVIRONMENTAL CONTROL SYSTEM (ECS)
INTRODUCTION
FUNCTIONAL DESCRIPTION
Spacecraft Atmosphere Control
Water Management
Thermal Control
OXYGEN SUBSYSTEM
O2 Demand Regulator Diagram
PRESSURE SUIT CIRCUIT
WATER SUBSYSTEM
WATER-GLYCOL COOLANT SUBSYSTEM
Coolant Flow
Glycol Temperature Control
ECS Radiator Control
ECS Radiator Subsystem Diagram
Space Radiators Flow Proportioning Valve Diagram
ELECTRICAL POWER DISTRIBUTION
Environmental Control System Schematic
Environmental Control System Power Distribution Diagram
ECS PERFORMANCE AND DESIGN DATA

ENVIRONMENTAL CONTROL SYSTEM (ECS)
INTRODUCTION
The environmental control system (ECS) is designed to provide the flight crew with a conditioned environment that is both life-supporting, and as comfortable as possible. The ECS is aided in the accomplishment of this task through an interface with the electrical power system, which supplies oxygen and potable water. The ECS also interfaces with the electronic equipment of the several Apollo systems, for which the ECS provides thermal control, with the lunar module (LM) for pressurizing the LM, and with the waste management system to the extent that the water and the urine dump lines can be interconnected.
The ECS is operated continuously throughout all Apollo mission phases. During this operating period the system provides the following three major functions for the crew:

  • Spacecraft atmosphere control
  • Water management
  • Thermal control
    Control of the spacecraft atmosphere consists of regulating the pressure and temperature of the cabin and suit gases; maintaining the desired humidity by removing excess water from the suit and cabin gases; controlling the level of contamination of the gases by removing CO2, odors, and particulate matter; and ventilating the cabin after landing. There are provisions for pressurizing the lunar module during docking and subsequent CSM/LM operations. (Refer to Docking and Transfer for a description of the docking procedures.)
    Water management consists of collecting, sterilizing, and storing the potable water produced in the fuel cells, and delivering chilled and heated water to the crew for metabolic consumption, and disposing of the excess potable water by either transferring it to the waste water system or by dumping it overboard. Provisions are also made for the collection and storage, of waste water (extracted in the process of controlling humidity), delivering it to the glycol evaporators for supplemental cooling, and dumping the excess waste water overboard.
    Thermal control consists of removing the excess heat generated by the crew and the spacecraft equipment, transporting it to the cab heat exchanger (if required) , and rejecting the unwanted heat to space, either by radiation from the space radiators, or in the form of steam by boiling water in the glycol evaporators.
    Five subsystems operating in conjunction with each other provide the required functions:
  • Oxygen subsystem
  • Pressure suit circuit (PSC)
  • Water subsystem
  • Water-glycol subsystem
  • Post- landing ventilation (PLY) subsystem.
    The oxygen subsystem controls the flow of oxygen within the command module (CM); stores a reserve supply of oxygen for use during entry and emergencies; regulates the pressure of oxygen supplied to the subsystem and PSC components; control s cabin pressure in nor mal and emergency (high flow-rate) modes; controls pressure in the water tanks and glycol reservoir; and provides for PSC purge via the DIRECT O2 valve.
    The pressure suit circuit provides the crew with a continuously conditioned atmosphere. It automatically controls suit gas circulation, pressure, and temperature; and removes debris, excess moisture, odors, and carbon dioxide from both the suit and cabin gases.
    The water subsystem (potable section) collects and stores potable water; delivers hot and cold water to the crew for metabolic purposes; and augments the waste water supply for evaporative cooling. The waste water section collects and stores water extracted from the suit heat exchanger, and distributes it to the water inflow control valves of the evaporators, for evaporative cooling.
    The water-glycol subsystem provides cooling for the PSC, the potable water chiller, and the spacecraft equipn1ent; and heating or cooling for the cabin atmosphere.
    The postlanding ventilation subsystem provides a means for circulating ambient air through the command module cabin after landing.
    FUNCTIONAL DESCRIPTION
    The environmental control system operates continuously throughout all mission phases. Control begins during preparation for launch and continues through recovery. The following paragraphs describe the operating modes and the operational characteristics of the ECS from the time of crew insertion to recovery.
    Spacecraft Atmosphere Control
    During prelaunch operations the SUIT CIRCUIT RETURN VAL VE is closed; and the DIRECT Oz valve i s opened slightly (approximately 0 .2 pound per hour flowrate) to provide an oxygen purge of the PSC. Just before prime crew insertion the Oz flowrate is increased to 0.6 pound per hour. This flow is in excess of that required for metabolic consumption and suit leakage. This excess flow causes the PSC to be pressurized slightly above the CM cabin. The slight overpressure maintains the purity of the PSC gas system by preventing the cabin gases from entering the PSC.
    Any changes made in the pressure or composition of the cabin gas during the prelaunch period is controlled by the ground support equipment through the purge port in the CM side hatch.
    As soon as the crew connects into the PSC, the suit gas becomes contaminated by CO2, odors, moisture, and is heated. The gases are circulated by the suit compressor through the CO2 and odor absorber assembly where a portion of the CO2 and odors are removed; then through the heat exchanger, where they are cooled and the excess moisture is removed. Any debris that might get into the PSC is trapped by the debris trap or on felt pads on the upstream side of each LiOH cartridge.
    When the crew is partially suited or in a shirtsleeve environment they contaminate the cabin gases. Since the contaminants can only be removed in the PSC, the crew must necessarily configure the PSC to allow for an adequate flow of gas out of the PSC into the cabin and back into the PSC through the suit return hoses and the SUIT CIRCUIT RETURN VALVE in order to provide the required scrubbing. This can be accomplished for the “partially suited” mode by disconnecting and installing cap screens on the return hoses and opening the SUIT CIRCUIT RETURN VALVE. For the shirtsleeve mode it can be accomplished by disconnecting the inlet hoses and placing the flow control valve in the CABIN FLOW position in addition to the preceding steps.
    During the ascent, the cabin remains at sea level pressure until the ambient pressure decreases a nominal 6 psi. At that point the CABIN PRESSURE RELIEF valve vents the excess gas overboard, maintaining cabin pressure at 6 psi above ambient. As the cabin pressure decreases, a relief valve in the O2 DEMAND REGULATOR vents suit gases into the cabin to maintain the suit pressure slightly above cabin pressure.
    Sometime after attaining orbit it will be necessary to close the DIRECT 02 valve to conserve oxygen. After the DIRECT O2 valve is closed, make-up oxygen for the PSC is supplied by the DEMAND REGULATOR when the SUIT CIRCUIT RETURN VALVE is closed or from the cabin via the cabin pressure regulator when the SUIT CIRCUIT RETURN VALVE is open.
    During normal space operations, the cabin pressure is maintained a t a nominal 5 psia by the cabin pressure regulator, at flowrates up to 1.4 pounds of oxygen per hour. In the event a high leak rate develops, the EMERGENCY CABIN PRESSURE regulator will supply oxygen at high flow rates to maintain the cabin pressure above 3.5 psia for more than 5 minutes, providing the leak is effectively no larger than a 1/2 – inch hole.
    When performing depressurized operations the suit circuit pressure is maintained above 3 .5 psia by the O2 DEMAND REGULATOR; the cabin pressure regulator shuts off automatically to prevent wasting oxygen.
    In event of meteorite puncture during shirtsleeve operations, the EMERGENCY CABIN PRESSURE regulator will maintain the cabin pressure at a safe level until the crew can don their suits.
    Prior to entry SUIT CIRCUIT RETURN VALVE is closed, isolating the suit circuit from the cabin; the 02 DEMAND REGULATOR then controls suit pressure. Cabin pressure is maintained during the descent by the cabin pressure regulator until the ambient pressure rises to a maximum of 0.9 psi above cabin pressure. At that point the cabin relief valve will open, allowing ambient air to flow into the cabin. As the cabin pressure increases, the O2 DEMAND REGULATOR admits oxygen into the suit circuit to maintain the suit pressure slightly below the cabin, as measured at the suit compressor inlet manifold.
    After spacecraft landing, the cabin is ventilated with ambient air by postlanding ventilation fan and valves. When the CM is floating upright in the water, the POST LANDING VENT switch is placed in the HIGH (day) or LOW (night) position. Either of these positions will supply power to open both vent valves and start the fan. In the HIGH position, the fan will circulate 150 cubic feet per minute (cfm); LOW, 100 cfm.
    Water Management
    In preparing the spacecraft for the mission the potable and waste water tanks are partially filled to ensure an adequate supply for the early stages of the mission. From the time the fuel cells are placed in operation until CSM separation, the fuel cells replenish the potable water supply. A portion of the water is chilled and made available to the crew through the drinking fixture and the food preparation unit. The remainder is heated, and is delivered through a separate valve on the food preparation unit.
    From the time the crew connects into the suit circuit until entry, the water accumulator pumps are extracting water from the suit heat exchanger and pumping it into the waste water system. The water is delivered to the glycol evaporators through individual water control valves. Provision is made for dumping excess waste water manually when the tank is full.
    Bacteria from the waste water system can migrate through the isolating valves into the potable water system. A syringe injection system is incorporated to provide for periodic injection of bactericide to kill bacteria in the potable water system.
    Thermal Control
    Thermal control is provided by two water-glycol coolant loops (primary and secondary). During prelaunch operations ground servicing equipment cools the water-glycol and pumps it through the primary loop, providing cooling for the electrical and electronic equipment, and the suit and cabin heat exchangers. The cold water-glycol is also circulated through the reservoir to make available a larger quantity of coolant for use as a heat sink during the ascent. Additional heat sink capability is obtained by selecting maximum cooling on the CABIN TEMP selector, and placing both cabin fans in operation. This cold soaks the CM interior structure and equipment. Shortly before launch, one of the primary pumps is placed in operation, the pump in the ground servicing unit is stopped, and the unit is isolated from the spacecraft system
    During the ascent the radiators will be heated by aerodynamic friction. To prevent this heat from being added to the CM thermal load, the PRIMARY GLYCOL TO RADIATORS valve is placed in the PULL TO BYPASS position at approximately 75 seconds before launch. The coolant then circulates within the CM portion of the loop.
    The heat that is generated in the CM, from the time that the ground servicing unit is isolated until the spacecraft reaches 110,000 feet, is absorbed by the coolant and the prechilled structure. Above 110,000 feet it is possible to reject the excess heat by evaporating water in the primary glycol evaporator.
    After attaining orbit the reservoir is isolated from the loop to maintain a reserve quantity of coolant for refilling the primary loop in case of loss of fluid by leakage. The PRIMARY GLYCOL TO RADIATORS valve is placed in the position (control pushed in) to allow circulation through the radiators and the radiator outlet temperature sensors. If the radiators have cooled sufficiently (radiator outlet temperature is less than the inlet) they will be kept on-stream; if not, they will be bypassed until sufficient cooling has taken place. After the radiators have been placed on-stream, the glycol temperature control is activated (GLYCOL EVAP TEMP IN switch in AUTO); and the CABIN TEMP selector is positioned as desired.
    The primary loop provides thermal control throughout the mission unless a degradation of system performance requires the use of the secondary loop.
    Several hours before CM-SM separation the system valves are positioned so that the primary loop provides cooling for the cabin heat exchanger, the entire cold plate network, and the suit heat exchanger. The CABIN TEMP control valve is placed in the MAX COOL position, and both cabin fans are turned on to cold-soak in the CM interior structure.
    Prior to separation the PRIMARY CLYCOL TO RADIATORS, and the GLYCOL TO RADIATORS SEC valves are placed in the BYPASS position to prevent loss of coolant when the CSM umbilical is cut. From that time (until approximately 110,000 feet spacecraft altitude) cooling is provided by water evaporation.
    OXYGEN SUBSYSTEM
    The oxygen subsystem shares the oxygen supply with the electrical power system. Approximately 640 pounds of oxygen is stored in two cryogenic tanks located in the service module. Heaters within the tanks pressurize the oxygen to 900 psig for distribution to the using equipment.
    Oxygen is delivered to the command module through two separate supply lines, each of which enters at an oxygen inlet restrictor assembly. Each assembly contains a filter, a capillary line, and a spring-loaded check valve. The filters provide final filtration of gas entering the CM. The capillaries which are wound around the hot glycol line, serve two purposes; they restrict the total 02 flow rate to 7.5 pounds per hour maximum, and they heat the oxygen to prevent it from entering the CM in a liquid state. The check valves serve to isolate the two supply lines.
    Downstream of the inlet check valves the two lines tee together and a single line is routed to the QXYGEN-S/M SUPPLY valve on panel 326. This valve is used in flight as a shutoff valve to back up the inlet check valves during entry. It is closed prior to CM-SM separation.
    The outlet of the S/M SUPPLY valve is connected in parallel to the OXYGEN-SURGE TANK valve (panel 326) and to a check valve on the OXYGEN CONTROL PANEL (panel 351). The SURGE TANK valve is normally open during flight, and is closed only when it is necessary to isolate the surge tank from the system. The surge tank stores approximately 3.7 pounds of oxygen at 900 psig for use during entry, and for augmenting the SM supply when the operational demand exceeds the flow capacity of the inlet restrictors. The OXYGEN SURGE TANK PRESSURE RELIEF and shutoff valve on panel 375 prevents overpressurization of the surge tank, and provides a means for shutting off the flow in case of relief valve failure. The relief valve operates at 1045±25 psid. A pressure transducer puts out a signal proportional to surge tank pressure for telemetry and for display to the crew. This signal shares the indicator used for displaying O2 CRYOGENIC TANK # 1 PRESSURE. The signal source is selected by the O2 PRESS IND switch, which is located beneath the indicator on panel 2. The outlet of the check valve (on the OXYGEN CONTROL PANEL) is connected to both the OXYGEN-PLSS valve on panel 326, and the MAIN REGULATOR on panel 351.
    The PLSS valve is used for controlling the flow of oxygen to and from the cabin repressurization package. The package consists of three one-pound capacity oxygen tanks connected in parallel; a toggle-type fast acting REPRESS O2 valve on panel 601 for dumping oxygen into the cabin at very high flowrates; a toggle valve and regulator on panel 600 for supplying oxygen to the emergency O2 face masks; a relief and shut-off valve on panel 602 to protect the package against over pressurization; and a direct-reading pressure gauge on panel 602 for monitoring package and pressure when the ‘PLSS valve is closed. (More accurate pressure indication can be had by placing the PLSS valve in the FILL position and monitoring SURGE TANK pressure.) Opening the REPRESS O2 valve, with the PLSS valve in the FILL position, will dump both the package tanks and the surge tanks at a rate that will pressurize the command module from 0 to 3 psia in one minute. When the PLSS valve is in the ON position, the package tanks augment the surge tank supply for entry and emergencies. The package tanks are filled by placing the PLSS valve to the FILL position, the O2 PRESS IND switch (MDC-2) to the SURGE TANK position, and monitoring surge tank pressure on the CRYOGENIC TANKS PRESSURE O2 1 indicator. When the indicator reads 900±35 psi, both the surge tank and package tanks are full.
    THE MAIN REGULATOR reduces the supply pressure to 85-110 psig for use by the subsystem components. The regulator assembly is a dual unit which is normally operated in parallel. Two toggle valves at the inlet to the assembly provide a means of isolating either of the units in case of failure, or for shutting them both off. Integral relief valves limit the downstream pressure to 140 psig maximum. The output of the MAIN REG ULA TOR passes through a flowmeter, then is delivered to the WATER & GLYCOL TANKS PRESSURE regulator, the cabin pressure regulator, EMERGENCY CABIN PRESSURE regulator (all on panel 351), the O2 DEMAND REG ULA TOR (panel 380), the DIRECT O2 valve (panel 7) , and the WATER ACCUMULATOR valves (panel 382).
    The output of the flowmeter is displayed on the O2 FLOW indicator (panel 2), which has a range of 0.2 to 1.0 pound per hour. Nominal flow for metabolic consumption and cabin leakage is approximately 0.43 pound per hour. Flow rates of 1 pound per hour or more with a duration of 16.5±1.5 seconds will illuminate the O2 FLOW HI light on the caution and warning panel (panel 2). The warning is intended to alert the crew to the fact that the oxygen flow rate is greater than is normally required. It does not necessarily mean that a malfunction has occurred, since there are a number of flight operations in which a high-oxygen flow rate is normal. These cases will be noted, when applicable, in the descriptions that follow. A pressure transducer at the outlet of the MAIN REGULATOR provides data for telemetry only.
    The WATER & GLYCOL TANKS PRESSURE regulator assembly (panel 351) is a dual unit, normally operating in parallel, which reduces the 100-psi oxygen to 20±2 psig (relative to cabin) for pressurizing the positive expulsion bladders in the waste and potable water tanks, and in the glycol reservoir. Integral relief valves limit the downstream pressure to 25±2 psi above cabin pressure. INLET and OUTLET SELECTOR valves are provided for selecting either or both regulators and relief valves, or for shutting the unit off. When changing the position of the selector valves for the purpose of isolating a malfunctioning unit, it is necessary to place both selector valves in the same position in order to eliminate the possibility of cross-feeding oxygen through the outlet selector valve if it is left in the normal position. If a cross-selection is made (inlet selector to 1; outlet selector to 2, or vice versa), flow through the assembly is blocked.
    The cabin pressure regulator controls the flow of oxygen into the cabin to make up for depletion of the gas due to metabolic consumption, normal leakage, or for repressurization. The assembly consists of two absolute pressure regulators operating in parallel, and a manually operated CABIN REPRESS valve. The regulator is designed to maintain cabin pressure at 5±0.2 psia at flow rates up to 1.4 pounds per hour. (O2 FLOW HI light on.) Losses in excess of this value will result in a continual decrease in cabin pressure. When cabin pressure falls to 3 .5 psia minimum, the regulator will automatically shut off to prevent wasting the oxygen supply. Following depressurization, the cabin can be repressurized by manually opening the CABIN REPRESS valve. The CABIN REPRESS valve will flow a minimum of 6 pounds per hour. The Oz FLOW HI light will be on.
    The EMERGENCY CABIN PRESSURE regulator provides emergency protection for the crew in the event of a severe leak in the cabin. The assembly consists of two absolute pressure regulators, either of which can handle the maximum flow rate, and a selector valve for selecting either or both of the regulators, or for shutting the unit off. The regulator valve starts to open when cabin pressure decreases to 4.6 psia; and at 4.2 psia the valve is full-open, flooding the cabin with oxygen. The regulator can supply oxygen to the cabin at a flow rate of 0.67 pound per minute minimum (O2 FLOW HI light on), to prevent rapid decompression in case of cabin puncture. The regulator is capable of providing flow rates which will maintain cabin pressure above 3 .5 psia for a period of 5 minutes, against a leakage rate equivalent to 1/2-inch-diameter cabin puncture. The regulator is normally used during shirt-sleeve operations, and is intended to provide time for donning pressure suits before cabin pressure drops below 3.5 psia. During pressure suit operations, the regulator is shut off to prevent unnecessary loss of oxygen in case of unplanned cabin depressurization.
    The 02 DEMAND REGULATOR (O2 Demand Regulator Diagram) supplies oxygen to the suit circuit whenever the suit circuit is isolated from the cabin (return air SHUTOFF VALVE closed), and during depressurized operations. It also relieves excess gas to prevent overpressurizing the suits. The assembly contains redundant regulators; a single relief valve for venting excess suit pressure; an inlet selector valve for selecting either or both regulators; and a SUIT TEST valve for performing suit integrity tests.
    O2 Demand Regulator Diagram

Each regulator section consists of an aneroid control, and a differential diaphragm housed in a reference chamber. The diaphragm pushes against a rod connected to the demand valve; the demand valve will be opened whenever a pressure differential is sensed across the diaphragm. In operation, there is a constant bleed flow of oxygen from the supply into the reference chamber, around the aneroid, and out through the control port into the cabin. As long as the cabin pressure is greater than 3.75 psia (nominal), the flow of oxygen through the control port is virtually unrestricted, so that the pressure within the reference chamber is essentially that of the cabin. This pressure act s on the upper side of the diaphragm, while suit pressure is applied to the underside of the diaphragm through the suit sense port. The diaphragm can be made to open the demand valve by either increasing the reference chamber pressure, or by decreasing the sensed suit pressure.
The increased pressure mode occurs during depressurized operations. As the cabin pressure decreases, the aneroid expands, At 3.7 psia the aneroid will have expanded sufficiently to restrict the outflow of oxygen through the control port, thus increasing the reference chamber pressure. When the pressure rises approximately 3-inch H2O pressure above the sensed suit pressure, the demand valve will be opened.
The regulator assembly contains a poppet-type relief valve which is integral with the suit pressure sense port. During operations where the cabin pressure is above 3.75 psia, the relief valve is loaded by a coil spring which allows excess suit gas to be vented whenever suit pressure rises to 2- to 9-inch H2O above cabin pressure. When the cabin pressure decreases to 3.75 psia, the reference chamber pressure is increased by the throttling effect of the expanding aneroid. The reference chamber pressure is applied, through ducts, to two relief valve loading chambers which are arranged in tandem above the relief valve poppet. The pressure in the loading chambers acts on tandem diaphragms which are forced against the relief valve poppet. The relief value of the valve is thus increased to 3.75 psia plus 2 – to 9-inch H2O.
The SUIT TEST valve provides a means for pressurizing and depressurizing the suit circuit, at controlled rates, for performing suit integrity tests. Placing the SUIT TEST valve in the PRESS position supplies oxygen through a restrictor to pressurize the suit circuit to a nominal 4 psi above cabin, in not less than 75 seconds. The maximum time required for pressurizing or depressurizing the suits depends upon the density of the suit and cabin gases at the time the test is performed. It will take a longer time to perform the pressurizing or depressurizing during prelaunch than in orbit because of the higher density of the gas at sea level pressure. Placing the SUIT TEST valve in the DEPRESS position will depressurize the suits in not less than 75 seconds. Moving the SUIT TEST valve from the PRESS position to OFF will dump the suit pressure immediately. Al so, if any one of the three suits is vented to cabin, while the SUIT TEST valve is in the PRESS position, all three suits will collapse immediately. This is due to the restrictor in the pressurizing port, which prevents the O2 DEMAND REGULATOR from supplying the high oxygen flow rate required for maintaining the pressure in the other two suits.
The DIRECT O2 valve on panel 7 is a screw-actuated poppet valve capable of metering oxygen into the suit circuit of flow rates from 0 to 0 .67 pound per minute (at 85 psig inlet pressure). The control end of the poppet valve is connected to a bellows assembly, which provides both the internal seal and the force required for closing the valve. When the knob is rotated counterclockwise, the screw mechanism moves inward contacting a follower on the bellows assembly forcing the poppet valve off its seat, thus opening the valve. When the knob is rotated clockwise the screw moves outward all owing the bellows assembly to close the valve. Because there is no mechanical connection between the screw and the bellows assembly, the valve will actually be closed before the screw mechanism l1as been rotated to the extreme clockwise position. Under average operating conditions, it will require approximately 30- degree rotation counterclockwise from the extreme clockwise position to crack the valve open.
PRESSURE SUIT CIRCUIT
The pressure suit circuit (PSC) is a circulating gas loop which provides the crew with a continuously conditioned atmosphere throughout the mission. The gas is circulated through the PSC by two centrifugal compressors which are controlled by individual switches on panel 4. Normally only one of the compressors is operated at a time; however, the individual switches provide a means for connecting either or both of the compressors to either a-c bus.
A differential pressure transducer connected between the compressor inlet and outlet manifolds provides a signal to the SUIT COMPR ΔP indicator (MDC-2); to telemetry; and to the caution and warning system, which will illuminate the SUIT COMPRESSOR light at a ΔP of 0.22 psig or less . Another differential pressure transducer connected between the compressor inlet manifold and the cabin, provides a signal to the SUIT-CAB ΔP indicator (MDC-2); and to telemetry. An absolute pressure transducer connected to the compressor inlet manifold provides a signal to the PRESS SUIT indicator (MDC-2); and to telemetry.
The gas leaving the compressor flows through the CO2 and odor absorber assembly. The assembly is a dual unit containing two absorber elements in separate compartments with inlet and outlet manifolds common to both. A diverter valve in the inlet manifold provides a means of isolating one compartment or the other (without interrupting the gas flow) for the purpose of replacing a spent absorber. An interlock mechanism between the diverter valve handle and the cover handles is intended to prevent opening both compartments at the same time. A pressure interlock device on each canister cover extends a pin into a slot in the cover handle whenever the internal pressure is one psi above cabin pressure. A manual bleed valve on each canister cover provides a means of bleeding down the canister pressure so the cover can be opened in a depressurized cabin. The absorber elements contain lithium hydroxide and activated charcoal for removing carbon dioxide and odors from the suit gases. Orlon pads on the inlet and outlet sides trap small particles and prevent absorbent materials from entering the gas stream.
From the filter the gas flows through the suit heat exchanger where the gases are cooled and the excess moisture is removed. The heat exchanger assembly is made up of two sets of broad flat tubes through which the coolant from the primary and secondary loops can be circulated. The coolant flow/bypass is controlled by two valves located on the coolant control panel (382). The SUIT HT EXCH PRIMARY GLYCOL valve is a motor-driven valve with manual override; the motor is controlled by the SUIT CIRCUIT-HEAT EXCH switch on MDC-2. The SUIT HT EXCH SECONDARY GLYCOL valve must be positioned manually. The space between the tubes forms passages through which the suit gases flow. The coolant flowing through the tubes absorbs some of the heat from the suit gases. As the gases are cooled to about 55 °F, the excess moisture condenses out and is removed from the heat exchanger by one or both of a pair of water accumulator pumps.
The water accumulators are piston-type pumps, which are actuated by oxygen pressure (100 psi) on the discharge stroke, and by a return spring for the suction stroke. The oxygen flow is controlled by the two WATER ACCUMULATOR selector valve assemblies located on the COOLANT CONTROL PANEL (382). Each valve assembly contains a selector valve, a solenoid valve, and an integral bypass. When the selector valve is in the RMTE position, oxygen flow is controlled by the solenoid valve; when in the MAN position, the oxygen flows through the bypass directly to the pump. The solenoid valve can be controlled automatically by signals from the central timing equipment by placing the SUIT CIRCUIT-H2O ACCUM switch (panel 2) in either AUTO 1 or AUTO 2. In the automatic mode the central timing equipment signal will cause one of the accumulators to complete a cycle every ten minutes. If it becomes necessary to cycle the accumulators at more frequent intervals the solenoid valve can be controlled manually by placing the AUTO switch in the OFF position, and placing the adjacent H2O ACCUM switch to the ON position for either No. 1 or 2 accumulator. When exercising manual control, either by means of the switch or the selector valve, it is necessary to hold that particular control on for 10 seconds then return it to the OFF position.
The cool gas (55 °F nominal) flows from the heat exchanger through the suit flow limiters and the flow control valves, into the suits. The suit temperature is measured at the heat exchanger outlet, and is displayed on the SUIT TEMP indicator (panel 2) and telemetered.
A suit flow limiter is installed in each suit supply duct to restrict the gas flow rate through any one suit. The flow limiter is a tube with a Venturi section, sized to limit flow to 0.7 pound per minute. The limiter offers maximum resistance to gas flow through a torn suit, when cabin pressure is near zero psia. The O2 demand regulator will supply oxygen at flow rates up to 0.67 pound per minute (for at least 5 minutes) to maintain pressure in the circuit while the torn suit is being repaired.
The flow control valves (panels 300, 301, 302) are part of the suit hose connector assembly. These valves provide a means for adjusting the gas flow through each suit individually, and are fully modulating from OFF to the FULL FLOW position. When operating in a shirtsleeve environment with the inlet hose disconnected from the suit, placing the flow control valve in the CABIN FLOW position will allow approximately 12 cubic feet of suit gas per minute to flow into the cabin.
A suit flow relief valve is installed between the suit heat exchanger outlet and the compressor inlet, and is intended to maintain a relatively constant pressure at the inlets to the three suits by relieving transient pressure surges. The SUIT FLOW RELIEF valve control (panel 382) provides a means for manually closing the valve by placing the control in the OFF position. Placing the control in AUTO removes the restraint and allows the valve to operate as a relief valve. There is no provision for manually opening the valve. It is planned to place the control in the OFF position for the duration of the mission to ensure maximum flow through the SUIT CIRCUIT.
The gas leaving the suits flows through the debris trap assembly, into the suit compressor. The debris trap is a mechanical filter for screening out solid matter that might otherwise clog or damage the suit compressors. The trap consists of a stainless steel screen designed to block particles larger than 0.040 inch, and a bypass valve which will open at differential pressure of 0.5 inch H2O in the event the screen becomes clogged.
The SUIT CIRCUIT RETURN VALVE (panel 381) is installed on the debris trap upstream of the screen. The valve permits cabin gases to enter the suit circuit for scrubbing. The valve consists of two flapper-type check valves, and a manual shutoff valve, all in series. The manual VALVE provides a means for isolating the suit circuit from the cabin manually by means of a remote control located on panel 381. This is done to prevent inducting cabin gases into the suit circuit, in the event the cabin gases become contaminated.
The SUIT CIRCUIT RETURN VALVE is located at the suit compressor inlet manifold, which is normally 1 to 2 inches of water pressure below cabin pressure. The differential pressure causes cabin gases to flow into the suit circuit when the manual valve is open. The reconditioned cabin gases are recirculated through the suits and/ or cabin. During emergency operation, the check valve prevents gases from flowing into the depressurized cabin from the suit circuit.
A CO2 sensor is connected between the suit inlet and return manifold. The output signal is delivered to the PART PRESS CO2 indicator (panel 2); to telemetry; and to the caution and warning system. At a CO2 partial pressure of 7.6 mm hg, the CO2 PP HI light on panel 2 will be illuminated
WATER SUBSYSTEM
The water subsystem consists of two individual fluid management networks which control the collection, storage, and distribution of potable and waste water. The potable water is used primarily for metabolic purposes. The waste water is used solely as the evaporant in the primary and secondary glycol evaporators. Although the two networks operate and are controlled independently, they are interconnected in a manner which allows potable water to flow into the waste system under certain conditions described below.
Potable water produced in the fuel cells is pumped into the CM at a flow rate of approximately 1. 5 pounds per hour. The water flow through the hydrogen separator to a check valve, on the WATER CONTROL PANEL (352), and to the inlet ports of the POTABLE TANK INLET and WASTE TANK INLET valves (panel 352). The hydrogen separator consists of a series of tubes (made of 25 percent silver and 75 percent palladium) through which the water flows, encased in a can which is vented to space. Hydrogen, in both the dissolved and free states, passes through the walls of the tubing into the can and flows overboard. The separator is installed in the right hand equipment bay behind the waste management panel, and is connected into the system through flexible hoses and quick-disconnects, which are accessible through a door at the bottom of panel 252. The check valve at the inlet prevents loss of potable water after CM-SM separation.
The POTABLE TANK INLET is a manual shutoff valve used for preventing the flow of fuel cell water into the potable system in the event the fuel cell water becomes contaminated. The pH HI talkback (panel 3) shows a “barberpole” when the water pH factor exceeds a value of 9.
The WASTE TANK INLET is an in-line relief valve, with an integral shutoff valve. The relief valve allows potable water to flow into the waste water tank whenever the potable water pressure is 6 psi above waste water pressure. This pressure differential will occur when the fuel cells are pumping water, and either the potable water tank is full, or the POTABLE TANK INLET valve is closed; or when the waste water tank is completely empty and the glycol evaporators are demanding water for cooling. In the latter case, the water flow is only that quantity which is demanded. The shutoff valve provides a means of blocking flow in case the relief valve fails. If such a failure occurs, potable water can flow through the valve (provided the potable water pressure is higher than the waste), until the two pressures are equal. Reverse flow is prevented by a check valve downstream of the WASTE TANK INLET valve.
In the event that both water tanks are full at the time the fuel cells are pumping, the excess potable water will be dumped overboard through the PRESSURE RELIEF valve on panel 352. However, automatic dumping through the relief valve is not desirable because the pumps in both the potable and waste water systems discharge water intermittently, rather than in a steady stream. Dumping water through the relief valve in spurts results in some flash-freezing, which could result in a temporary blockage of the dump line. To preclude this the PRESSURE RELIEF valve has been modified by removing the poppet of one of the two relief valves, so that it can be used as a dump valve, to dump water in a steady stream. During flight the waste water tank quantity will be maintained below 75 percent by manually dumping the excess water. This means that normally an ullage will be maintained to receive the potable water, instead of dumping it overboard.
Water flows from the control panel to the potable water tank, the FOOD PREPARATION WATER unit (panel 305), and the water chiller. Chilled water is delivered to the FOOD PREPARATION WATER unit; and to the drinking water dispenser through the DRINKING WATER SUPPLY valve (panel 304).
The water chiller cools and stores 0. 5 pound of potable water for crew consumption. The water chiller is designed to supply 6 ounces of 50°F water every 24 minutes. The unit consists of an internally baffled reservoir containing a coiled tube assembly which is used as the coolant conduit. The baffles are used to prevent the incoming hot water from mixing with and raising the temperature of the previously chilled water.
The FOOD PREPARATION WATER unit heats potable water for use by the crew, and allows manual selection of hot or cold potable water. The cold potable water is supplied by the water chiller. The unit consists of an electrically heated water reservoir and two manually operated valves, which meter water in 1-ounce increments. The insulated reservoir has a capacity of 1.9 pounds of water. Thermostatically controlled heating elements in the reservoir heat the water and maintain it at 154° F nominal. Two metering valves dispense either hot or cold water, in 1-ounce increments, through a common nozzle. The hot water delivery rate is approximately 10 ounces every 30 minutes.
The DRINKING WATER SUPPLY valve on panel 304 provides a means for shutting off the flow of water to the drinking water dispenser (water pistol), in case of a leak in the flex hose.
The waste water and potable water is stored in positive expulsion tanks, which with the exception of capacity, are identical in function, operation, and design. The positive expulsion feature is obtained by an integrally supported bladder, installed longitudinally in the tank. Water collector channels, integral with the tank walls, prevent water from being trapped within the tank by the expanding bladder. Quantity transducers provide signals to the H2O QUANTITY indicator on panel 2. The signal source is selected by the H2O QTY IND switch located below and to the left of the indicator on panel 2.
Waste water extracted from the suit heat exchanger is pumped into the waste water tank, and is delivered to the EVAP WATER CONTROLPRIMARY and SECONDARY valves on panel 382. When the tank is full, excess waste water is dumped overboard through the water PRESSURE RELIEF valve. The EVAP WATER CONTROL valves consist of a manually operated inlet valve and a solenoid valve. When the inlet valves are in AUTO, the solenoid valves control water flow to the evaporators. The PRIMARY solenoid valve is controlled automatically when the GLYCOL EVAP-H20 FLOW switch (panel 2) is in AUTO, and manually when the switch is ON. The SECONDARY solenoid valve is controlled automatically when the SEC COOLANT LOOP EVAP switch is in EVAP. There is no manual control provided.
WATER-GLYCOL COOLANT SUBSYSTEM
The water-glycol coolant subsystem consists of two independently operated closed coolant loops. The primary loop is operated continuously throughout the mission, unless damage to the equipment necessitates shutdown. The secondary loop is operated at the discretion of the crew, and provides a backup for the primary loop. Both loops provide cooling for the suit and cabin atmospheres, the electronic equipment, and a portion of the potable water supply. The primary loop also serves as a source of heat for the cabin atmosphere when required.
Coolant Flow
The coolant is circulated through the loops by pumping unit consisting of two pumps, a full-flow filter, and an accumulator for the prin1ary loop; and a single pump, filter, and accumulator for the secondary loop. The purpose of the accumulators is to maintain a positive pressure at the pump inlets by accepting volumetric changes due to changes in coolant temperature. If the primary accumulator leaks, it can be isolated from the loop by means of the PRIM GLY ACCUM (panel 378). Then the reservoir must be placed in the loop to act as an accumulator. Accumulator quantity is displayed on the ACCUM PRIM/SEC indicator on panel 2. (The signal source is selected by the ECS INDICATORS rotary switch on panel 2.) The primary pumps are controlled by the ECS GLYCOL PUMPS rotary switch on panel 4, which permits either of the pumps to be connected to either a-c bus. The secondary pump is controlled by a three -position toggle switch SEC COOLANT LOOP-PUMP on panel 2, which allows the pump to be connected to either a-c bus.
The output of the primary pump flows through a passage in the evaporator steam pressure control valve to de-ice the valve throat. The coolant next flows through the GLYCOL TO RADIATORS-PRIM valve (panel 377), through the radiators, and returns to the CM. The GLYCOL TO RADIATORS-PRIM valve is placed in the BYPASS position; prior to launch to isolate the radiators from the loop, and prior to CM-SM separation to prevent loss of coolant when the CSM umbilical is cut. During space operations the valve is in the NORMAL position.
Coolant returning to the CM flows to the GLYCOL RESERVOIR valves (panel 326). From prelaunch until after orbit insertion, the reservoir INLET and OUTLET valves are open and the bypass valve is closed, allowing coolant to circulate through the reservoir. This provides a quantity of cold coolant to be used as a heat sink during the early stage of launch. After orbit insertion, the reservoir is isolated from the primary loop (by opening the BYPASS valve, and closing the INLET and OUTLET valves) to provide a reserve supply of coolant for refilling the loop in the event a leak occurs. Refilling is accomplished by means of the PRIM ACCUMR FILL valve (panel 379). Prior to entry, the reservoir is again placed in the loop.
The coolant flow from the evaporator divides into two branches. One branch carries a flow of 33 pounds per hour to the inertial measurement unit (IMU), and into the coldplate network. The other branch carries a flow of 167 pounds per hour to the water chiller, then through the SUIT HI EXCH PRIMARY GLYCOL valve (panel 382) and the suit heat exchanger to the PRIMARY CABIN TEMP control valve (panel 303).
The PRIMARY CABIN TEMP control valve routes the coolant to either the cabin heat exchanger or to the coldplate network. The valve is positioned automatically by the cabin temperature control, or manually by means of an override control on the face of the valve. The valve is so constructed that in the cabin full cooling mode , the flow of coolant from the suit heat exchanger ( 167 pounds per hour) is routed first through the cabin heat exchanger and then through the thermal coldplates where it joins with the flow (33 pounds per hour) from the IMU. In the cabin full heating mode, the total flow (200 pounds per hour) is routed through the thermal coldplates first, where the water-glycol absorbs heat; from there it flows through the cabin heat exchanger. In the intermediate valve positions, the quantity of cool or warm water-glycol flowing through the heat exchanger is reduced in proportion to the demand for cooling or heating. Although the amount of water-glycol flowing through the cabin heat exchanger will vary, the total flow through the thermal coldplates will always be total system flow. An orifice restrictor is installed between the cabin temperature control valve and the inlet to the coldplates . Its purpose is to maintain a constant flow rate through the coldplates by reducing the heating mode flow rate to that of the cooling mode flow rate. Another orifice restrictor, located in the coolant line from the IMU, maintains a constant flow rate through this component regardless of system flow fluctuations. The total flow leaving the PRlMARY CABIN TEMP valve enters the primary pump and is recirculated.
The output of the secondary pump flows through a passage in the secondary evaporator steam pressure control valve for de-icing the valve throat. The coolant next flows through the GLYCOL TO RADIATORS-SEC valve (panel 377), through the radiators, and returns to the CM. The GLYCOL TO RADIATORS-SEC valve is placed in the bypass position, prior to CM-SM separation to prevent loss of coolant when the CSM umbilical is severed. After returning to the CM the coolant flows through the secondary evaporator, the SUIT HT EXCH SECONDARY GLYCOL valve, and the suit heat exchanger to the SECONDARY CABIN TEMP control valve (panel 303). The SECONDARY CABIN TEMP control valve regulates the quantity of coolant flowing through the cabin heat exchanger in the cooling mode (there is no heating capability in the secondary loop). The coolant from the secondary cabin temp control valve and/or the cabin heat exchanger then flows through redundant passages in the coldplates for the flight critical equipment and returns to the secondary pump inlet.
Glycol Temperature Control
The heat absorbed by the coolant in the primary loop is transported to the radiators where a portion is rejected to space. If the quantity of heat rejected by the radiators is excessive, the temperature of the coolant returning to the CM will be lower than desired (45 °F nominal). If the temperature of the coolant entering evaporator drops below a nominal 43°F, the mixing mode of temperature control is initiated. The automatic control (GLYCOL EVAP-TEMP IN switch, AUTO position) opens the PRIMARY GLYCOL EVAP INLET TEMP valve (panel 382), which allows a sufficient quantity of hot coolant from the pump to mix with the coolant returning from the radiators, to produce a mixed temperature at the inlet to the evaporator between 43° and 48 °F. There is no mixing mode in the secondary loop. If the temperature of the coolant returning from the secondary radiator is lower than 45 °F nominal, the secondary radiator inlet heater will be turned on to maintain the outlet temperature between 42° and 48°F.
If the radiators fail to radiate a sufficient quantity of heat, the coolant returning to the CM will be above the desired temperature. When the temperature of the coolant entering the evaporator rises to 48° to 50.5°F, the evaporator mode of cooling is initiated. The glycol temperature control (GLYCOL EVAP-STEAM PRESS switch, AUTO position) opens the steam pressure valve allowing the water in the evaporator wicks to evaporate, using some of the heat contained in the coolant for the heat of vaporization. A glycol temperature sensor at the outlet of the evaporator controls the position of the steam pressure valve to establish a rate of evaporation that will result in a coolant outlet temperature between 38° to 45°F (an evaporator outlet temperature range of 11.5±5 °F is acceptable for a period of one hour following a transition from the mixing mode of glycol temperature control to the evaporative mode). The evaporator wicks are maintained in a wet condition by the wetness control (GLYCOL EVAP H2O FLOW switch, AUTO position), which uses the wick temperature as an indication of water content. As the wicks become dryer, the wick temperature increases and the water control valve is opened. As the wicks become wetter, the wick temperature decreases and the water valve closes. The evaporative mode of cooling is the same for both loops, except that there is backup control for the primary loop only. The PRIMARY GLYCOL EVAP INLET TEMP valve can be positioned manually when the TEMP IN switch is in the MAN position. The steam pressure valve can be controlled remotely by placing the STEAM PRESS switch to the MAN position, and using the INCR/DECR switch to position the valve. The water control valve can be opened remotely by placing the Hz O F LOW switch to ON. The secondary evaporator is controlled automatically when the SEC COOLANT LOOP switch is in the EVAP position; placing the switch in RESET causes the control to close the secondary steam pressure valve. The OFF position removes power from the control.
ECS Radiator Control
Each coolant loop includes a radiator circuit (ECS Radiator Subsystem Diagram). The primary radiator circuit consists basically of two radiator panels, in parallel with a flow- proportioning control for dividing the flow between them, and a heater control for adding heat to the loop. The secondary circuit consists of a series loop utilizing some of the area of both panels, and a heater control for adding heat to the loop.
ECS Radiator Subsystem Diagram

The radiator panels are an integral part of the SM skin and are located on opposite sides of the SM (panel 1 in bays 2 and 3; panel 2 in bays 5 and 6). With the radiators being diametrically opposite, it is possible that one primary panel may “see” deep space while the other “sees” the sun, earth, or moon. These extremes in environments, provide for large differences in panel efficiencies and outlet temperatures. The panel seeing deep space can reject more heat than the panel receiving external radiation; therefore, the overall efficiency of the subsystem can be improved by increasing the flow to the cold panel. The higher flow rate reduces the transit time of the coolant through the radiator, which decreases the quantity of heat radiated.
Flow through the radiators is controlled by a dual flow-proportioning valve assembly, four radiator isolation valves, and a solid-state electronic controller. The flow-proportioning valve assembly (Space Radiators Flow Proportioning Valve Diagram) consists of two vane-type proportioning valves each driven by an individually controlled torque motor. The assembly has a common inlet port, and each of the valves has two outlet ports, one going to the supply lines for radiator panel No. 1, and the other going to panel 2. A radiator isolation valve is installed between each of the valve outlet ports and the supply line for each of the radiator panels. The controller not only contains the circuits for controlling the position of the flow-proportioning valves, it also contains radiator isolation valve selection logic, a failure-sensing logic, and redundant power supplies.
Space Radiators Flow Proportioning Valve Diagram

Power is supplied to the controller through the two FLOW CONT switches in the ECS RADIATORS switch group on panel 2. Placing the PWR-MAN SEL MODE switch in the PWR position, routes d-c power to the AUT0-1-2 switch, which is used for selecting the operating m ode of the controller. When the AUT0-1-2 switch is placed in the AUTO position, and the PWR-MAN SEL MODE switch is in PWR, 28 vdc is applied to the No. 1 power supply of the controller through the internal automatic transfer circuit. The output of the power supply goes to the No. 1 operational amplifier which controls the No. 1 flow-proportioning valve; the failure sensing logic circuit, which controls the electrical state of the auto transfer circuit; and to the control circuit for the four radiator isolation valves, which will position the valves for operation on the No. 1 flow-proportioning system. Three temperature sensors are located in the outlet line from each of the primary radiator panels. The first pair of sensors are connected to the temperature bridge of the No. 1 operational amplifier, the second pair to the No. 2 amplifier, and the third pair to the failure-sensing logic amplifier.
During operation, if a difference in radiator panel outlet temperature occurs, the flow-proportioning valve will be positioned to increase the coolant flow to the cooler radiator panel. At a temperature differential of 10°F the flow-proportioning valve will be “hard over,” diverting approximately 95 percent of the flow to the cold radiator. The failure-sensing logic is monitoring radiator panel outlet temperatures and the magnitude and polarity of the flow-proportioning valve torque motor current. If a temperature differential of 15°F occurs, and the torque motor current is less than 90 percent of maximum or of the wrong polarity, the failure-sensing logic will trigger the automatic transfer circuit. The transfer from the No. 1 to the No. 2 system is effected by removing the input power from the No. 1 power supply and applying power to the No. 2 power supply. The output of the No. 2 power supply then cause s the radiator isolation valves to be positioned for operation with the No. 2 flow-proportioning valve, and applies power to the No. 2 operational amplifier. The failure-sensing logic does not operate with the No. 2 system.
When the AUT0-1-2 switch is in the 1 or 2 position, power is applied to the corresponding power supply, which will set up the system for operation as described previously, except for the failure sensing and transfer circuits. Transfer in this case is by means of the AUT0-1-2 switch.
In situations where the radiator inlet temperature is low and the panels have a favorable environment for heat rejection, the radiator outlet temperature starts to decrease and thus the bypass (flow through the PRIMARY GLYCOL EVAP INLET TEMP valve) ratio starts to increase. As more flow is bypassed, the radiator outlet temperature decreases until the -20 °F minimum desired temperature would be exceeded. To prevent this from occurring, an in-line heater upstream of the radiator is automatically turned on wl1en radiator mixed outlet temperature drops to -15±1 °F and remains on until -10 °±0.5 °F is reached. The controller provides only on/off heater control which results in a nominal 450 watts being added to the coolant each time the heater is energized. Power for the controller comes from the ECS RADIATORS HEATER switch in the PRIM 1 or PRIM 2 position. Switching to the redundant heater system is accomplished by the crew, if the temperature decreases to -20°F.
If the radiator outlet temperature falls below the desired minimum, the effective radiator surface temperature will be controlled passively by the selective stagnation method. The two primary circuits are identical, each consisting of five tubes in parallel and one downstream series tube. The two panels, as explained in the flow proportioning control system, are in parallel with respect to each other. The five parallel tubes of each panel have manifolds sized precisely to provide specific flow-rate ratios in the tubes, numbered l through 5. Tube 5 has a lower rate than tube 4, and so on, through tube 1 which has the higher flow. It follows, that for equal fin areas the tube with the lower flow rate will have a lower coolant temperature. Therefore, during minimum CM heat loads, stagnation begins to occur in tube 5 as its temperature decreases; for as its temperature decreases, the fluid resistance increases, and the flow rate decreases. As the fin area around tube 5 gets colder, it draws heat from tube 4 and the same process occurs with tube 4. In a fully stagnated condition, there is essentially no flow in tubes 3, 4, and 5, and some flow in tubes 1 and 2, with most of it in tube 1.
When the CM heat load increases and the radiator inlet starts to increase, the temperature in tube 1 increases and more heat is transferred through the fin towards tube 2. At the same time, the PRIMARY GLYCOL EVAP INLET TEMP valve starts to close and force more coolant to the radiators, thus helping to thaw the stagnant portion of the panels. As tube 2 starts to get warmer and receives more flow, it in turn starts to thaw tube 3, etc. This combination of higher inlet temperatures and higher flow rates quickly thaws out the panel. The panels automatically provide a high effectiveness (completely thawed panels operating at a high-average fin temperature) at high-heat loads, and a low effectiveness (stagnated panels operating at a low-average fin temperature) at low-heat loads.
The secondary radiator consists of four tubes which are an integral part of the ECS radiator panel structure. Each tube is purposely placed close to the hottest primary radiator tubes (i.e., the number 1 and the downstream series tube on each panel) to keep the water-glycol in the secondary tubes from freezing while the secondary circuit is inoperative. The “selective stagnation” principle is not utilized in the secondary radiator because of the “narrower” heat load range requirements. This is also the reason the secondary radiator is a series loop. Because of the lack of this passive control mechanism, the secondary ECS circuit is dependent on the heater control system at low-heat loads and the evaporator at high-heat loads for control of the water-glycol temperature.
The secondary heater control receives power through the ECS RADIATORS HEATER switch in the SEC position. The secondary heaters differ from the primary in that they can be operated simultaneously. When the secondary outlet temperature reaches 45°F the No. 1 heater comes on, and at 42°F the No. 2 heater comes on; at 44°F No. 2 goes off, and at 45°F No. 1 goes off.
ELECTRICAL POWER DISTRIBUTION
The electrical power required for the operation of the environmental control system is 28 volts de and 115/200 volts 400 cycles 3-phase ac. (See Environmental Control System Schematic and Environmental Control System Power Distribution Diagram.) The larger motors of the system utilize 200-volt 3-phase power, whereas the smaller motors and control circuits operate from a single phase of the ac at 115 volts. Except for the postlanding ventilation system, those components using 28 volts de will receive power from the fuel cells before CSM separation and from batteries after separation. The postlanding ventilation system will operate from batteries, exclusively.
Environmental Control System Schematic

Environmental Control System Power Distribution Diagram

ECS PERFORMANCE AND DESIGN DATA
The following table provides performance and design data for system components that operate automatically without direct control. Components are identified by the AiResearch item number and nomenclature.

APOLLO 11 OPERATIONS HANDBOOK BLOCK II SPACECRAFT
VOLUME l SPACECRAFT DESCRIPTION

SECTION 2 SYSTEMS DATA
INTRODUCTION
GUIDANCE AND CONTROL
GUIDANCE AND CONTROL SYSTEMS INTERFACE
ATTITUDE REFERENCE
G & C Attitude Reference Diagram
G&C Attitude Control Diagram
THRUST AND THRUST VECTOR CONTROL
G&C Thrust Vector Control Diagram
GUIDANCE AND NAVIGATION SYSTEM (G&N)
INTRODUCTION
G & N Equipment Location Diagram
PGNCS Functional Diagram
FUNCTIONAL DESCRIPTION
MAJOR COMPONENT/SUBSYSTEM DESCRIPTION
Inertial Subsystem
Navigation Base
Inertial Measurement Unit
Coupling Data Unit
Power and Servo Assembly
Computer Subsystem
Command Module Computer
CMG Organization
Timer
Sequence Generator
Central Processor
Registers
Register A
Register B
Register E
Register F
Register G
Register L
Register Q
Register S
Register Z
Memory
Priority Control
Input-Output
Output Channel 01
Output Channel 02
Output Channel 03
Output Channel 04
Output Channel 05
Output Channel 06
Output Channel 07
Output Channel 10
Output Channel 11
Output Channel 12
Output Channel 13
Input Channel 15
Input Channel 16
Input Channel 30
ULLAGE THRUST PRESENT (Bit Position 1)
SM SEPARATE (Bit Position 2)
SPS READY (Bit Position 3)
S-IVB SEPARATE – ABORT, LIFT OFF (Bit Position 4 and 5)
OCDU FAIL (Bit Position 7)
IMU OPERATE (Bit Position 9)
SC CONTROL OF SATURN (Bit Position 10)
IMU CAGE (Bit Position 11)
IMU CDU FAIL (Bit Position 12)
IMU FAIL (Bit Position 13)
ISS TURN ON REQUEST (Bit Position 14)
TEMP IN LIMITS (Bit Position 15)
Input Channel 31
Input Channel 32
Input Channel 33
Output Channels 34
Output Channels 35
Power
Display and Keyboard
Display and Keyboard Diagram
Display
UPLINK ACTY light
NO ATT light
STBY light
KEY REL light
OPR ERR light
TEMP light
GIMBAL LOCK light
PROG light
RESTART light
TRACKER light
COMP ACTY light
PROG display
VERB display
NOUN display
REGISTER 1, 2 and 3
Keyboard
0 through 9 pushbuttons

  • and – pushbuttons
    NOUN pushbutton
    CLR pushbutton
    PRO pushbutton
    KEY REL pushbutton
    ENTR pushbutton
    RSET pushbutton
    VERB pushbutton
    Verb-Noun Formats.
    Keyboard Operation
    Optical Subsystem
    Optics
    Coupling Data Unit
    OPERATIONAL MODES
    S-IVB Takeover
    Thrust Vector Control
    IMU Turn-On Mode
    IMU Cage Mode
    IMU Coarse Align
    IMU Fine Align
    Attitude Error Display Mode
    Inertial Reference Mode
    Zero Optics Mode
    Manual Mode Operation
    Manual Direct Operation
    Slave Telescope Modes
    Manual Resolved Operation
    Optics-Computer Mark Logic
    Computer Mode Operation
    POWER DISTRIBUTION
    PGNCS Power Distribution Schematic
    PGNCS Lighting Schematic

SECTION 2 SYSTEMS DATA
INTRODUCTION
Systems data include description of operations, component description and design data, and operational limitations and restrictions. GUIDANCE AND CONTROL describes the overall spacecraft navigation, guidance, and control requirements and the resultant systems interface. Subsections Guidance and Navigation, Stabilization and Control, Service Propulsion, Reaction Control, Electrical Power, Environmental Control, Telecommunications, Sequential, and Caution and Warnings present data grouped by spacecraft systems. Miscellaneous Systems, Crew Personal Equipment, and Docking and Crew Transfer data is described in this section also.
GUIDANCE AND CONTROL 2.1
GUIDANCE AND CONTROL SYSTEMS INTERFACE 2.1.1
The Apollo guidance and control functions are performed by the primary guidance, navigation, and control system (PGNCS), and stabilization and control system (SGS). The PGNCS and SCS systems contain rotational and translational attitude and rate sensors which provide discrete input information to control electronics which, in turn, integrate and condition the information into control commands to the spacecraft propulsion sys terns. Spacecraft attitude control is provided by commands to the reaction control system (RCS). Major velocity changes are provided by commands to the service propulsion system (SPS). Guidance and control provides the following basic functions:

  • Attitude reference
  • Attitude control
  • Thrust and thrust vector control.
    The basic guidance and control functions may be performed automatically, with primary control furnished by the command module computer (CMC) or manually, with primary control furnished by the flight crew. The subsequent paragraphs provide a general description of the basic functions.
    ATTITUDE REFERENCE
    The attitude reference function (G&C Attitude Reference Diagram) provides display of the spacecraft attitude with reference to an established inertial reference. The display is provided by two flight director attitude indicators (FDAI) located on the main display console, panels 1 and 2. The displayed information consists of total attitude, attitude errors, and angular rates. The total attitude is displayed by the FDAI ball. Attitude errors are displayed by three needles across scales on the top, right, and bottom of the apparent periphery of the ball. Angular rates are displayed by needles across the top right, and bottom of the FDAI face.
    G & C Attitude Reference Diagram

Total attitude information is derived from the IMU stable platform or the gyro display coupler (GDC). The IMU provides total attitude by maintaining a gimbaled gyro- stabilized platform to an inertial reference orientation. The GDC provides total attitude by updating attitude information with angular rate inputs from gyro assembly 1 or 2. Both the IMU and the GDC furnish total attitude data to the command module computer (CMC) as well as to the FDAIs.
Attitude error information is derived from three sources. The first source is from the IMU through the coupling data unit (CDU) which compares IMU gimbal angles with CMC commanded angles set into the CDU. Any angular difference between the IMU gimbals and the CDU angles is sent to the FDAI for display on the attitude error needles. The second source is from gyro assembly 1 which contains three (one for each of the X, Y, and Z axes) single-degree-of-freedom attitude gyros. Any spacecraft rotation about an axis will offset the case of a gyro from the float. This rotation is sensed as a displacement off null, and a signal is picked off which is representative of the magnitude and direction of rotation. This signal is sent to the FDAI for display on the attitude error needles. The third source is from the GDC which develops attitude errors by comparing angular rate inputs from gyro assembly 1 or 2 with an internally stored orientation. This data is sent to the F DAI for display on the attitude error needles.
Angular rates are derived from either gyro assembly 1 or 2. Normally, the No. 2 assembly is used; however, gyro assembly 1 may be switched to a backup rate mode if desired. For developing rate information, the gyros are torqued to null when displaced; thus, they will produce an output only when the spacecraft is being rotated. The output signals are sent to the FDAI for display on the rate needles and to the GDC to enable updating of the spacecraft attitude.
ATTITUDE CONTROL 2.1.3
The attitude control £unction is illustrated in G&C Attitude Control Diagram. The control may be to maintain a specific orientation, or to command small rotations or translations. To maintain a specific orientation, the attitude error signals, described in the preceding paragraph, are also routed to the control reaction jet on-off assembly. These signals are conditioned and applied to the proper reaction jet which fires in the direction necessary to return the spacecraft to the desired attitude. The attitude is maintained within specified deadband limits. The deadband is limited within both a rate and attitude limit to hold the spacecraft excursions from exceeding either an attitude limit or angular rate limit. To maneuver the spacecraft, the reaction jets are fired automatically under command of the CMC or manually by flight crew use of the rotation control. In either case, the attitude control function is inhibited until the maneuver is completed. Translations of small magnitude are performed along the +X axis for fuel settling of SPS propellants prior to burns, or for a backup deorbit by manual commands of the translation control. An additional control is afforded by enabling the minimum impulse control at the lower equipment bay. The minimum impulse control produces one directional pulse of small magnitude each time it is moved from detent. These small pulses are used to position the spacecraft for navigational sightings.
G&C Attitude Control Diagram

THRUST AND THRUST VECTOR CONTROL 2.1.4
The guidance and control system provides control of two thrust functions (G&C Thrust Vector Control Diagram). The first is control of the SPS engine on-off time to control the total magnitude of thrust applied to the spacecraft. Primary control of thrust is through the CMG. The thrust-on time, magnitude of thrust desired, and thrust-off signal are preset by the flight crew, and performed in conjunction with the CMG. The value of velocity change attained from the thrust is derived by monitoring accelero1neter outputs from the IMU. When the desired velocity change has been achieved, the CMG removes the thrust-on signal. Secondary thrust control is afforded by the velocity counter portion of the entry monitor subsystem. The counter is set to the value of desired thrust prior to the engine on signal. Velocity change is sensed by a +X axis accelerometer which produces output signals representative of the velocity change. These signals drive the velocity counter to zero which terminates the engine on signal. In either case, the actual initiation of thrust is performed by the flight crew. There 1s a switch for manual override of the engine on and off signals.
G&C Thrust Vector Control Diagram

Thrust vector control is required because of center-of-gravity shifts caused by depletion of propellants in the SPS tanks. Thrust vector control is accomplished by electromechanical actuators to position the gimbal-mounted SPS engine. Automatic thrust vector control (TVC) commands may originate in the PGNCS or SGS systems. In either case, the pitch and yaw attitude error signals are removed from the RCS system and applied to the SPS engine gimbals. Manual TVC is provided to enable takeover of the TVC function if necessary. The MTVC is enabled by twisting the translation control to inhibit the automatic system; and enables the rotation control which” provides command signals for pitch and yaw axes to be applied to the gimbals. The initial gimbal setting is accomplished prior to the burn by positioning thumbwheels on the fuel pressure and gimbal position display.
GUIDANCE AND NAVIGATION SYSTEM (G&N)
INTRODUCTION 2.2.1
The primary guidance navigation and control (PGNCS) system measures spacecraft attitude and velocity, determines trajectory, controls spacecraft attitude, controls the thrust vector of the service propulsion engine, and provides abort information and display data. Primary determination of the spacecraft velocity and position and computation of the trajectory parameters is accomplished by the manned space flight network (MSFN).
The PGNCS system consists of three subsystems as follows:

  • Inertial subsystem (ISS)
  • Computer subsystem (CSS)
  • Optics subsystem (OSS).
    The inertial subsystem is composed of an inertial measurement unit (IMU), part of the power and servo assembly (FSA), part of the controls and displays, and three inertial coupling data units (CDUs). The IMU provides an inertial reference with a gimbaled, three-degree of-freedom, gyro-stabilized stable platform.
    The computer subsystem is composed of the command module computer (CMC) and two display and keyboard panels (DSKYs), which are part of the controls and displays. The CMC is a digital computer which processes and controls information to and from the IMU, the optics, DSKYs, and stores programs and reference data.
    The optics subsystem is composed of a scanning telescope (SCT), a s extant (SXT), drive motors for positioning the SCT and SXT, parts of the FSA, part of the controls and dis plays, and two optics CDUs. The SCT and SXT are used to determine the spacecraft position and attitude with· relation to stars and/ or landmarks.
    The three G&N subsystems are configured to enable the CSS and OSS to be operated independently. This allows continued use of the CSS and/or OSS in the e vent of a mal function in one of these subsystems or in the ISS. System power requirements and reference signals are provided by the power a n d servo assembly (FSA). Major components of the system are located in the command module lower equipment bay (G&N Equipment Location Diagram). System circuit breakers, caution and warning indicators, and one of tl1e DSKYs are located on the main display console.
    G & N Equipment Location Diagram

FUNCTIONAL DESCRIPTION 2.2.2
The primary guidance navigation and control system provides capabilities for the following:

  • Inertial velocity and position (state vector) computation
  • Optical and inertial navigation measurements
  • Spacecraft attitude measurement and control
  • Generation of guidance commands during CSM-powered flight and CM atmospheric entry.
    The PGNCS system is initially activated and aligned during the prelaunch phase. During the ascent phase, the system measures velocity and attitude, computes position, compares the actual spacecraft trajectory with a predetermined trajectory, and displays pertinent data. The flight crew uses the displayed information as an aid for decision to abort or continue the mission.
    During periods when on -board velocity and/ or attitude change sensing is not required, the IM U can be placed in standby operation to conserve electrical power. The CMC is used more extensively than the IMU; however, it can also be placed i n standby operation to conserve electrical power. When the guidance and navigation function is to be restored, the IMU and CMC are reactivated, with the CMC using the last computed velocity as the basis for further velocity computations. New positional data must be acquired from optical sightings or MSFN through telemetry or voice communications.
    Initial position and attitude information as well as periodic updating of this information is made through use of the optics. This is accomplished by the navigator making two or more landmarks, star landmark, star – horizon, and/ or star sightings. The sightings are made by acquiring the star-landmark or star- horizon with the SCT and/ or SXT. When the viewed object is centered, a mark command is initiated. The CMC reads the optics angles, IMU angles, and time, in conjunction with internal programs to determine the spacecraft position. This position information and the spacecraft velocity are used to compute an estimated trajectory. The actual trajectory is compared with previous trajectory data to generate the trajectory error, if any, for further reference. Optical measurements are also used in aligning the IMU to a specific reference orientation.
    The IMU (PGNCS Functional Diagram) contains three inertial rate integrating gyros (IRIGs) and three pulsed-integrating pendulous accelerometers (PIPAs). The IRIGs and PIPAs are mounted on the stable platform which is gimbaled to provide three degrees of freedom. The stable platform inertial reference is maintained by the IRIGs in conjunction with electronic stabilization loops. Any displacement of the platform is sensed by the IRIGs, which produce output signals representative of the magnitude and direction of displacement. The IRIG signals are applied to servo amplifiers, which condition the signals to drive gimbal torque motors. The gimbal torque motors the n restore the initial platform orientation by driving the gimbals until the IRIG signals are nulled.
    PGNCS Functional Diagram

The PIPAs are orthogonally mounted and sense changes in spacecraft velocity. An acceleration or deceleration results in output signals which are r e presentative of the magnitude and direction of the velocity change. The output signals are applied to the CMC which uses the information to update spacecraft velocity data. Continual updating of velocity information, with respect to the initial spacecraft position and trajectory, enables the CMC to provide current velocity, position, and trajectory information.
The IMU also provides a space- stabilized reference for spacecraft attitude sensing and control. Attitude change sensing is accomplished by monitoring the spacecraft attitude with reference to the stable platform. Resolvers are mounted at the gimbal axes to provide signals representative of the gimbal angles. Inertial CDUs repeat the platform attitude. Attitude monitoring is afforded by comparing the inertial CDU angles with the CMC desi red angles. If the angles differ, error signals are generated. If the attitude error is larger than the selected deadband limits, the CMC fires the appropriate RCS engines. The spacecraft is rotated back to the initial reference attitude and the error signals are nulled (within deadband limits).
TJ1e CMC provides automatic execution of computer programs, automatic control of ISS and OSS modes, and in conjunction with the DSKYs, manual control of ISS and OSS modes and computer displays. The CMC contains a two-part memory which consists of a large nonerasable section and a smaller era sable section. Nonerasable memory contains mission and system programs, and other predetermined data which are wired in during assembly. Data readout from this section is nondestructive and cannot be changed during operation. The erasable section of memory provides for data storage, retrieval, and operations upon measured data and telemetered information. Data readout from this section is destructive, permitting changes in stored data to be made as desired. Information within the memory may be called up for display on the two DSKYs. The DSKYs enable the flight crew to enter data or instructions into the CMG, request display of data from CMG memory, and offer an interrupt control of CMG operation. The CMC timing section provides timing signals of various frequencies for internal use and to other on-board systems which require accurate or synchronized timing. Data within the CMC is transmitted to MSFN through a “downlink” telemetry function. Telemetered data is transmitted as a function of a CMC program or by request from MSFN. Data within the CMC may be updated through “uplink” telemetry from the MSFN. The CMC performs guidance functions by executing internal programs using predetermined trajectory parameters, attitude angles from the inertial CDUs, velocity changes from the PIPAs, and commands from the DSKYs (crew) to generate control commands. The navigation function is performed by using stored star-landmark or star horizon data, optics angles from the optics CDUs, and velocity changes from the PIPAs in the execution of navigation programs.
The optics provide accurate star and landmark angular measurements. Sightings are accomplished by the navigator using the SXT and SCT. ‘The optics are positioned by drive motors commanded by the optics hand controller or by the CMC. The shaft axes are parallel. Trunnion axes may be operated in parallel or offset, as desired. The SCT is a unity power instrument providing an approximate 60 -degree field of view. It is used to make landmark sightings and to acquire and center stars or landmarks prior to SXT use. The SXT provides 28-power magnification with a 1. 8-degree field of view. The SXT has two lines of sight, enabling it to measure the included angle between two objects. This requires two lines of sight which enable the two viewed objects to be superimposed. For a star -landmark or star horizon sighting, the landmark line of sight is c entered along the SXT shaft axis. The star image is moved toward the landmark or horizon by rotating the shaft and trunnion axes until the two viewed objects are super imposed. The shaft and trunnion angles are repeated by the optic CDUs. When the navigator is satisfied with image positions, he issues a marked command to the CWC. The CWC reads the optics CDU angles, IMU CDU angles, and time and computes the position of the spacecraft. The CMG bases the computation on stored star and navigator-supplied landmark data which may also be used by the CMG to request specific star s for navigational sightings. Two or more sightings, on two or more different stars, must be taken to perform a complete position determination.
MAJOR COMPONENT /SUBSYSTEM DESCRIPTION 2.2.3
Inertial Subsystem 2.2.3.1
The function of the inertial subsystem is to provide a space-stabilized inertial reference from which velocity changes and attitude changes can be sensed. It is composed of the navigation base (NB), the inertial measurement unit (IMU), parts of the power and servo assembly (FSA), parts of the control and display panels, and three coupling data units (CDUs).
Navigation Base 2.2.3.1.1
The navigation base (NB) is the rigid, supporting structure which mounts the IMU and optical instruments. The NB is manufactured and installed to close tolerances to provide accurate alignment of the equipment mounted on it. It also provides shock-mounting for the IMU and optics.
Inertial Measurement Unit 2.2.3.1.2
The inertial measurement unit (IMU) is the main unit of the inertial subsystem. It is a three- degree-of-freedom stabilized platform assembly, containing three inertial rate integrating gyros (IRIGs), and three pulsed-integrating pendulous accelerometers (PIPAs). The stable member itself is machined from a solid block of beryllium with holes bored for mounting the PIPAs and IRIGs.
The stable platform attitude is maintained by the IRIGs, stabilization loop electronics, and gimbal torque motors. Any displacement of the stable platform or gimbal angles is sensed by the IRIGs which generate error signals. IRIG error signals are resolved, amplified, and applied to stabilization loop electronics. The resultant signal is conditioned and applied to the gimbal torque motors, which restore the desired attitude.
The stable platform provides a space – referenced mount for three PIPAs, which sense velocity changes. The PIPAs are mounted orthogonally to sense the velocity changes along all three axes. Any translational force experienced by the spacecraft causes an acceleration or deceleration which is sensed by one or more PIPAs. Each PIPA generates an output signal proportional to the magnitude and direction of velocity change. This signal, in the form of a pulse train, i s applied to the CMC. The CMC will use the signal to update the velocity information, and will also generate signals to enable the torquing of each PIPA ducosyn back to null.
The temperature control system is a thermostatic system that maintains the IRIG and PIPA temperatures within their required limits during both IMU standby and operate modes. Heat is applied by end-mount heaters on the inertial components, stable member heaters, and a temperature control anticipatory heater. Heat is removed by convection, conduction, and radiation. The natural convection used during IMU standby modes is changed to blower -controlled, forced convection during IMU operating modes. IMU internal pressure is normally between 3. 5 and 15 psia enabling the required forced convection. To aid in removing heat, a water-glycol solution passes through coolant passages in the IMU support gimbal. Therefore, heat flow is from the stable member to the case and coolant. The temperature control system consists of the temperature control circuit, the blower control circuit, and the temperature alarm circuit. A separate external temperature control system is also provided for test configurations but will not be discussed in this manual.
Coupling Data Unit 2.2.3.1.3
The CDU, an all electronic device, is used as an interface element between the ISS and CSS, the OSS and CSS, and the CSS and various controls and displays. It functions primarily as an analog-to-digital (A/D) or digital-to-analog (D/A) converter. There are five, almost identical, loops, one each for the inner, middle, and outer IMU gimbals, and one each for the shaft and trunnion optical axes. The ISS portion of the CDU performs the following functions:
a. Converts IMU gimbal angles from analog-to-digital form, and supplies the CMC with this information.
b. Converts digital signals from the CMC to either 800-cps or direct-current signals.
c. Controls the moding of the ISS through logical manipulation of computer discretes.
The analog signal from the 1X and 16X resolvers, located on the IMU gimbals, is transmitted to the CDU. This angular information, proportional to the sine and cosine of the gimbal angle, is converted to digital form with one pulse to the CMC equivalent to 40 arc-seconds of gimbal movement.
During coarse align, attitude error display, and Saturn takeover modes, the ISS channels of the CDU provide the digital to analog conversion of the CMG output to generate an a-c or d-c output. The a-c output is applied to the servo amplifiers of the PSA to drive the gimbals to the desired angle, and is also applied to the FDAI for deflection of the attitude error needles. The d-c signal is applied to the Saturn Flight Control Computer which will gimbal the Saturn engine or provide commands to the Saturn attitude control system.
Power and Servo Assembly 2.2.3.1.4
The purpose of the power and servo assembly (PSA) is to provide a central mounting point for the majority of the G&N system power supplies, amplifiers, and other modular electronic components.
The PSA is located on the lower D&C panel rack directly below the IMU. It consists of 42 modules mounted to a header assembly. Connector s and harnessing are integral to the construction of the header assembly, and G&: N harness branches are brought out from the PSA header. A thin cover plate is mounted on the PSA, providing a hermetic seal for the interior. During flight, this permits pressurization of the PSA to remain at 15 psi. Connectors are available at the PSA for measuring signals at various system test points.
Computer Subsystem 2.2.3.2
The computer subsystem (CSS) consists of the command module computer (CMC), and two display and keyboard panels (DSKYs). The CMC and one DSKY are located in the lower equipment bay. The other DSKY is located on the main display console.
Command Module Computer 2.2.3.2.1
The CMC is a core memory, digital computer with two types of memory, fixed and erasable. The fixed memory permanently stores navigation tables, trajectory parameters, programs, and constants. The erasable memory stores intermediate information.
The CMC processes data and issues discrete control signals, both for the PGNCS and the other spacecraft systems. It is a control computer with many of the features of a general purpose computer. As a control computer, the CMC aligns the stable platform of the inertial measurement unit (IMU) in the inertial subsystem, positions the optical unit in the optical subsystem, and issues control commands to the spacecraft. As a general purpose computer, the CMC solves guidance problems required for the spacecraft mission. In addition, the CMC monitors the operation of the PGNCS and other spacecraft systems.
The CMC stores data pertinent to the flight profile that the spacecraft must assume in order to complete its mission. This data, consisting of position, velocity, and trajectory information, is used by the CMC to solve the various flight equations. T h e results of various equations can be used to determine the required magnitude and direction of thrust required. Corrections to be made are established by the CMC. The spacecraft engines are turned on at the correct time, and steering signals are controlled by the CMG to reorient the spacecraft to a new trajectory, if required. The inertial subsystem senses acceleration and supplies velocity changes to the CMC for calculating the total velocity. Drive signals are supplied from the CMC to coupling data unit (CDU) and stabilization gyros in the inertial subsystem to align the gimbal angles in the IMU. Error signals are also supplied to the CDU to provide steering capabilities for the spacecraft. CDU position signals are fed to the CMC to indicate changes in gimbal angles, which are used by the CMC to keep cognizant of the gimbal positions. The CMG receives mode indications and angular information from the optical subsystem during optical sightings. This information is used by the CMG to calculate present position and orientation, and is used to refine trajectory information. Optical subsystem components can also be positioned by drive signals supplied from the CMG.
CMG Organization
The CMC is functionally divided into seven blocks: (See PGNCS Functional Diagram).

  1. Timer
  2. Sequence generator
  3. Central processor
  4. Memory
  5. Priori ty control
  6. Input-output
  7. Power
    Timer
    The timer generates all the necessary synchronization pulses to ensure a logical data flow from one area to another within the CMG. It also generates timing waveforms which are used by (1) the CMC’s alarm circuitry, and (2) other areas of the spacecraft for control and synchronization purposes.
    The master clock frequency is generated by an oscillator and is applied to the c lock divider logic. The divider logic divides the master clock input into gating and timing pulses at the basic clock rate of the computer. Several outputs are available from the pulses at the basic clock rate of the computer. Several outputs are available from the scaler, which further divides the divider logic output into output pulses and signals used for gating, to generate rate signal outputs and for the accumulation of time. Outputs from the divider logic also drive the time pulse generator which produces a recurring set of time pulses. This set of time pulses defines a specific interval (memory cycle time) in which access to memory and word flow take -place within the computer.
    The start- stop logic senses the status of the power supplies and specific alarm conditions in the computer, and generates a stop signal which is applied to the time pulse generator to inhibit word flow. Simultaneously, a fresh-start signal is generated which is applied to all functional areas in the computer. The start-stop logic, and subsequently word flow in the computer, can also be controlled by inputs from the computer test set (CTS) during pre-installation systems and subsystem tests.
    Sequence Generator.
    The sequence generator directs the execution of machine instructions. It does this by generating control pulses which logically sequence data throughout the CMC. The control pulses are formed by combining the order code of an instruction word with synchronization pulses from the timer.
    The sequence generator contains the order code processor, command generator, and control pulse generator. The sequence generator executes the instructions stored in memory by producing control pulses which regulate the data flow of the computer. The manner in which the data flow is regulated among the various functional areas of the computer and between the elements of the central processor causes the data to be processed according to the specifications of each machine instruction.
    The order code processor receives signals from the central processor, priority control, and peripheral equipment (test equipment). The order code signals are stored in the order code processor and converted to coded signals for the command generator. The command generator decodes these signals and produces instruction commands. The instruction commands are sent to the control pulse generator to produce a particular sequence of control pulses, depending on the instruction being executed. At the completion of each instruction, new order code signals are sent to the order code processor to continue the execution of the program.
    Central Processor.
    The central processor performs all arithmetic operations required of the CMC, buffers all information coming from and going to memory, checks for correct parity on all words coming from memory, and generates a parity bit for all words written into memory.
    The central processor consists of the flip-flop registers, the write, clear, and read control logic, write amplifiers, memory buffer register, memory address register and decoder, and the parity logic. All data and arithmetic manipulations within the CMC take place in the central processor.
    Primarily, the central processor performs operations indicated by the basic instructions of the program stored in memory. Communication within the central processor is accomplished through the write amplifiers. Data flows from memory to the flip-flop registers or vice versa, between individual flip-flop registers, or into the central processor from external sources. In all instances, data is placed on the write lines and routed to specific register, or to another functional area under control of the write, clear, and read logic. This logic section accepts control pulses from the sequence generator and generates signals to read .the content of a register onto the write lines, and write this content into another register of the central processor or to another functional area of the CMG. The particular memory location is specified by the content of the memory address register. The address is fed from the write lines into this register, the output of which is decoded by the address decoder logic. Data is subsequently transferred from memory to the memory buffer register. The decoded address outputs are also used as gating functions within the CMG.
    The memory buffer register buffers all information read out or written into memory. During read out, parity is checked by the parity logic and an alarm is generated in case of incorrect parity. During write-in, the parity logic generates a parity bit for information being written into memory. The flip-flop registers are used to accomplish the data manipulations and arithmetic operations. Each register is 16 bits or one computer word in length. Data flows into and out of each register as dictated by control pulses associated with each register. The control pulses are generated by the write, clear, and read control logic.
    External inputs through the write amplifiers include the content of both the erasable and fixed memory bank registers, all interrupt addresses from priority control, control pulses which are associated with specific arithmetic operations, and the start address for an initial start condition. Information from the input and output channels is placed on the write lines and routed to specific destinations either within or external to the central processor. The CTS inputs allow a word to be placed on the w rite lines during system and subsystem tests.
    Registers.
    Registers A, L, Q; Z, and B consist of 16 bit positions each. These are numbered 16 through 1 reading from left to right. Register E BANK consists of three bit positions numbered 11 through 9. Register S consists of 12 bit positions numbered 12 through 1. Register SQ consists of seven bit positions, SQ, EXT, 16 and 14 through 10. Registers X and Y comprise the adder and each register consists of 16 bit positions. The 16 output gates of the adder are called register U; note, however, that U is not a register in the sense of the flip-flop registers comprising the central processor. Register U and the write amplifiers each consists of 16 bit positions numbered 16 through 1. All registers mentioned so far may contain addresses, a code, etc. They do not, however, contain a parity bit. Whenever a number is contained in these registers, the lowest order bit is stored in bit position 1 and the highest order bit is stored in bit position 14. The sign bit is stored in bit position 16. A zero in this bit position signifies a positive number and a one signifies a negative number. Bit position 15 is used for storing either the overflow or underflow bit.
    Register G
    Register G serves as a buffer between the central processor and memory. It consists of 16 bit positions numbered 16 through 1. Any parity bit received from memory is transferred to the parity block but not to the central processor register. The 16 inputs to the parity block are numbered 16 and 14 through 0. No provision is made for entering an overflow bit into the parity block.
    Register A
    Register A is called the “accumulator.” It contains the results of arithmetic operations.
    Register L
    Register L is called the “lower order accumulator.” It contains the least significant bits of the product or quotient after a multiplication or division process.
    Register B
    Register B is called the “buffer register.” It also provides a means of complementing since its reset side can also be interrogated. The reset side is sometimes called “register C.”
    Register Z
    The Z register is the program counter. It contains the address of the next instruction word in the program. As each instruction is executed, this register is incremented by one because the instruction words usually are stored sequentially in memory.
    Register Q
    The Q register is named the “return address register.” When the CMG transfers control to another program or routine, the contents of the Z register are stored in register Q. When the CMG returns to the original program, register Q contains the address of the appropriate instruction.
    The write amplifiers provide the current driving capabilities for the registers. These amplifiers in no way store information; they simply route information.
    Register S
    Register S contains the address of the word to be called out from memory.
    Register E
    Register E BANK is also used when erasable memory is addressed.
    Register F
    Register F BANK is used when fixed memory is addressed.
    Memory
    Memory provides the storage for the CMG and is divided into two sections: erasable memory and fixed memory. Erasable memory can be written into or read from; its readout is destructive. Fixed memory cannot be written into and its readout is nondestructive.
    The CMC has erasable and fixed memories. The erasable memory can be written into and read out of; fixed memory can only be read out of. Erasable memory stores intermediate results of computations, auxiliary program information, and variable data supplied by external inputs from the PGNCS and other systems of the spacecraft. Fixed memory stores programs, constants, and tables. There is a total of 38,912, ·sixteen bit word storage locations in fixed and erasable memories. It should be noted that the majority of the memory capacity is in fixed memory (36, 864 word locations). Both memories are magnetic core storage devices; however, the cores are used differently in each type of memory. It is assumed that the reader is familiar with the basic magnetic properties of a ferrite core as described by a square hysteresis curve. A core is a static storage device having two stable states. It can be magnetized in one or two directions by pas sing a sufficient current, I, through a wire which pierces the core. The direction of current determines the direction of magnetization. The core will retain its magnetization indefinitely until an opposing current switches the core in the opposite direction. Wires carrying current through the same core are algebraically additive. Sense wires which pierce a switched core will carry an induced pulse.
    Priority Control
    Priority control establishes a processing priority of operations which must be performed by the CMC. These operations are a result of conditions which occur both internally and externally to the CMC. Priority control consists of counter priority control and interrupt priority control. Counter priority control initiates actions which update counters in erasable memory. Interrupt priority control transfers control of the CMC to one of several interrupt subroutines stored in fixed memory.
    The start instruction control restarts the computer following a hardware or program failure. The counter instruction control updates the various counters in erasable memory upon reception of certain incremental pulses. The counter instruction control is also used during test functions to implement the display and load requests provided by the computer test set. The interrupt instruction control forces the execution of the interrupt instruction (RUPTOR) to interrupt the current operation of the computer in favor of a programmed operation of a higher priority.
    Input-Output
    The input-output section routes and conditions signals between the CMC and other areas of the spacecraft. In addition to the counter interrupt and the program interrupts previously described, the CMC has a number of other inputs derived from its interfacing hardware. These inputs are a result of the functioning of the hardware, or an action by the operator of the spacecraft. The counter interrupts, in most cases, enable the CMC to process inputs representative of data parameters such as changes in velocity. The program interrupt inputs to the CMC are used to initiate processing of functions which must be processed a relatively short time after a particular function is present. The other inputs to the CMC, in general, enable the CMC to be cognizant of “conditions” which exist in its environment. These inputs are routed to CMC and are available to the CMCs programs through the input channels.
    The outputs of the CMC fall in one of the following categories: data, control, or condition indications. Some of these outputs are controllable through the CMC program while others are present as a function of the CMC circuitry. All of the outputs which are controlled by the CMC programs are developed through the CMC output channels.
    Channel 01 is the L register.
    Channel 02 is the Q register.
    Channel 03 the high-order scaler channel.
    Channel 04 the low-order scaler channel.
    Output Channel 05 has eight bit positions and is associated with the reaction control system jets.
    Output Channel 06 has eight bit positions and is also associated with the reaction control system jets. A logic one in any of the bit positions will cause the appropriate reaction control jets to be fired. The outputs of this channel control the jets used for Z and Y translations, and the roll rotation. The logic is the same as for output channel 05. Assume that it was desired to perform a pure roll maneuver. One of the ways this could be implemented would be to have logic ones in bit positions l and 3 while all other bit positions contained a logic zero. There are other methods, of course, but these will not be detailed.
    Channel 07 is the F EXT register. It is associated with the selection of word locations in fixed memory. This channel has three bit positions.
    Output Channel 10 routes information contained in this channel to the DSKY s. The different configurations light various displays on the DSKYs.
    Output Channel 11 routes information contained in bits 1 through 7 of this channel to the DSKYs. Bit 13 is routed to the SCS system.
    Output Channel 12 consists of 15 bit positions, 14 of which are presently used. The outbits are d-c signals sent to the spacecraft and PGNCS.
    Output Channel 13 associates the first four bits of this channel with the VHF ranging. Bit positions 12 through 14 have been covered under program interrupt priority control.
    Output Channel 14 associates bit positions 11 through 15 with the CDU drive control. This control generates the following pulse trains which are sent to the CDUs: CDUXDP (X C DU positive drive pulse), CDUXDM (X CDU negative drive pulse), CDUYDP, CDUYDM, CDUZDP, CDUZDM, TRNDP, TRNDM, SHAFTDP (shaft CDU positive drive pulse), and SHAFTDM. The CDU drive control also enters the following d-c signals into the counter-priority control to request the execution of a DINC instruction: X IMU, CDU, Y IMU, CDU, Z IMU CDU, S OP CDU and T OP CDU.
    Signal X IMU CDU is generated when bit position 15 contains a logic one. Signal Y IMU CDU is generated when bit position 14 contains a logic one, signal Z !MU CDU when bit position 13 contains a logic one, signal T OP CDU when bit position 12 contains a logic one, and signal S OP CDU when bit position 11 contains a logic one. More than one of these signals can be generated simultaneously.
    Once a desired quantity, e.g., -432, has been entered into a CDU counter, e.g., erasable memory address 0050, and output channel 14 has been properly set (logic 1 in bit position 15), the CDU drive control generates signal X IMU CDU which sets a flip-flop in counter priority control and commands the sequence generator to execute a DING instruction. As the instruction is executed, the counter control is diminished by one to -431. The CDU drive control then generates a CDUXDM pulse and routes it to the X CDU. Since the priority flip-flop is still set, another DING instruction is requested. This is repeated until the counter content has diminished to zero. Once the counter contains zero and a DING instruction is executed, a signal is generated which clears bit position 15 of output channel 14, resets the priority cell, and stops the transmission of pulses.
    The gyro drive control selects a gyro to be torqued positively or negatively, and then applies a 3200-cps pulse train to the appropriate gyro to accomplish this function. There are six signals associated with selection of the gyro and the direction in which it will be torqued: GYXP (drive gyro x positive), GYXM (drive gyro x negative), GYYP, GYYM, GYZP, and GYZM. The appropriate signal is determined by the bit configuration of bits 7 through 9 of output channel 14. If bit positions 6 and 10 are a logic one, a 3200-cps pulse train is routed to the gyro electronics specified by bit positions 7 through 9, and a d-c signal is entered into the counter priority control which commands the sequence generator to perform a DINC instruction.
    Assume that it is desired to torque the X-gyro in the negative direction by 123 pulses. The GYROS counter in counter priority control would be set to 123. Bit positions 7 through 9 would be 101 respectively, and bit positions 6 and 10 would be logic one. Each time a pulse is sent to the gyro, the GYROS counter is DINCed. The d-c signal to counter priority will remain until the GYROS counter goes to zero which will terminate the torquing.
    Input Channel 15.
    This channel consists of five bit positions. When a key on the main panel DSKY is pressed, a unique five-bit code is entered into this channel. The RUPT 5 interrupt routine is also developed whenever a key on the main panel DSKY is pressed.
    Input Channel 16.
    This channel consists of seven bit positions. If the MARK pushbutton has been pressed, a logic one is entered into bit position 6. This would cause a KEYR UPT 2 (RUPT 6) interrupt routine.
    If the MARK REJECT pushbutton has been pressed, a logic one is entered into bit position 7 of this channel. This will also cause a KEYR DPT 2 interrupt routine to be performed. When a key on the navigation panel DSKY is pressed, a unique five-bit code is entered into bit positions 1 through 5. The insertion of this code into input channel 16 initiates a KEYR UPT 2 interrupt routine.
    Input Channels 17 through 27 are spares.
    Input Channel 30 consists of 15 bit positions. The inputs to these positions are inverted and utilized as follows:
    a. Bit Position 1 (ULLAGE THRUST PRESENT). This input is generated by the S-IVB instrumentation unit. If this input is a logic zero, it signifies that the action has occurred or has been commanded to occur.
    b. Bit Position 2 (SM SEPARATE). This input originates in the mission sequencer and is a logic O when the service module is separated from the command module.
    c. Bit Position 3 (SPS READY). A logic zero in this bit position indicates that the pilot has completed the SPS engine start checklist.
    d. Bit Position 4 and 5 (S-IVB SEPARATE – ABORT, LIFT OFF). These inputs are generated in the S-IVB instrumentation unit. They indicate that the appropriate actions have occurred or have been commanded to occur.
    e. Bit Position 7 (OCDU FAIL). This input is generated in the OSS and is a logic zero when a failure has occurred in one of the optical CDUs.
    f. Bit Position 9 (IMU OPERATE). A binary zero in this bit position indicates that the IMU is turned on and is operating with no malfunctions.
    g. B it Position 10 (SC CONTROL OF SATURN). A logic zero in this bit position indicates that the SC has control over the SATURN stage.
    h. Bit Position 11 (IMU CAGE). A logic zero in tl1is bit position indicates tl1at the IMU gimbals are at their null position.
    i. Bit Position 12 (IMU CDU FAIL). A logic zero i11 this bit position indicate s tl1at a failure has occurred in one of the inertial CDUs.
    j. Bit Position 13 (IMU FAIL). A logic zero in this bit position indicates that a malfunction has occurred in the IMU stab loops.
    k. Bit Position 14 (ISS TURN ON REQUEST). A logic zero is inserted into this bit position when the ISS has been turned on, or commanded to be turned on.
    l. Bit Position 15 (TEMP IN LIMITS). A logic one is inserted into tl1is bit position if the stable member temperature has not exceeded its design limits. If the limit has been exceeded, a logic zero will be stored.
    Input Channel 31
    Input Channel 31, channel consists of 15 bit positions. Bit positions l through 6 receive their inputs from the rotational hand controller. A logic zero in any one of these bit positions is associated with roll, pitch, or yaw commands. Bit positions 7 through 12 receive their inputs from the translational hand controller. A logic zero in any one of these bit positions is associated with the X, Y, or Z translation commands.
    A logic zero in bit position 13 indicates that the present SC attitude is being held and the hand controller is not being used. A logic zero in bit position 14 indicates that the SC is drifting freely, and that the CMC is not receiving inputs from the hand controller or minimum impulse controller. A logic zero in bit position 15 indicates that the GMC is controlling the present SC attitude and the hand controller is not commanding an attitude change. All inputs to this channel are inverted.
    Input Channel 32
    Input Channel 32, the first six bit positions of this channel receive their inputs from the minimum impulse controller. A logic zero in any of these bit positions is associated witl1 the pitch, yaw, or roll motion commanded by the mini mum impulse controller. Bi t position 11 contains a logic zero while the LM is attached to the CSM. All inputs to this channel are inverted.
    Input Channel 33
    Input Channel 33, inputs to this channel are generated in the CMC and optics. A logic zero in bit position 2 indicates that the VHF Digital Ranging information is good. Bit positions 4 and 5 receive d-c signals from the optics control panel. 1′.he d-c signals are generated by switch and relay closures. A logic zero appears in bit position 10 if the BLOCK UPL INK switch is thrown to the BLOCK position. Bit positions 11 or 12 contain a logic zero if the uplink or downlink telemetry, rates are too high. Bit position 13 contains a logic zero if a failure occurs in the accelerometer loops. All inputs to this channel are inverted.
    Output Channels 34 and 35
    Output Channels 34 and 35 provide 16 bit words including a parity bit for downlink telemetry transmission.
    Power
    This section provides voltage levels necessary for the proper operation of the CMC.
    CMC power is furnished by two switching-regulator power supplies: a +4-volt and a +14- volt power supply which are energized by fuel cells in the electrical power system.
    Input voltage from the electrical power system is chopped at a variable duty cycle and then filtered to produce the required voltages. Chopping is accomplished by varying the pulse width of a signal having a fixed repetition rate and known amplitude.
    Source voltage, +28 vdc, is supplied from the electrical power system through the power switch to the control module. The control module, essentially a pulse generator, detects the difference between the primary feedback output of the power supply and a reference voltage. (A secondary feedback path is connected to the CTS for marginal-voltage test operations.) A differential amplifier detects any change in the output voltage from the desired level. The output of the differential amplifier and a 51, 2-kilocycle sync pulse from the timer drive a one-shot multivibrator in the control module. The differential amplifier output determines the multivibrator pulse width. The resultant +14-volt pulse is supplied to the power switch.
    The power switch filters the control module output to produce the desired d-c voltage. Additional filtering action protects the electrical power system from the wide – load variations caused by the chopping action of the power supply. The power switch also contains a temperature sensing circuit. Because of load requirements, the +4-volt power supply requires two power switches.
    The power supply outputs are monitored by a failure detector consisting of four differential amplifiers. There are two amplifiers for each power supply, one for overvoltage and one for undervoltage detection. If an overvoltage condition exists, a relay closure signal indicating a power failure is supplied to the spacecraft.
    Display and Keyboard 2.2.3.2.2
    The DSKYs facilitate intercommunication between the flight crew and the CMC. The DSK Ys operate in parallel, with the main display console DSKY providing CMC display and control while the crew are in their couches. (Display and Keyboard Diagram)
    Display and Keyboard Diagram

The exchange of data between the flight crew and the CMC is usually initiated by crew action; however, it can also be initiated by internal computer programs. The exchanged information is processed by the DSKY program. This program allows the following five different modes of operation:

  • Display of Internal Data. Both a one-shot display and a periodically updating display (called monitor) are provided.
  • Loading External Data. As each numerical character is entered, it is displayed in the appropriate display panel location.
  • Program Calling and Control. The DSKY is used to initiate a class of routines which are concerned with neither loading nor display. Certain routines require instructions from the operator to determine whether to stop or continue at a given point.
  • Changing Major Mode. The initiation .of large scale mission phases can be commanded by the operator. ·
  • Display of PGNCS Caution and Status. The DSK Y is used to display the status of the ISS, OSS, and CMC and to provide an indication of hardware and software cautions.
    Displays
    The displays consist of eleven status and caution indicators, three decimal displays and three decimal or octal registers. The function of the indicators and displays is as follows:
    UPLINK ACTY light
    On when the CMC has received a complete 16 bit digital uplink message or during the rendezvous navigation program the gimbal angle changes are greater than 10 degrees to align the CSM to the desired tracking attitude and the astronaut has disabled the automatic tracking .
    NO ATT light
    Lighted when the ISS is in a coarse align mode.
    STBY light
    On when the CMC is in the standby mode.
    KEY REL light
    Lighted when an internal display desires the use of the DSKY and the astronaut is using the DSKY or the astronaut presses a key (exceptions: PRO, RSET and ENTR) when an internal flashing display is currently on the DSK Y or the astronaut presses a key (exceptions): PRO, RSET and ENTR) on top of his Monitor Verb display.
    OPR ERR light
    On when the operator performs an improper sequence of key depressions.
    TEMP light
    Lighted when the CMC receives a signal from the IMU temperature control that the stable member is outside of the temperature range of 126.3 to 134.3 ° F.
    GIMBAL LOCK light
    On when the middle gimbal angle exceeds ±70° from its zero position.
    PROG light
    Lighted when the internal program detects computational difficulty.
    RESTART light
    On when the CMC detects a temporary hardware or software failure.
    TRACKER light
    Lighted when the CMC receives a signal from the OCDU indicating a failure or the rendezvous navigation program reads VHF range information but the Data Good discrete is missing.
    COMP ACTY light
    On when the CMC is occupied with an internal sequence.
    PROG display
    Provides a decimal display of the current mission program in sequence.
    VERB display
    Provides a decimal display of the verb, (action) being performed.
    NOUN display
    Provides a decimal display of the noun (location or register) where the action (verb) is being performed.
    REGISTER 1, 2 and 3
    Provides a display of the contents of registers or memory locations.
    Keyboard
    The keyboard consists of ten numerical keys (pushbuttons) labeled 0 through 9, two sign keys (+ or -) and seven instruction keys: VERB, NOUN CLR (clear), PRO (proceed), KEY REL (key release), ENTR (enter), and RSET (reset).
    Whenever a key is pressed,·+ 14 vdc is applied to a diode encoder which generates a unique five-bit code associated with that key. There is, however, no five-bit code associated with the PRO key. If a key on the main panel DSKY is pressed, the five-bit code associated with that key is entered into bit positions l through 5 of input channel 15 of the CMC. Note that this input will cause a request for the KEYRUPT 1 program interrupt. If a key on the navigation panel DSKY is pressed, the five-bit code associated with that key is entered into bit position 1 through 5 of input channel 16 of the CMG. Note that this input will cause a request for the KEYRUPT 2 program interrupt. The function of the keys is as follows:
    0 through 9 pushbuttons
    Enters numerical data, noun codes, and verb codes into the CMG.
  • and – pushbuttons
    Informs the CMC that the following numerical data is decimal and indicates the sign of the data.
    NOUN pushbutton
    Conditions the CMC to interpret the next two numerical characters as a noun code and causes the noun display to be blanked.
    CLR pushbutton
    Clears data contained in the data displays. Pressing this key clears the data display currently being used. Successive depressions clear the other two data displays.
    PRO pushbutton
    Commands the CMC to the standby mode if power down program has been run. An additional depression commands the CMC to resume regular operation. If power down program has not been run, a depression commands CMC to proceed without data.
    KEY REL pushbutton
    Releases the DSKY displays initiated by keyboard action so that information supplied by the CMC program may be displayed.
    ENTR pushbutton
    Informs the CMC that the assembled data is complete and the requested function is to be executed.
    RSET pushbutton
    Extinguishes the DSKY caution indicators. (OPR ERR, PROG, RESTART, STB Y and UPLINK ACTY).
    VERB pushbutton
    Conditions the CMC to interpret the next two numerical characters as a verb code and causes the verb display to be blanked.
    Verb-Noun Formats.
    A noun may refer to a device, a group of computer registers or a group of counter registers, or it may simply serve to convey information without referring to any particular computer register. The noun is made up of 1, 2, or 3 components, each component being entered separately as requested by the verb code. As each component is keyed, it is displayed on the display panel with component 1 displayed in REGISTER 1, component 2 in REGISTER 2, and component 3 in REGISTER 3. There are two classes of nouns: normal and mixed. Normal nouns (codes 01 through 39) are those whose component members refer to computer registers which have consecutive addresses and use the same scale factor when converted to decimal. Mixed nouns (codes 40 through 99) are those whose component members refer to nonconsecutive addresses or whose component members require different scale factors when converted to decimal, or both.
    A verb code indicates what action is to be taken. It also determines which component member of the noun group i s to be acted upon. For example, there are five different load verbs. Verb 21 is required for loading the first component of the selected noun; verb 22 loads the second component; verb 23 loads the third component; verb 24 loads tl1e first and second component; and verb 25 loads all three components. A similar component format is used in tl1e display and monitor verbs. There are two general c lasses of verbs: regular and extended. The regular verbs (codes 01 through 39) deal mainly with loading, displaying, and monitoring data. The extended verbs (codes 40 through 99) are principally concerned with calling up internal programs, whose function is system testing and operation.
    Whenever data is to be loaded by the operator, tl1e VERB and NOUN lights flash, the appropriate data dis play register is blanked, and the internal computer storage register is cleared in anticipation of data loading. As each numerical character is keyed in, it is displayed in the proper display register. Each data display register can handle only five numerical characters at a time (not including sign). If an attempt is made to key in more than five numerical characters at a time, the sixth and subsequent characters are s imply rejected but they do appear in the display register.
    The + and – keys are accepted prior to inserting tl1e first numerical character of REGISTER 1, REGISTER Z, or REGISTER 3; if keyed in at any other time, the signs are rejected. If the 8 or 9 key is actuated a t any time other than while loading a data word preceded by a + or – sign, it is rejected and the OPR ERR light goes on.
    The normal use of the flash is with a load verb. However, there are two special cases when the flash is used with verbs other than load verbs.
  1. Machine Address to be specified. There is a class of nouns available to allow any machine address to be used; these are called “machine address to be specified” nouns. When the “ENTR,” which causes the verb-noun combination to be executed, senses a noun of this type the flash is immediately turned on. T h e verb code is left unchanged. The operator should load the complete machine address of interest (five-character octal). This is displayed in REGISTER 3 as it is keyed in. If an error is made in loading the address, the CLR key may be used to remove i t. Pres sing the ENTR key causes execution of the verb to continue.
  2. Change Major Mode. To change major mode, the sequence is VERB 37 ENTR. This causes the noun display register to be blanked and the verb code to be flashed. The two -character octal major mode code should then be loaded. For verification purposes, it is displayed a s it is loaded in the noun display register. The entry causes the flash to be turned off, a request for the new major mode to be entered, and new major n1ode code to be displayed in the PROG display register.
    The flash is turned off by any of the following events:
  • Final entry of a load sequence.
  • Entry of verb “proceed without data” (33) or depression of PRO pb.
  • Entry of verb “terminate” (34).
    It is important to conclude every load verb by one of the aforementioned three, especially if the load was initiated by program action within the computer. If an internally initiated load is not concluded validly, the program th.at initiated it may n ever be recalled. The “proceed without data” verb is used to indicate that the operator is unable to, or does not wish to, supply the data requested, but wants the initiating program to continue as best it can with old data. The “terminate” verb i s used to indicate that the operator chooses not to load the requested data and also wants to terminate the requesting routine.
    Keyboard Operation
    The standard procedure for the execution of keyboard operations consists of a sequence of seven key depressions:
  • VERB
  • V 1
  • V 2
  • NOUN
  • N 1
  • N 2
  • ENTR
    Pressing the VERB key blanks the two verb lights on the DSKY and clears the verb code register in the CMC. The next two numerical inputs are interpreted as the verb code. Each of these characters is displayed by the verb lights as it is inserted. The NOUN key operates similarly with the DSKY noun lights and CMC noun code register. Pressing the ENTR key initiates the program indicated by the verb-noun combination displayed on the DSKY. Thus, it is not necessary to follow a standard procedure in keying verb -noun codes into the DSKY. It can be done in reverse order, if desired, or a previously inserted verb or noun can be used without rekeying it. No action is taken by the CMC in initiating the verb-noun defined program until the ENTR key is actuated. If an error is noticed in either the verb code or noun code, prior to actuation of the ENTR key, it can be corrected simply by pressing the corresponding VERB or NOUN key and inserting the proper code. The ENTR key should not be actuated until it has been verified that the correct verb and noun codes are displayed.
    If the selected verb-noun combination requires data to be loaded by the operator, the VERB and NOUN lights start flashing on and off (about once per second) after the ENTR key is pressed. Data is loaded in five character words and, as it is keyed in, it is displayed character-by-character in one of the five- position data display registers; REGISTER 1, R EGISTER 2, or REGISTER 3. Numerical data is assumed to be octal unless the five-character data word is preceded by a plus or minus sign, in which case it is considered to be decimal. Decimal data must be loaded in full five-numeral character words (no zeros may be left out); octal data may be loaded with high-order zeros left out. If a decimal is used for any component of a multicomponent load verb, it must be used for all components of that verb. In other words, no mixing of octal and decimal data is permitted for different components of the same load verb. The ENTR key must be pressed after each data word. This tells the program that the numerical word being keyed in is complete. The on-off flashing of the VERB -NOUN lights terminates after the last ENTR key actuator of a loading sequence.
    The CLR key is used to remove errors in loading data as it is displayed in REGISTER l, REGISTER 2, or REGISTER 3. It does nothing to the PROG, NOUN or VERB lights. (The NOUN lights are blanked by the NOUN key, the VERB lights by the VERB key.) For single-component load verbs or “machine address to be specified” nouns, the CLR key depression performs the clearing function on the particular register being loaded, provided that the CLR key is depressed before the ENTR key. Once the ENTR key is depressed, the CLR key does nothing. The only way to correct an error after the data is entered for a single component load verb is to begin the load verb again. For two- or three- component load verbs, there is a CLR backing-up feature. The first depression of the CLR key clears whichever register is being loaded. (The CLR key may be pressed after any character, but before its entry.) Consecutive CLR key actuations clear the data display register above the current one until REGISTER 1 is cleared. Any attempt to back up (clear) beyond REGISTER 1 is simply ignored. The CLR backing up function operates only on data pertinent to the load verb which initiated the loading sequence. For example, if the initiating load verb were a “write second component into” type only, no backing up action would be possible.
    The numerical keys, the CLR key, and the sign keys are rejected if depressed after completion (final entry) of a data display or data load verb. At such time, only the VERB, NOUN, ENTR, RSET, or KEY REL inputs are accepted. Thus, the data keys are accepted only after the control keys have instructed the program to accept them. Similarly, the + and – keys are accepted only before the first numerical character of REGISTER 1, REGISTER 2, and REGISTER 3 is keyed in, and at no other time. The 8 or 9 key is accepted only while loading a data word which is preceded by a + or – sign.
    The DSKY can also be used by internal computed programs for sub routines. However, any operator keyboard action (except RSET) inhibits DSKY use by internal routines. The operator retains control of the DSKY until he wishes to release it. Thus, he is assured that the data he wishes to observe will not be replaced by internally initiated data displays. In general, it is recommended that the operator release the DSKY for internal use when he has temporarily finished with it; this is done by pressing the KEY REL key.
    Optical Subsystem 2.2.3.3
    The optical subsystem is used for taking precise optical sightings on celestial bodies and for taking fixes on landmarks. These sightings are used for aligning the IMU and for determining the position of the spacecraft. The system includes the navigational base, two of the five CDUs, parts of the power and servo assembly, controls and displays, and the optics, which include the scanning telescope (SCT) and the sextant (SXT).
    Optics 2.2.3.3.1
    The optics consist of the SCT and the SXT mounted in two protruding tubular sections of the optical base assembly. The SCT and SXT s haft axes are aligned parallel to each other and afford a common line -of-sight (LOS) to selected targets. The trunnion axes may be parallel or the SGT axis may be offset, depending upon the mode of operation.
    The sextant is a highly accurate optical instrument capable of measuring the included angle between two targets. Angular sightings of two targets are made through a fixed beam splitter and a movable mirror located in the sextant head. The sextant lens provides 1.8-degree true field-of-view with 28X magnification. The movable mirror is capable of sighting a target to 50 degrees LOS from the shaft axis. The mechanical accuracy of the trunnion axis is twice that of the LOS requirement because of mirror reflection which doubles any angular displacement in trunnion axis.
    The scanning telescope is similar to a theodolite in its ability to accurately measure elevation and azimuth angles of a single target using an established reference. The lenses provide 60-degree true field-of view at 1X magnification. The telescope allowable LOS errors are one minute of arc -rms in elevation with maximum repeatability of 15 arc seconds and approximately 40 arc-seconds in shaft axis.
    Coupling Data Unit 2.2.3.3.2
    The identical coupling data unit (CDU) used in the ISS is also used part of the OSS. Two channels of the CDU are used, one for the SXT shaft axis and one for the SXT trunnion axis. These CDU channels repeat the SXT shaft and trunnion angles and transmit angular change information to the CMC in digital form. The angular data transmission in the trunnion channel is mechanized to generate one pulse to the CMC for 5 arc-seconds of movement of the SXT trunnion which is equivalent to 10 arc-seconds of SLOS movement. The shaft CDU channel issues one pulse for each 40 arc -seconds of shaft movement. The location of the SXT shaft and trunnion axes are transmitted to the CDUs through 16X and 64X resolvers, located on the SXT shaft and trunnion axes, respectively. This angular information is transmitted to the CDUs in the form of electrical signals proportional to the sine and cosine of l 6X shaft angle and 64X trunnion angle. During the computer mode of operation, the CDU provides digital-to-analog conversion of the CMC output to generate an a -c input to the SXT shaft and trunnion servos. This analog input to the SXT axes will drive the SLOS to some desired position. In addition, the OSS channels of the CDU perform a second function on a time-sharing basis. During a thrust vector control function, these channels provide digital-to-analog conversion between the CMC and the service propulsion system (SPS) gimbals.
    OPERATIONAL MODES 2.2.4
    The PGNCS has two systems, six inertial subsystem (ISS), and three optical subsystem (OSS) modes. The system modes are listed as follows:
  • Saturn takeover
  • Thrust vector control.
    The ISS modes are listed as follows:
  • IMU turn- on
  • IMU cage
  • Coarse align
  • Fine align
  • Attitude error
  • Inertial reference
    The OSS modes are listed as follows:
  • Zero optics
  • Manual control
  • Computer control
    The moding of the system and ISS is controlled by the CDU with the exception of one mode, a cage switch on the main display and control panel. All other modes must be commanded by the CMC through the issuance of discrete moding commands to the CDU .
    The modes of operation for the OSS are selected by the astronaut using controls located on the indicator control panel.
    S-IVB Takeover 2.2.4.1
    The S-IVB takeover capability provides steering signals to the Saturn instrument unit autopilot. There are two modes of operation, automatic and manual. The automatic mode provides the backup capability of issuing steering commands to the IU during the boost phase. This mode is initiated by positioning the LAUNCH VEHICLE GUIDANCE switch on the main display and control panel to CMC and during the boost monitor program only. This switch arms the S-IVB takeover relay with 28 vdc and issues a discrete to the CMG. Tl1e CM G, on recognition of this input discrete, switches to a control routine which generate s an S-IVB takeover discrete. The S-IVB takeover discrete allows the relay in the mode module to energize, closing the interface between the DAG and the S -IVB instrument unit.
    Normally the boost monitor program monitors the CDUs, computes the difference between the desired attitude (determined by a stored polynominal) and the actual attitude, and displays the error on the FDAI . During the takeover mode the commands are computed by taking the error (difference between polynominal and actual attitude) at takeover and storing as a bias. This value is subtracted from the actual error computed on succeeding cycle s and is used to issue steering commands that attempt to maintain a constant error equal to that existing at takeover.
    The manual mode provides the capability of issuing rotation control commands, through the CMC, to the instrument unit. The manual mode is initiated by placing the LAUNCH VEHICLE GUIDANCE switch to the CMC position and enabling the RCS digital autopilot with an extended verb. T h e switch arms the S-IVB takeover relay with 28 vdc and issues a discrete to the computer. The CMC, on recognition of this discrete and the RCS digital autopilot enabled, generates the S -IVB takeover discrete.
    If either rotation control is placed to a pitch, yaw, or roll breakout position, the CMC issues an error-counter -enable discrete to the CDU. The error-counter-enable discrete is buffered in the moding module, modified by the digital mode module finally all owing the error counters to be enabled. The CMG then generates a ±8c pulse train to the appropriate error counter where it is accumulated and converted to a ±d – c output signal by the DAC. The ±d- c signal is applied to the S-IVB IU a s a 0. 5 °/sec ± pitch or ± yaw rate command.
    When the rotation control is returned to the null position, the CMG inhibits the error- counter-enable discrete to the CDU which causes the error counter to reset. This results in a 0-vdc output signal from the DAC which is applied to the S-IVB IU as a 0°/sec roll, pitch, or yaw rate command.
    Thrust Vector Control 2.2.4.2
    This system mode 1s initiated by CMC program control.
    The CMC commands a TVC discrete which energizes the TVC relay closing the interface between the CDU DAC and the SPS gimbal servo amplifiers.
    The computer also issues an OSS error-counter enable and an ISS error -counter enable. The computer, when all operating requirements are met, issues an SPS engine-on command.
    The ISS read counters are repeating the gimbal angle changes indicating to the CMC the present spacecraft attitude. The accelerometers provide the program with delta V inputs. These data are used to compute an attitude error and a SPS steering signal.
    The attitude error is converted to a pulse train which is used to increment the CDU ISS error counters. The contents of these counters are converted to analog and displayed as they were in the attitude error display mode. The read counter input to the error counter is inhibited, allowing the error counter to be incremented or decremented only by CMC commands.
    The OSS error counters are incremented by a delta8 command proportional to the steering signals required to steer the spacecraft on the proper trajectory. The error counter can operate completely independent of the read counter circuitry so the condition of the OSS is immaterial to this operation. The error counter contents are converted to analog 800 cps and then to a ±d-c voltage in the C DU OSS DAC. The pitch or yaw steering signal is routed through the TVC relay in the mode module to the SPS gimbal servo amplifiers. The TVC mode is complete when the spacecraft reaches the required velocity and the engine-off discrete is issued by the CMC. Each Delta8c pulse from the CMC changes the SPS gimbals by 85 arc -seconds.
    IMU Turn-On Mode 2.2.4.3
    The purpose of the IMU turn-on mode is to initialize the ISS by driving the IMU gimbal s to zero, and cl earing and inhibiting the CDU read counters and error counters. The IMU turn-on mode is initiated by applying IMU operate power to the subsystem. The computer issues two CDU discretes required for this mode, CDU zero and coarse align. The computer also issues the turn-on delay complete discrete to the ISS after 90 seconds.
    When IMU operate power is applied to the subsystem, the computer receives an ISS power-on discrete and a turn- on delay request. The computer responds to the turn- on delay request by issuing the CDU zero and coarse align discretes to the CDU. To prevent PIPA torquing for 90 seconds during the IMU turn-on mode, an inhibit is applied to the pulse torque power supply. This same inhibit is present when a computer warning has been issued. The CDU zero discrete clears and inhibits the read counters and error counters. The ISS operate power (+28 vdc) is routed through the de-energized contacts of the auto cage control relay to energize the cage relay. A 0-vdc signal, through the energized contacts of the cage relay, energizes the coarse-align relay. The energized contacts of the coarse-align relay switch the gimbal servo amplifier demodulator reference from 3200 cps to 800 cps, and close the IMU c age loop through the energized contacts of the cage relay. The coarse-align relay is held energized by the CDU coarse-align discretes and the energized contacts of the cage relay. The IMU gimbals will drive to tl1e zero reference position using the sine output of the lX gimbal resolvers (sin theta).
    After 90 seconds, the computer issues the ISS turn-on delay complete discrete which energizes the ISS turn-on control relay. The auto cage control relay is energized by the ISS turn-on control relay. The ISS turn-on control relay then locks up through the energized contacts of the auto cage control relay. Energizing the auto cage control relay also removes the turn-on delay request and de-energizes the cage relay. This removes the sin theta signal and applies the coarse-align output to the gin1bal servo amplifier. Energizing the ISS turn-on control relay removes the pulse torque power supply inhibit. The 90-second delay enables the gyro wheels time to reach their operating speed prior to closing the stabilization loops. ·The pulse torque power supply inhibit prevents accelerometer torquing during the 90 seconds.
    IMU Cage Mode 2.2.4.4
    The IMU cage mode is an emergency mode which (1) allows the astronaut to recover a tumbling IMU by setting the gimbal s to zero, and (2) to establish an inertial reference. The IMU cage mode can also be used to establish an inertial reference when the CSS is not activated.
    The IMU cage mode is manually initiated by closing the spring-loaded cage switch on the main display and control panel for sufficient time to allow the IMU gimbals to settle at the zero position (5 seconds maximum).’The IMU gimbal zeroing can be observed on the FDAI.
    If the mode is commanded to recover a tumbling IMU after the IMU turn-on mode is completed, closing the IMU cage switch will cause the IMU gimbals to drive to zero. When the switch is released, the ISS will enter the inertial reference mode.
    If the IMU cage mode is commanded to establish an inertial reference with the CSS in standby or off, the closing of the IMU cage switch will cause the IMU gimbals to drive to zero. When the switch is released, the inertial reference mode will be established.
    Closing the IMU cage switch energizes the cage and coarse-align relays, which apply the sin theta signals to the gimbal servo amplifier, and sends an IMU cage discrete to the computer. Releasing the switch causes the cage and coarse-align relays to de-energize. When the coarse-align relay is de-energized, the stabilization loops are closed. The computer, upon receiving the IMU cage signal, discontinues sending all of the following discretes and control signals:
  • Error-counter enable (OSS)
  • Error-counter enable (ISS)
  • Coarse-align enable
  • TVC enable
  • SPS engine on (CSM only)
  • Gyro-command enable (torquing)
  • ±X and/ or ±Y optics CDU – D/ A
  • ±X (outer), ±Y (inner), ±Z (middle) IMU CDU – D/A
  • ±X, ±Y, ±Z gyro select
  • Gyro set pulses.
    The IMU cage mode should not be used indiscriminately. It is intended only as an emergency recovery function for a tumbling IMU. During the IMU cage mode, IMU gimbal rates are sufficient to cause the gyros to be driven into their rotational and radial stops because of no CDU rate limiting. This action causes both temporary and permanent (if gyro torquing was in process during cage) bias shifts on the order of several MERU.
    IMU Coarse Align 2.2.4.5
    The coarse-align mode of operation is mechanized to allow the computer to rapidly align the IMU to a desired position with a limited degree of accuracy. The computer issues two discretes to the CDU in this mode, coarse-align and error-counter enable.
    The coarse-align discrete is routed through the moding module where it is buffered. One buffered output provides a ground path to the coarse-align relay energizing the relay. The energized relay opens the gyro preamp output, replaces the normal 3200-cps demodulator reference with an 800-cps reference, and routes the 800-cps coarse-align output from the DAC into the gimbal servo amplifier demodulator, thereby allowing any 800-cps signal generated within the DAC to drive the gimbal until the DAC output is zero vrms.
    The buffered coarse-align discrete and error-counter-enable discrete are r outed from the moding module to the digital mode module for logical manipulations. The discretes at 0-vdc level are accepted by the error counter and logic module as moding commands enabling the error counter, and allowing the transfer of delta theta sub g angles from the read counter to the error counter.
    After the logic circuitry has been set up to accept commands from the computer, the CMC will begin transmitting ±.delta theta sub c pulse trains at 3200 pps. These pulses, each equivalent to a change in gimbal angle of 160 arc -seconds, are accumulated in the error counter. The nine stages of the error counter are used solely to control ladder switches in the digital-to-analog converter module.
    The ±.delta theta sub pulse train is routed through a buffer stage in the DAC. The first ±.delta theta sub pulse arriving at the EC&L logic will determine the direction the counter is to count, and will also provide a DAC -polarity control to the DAC. The polarity control provides an in-phase or an out-of-phase reference to the resistive ladder network through switches selected by the nine-bit error counter. An 800-cps analog signal will be generated at the ladder, the amplitude of which is dependent on the error counter content and the phase on the polarity of the input command ±.delta theta sub.
    The ladder output is mixed with the coarse- and fine-resolve r errors, after nulling, from the coarse module and the main summing amplifier module, respectively. These errors are out of phase with the ladder output and will act as a degenerative feedback providing rate limiting to the coarse-align loop drive rates.
    The 800-cps mixing amplifier output of the DAC is routed through the coarse-align relay into the gimbal servo amplifier, causing the gimbal to drive in the direction commanded by the CMC.
    The changing gimbal angles are recognized by the error-detection circuits in the coarse module and the main summing amplifier. These detected errors, recognized by the error counter logic circuitry, allow the 4 pulse train at 6400 pps to increment the read counter. The incrementing read counter will close attenuation switches in the coarse, quadrant select, the main summing amplifier modules nulling the sine and cosine voltage inputs from 1X and 16X resolver into the error- detect circuits.
    As the read counter is being incremented, the output of the first stage is r outed through logic in the EC&L module, through a buffer in the DAC, and out to the CMC as an increase in gimbal angle of 40 arc seconds. The output of the third stage of the counter, at 160 arc-seconds per pulse, is recognized in the EC&L logic as an incremental value to be entered into the error counter in the opposite direction to the commanded delta theta. If delta theta is positive, the error counter is counted up and the delta theta sub g from the read counter decrements the counter. For each read counter pulse into the error counter, the total content will decrease the DAC output and the rate of drive. When the number of digital feedback pulses equal the commanded pulse number, the error counter will be empty and the DAC output should be zero.
    The limited read counter incrementing rate, and the fact that the fine error input to the DAC increases in proportion to theta – <./J as the drive rate exceeds the range controlled by the fine system, limits the gimbals rate of drive to a maximum of 35 degrees per second.
    IMU Fine Align 2.2.4.6
    The fine-align mode of operation allows the computer to accurately align the IMU to a predetermined gimbal angle within seconds of arc. The computer does not command any CDU discretes during this mode of operation; therefore, the read counter circuitry will repeat the changing gimbal angles exactly as was done in the coarse-align mode. The computer will keep track of the gimbal angle to within 40 arc – seconds.
    The commanding signals for the fine – align mode are generated in the time-shared, fine-align electronics. The computer first issues a torque-enable discrete which applies 28 vdc and 120 vdc to the binary current switch and the differential amplifier precision voltage reference circuit, allowing the circuit to become operative. The circuit switch is reset to allow a dummy current, which is equal to the torquing current, to flow. This allows the current to settle to a constant value prior to its being used for gyro torquing. A gyro is then selected for either plus or minus torquing. After the preceding discretes have been issued, the computer then sends set commands or fine-align commands to the set side of the current switch. The pulse turns on the selected plus or minus torque current to the gyro, causing the float to move. The resulting signal generator output causes the platform to be driven through a n angle equal to the commanded angle. The CMC will receive inputs from the CDU read counter indicating the change in gimbal angle.
    The number of torquing pulses sent from the CMC to the torquing electronics is computed, based on the angle of the gimbal at an instant of time and a desired alignment angle. The difference is converted in to the number of pulses necessary to drive the gimbal through the difference angle. Each pulse sent is equivalent to 0. 615 arc- second of gimbal displacement. The required number of fine-align pulses is computed only once and is not recomputed based on the gimbal angle after the desired number of pulses have been sent. The fine-align loop operation is open loop as far as the computer is concerned.
    The fine-align pulses generated by the CMC are issued in bursts at a bit rate of 3200 pulses per second. The fine-align electronics will allow the torquing current to be on in the direction chosen by computer logic for the duration of the pulse burst.
    Attitude Error Display Mode 2.2.4.7
    The attitude error display mode of the inertial subsystem allows the computer to display to the operator, in analog fashion, an attitude error. In this mode of operation, only the CDU error-counter-enable discrete is generated by the computer. In this mode of operation, the computer is again informed of the gimbal angle and any changes to it through the read counter and the analog-to-digital conversion associated with it. The read counter 2-degree output is r outed through logic in the EC&L module through the DAC buffer to the CMC.
    The computer is then aware of the present attitude of the spacecraft. The digital autopilot program has a computed desi red attitude associated with the present time and position of the spacecraft. Any difference between the desired and actual is an attitude error. The attitude error is converted to delta theta sub c pulses, each pulse being equivalent to 160 arc-seconds of error, which are sent to the error counter at a rate of 3200 pps. The error counter is incremented to contain the number of pulses commanded. The contents of the error counter are converted to an 800-cps error signal by the DAC. The phase of the DAC output is determined by logic in the EC &L module, based on whether the input command was a plus or minus delta theta. The 800 cps with a maximum amplitude of 5 vrms zero or biphase is displayed on the attitude error needles of the FDAI as an attitude error. The digital feedback from the read counter to the error counter is disabled during this mode of operation allowing only the CMG-generated delta theta commands to increment or decrement the error counter.
    The spacecraft attitude can also be displayed on the FDAI. This information is taken from the lX gimbal angle resolver sine and cosine windings. Pitch, yaw, and roll can be displayed from the inner, middle, and outer gimbals, respectively.
    Inertial Reference Mode 2.2.4.8
    The inertial reference mode of operation is a mode of operation in which no computer discretes are being issued by the computer to any part of the ISS. This mode is used as a means of obtaining an inertial reference only. This reference is taken from the lX gimbal angle resolver sine and cosine windings. The reference can be displayed on the FDAI or used as an input to the attitude set relays of the SGS.
    In this mode of operation, the 25 IRIGs hold the stable platform inertially referenced. The CDU read counter will continuously monitor the changing gimbal angles because of spacecraft motion and indicate to the CMC the changing angles. The error counter and the DAC are not used in this mode of operation.
    Zero Optics Mode 2.2.4.9
    During the zero optics mode, the shaft and trunnion axes of the SXT are driven to their zero positions by taking the outputs of the transmitting resolvers (1X and 64X in trunnion and 1 / 2X and 16X in shaft) and feeding them through the two-speed (2X) switches to the motor drive amplifier (MDA). The MDA in turn drives loops to null positions as indicated by zero output from the resolvers. The SCT shaft and trunnion axes follow to a zero position. After 15 seconds, the computer will issue a CDU zero discrete, and will initialize the shaft and trunnion counters in preparation for receiving new data from the CDU.
    The zero optics mode is selected by the flight crew. Placing the ZERO switch to ZERO position will energize a relay in the PSA via a relay driver, which, in turn, will energize the two-speed switch. The computer is notified of the zero optics mode by a signal from the zero switch when the change from off to zero position occurs.
    Manual Mode Operation 2.2.4.10
    The manual mode can be selected to operate under either direct hand control or resolved hand control. Independent control of the SCT trunnion is possible in both of these mode variations.
    Manual Direct Operation 2.2.4.10.1
    When in this mode, the hand controller outputs are applied directly to the SXT shaft and trunnion motor drive amplifiers. Forward and back motion of the hand controller commands increasing and decreasing trunnion angles, and right and left motion of the hand controller commands increasing and decreasing shaft angles, respectively. The target image motion is in the R-M coordinate system, the position of which is dependent upon the position of the SXT shaft.
    The apparent speed of the image motion can be regulated by the flight crew by selecting either low, medium, or high controller speed on the indicator control panel. This regulates the voltage· applied to the motor drive amplifier, As and At; therefore, the shaft and trunnion drive rates. The maximum rates are approximately 20 degrees per second for the shaft and 10 degrees per second for the trunnion.
    Slave Telescope Modes 2.2.4.10.2
    The slave telescope modes provide for alternate operation of the telescope trunnion while the SXT is being operated manually. The alternate modes are selected by the TELTRUN switch on the mode control panel. There are three possible selections, SLAVE to SXT, 0 °, and 25°. With this switch in the SLAVE to SXT position, the SCT trunnion axis is slaved to the SXT trunnion; this is the normal operating position for the SCT. With the switch in the 0 ° position, the SCT trunnion is locked in a zero position by the application of a fixed voltage to the SCT trunnion lX receiving resolver. This will cause this position loop to null in a zero orientation. Therefore, the centerline of the SCT 60-degree field-of-view is held parallel to the L LOS of the SXT.
    With the switch in the 25 ° position, an external voltage is applied to the same lX receiving resolver which will cause the SCT trunnion position loop to null out so that the centerline of the 60-degree field-of-view is offset 25 degrees (At of SCT at 12. 5 degrees) from the LLOS of the SXT. This position of the SCT trunnion will allow the landmark to remain in the 60- degree field-of-view while still providing a total possible field-of-view of 110 degrees if the SCT shaft is swept through 360 degrees.
    Manual Resolved Operation 2.2.4.10.3
    When in this mode, the hand controller outputs are put through a matrix transformation prior to being directed to the shaft and trunnion motor drive amplifiers. The matrix transformation makes the image motion correspond directly to the hand controller motion. This is up, down, right, and left motions of the hand controller command; the target image moves up, down, right, and left respectively, in the field of view. In other words, the image motion is in the X-Y spacecraft coordinate system. The matrix transformation takes place in two steps. The outputs of the hand controller are routed to the lX resolver on the SXT shaft. Here the drive signals, As and At, are transformed by the sine and cosine functions of the shaft angle (As). One of the two outputs of the lX resolver is sent to the SXT trunnion motor drive amplifier. The second output is then resolved through the SLOS angle (ALOS) so that the target image motion will be independent of SLOS angle. This is accomplished by the cosecant computing amplifier (CSC) and the 2X computing resolver located on the SXT trunnion axis. The net result is that the shaft drive rate, A·, is inversely proportional to the sine of the SLOS angle. The speed controller is also operational in this mode.
    Optics-Computer Mark Logic 2.2.4.10.4
    The MARK and MARK REJECT buttons on the indicator control panel are utilized to instruct the computer that a navigational fix has taken place, and that SXT shaft and trunnion position and the time should either be recorded or rejected. The mark command is generated manually by the flight crew which energizes the mark relay. The mark relay transmits a mark command to the computer. If an erroneous mark is made, the mark reject button is depressed; this will generate a “mark reject” command to the computer.
    Computer Mode Operation 2.2.4.10.5
    The computer -controlled operation is selected by placing the moding switch in computer position. The mechanization of this loop is chosen by the computer program that has been selected by the flight crew. The operation of the SXT under computer control is accomplished by completing the circuit from the CDU digital-to-analog converters (DAC) to the shaft and trunnion motor drive amplifier. The computer can then provide inputs to these amplifiers via a digital input to the CDU, which are converted in the DAC to an 800-cycle signal that can be used by the MDA. This mode is used when it is desired to look at a specific star for which the computer has the corresponding star coordinates. The compute r will also know the attitude of the spacecraft from the position of the IMU gimbals and will, therefore, be able to calculate the position of the SXT axe s required to acquire the star. The computer can then drive the shaft and trunnion of the SXT to the desired position via the DAC.
    POWER DISTRIBUTION 2.2.5
    The guidance and navigation circuit breakers (panel 5) supply a-c and d-c power to switches on panels 5 and 100 and. directly to the PSA and CMG. The panel 5 switch (G/N PWR) supplies ACl or AC2 power to the PSA (PGNCS Power Distribution Schematic) where it is routed to the dimmer power supply. The output of the dimmer power supply is provided to the following:
  • Caution and warning lamp on LEB panel 122
  • Star acquired lamp on LEB panel 122
  • TPAC readout on LEB panel 122
  • Optics (SGT and SXT) reticles
    PGNCS Power Distribution Schematic

The panel 100 switches (G/N POWER – IMU and OPT ICS) supply the d-c power to the PSA for power to the ISS, OPTICS and CDU power supplies. The IMU HTR and COMPUTER circuit breakers supply power to the ISS temperature control circuits and the CMG power supplies.
Circuit breakers on panel 226 supply a-c power to dimmer controls on panels 8 and 100 for lighting on the DSKYs and LEB panel 122. The circuit breakers (LMDC-AC1 and LEB AC2) supply the a-c power to variable transformers in panels 8 and 100 and to isolation transformers (PGNCS Lighting Schematic) for control of intensity of the status and key integral lamps on the DSKYs and integral lamps on LEB panel 122. The intensity of the displays on the DSKYs are controlled by rheostats on panels 8 and 100.
PGNCS Lighting Schematic

APOLLO 11 OPERATIONS HANDBOOK BLOCK II SPACECRAFT

MISCELLANEOUS SYSTEMS DATA
INTRODUCTION
TIMERS
Accelerometer (G-Meter)
COMMAND MODULE UPRIGHTING SYSTEM
Uprighting System Electrical Schematic
Functional Description

MISCELLANEOUS SYSTEMS DATA
INTRODUCTION
Miscellaneous systems data pertain to items that are not covered in other systems. These items consist of timers, accelerometers (G-meter}, and uprighting system.
TIMERS
Two mission timers (electrical) and two event timers (electrical/mechanical} are provided for the crew in the command module. One mission timer is located on panel 2 of the MDC· and the other on panel 306 in the l eft-hand forward equipment bay. Each mission timer has provisions for manually setting the readout (hours, minutes, and seconds), and the capability of starting, stopping, and resetting to zero. The numerical elements are electroluminescent lamps and the intensity is controlled by the NUMERICS light control on panels MDC- 8 and LEB-100. The event timers are located on MDC-1 and 306 in the l eft-hand forward equipment bay, and provide the crew with a means of monitoring and timing events. All timers reset and start automatically when lift-off occurs, and the timer located on MDC-1 will be automatically reset and restarted if an abort occurs. The event timers are integrally illuminated by an internal electroluminescent lamp and controlled by the INTEGRAL light controls located on MDC-8 and LEB-100. (For further information, controls and displays.)
ACCELEROMETER (G-METER)
The accelerometer or G-meter (MDC-1) provides the crew with a visual indication of spacecraft positive and negative G -loads. This meter is illuminated by an internal electroluminescent lamp and controlled by the INTEGRAL light control on MDC-8. For additional information, refer to controls and displays.
COMMAND MODULE UPRIGHTING SYSTEM
The CM uprighting system is manually controlled and operated after the CM has assumed a stable, inverted floating attitude. The system consists of three inflatable air bags, two relays, three solenoid- control valves, two air compressors, control switches, and air lines. The inflatable bags are located in the CM forward compartment and the air compressors in the aft compartment. The control switches and circuit breakers are located in the crew compartment. The switches control relays which are powered by the postlanding bus and the relays control power to the compressors which are powered by battery buses A and B. (See the Uprighting System Electrical Schematic.)
Uprighting System Electrical Schematic

Functional Description
FLOAT BAG 1L switch controls inflation of the air bag on -Y axis, switch ZR controls inflation of the air bag on the +Y axis, and switch 3 CTR controls inflation of the air bag on the +Z axis of the CM. (See the Uprighting System Electrical Schematic.) Each bag is 43 inches in diameter and has a capacity of approximately 24 cubic feet when inflated. If the CM becomes inverted after landing, the crewmember at station 1 initiates filling of the three bags by setting the FLOAT BAG 1 L, ZR, and 3 CTR switches to FILL. When the CM is uprighted, the three FLOAT BAG switches will be set to OFF. A 4. 25±0. 25-psi relief valve is located in the inlet of each bag. Backup relief valves set at 13. 5 psi are located in the outlet of each compressor.

APOLLO 11 OPERATIONS HANDBOOK BLOCK II SPACECRAFT
VOLUME l SPACECRAFT DESCRIPTION

REACTION CONTROL SYSTEM (RCS)
CM-SM Engine Locations Diagrams
CSM -RCS Auto Control Schematic
CM-SM R CS Engine Power Supplies (Automatic) Diagram
CMS RCS Direct Control Schematic
SM-CM RCS Engine Power Supplies (Direct) Rotation Control No. 1 Diagram
SM-CM RCS Engine Power Supplies (Direct) Rotation Control No. 2 Diagram
SM RCS FUNCTIONAL DESCRIPTION
SM RCS Functional Flow Schematic
RCS Electrical Control
SM RCS SUBSYSTEM QUAD
SM RCS ELECRTICAL HEATERS
SM RCS MAJOR COMPONENT /SUBSYSTEM DESCRIPTION
Pressurization Subsystem
Helium Supply Tank
Helium Isolation Valves
Pressure Regulator Assemblies
Check Valve Assemblies
Pressure Relief Valves
Distribution Plumbing
Secondary Propellant Fuel Pressure Isolation Valve
Propellant Subsystem
Primary and Secondary Oxidizer Tanks
Primary and Secondary Fuel Tanks
Propellant Isolation Shutoff Valve
Distribution Plumbing
Propellant, In-Line Filters
Engine Assemblies
Propellant Solenoid Injector Control Valves (Fuel and Oxidizer)
SM RCS Steady State Operation – Typical
SM RCS Engine Minimum Total Impulse – Typical
Injector
Combustion Chamber
Nozzle Extension
RCS Electrical Heaters
Pressure Versus Temperature Measuring System
Engine Thrusting Logic
SM RCS PERFORMANCE AND DESIGN DATA
Design Data
Helium Tanks (4)
Regulator Units (8)
Secondary Fuel Pressure Transducers (4)
Helium Relief Valves (8)
Primary Fuel Tank (4)
Primary Oxidizer Tank (4)
Secondary Fuel Tank (4)
Secondary Oxidizer Tank (4)
Inline Filters (8)
Engine (16)
Filters – each injector valve inlet
Package Temperature Transducer (4)
Heater Therm-0-Switch
Performance Data
SM RCS Electrical Power Distribution
SM RCS Electrical Power Distribution Schematic
SM RCS OPERATIONAL LIMITATIONS AND RESTRICTIONS
CM RCS FUNCTIONAL DESCRIPTION
CM RCS Functional Flow Schematic
CM RS Function Flow Diagram
CM RCS MAJOR COMPONENTS/SUBSYSTEMS DESCRIPTION
Pressurization Subsystem
Helium Supply Tank
Helium Isolation (Squib-Operated) Valve
Helium Pressure Regulator Assembly
Helium Check Valve Assembly
Helium Relief Valve
Distribution Plumbing
Propellant Subsystem
Oxidizer Tank
Fuel Tank
Diaphragm Burst Isolation Valve
Propellant Isolation Shutoff Valves
Distribution Plumbing
Engine Assembly
CM RCS Engine Thrust Rise and Decay Time Diagram
Propellant Solenoid Injector Control Valves (Fuel and Oxidizer)
Injector
Thrust Chamber Assembly
Nozzle Extension
Engine Solenoid Injector Temperature-Control System
Engine Thrust ON-OFF Logic
Propellant Jettison
CM RCS Squib Valve Power Control Diagram
CM RCS PERFORMANCE AND DESIGN DATA
Design Data
Helium Tanks
Helium Isolation Squib Valve Filter
Regulator Units (4)
Check Valve Filters
Helium Relief Valves (4)
Helium Manifold Pressure Transducer (4)
Fuel Tanks (2)
Valve Isolation Burst Diaphragm (4)
Engine
Oxidizer Blowout Plug
Fuel Blowout Plug
Performance Data
CM RCS Electrical Power Distribution
CM RCS Electrical Power Distribution Schematic
CM RCS OPERATION LIMITATIONS AND RESTRICTIONS

REACTION CONTROL SYSTEM (RCS)
The Apollo command service module includes two separate reaction control systems completely independent designated SM RCS and CM RCS. The SM RCS is utilized to control S/C rates and rotation in all three axis in addition to any minor translation requirements including CSM-S-IVB separation, SPS ullage ulland CM-SM separation maneuvers. The CM RCS is utilized to control CM rates and rotation in all three axis after CM-SM separation and during entry. The CM RCS does not have automatic translation capabilities.
Both the SM and CM R CS may be controlled either automatically or manually from the command module. Physical location of the RCS engines is shown in CM-SM Engine Locations Diagrams. Engine firing sequence for specific maneuvers and individual .engine circuit breaker power control is shown in CSM -RCS Auto Control Schematic , CM-SM R CS Engine Power Supplies (Automatic) Diagram, SM-CM RCS Engine Power Supplies (Direct) Rotation Control No. 1 Diagram , CMS RCS Direct Control Schematic, SM-CM RCS Engine Power Supplies (Direct) Rotation Control No. 2 Diagram.
CM-SM Engine Locations Diagrams

CSM -RCS Auto Control Schematic

CM-SM R CS Engine Power Supplies (Automatic) Diagram

CMS RCS Direct Control Schematic

SM-CM RCS Engine Power Supplies (Direct) Rotation Control No. 1 Diagram

SM-CM R CS Engine Power Supplies (Direct) Rotation Control No. 2 Diagram

SM RCS FUNCTIONAL DESCRIPTION
The SM RCS consists of four individual, functionally identical packages, located 90 degrees apart around the forward portion (+X axis) of the SM periphery, and offset from the S/C Y and Z axis by 7 degrees 15 minutes. Each package, configuration, called a “quad,” is such that the reaction engines are mounted on the outer surface of the panel and the remaining components are inside. Propellant distribution lines are routed through the panel skin to facilitate propellant transfer to the reaction engine combustion chambers. The engine combustion chambers are canted approximately 10 degrees away from the panel structure to reduce the effects of exhaust gas on the service module skin. The two roll engines on each quad are offset-mounted to accommodate plumbing in the engine mounting structure.
Each RCS package incorporates a pressure-fed, positive-expulsion, pulse-modulated, bipropellant system to produce the reaction thrust required to perform the various SM RCS control functions. Acceptable package operating temperature is maintained by internally mounted, thermostatically controlled electric heaters. The SM RCS propellants consist of inhibited nitrogen tetroxide (N204), used as the oxidizer, and monomethylhydrazine (MMH), used as the fuel. Pressurized helium gas is the propellant transferring agent.
The reaction engines may be pulse-fired, producing short-thrust impulses or continuously fired, producing a steady-state thrust level. The short-pulse firing permits attitude-hold modes of operation and extremely accurate attitude alignment maneuvers during navigational sightings. CSM attitude control is normally maintained by utilizing the applicable pitch, yaw, and roll engines on all four quads. However, in the event of a malfunction or in order to conserve propellants, complete attitude control can be maintained with only two adjacent quads operating.
A functional flow diagram for a SM RCS quad is shown in the SM RCS Functional Flow Schematic . The helium storage vessel supplies helium to two solenoid-operated helium isolation valves that are normally open throughout the mission. This allows helium pressure to the regulators, downstream of each helium isolation valve, reducing the high-pressure helium to a desired working pressure.
SM RCS Functional Flow Schematic
RCS Electrical Control
SM RCS SUBSYSTEM QUAD
SM RCS ELECRTICAL HEATERS
RCS Electrical Control

SM RCS SUBSYSTEM QUAD

SM RCS ELECRTICAL HEATERS

Regulated helium pressure is directed through series -parallel check valves. The check valves permit helium pressure to the fuel and oxidizer tanks, and prevent reverse flow of propellant vapors or liquid. A pressure relief valve is installed .in the pressure lines between the check valves and. propellant tanks to protect the propellant tanks from any excessive pressures.
Helium entering the propellant tanks creates a pressure buildup around the positive expulsion bladders forcing the propellants in the tank to be expelled into the propellant distribution lines. Propellants from the primary fuel and oxidizer tanks flow through the primary propellant isolation valves. Propellants from the secondary fuel and oxidizer tanks flow through the secondary propellant isolation valves. The secondary propellant fuel pressure isolation valve will be opened when the secondary propellant fuel pressure transducer (located downstream of the primary fuel tank) senses a drop in pressure. The drop in pressure indicates the primary fuel tank is at propellant depletion. Opening the secondary propellant fuel pressure valve at this time allows regulated helium pressure to the secondary fuel tank. It has been determined that due to the O/F ratio the fuel tank will deplete ahead of the oxidizer tanks, thus accounting for the secondary propellant fuel pressure isolation valve installation in the helium pressurization path to the secondary fuel tank only.
Oxidizer and fuel is distributed to the four engines by a parallel feed system. The fuel valve on each engine opens approximately two milliseconds prior to the oxidizer valve, to provide proper engine operation. Each valve assembly contains orifices which meter the propellant flow to obtain a nominal 2 : 1 oxidizer /fuel ratio by weight. The oxidizer and fuel impinge, atomize, and are ignited by hypergolic reaction within the combustion chamber. The injector valves are controlled automatically by the controller reaction jet ON-OFF assembly. Manual direct control is provided for rotational maneuvers and direct ullage only. The engine injector valves are spring-loaded closed. This system configuration maintains propellants under constant pressure, at the engine injector valves, providing rapid consistent response rates to thrust ON-OFF commands.
SM RCS MAJOR COMPONENT /SUBSYSTEM DESCRIPTION
The SM RCS is composed of four separate, individual quads, each quad containing the following four major subsystems:

  • Pressurization
  • Propellant – primary/ secondary
  • Rocket engine
  • Temperature control system
    Pressurization Subsystem
    The pressurization subsystem regulates and distributes helium to the propellant tanks (SM RCS Functional Flow Schematic). It consists of a helium storage tank, isolation valves, pressure regulators, and lines necessary for filling, draining, and distribution of the helium.
    Helium Supply Tank
    The total high-pressure helium supply is contained within a single-spherical storage tank.
    Helium Isolation Valve
    The helium isolation valves between the helium tank and pressure regulators contain two solenoids: one solenoid is energized momentarily to magnetically latch the valve open; the remaining solenoid is energized momentarily to unlatch the valve, and spring pressure and helium pressure forces the valve closed. The helium isolation valves in each quad are individually controlled by their own individual SM RCS HELIUM switch on MDC- 2. The momentary OPEN position energizes the valve into the magnetic latch (open). The momentary CLOSE position energizes the valve to unlatch the magnetic latch (closed). The center position removes electrical power from either solenoid. The valves are normally open in respect to system pressure substantiating the magnetic latching feature for power conservation purposes during the mission in addition to prevent overheating of the valve coil.
    A position switch contained within each valve controls a position indicator above each switch on MDC-2. When the valve is open, the position switch is open and the indicator on MDC-2 is gray (same color as the panel), indicating the valve is in its normal position. When the valve is closed, the position switch is closed and the indicator on MDC-2 is barber pole (diagonal lines), indicating the valve is in its abnormal position.
    The valve is closed in the event of a pressure regulator unit problem and during ground servicing.
    Pressure Regulator Assemblies
    Helium pressure regulation is accomplished by two regulator assemblies connected in parallel, with one assembly located downstream of each helium isolation valve. Each assembly incorporates two (primary and secondary) regulators connected in series and a filter at the inlet to each regulator. The secondary regulator remains open as the primary regulator functions properly. In the event of the primary regulator failing open, the secondary regulator, in series, will maintains lightly higher but acceptable pressures.
    Check Valve Assemblies
    Two check valve assemblies, one assembly located upstream of the oxidizer tanks and the other upstream of the fuel tanks, permit helium flow in the downstream direction only. This prevents propellant and/ or propellant vapor reverse flow into the pressurization system if seepage or failure occurs in the propellant tank bladders. Filters are incorporated in the inlet to each check valve assembly and each test port.
    Pressure Relief Valves
    The helium relief valve contains a burst diaphragm, filter, a bleed device, and the relief valve. The burst diaphragm is installed to provide a more positive seal against helium than that of the actual relief valve. The burst diaphragm ruptures at a predetermined pressure. The burst diaphragm is of the nonfragmentation type, but in the event of any fragmentation, the filter retains any fragmentation and prevents particles from flowing onto the relief valve seat. The relief valve will relieve at a pressure slightly higher than that of the burst diaphragm rupture pressure and relieve the excessive pressure overboard protecting the fuel and oxidizer tanks. The relief valve will reseat at a predetermined pressure.
    A pressure bleed device is incorporated between the burst diaphragm and relief valve. The bleed valve vents the cavity between the burst diaphragm and relief valve in the event of any leakage across the diaphragm, or vents the cavity upon completion of performing a checkout of the relief valve from the vent port on the relief valve. The bleed device is normally open and will c lose when the pressure increases up to a predetermined pressure. The bleed device automatically opens when the pressure decreases to the bleed valve opening pressure.
    A protective cover is installed over the relief valve vent port and bleed valve cavity port to prevent moisture accumulation and foreign matter entrance. The covers are left in place at lift-off.
    Distribution Plumbing
    Brazed joint tubing is used to distribute regulated helium in each RCS quad from the helium storage vessels to the propellant tanks.
    Secondary Propellant Fuel Pressure Isolation Valve
    The secondary propellant fuel pressure isolation valve in the pressurization line to the secondary fuel tank contains two solenoids: one solenoid is energized momentarily to magnetically latch the valve open; the remaining solenoid is energized momentarily to unlatch the valve, and spring pressure and helium pressure forces the valve closed. The secondary propellant fuel pressure isolation valve in each quad is controlled individually by its own individual SM RCS SEC PRPLNT FUEL PRESS switch on MDC-2. The momentary OPEN position energizes the valve into the magnetic latch (open); the momentary CLOSE position energizes the valve to unlatch the magnetic latch (closed). The center position removes electrical power from either solenoid. The valve is normally closed in respect to system pressure.
    There is no position indicator talkback of the valve position to the MDC.
    The valve will be opened when the secondary propellant fuel pressure decreases, indicating the primary fuel tank is depleted.
    Propellant Subsystem
    This subsystem consists of two oxidizer tanks, two fuel tanks, two oxidizer and two fuel isolation valves, a fuel and oxidizer inline filter, oxidizer balance line, and associated distribution plumbing.
    Primary and Secondary Oxidizer Tank
    The oxidizer supply is contained in two titanium alloy, hemispherically domed cylindrical tanks. The tanks are mounted to the RCS panel. Each tank contains a diffuser tube assembly and a teflon bladder for positive expulsion of the oxidizer. The bladder is attached to the diffuser tube at each end of each tank. The diffuser tube acts as the propellant outlet.
    When the tanks are pressurized, the helium surrounds the entire bladder, exerting a force which causes the bladder to collapse about the propellant, forcing the oxidizer into the diffuser tube assembly and on out of the tank outlet into the manifold, providing expulsion during zero g’s.
    An oxidizer fluid balance line is incorporated on the oxidizer tank side of the propellant isolation valves between the primary and secondary oxidizer tanks (SM RCS Functional Flow Schematic). In prelaunch, prior to lift-off, the helium and four propellant isolation valves are opened. The primary oxidizer tank will flow oxidizer to the secondary tank because the primary tank is located above the secondary tank. This displaces the ullage area in the secondary tank to the primary and fills the secondary full of oxidizer. If the launch continues normally, this creates no problem. However, if a long hold period occurs, the four propellant isolation valves will be closed and the fluid in the secondary tank will expand because of thermal growth. The fluid balance line allows the oxidizer to bleed from the secondary to the primary tank preventing possible rupture of the secondary tank.
    The fuel tanks could have a similar problem except that the secondary propellant fuel pressure valve is closed prior to the opening of the four propellant isolation valves. This prevents transfer of fuel from one tank to the other.
    Primary and Secondary Fuel Tanks
    The fuel supply is contained in two tanks that are similar in material, construction, and operation to that of the oxidizer tanks.
    Propellant Isolation Shutoff Valve
    Each propellant isolation valve contains two solenoids: one that is energized momentarily to magnetically latch the valve open; and the remaining solenoid is energized momentarily to unlatch the magnetic latch, and spring pressure and propellant pressure closes the valve. The propellant isolation valves located in the primary fuel and oxidizer lines, as well as the secondary fuel and oxidizer lines in each quad, are all controlled by a single SM RCS propellant switch on MDC-2. The SM RCS propellant switch on MDC-2 for each quad placed to OPEN momentarily energizes the two primary and secondary fuel and oxidizer isolation valves into the magnetic latch (open); the CLOSE momentary position energizes the valve to unlatch the magnetic latch (closed). The center position removes electrical power from either solenoid.
    Each quad, primary fuel, and oxidizer tank isolation valve contains a position switch that is in parallel to one PRIM PRPLNT position indicator above the SM RCS propellant switch on MDC-2. When the position indicator switch in each valve is actuated open, the PRIM PRPLNT indicator on MDC- 2 is gray (same color as the panel) indicating both valves are open with respect to the fluid flow. Each quad, secondary tank fuel and oxidizer isolation valve contains a position switch that is in series to one SEC PRPLNT position indicator below the SM RCS propellant switch on MDC-2. When the position indicator switch in each valve is actuated closed, the SEC PRPLNT indicator on MDC- 2 is gray (same color as the panel) indicating the valves are open to the fluid flow. When the position indicator switch in either primary fuel or oxidizer isolation valve is actuated closed, the PRIM PRPLNT position indicator on MDC- 2 is barber pole (diagonal lines) indicating that either valve or both valves are closed in respect to the fluid flow. When tl1e position indicator switch in either secondary fuel or oxidizer isolation valve is actuated open, the SEC PRPLNT position indicator on MDC-2 is barber pole (diagonal lines) indicating that either valve or both valves are closed in respect to the fluid flow.
    The primary and secondary fuel and. oxidizer isolation valves of each quad are normally open to the fluid flow.
    The primary and secondary fuel and oxidizer isolation valves of a quad are closed to the fluid flow in the event of a failure downstream of the propellant isolation valves such as line rupture, runaway thruster, etc.
    Distribution Plumbing
    Propellant distribution plumbing within each quad is functionally identical. Each quad contains separate similar oxidizer and fuel plumbing networks. Propellants, within their respective networks, are directed from the supply tanks through manifolds for distribution to the four engines in the clusters.
    Propellant, In-Line Filters
    In-line filters are installed in the fuel and oxidizer lines downstream of the propellant shutoff valves and prior to the engine manifold contained within the engine housing.
    The in-line filters are installed to prevent any particles from flowing into the engine injector valves and engine injector.
    Engine Assemblies
    The service module reaction control system engines are radiation cooled, pressure fed, bi propellant thrust generators which can be operated in either the pulse or steady state mode. (These modes are defined as a firing duration of less than one second, and one second or more, respectively.)
    Each engine has a fuel and oxidizer injector solenoid control valve. The injector solenoid control valves control the flow of propellants by responding to electrical commands (automatic or manual) generated by the controller reaction jet ON-OFF assembly or direct RCS respectively. Each engine contains an injector head assembly which directs the flow of each propellant from the injector solenoid control valves to the combustion chamber where the propellants atomize and ignite (hypergolic) producing thrust. A filter is incorporated at the inlet of each fuel and oxidizer solenoid injector valve. An orifice is installed in the inlet of each fuel and oxidizer solenoid injector valve that meters the propellant flow to obtain a nominal 2:1 oxidizer- fuel ratio by weight.
    Propellant Solenoid Injector Control Valves (Fuel and Oxidizer)
    The propellant solenoid injector valves utilize two coaxially wound coils, one for automatic and one for direct manual operation. The automatic coil is used when the thrust command originates from the controller reaction jet ON-OFF assembly which is the electronic circuitry that selects the required automatic coils to be energized for a given maneuver. The direct manual coils are used when the thrust command originates at the rotation control (direct mode), direct ullage pushbutton, SPS abort or the SM jettison controller (SM RCS Functional Flow Schematic)
    The solenoid valves are spring- loaded closed and energized open.
    The reaction time of the valves are illustrated in SM RCS Steady State Operation – Typical graph and SM RCS Engine Minimum Total Impulse – Typical graph.
    SM RCS Steady State Operation – Typical

SM RCS Engine Minimum Total Impulse – Typical

SM RCS Steady State Operation – Typical graph illustrates a thrusting duration of 15 seconds (steady state). The electrical on signal is received within either the automatic (normal) or manual direct coils of the engine injector valves. At 14 seconds after the receipt of the thrust on signal, the automatic or manual direct coils are deenergized and the injector valves spring-load closed. However, due to the valve lag and residual propellant flow downstream of the injector valves, thrust output continues until the residuals have burned which establishes the cutoff transient.
SM RCS Engine Minimum Total Impulse – Typical graph illustrates the minimum electrical signal that can be provided to the automatic coils of the injector valves from the controller reaction jet ON-OFF assembly. Sequence of operation is described in the subsequent steps:
a. A time of 12 to 18 milliseconds will elapse before the controller reaction jet ON-OFF assembly can electrically provide a command off signal to the automatic coils of injector valves on the engine.
b. Then the automatic coils of injector valves receive the electrical on signal, injector valves are energized to open position.
c. The fuel injector valve automatic coil energizes to the fully open position in approximately 7 milliseconds, and the oxidizer injector valve automatic coil energizes to the fully open position in approximately 9 milliseconds, establishing an approximate 2-millisecond fuel lead. This is accomplished by varying the resistance of the automatic coils in the fuel and oxidizer injector valve.
d. The ·propellants start to flow from the injector valves as soon as they start to open to the premix igniter; however, the fuel will lead the oxidizer by 2 milliseconds.
e. The propellants flow into the premix igniter and the combustion chamber which creates some pressure, gas velocity, and thrust in the combustion chamber even though it is very small because the engine is operating in a space environment.
f. The pressure, gas velocity, and thrust continue to increase s lightly until the valves reach the full open position.
g. At approximately 12- 1/2 milliseconds, the propellants ignite (hypergolic), producing a spike of thrust upwards into the area of approximately 70 to 80 pounds. At 12 milliseconds minimum, the electrical signal is removed from automatic coils of the injector valves.
h. The engine tl1rust continues very erratic until the valves become deenergized and spring-load closed.
i. At approximately 7 milliseconds on the fuel valve and approximately 8 milliseconds on the oxidizer valve, the injector valves are fully closed.
j. The residual propellants, downstream of the injector valves, continue to flow into the combustion chamber, decreasing until complete thrust decay of O pounds occurs at approximately 65 milliseconds.
k. In order to determine the total impulse for this time span of operation (SM RCS Engine Minimum Total Impulse – Typical graph), everything under the entire thrust curve must be integrated.
The automatic coils are electrically connected in parallel from the controller reaction jet ON-OFF assembly.
The direct manual coils in the fuel and oxidizer injector valves provide a direct backup to the automatic mode of operation. The direct manual coils of the injector valves are electrically connected in series. The reason for the series connection of the manual coils are as follows:
a. To insure a fuel lead if any heat- soaked back into the direct manual coil windings, which would change the coil resistance and result in an oxidizer lead if the coils were connected in parallel.
b. The series connection from the fuel direct manual coil is positive to negative and to the oxidizer direct manual coil is negative to positive, then to ground. The reverse polarity on the oxidizer coil increases the arc suppression, reducing the arc at the rotation control in the direct RCS mode of operation. The direct manu.al coil opening time for the fuel injector valve is 26 milliseconds and the oxidizer is approximately 36 milliseconds. Closing time for the fuel and oxidizer direct manual coils is 55 ± 25 milliseconds.
Injector
The main chamber portion of the injector will allow 8 fuel streams to impinge upon 8 oxidizer streams (unlike impingement) for main chamber ignition. There are 8 fuel holes around the outer periphery of the injector which provide film cooling to the combustion chamber walls. There are 8 fuel holes around the premix chamber providing cooling to the premix chamber walls.
The injector contains a premix igniter, and the premix chamber contains a fuel and an oxidizer passage that impinge upon each other {unlike impingement) within the premix igniter chamber. The premix igniter chamber, along with the approximate 2-millisecond fuel lead, provides a smoother start transient primarily in the pulse mode of operation and especially in the area of minimum impulse.
Combustion Chamber
The combustion chamber is constructed of unalloyed molybdenum which is coated with molybdenum disilicide to prevent oxidation of the base metal. Cooling of the chamber is by radiation and film cooling.
Nozzle Extension
The nozzle extension is attached to the chamber by a waspolloy nut. The nozzle extension is machined from a cobalt base alloy (stainless steel). The stiffener rings are machined.
RCS Electrical Heaters
Each of the RCS engine housings contains two electrical strip heaters. Each heater contains two electrical elements. Each heater element is controlled by a No. 2 therm-o-switch (SM RCS Functional Flow Schematic). When the SM RCS HEATERS switch on MDC- 2 for that quad is placed to PRI, 28 vdc is supplied to the No. 2 therm-o-switch. The therm-o-switch is set at a predetermined range and will automatically open or close because of the temperature range of the therm-o-switch and will control one element in each heater. When the SM RCS HEATERS switch on MDC- 2 for that quad is placed to SEC, 28 vdc is supplied to the redundant No, 2 therm-oswitch. The therm-o-switch is set at a predetermined range and will automatically open or close because of the temperature range of the therm-o-switch and will control the redundant element in each h eater. The SM RCS HEATERS switches will normally be placed to PRl at earth orbit acquisition and the SEC position is utilized as a backup.
The OFF position of the SM RCS HEATERS switch on MDC-2 removes power from the SM RCS heaters.
The SM RCS package temperature indicator on MDC-2 may be utilized to monitor the package temperature of any one of the four SM RCS quads by utilizing the SM positions A, B, C or D of the RCS INDICATORS select switch on MDC-2. The SM RCS package temperature transducers will also illuminate the SM RCS A, B, C or D caution and warning lights on MDC-2 if the package temperature becomes too low or too high.
Pressure Versus Temperature Measuring System
The helium tank supply pressure and temperature for each quad is monitored by a pressure/temperature ratio transducer (SM RCS Functional Flow Schematic).
The pressure/temperature ratio transducer for each quad provides a signal to the RCS indicator select switch on MDC-2. When the RCS indicator select switch on MDC-2 is positioned to a given SM RCS quad, the pressure/temperature ratio signal is transmitted to the propellant quantity gauge on MDC-2, and the propellant quantity remaining for that quad is indicated in percent.
The helium tank temperature for each quad is monitored by a helium tank temperature transducer. The helium tank temperature is monitored by T LM. The helium tank temperature can be monitored on MDC-2. The SM RCS He TK TEMP/PRPLNT QTY switch and the SM positions. A, B, C, or D of the RCS indicators select switch on MDC-2 provides the crew with the capability to monitor either the helium tank temperature/pressure ratio as a percent quantity remaining, or helium tank temperature which can be compared against the helium supply pressure readout on MDC-2. With the use of a nomogram the propellant quantity remaining could be determined in percent through comparison of helium tank temperature and helium supply pressure.
Engine Thrusting Logic
In the SM RCS, the main buses cannot supply electrical power to one leg of the AUT O RCS SELECT switches on MDC-8 and controller reaction jet ON-OFF assembly until the contacts of the RCS latching relay are closed (SM RCS Functional Flow Schematic), Closing of these contacts for SM RCS control may be initiated by the following signals:
a. With the launch escape tower jettisoned, and the translation control rotated counterclockwise, an SPS abort or S-IVB separation may be initiated and the following sequence of events occur:

  1. Inform the CMG system of an abort initiation.
  2. Initiate applicable booster shutdown.
  3. Inhibit the pitch and yaw automatic jets of the controller jet ON- OFF assembly and provide a signal to SCS-SPS thrust ON- OFF logic.
  4. Initiates an ullage maneuver signal to the required direct manual coils of the SM RCS engines (as long as the translation control is counterclockwise, ullage is terminated when the translation control is returned to the neutral detent).
  5. Adapter separation occurs at 3.0 seconds after the above was initiated. In the event the automatic adapter separation did not occur, the CSM/ LV SEPARATION pushbutton on MDC-1 can be pressed and held.
  6. Energizes the RCS latching relay 3.8 seconds after the abort was initiated allowing the controller reaction jet ON- OFF assembly to provide electrical commands to the automatic coils of the SM RCS engines. If the sequential events control system logic fails to energize the RCS latching relay, the RCS CMD switch on MDC-2, placed to the R CS CMD position, provides a manual backup to the automatic function. In addition, if the CSM/LV SEPARATION pushbutton on MDC-1 is pressed and held for approximately 1 second the RCS latching relay is energized.
    b. A normal S-IVB separation sequence may be initiated as follows:
  7. The RCS CMD switch on MDC-2 is placed to RCS CMD, enabling the controller reaction jet ON-OFF assembly to provide commands to the automatic coils of the SM RCS engines.
  8. Then positioning the translation control to +X (backup of DIRECT ULLAGE pushbutton on MDC-1) provides the signal required to the +X SM RCS engines; and the CSM/ LV SEPARATION pushbutton on MDC-1 is held for 2 seconds to initiate adapter separation.
  9. (CSM/LV SEPARATION pushbutton on MDC-1 pressed and held for approximately 2 seconds will also energize the RCS latching relay,)
  10. The translation control is returned to neutral and the CSM/LV SEP pushbutton on MDC-1 is released.
    In the event the translation control is unable to provide an ullage maneuver, the DIRECT ULLAGE pushbutton, on MDC-1, when pressed and held, provides the direct ullage signal to the direct manual coils of the required SM RCS engines providing a +X translation. This provides a manual direct backup to the translation control for the ullage maneuver. The ullage maneuver is terminated upon release of the DIRECT ULLAGE pushbutton.
    In the event the controller reaction jet ON – OFF assembly is unable to provide commands to the automatic coils of the SM R CS engines, a backup method is provided. This method consists of two ROT CONT PWR DIRECT RCS switches on MDC-1 and the two rotation controllers. The ROT CONT PWR DIRECT RCS 1 switch supplies power only to rotation control 1. When the ROT CONT PWR DIRECT RCS 1 switch, is positioned to MNA/MNB, main buses A and B supply power only to rotation control 1. When the ROT CONT PWR DIRECT RCS 1 switch is positioned to MNA, main bus A supplies power only to rotation control 1. The ROT CONT PWR DIRECT RCS 2 switch supplies power only to rotation control 2. When the ROT CONT PWR DIRECT RCS 2 switch is positioned to MNA/MNB, main buses A and B supply power only to rotation control 2. When the ROT CONT PWR DIRECT RCS 2 Switch is positioned to MNB, main bus B supplies power only to rotation control 2. When the rotation control is positioned fully to its stops in any direction, the rotation control will energize the required direct manual coils for the desired maneuver and provide an inhibit signal to the SM RCS automatic coils.
    If the controller reaction jet ON-OFF assembly is unable to provide commands to the automatic coils of the S M RCS engines, it is noted that translation control of the spacecraft is disabled.
    SM RCS PERFORMANCE AND DESIGN DATA
    Design Data
    The following list is the design data on the SM RCS components.
    Helium Tanks (4)
    4150±50 psig at 70±5 °F during servicing. After servicing setting on launch pad is 70 ±10°F, capacity 1.35 lb. Internal volume of 910 ±5 cubic inches. Wall thickness, 0.135 inch.
    Regulator Units (8)
  11. Primary 181 ±3 psi g with a normal lockup of 183±5 ps1g.
  12. Secondary lockup of 187±5 psig. From lockup pressure not to drop below 182 p sig or rise above 188 psig. Filter 25 microns nominal, 40 microns absolute at inlet of each regulator unit.
    Secondary Fuel Pressure Transducers (4)
    Illuminate caution and warning light on MDC- 2 (SM RCS A, B, C, or D): Underpressure 145 psia nominal. Overpressure 215 psia nominal.
    Check Valve-Filters – 40 microns nominal, 74 microns absolute. One at inlet to check valve assembly, one at each test port.
    Helium Relief Valves (8)
    Diaphragm rupture at 228 ±8 psig, filter 10 microns nominal, 25 microns absolute. Relief valve relieves at 236.5 ±11.5 psig, reseats at not less than 220 psig. Flow capacity 0.3 lb/minute at 248 psig at 60°F. Bleed device closes when increasing pressure reaches no more than 179 psig in the cavity and a helium flow of less than 20 standard cubic centimeters per hour across the bleed device and relief valve assembly combined. The bleed device reopens when decreasing pressure has reached no less than 20 psig.
    Primary Fuel Tank (4)
    Combined propellant and ullage volume of 69.1 lb, initially at 65°F at 150 psig , resulting in a tank pressure of no more than 2 15 psia when heated to 85°F.
    Outside diameter 12.62 in. maximum. Length 23. 717 (+O.060, -0.000) in. Wall thickness 0.017 to 0.022 in.
    Helium inlet port 1/4 in. ; fill and drain port 1/2 in.
    Primary Oxidizer Tank (4)
    Combined propellant and ullage volume of 137.0 lb. initially a t 65°F at 150 psig, resulting in a tank, pressure of no more than 215 psia when heated to 85°F. Outs ide diameter 12. 62 in. maximum, length 28.558 (+0. 060, -0.00) in. Wall thickness 0. 017 to 0. 022 in.
    Secondary Fuel Tank (4)
    Combined propellant and ullage volume of 45.2 lb, initially at 65°F at 150 psig, resulting in a tank pressure of no more than 205 psia when heated to 105 °F. Outside diameter 12. 62 in. maximum, length 17.329 (+0.040, -0.000) in. Wall thickness 0.022 to 0.027 in.
    Secondary Oxidizer Tank (4)
    Combined propellant and ullage volume of 89.2 lb, initially at 65°F at 150 psig, resulting in a tank pressure of no more than 205 psia when heated to 105 °F. Outside diameter 12. 65 in. maximum, length 19.907 (+0.040, -0.000) in. Wall thickness 0.022 to 0.027 1n.
    Inline Filters (8)
    5 microns nominal, 15 microns absolute.
    Engine (16)
    1000-second service life, 750 seconds continuous, capable of 10,000 operational cycles. Expansion ratio 40 to 1 at nozzle exit. Cooling-film and radiation, injector type premix igniter, one on one unlike impingement, 8 fuel annulus for film cooling of premix ignitor, main chamber 8 on 8 unlike impingement, 8 fuel for film cooling of combustion chamber wall.
    Nozzle exit diameter – 5. 6 inches
    Fuel lead
    Automatic coils – connected in parallel
    Manual coils – connected in series
    Weight – 4. 99 lb
    Length – 13.400 in. maximum
    Filters – each injector valve inlet
    100 microns nominal, 250 microns absolute
    Package Temperature Transducer (4)
    Illuminate caution and warning light on MDC-2 (SM RCS A, B, C, or D):
  • Below temperature of 75 °F nominal.
  • Above temperature of 205°F nominal.
    Heater Therm-0-Switch

2

Close at 115°F
Open at 134 °F
Minimum spread 9°F
36 ±3.6 watts per element nominal two per quad.
Performance Data
Refer to CSM/LM Spacecraft Operational Data Book
SM RCS Electrical Power Distribution
See SM RCS Electrical Power Distribution Schematic for electrical power distribution.
SM RCS Electrical Power Distribution Schematic

SM RCS OPERATIONAL LIMITATIONS AND RESTRICTIONS
Refer to Volume 2, AOH malfunction procedures.
CM RCS FUNCTIONAL DESCRIPTION
The command module reaction control subsystems provide the impulses required for controlling spacecraft rates and attitude during the terminal phase of a mission.
The subsystems may be activated by the CM-SM SEPARATION switches on MDC-2 placed to CM-SM SEPARATION position, or by placing the CM RCS PRESSURIZE switch on MDC-2 to the CM RCS PRESS position. The subsystems are activated automatically in the event of an abort from the pad up to launch escape tower jettison. Separation of the two modules occurs prior to entry {normal mode), or during an abort from the pad up to launch escape tower jettison.
The CM RCS consists of two similar and independent subsystems, identified as subsystem 1 and subsystem 2. Both subsystems are pressurized simultaneously. In the event a malfunction develops in one subsystem, the remaining subsystem has the capability of providing the impulse required to perform necessary pre-entry and entry maneuvers. The CM RCS is contained entirely within the CM and each reaction engine nozzle is ported through the CM skin. The propellants consist of inhibited nitrogen tetroxide {N204) used as the oxidizer and monomethylhydrazine (MMH) used as fuel. Pressurized helium gas is the propellant transferring agent.
The reaction jets may be pulse-fired, producing short thrust impulses or continuously fired, producing a .steady state thrust level. CM attitude control is maintained by utilizing the applicable pitch, yaw and roll engines of subsystems 1 and 2. However, complete attitude control can be maintained with only one subsystem.
A functional flow diagram of CM RCS subsystems 1 and 2 is shown in the CM RCS Functional Flow Schematic . The helium storage vessel of each subsystem supplies pressure to two helium isolation squib valves that are closed throughout the mission until either the CM SM Separation switch on MDC-2, or CM RCS PRESS switch on MDC-2 is activated. When the helium isolation squib valves in a subsystem are initiated open, this allows the helium tank source pressure to the pressure regulators downstream of each helium isolation squib valve. The regulators reduce the high-pressure helium to a desired working pressure.
CM RCS Functional Flow Schematic

Regulated helium pressure is directed through series-parallel check valves. The check valves permit helium pressure to the fuel and oxidizer tanks and prevent reverse flow of propellant vapors or liquids. A pressure relief valve is installed in the pressure lines between the check valves and propellant tanks to protect the propellant tanks from any excessive pressure.
Helium entering the propellant tau½s creates a pressure buildup around the propellant positive expulsion bladders, forcing the propellants to be expelled into the propellant distribution lines. Propellants then flow to valve isolation burst diaphrag1ns, which rupture due to the pressurization, and then through the propellant isolation valves. Each subsystem supplies fuel and oxidizer to six engines.
Oxidizer and fuel is distributed to the 12 engines by a parallel feed system. The fuel and oxidizer engine injector valves, on each engine, contain orifices which meter the propellant flow to obtain a nominal 2.1 oxidizer/fuel ratio by weight. The oxidizer and fuel ignite due to the hypergolic reaction. The engine injector valves are controlled automatically by the controller reaction jet ON-OFF assembly. Manual direct control is provided for rotational maneuvers, and the engine injector valves are spring-loaded closed.
CM RCS engine preheating may be necessary before initiating pressurization due to possible freezing of the oxidizer (+11 .8°F) upon contact with the engine injector valves. The crew will monitor the engine temperatures and determine if preheating is required by utilizing the engine injector valve solenoids direct manual coils for preheat until acceptable engine temperatures are obtained. The CM RCS HTRS switch, on MDC-101, will be utilized to apply power to the engine injector valve direct manual coils for engine preheating.
CM RS Function Flow Diagram

Since the presence of hypergolic propellants can be hazardous upon CM impact, the remaining propellants are burned or dumped and purged with helium in addition to depleting the helium source pressure prior to CM impact.
In the event of an abort from the pad up to T + 42 seconds after liftoff, provisions have been incorporated to automatically dump the oxidizer and fuel supply overboard. Then, followed by a helium purge of the fuel and oxidizer systems in addition to depleting the 11elium source pressure.
CM RCS MAJOR COMPONENTS/SUBSYSTEMS DESCRIPTION
The CM RCS is composed of two separate, normally independent subsystems, designated subsystem 1 and subsystem 2. The subsystems are identical in operation, each containing the following four major subsystems:

  • Pressurization
  • Propellant
  • Rocket engine
  • Temperature control system heaters
    Pressurization Subsystem
    This subsystem consists of a helium supply tank, two dual pressure regulator assemblies, two check valve assemblies, two pressure relief valve assemblies, and associated distribution plumbing.
    Helium Supply Tank
    The total high-pressure helium is contained within a single spherical storage tank for each subsystem. Initial fill pressure is 4150±50 psig.
    Helium Isolation (Squib-Operated) Valve
    The two squib-operated helium isolation valves are installed in the plumbing from each helium tank to confine the helium into as small an area as possible. This reduces helium leakage during the period the system is not in use. Two squib valves are employed in each system to assure pressurization. The valves are opened by closure of the CM RCS PRESS switch on MDC-2 to CM RCS PRESS, or by placing the CM/SM SEP switches on MDC-2 to CM/SM SEP, or upon the receipt of an abort signal from tl1e pad up to the launcl1 escape tower jettison.
    Helium Pressure Regulator Assembly
    The pressure regulators used in the CM RCS subsystems 1 and 2 are similar in type, operation, and function to those used in the SM RCS.
    The difference is that the regulators in the CM RCS are set at a higher pressure than those of the SM RCS.
    Helium Check Valve Assembly
    The check valve assemblies used in CM RCS subsystems 1 and 2 are identical in type, operation, and function to those used in the SM RCS.
    Helium Relief Valve
    The helium relief valves used in the CM RCS subsystems 1 and 2 are similar in type, operation, and function to those used in the SM RCS.
    The difference being the rupture pressure of the burst diaphragm in the CM RCS is higher than that of the SM RCS and the relief valve relieves at a higher pressure in the CM RCS than that of the SM RCS.
    Distribution Plumbing
    Brazed joint tubing is used to distribute regulated helium in each subsystem from the helium storage vessels to the propellant tanks.
    Propellant Subsystem
    Each subsystem consists of one oxidizer tank, one fuel tank, oxidizer and fuel isolation valves, oxidizer and fuel burst diaphragm isolation valves, and associated distribution plumbing.
    Oxidizer Tank
    The oxidizer supply is contained in a single titanium alloy, hemispherical-domed cylindrical tank in each subsystem. Each tank contains a diffuser tube assembly and a teflon bladder for positive expulsion of the oxidizer similar to that of the SM RCS secondary tank assemblies. The bladder is attached to the diffuser tube at each end of the tank. The diffuser tube acts as the propellant outlet.
    When the tank is pressurized, the helium gas surrounds the entire bladder, exerting a force which causes the bladder to collapse about the propellant, forcing the oxidizer into the diffuser tube assembly and on out of the tank outlet into the manifold.
    Fuel Tank
    The fuel supply is contained in a single titanium alloy, hemispherical-domed cylindrical tank in each subsystem that is similar in material construction and operation to that of the SM RCS secondary fuel tanks.
    Diaphragm Burst Isolation Valve
    The burst diaphragms, downstream from each tank are installed to confine the propellants into as small an area as possible throughout the mission. This is to prevent loss of propellants in the event of line rupture downstream of the burst diaphragm of engine injector valve leakage.
    When the helium isolation squib valves are initiated open, regulated helium pressure pressurizes the propellant tanks creating the positive expulsion of propellants into the respective manifolds to the burst diaphragms which rupture and allow the propellants to flow on through the burst diaphragm and the propellant isolation valves to the injector valves on each engine. The diaphragm is of the nonfragmentation type, but in the event of any fragmentation, a filter is incorporated to prevent any fragments from entering the engine injector valves.
    Propellant Isolation Shutoff Valves
    When the burst diaphragm isolation valves are ruptured, the propellants flow to the propellant isolation valves.
    The fuel and oxidizer isolation valves in the SYS 1 fuel and oxidizer lines are both controlled by the CM RCS PRPLNT 1 switch on MDC-2. The fuel and oxidizer isolation valves in the SYS 2 fuel and oxidizer lines are both controlled by the CM RCS PRPLNT 2 switch on MDC-2, Each propellant isolation valve contains two solenoids, one that is energized momentarily to magnetically latch the valve open, and the remaining solenoid is energized momentarily to unlatch the magnetic latch and spring pressure and propellant pressure close the valve. The CM RCS PROPELLANT switch on MDC-2 is placed to ON energizing the valve into the magnetic latch (open), the OFF position energizes the valve to unlatch the magnetic latch (closed). The center position removes electrical power from either solenoid. The valves are normally open in respect to the fluid flow.
    Each valve contains a position switch which is in parallel to one position indicator above the switch on MDC-2 that controls both valves.
    When the position switch in each valve is open, the indicator on MDC-2 is gray (same color as the panel) indicating that the valves are in the normal position, providing a positive open valve indication. When the position switch in either valve is closed, the indicator on MDC-2 is barber pole (diagonal lines) indicating that either valve, or both valves, are closed.
    The valves are closed in the event of a failure downstream of the valves, line rupture, run away thruster, etc.
    Distribution Plumbing
    Brazed joint tubing is used to distribute regulated helium to the propellant positive expulsion tanks in subsystems 1 and 2. The distribution lines contain 16 explosive-operated (squib) valves which permit changing the helium and propellant distribution configuration to accomplish various functions within the CM RCS. Each squib valve is actuated by an explosive charge, detonated by an electrical hot-wire ignitor. After ignition of the explosive device, the valve remains open permanently. Two squib valves are utilized in each subsystem to isolate the high-pressure helium supply until RCS pressurization is initiated. Two squib valves are utilized to interconnect subsystems 1 and 2 regulated helium supply which ensures pressurization of both subsystems during dump-burn and helium purge operations. Two squib valves in each subsystem permit helium gas to bypass the propellant tanks which allow helium purging of the propellant subsystem and depletion of the helium source pressure. One squib valve in the oxidizer system permits both oxidizer systems to become common. One squib in the fuel system permits both fuel systems to become common. Two squib valves in the oxidizer syste1n, and two in the fuel system are utilized to dump the respective propellant in the event of an abort from the pad up to T +42 seconds.
    Engine Assembly
    The command module reaction control subsystem engines are ablative-cooled, bi-propellant thrust generators which can be operated in either the pulse mode or the steady-state mode.
    Each engine has a fuel and oxidizer injector solenoid valve. The injector solenoid control valves control the flow of propellants by responding to electrical commands generated by the controller reaction jet ONOFF assembly or by the direct manual mode. E ach engine contains an injector head assembly which directs the flow of each propellant from the engine injector valves to tl1e combustion chamber where the propellants atomize and ignite (hypergolic), producing thrust. Esti1nated engine thrust rise and decay is shown in figure CM RCS Engine Thrust Rise and Decay Time Diagram .
    CM RCS Engine Thrust Rise and Decay Time Diagram

Propellant Solenoid Injector Control Valves (Fuel and Oxidizer)
The injector valves utilize two coaxially wound coils, one for automatic and one for direct manual control. The automatic coil is used when the thrust command originates from the controller reaction jet ON-OFF assembly.
The direct manual coils are used wl1en the thrust command originates at the rotation control (direct RCS).
The engine injector valves are spring-loaded closed and energized open.
The reaction time of the values, pulse mode of operation, reason for pulse mode, and thrust curve generated by the engine is similar to the SM RCS engines.
The automatic coils in the fuel and oxidizer injector valves are connected in parallel from the controller reaction jet ON-OFF assembly.
The direct manual coils in the fuel and oxidizer injector valves provide a direct backup to the auto1natic system. The direct manual coils are connected in parallel from the rotation controls.
The engine injector valve automatic coil opening time is 8± 1 /2 milliseconds, and closing is 6±1/2 milliseconds. The engine injector valve direct manual coil opening time is 16±3 milliseconds and closing time is 7±3 milliseconds.
Injector
The injector contains 16 fuel and 16 oxidizer passages that i1npinge (unlike impinge1nent) upon a splash plate within the combustion chamber. Therefore, the injector pattern is referred to as an unlike impingement splash-plate injector.
Thrust Chamber Assembly
The thrust chamber assembly is fabricated in four segments, the combustion chamber ablative sleeve, throat insert, ablative material, asbestos and a fiberglass wrap. The engine is ablative-cooled.
Nozzle Extension
The CM RCS engines are mounted within the structure of the CM. The nozzle extensions are required to transmit the gasses from the engine out through the structure of the CM. The nozzle extensions are fabricated of ablative material.
Engine Solenoid Injector Temperature-Control System
A temperature-control system of the CM RCS engine is employed by energizing the manual direct coils on each engine (CM RCS Functional Flow Schematic).
Temperature sensors are mounted on 6 of the 12 engine injectors. A temperature sensor is installed on the subsystem 1 counterclockwise roll-engine injector, negative yaw-engine injector, negative pitch-engine injector, and on subsystem 2 positive yaw-engine injector, negative pitch-engine injector, and clockwise roll-engine injector.
The temperature transducers have a range from – 50° to +50°F. The temperature transducers from the three subsystems 1 and 2 engine injectors provide inputs to the two rotary switches on MDC-101, which are located in the lower equipment(bay of the command module. With the rotary switches positioned as illustrated in CM RCS Functional Flow Schematic, the specific engine injector temperature is monitored as d-c voltage on the 0- to 5-vdc voltmeter on MDC-101. The 0 vdc is equivalent to – 50°F and 5 vdc is equivalent to +50°F.
A CM RCS HEATER switch located on MDC-101 (CM RCS Functional Flow Schematic) is placed to the CM RCS HTR position when any one of the instrumented engines are below +28°F (3. 9 vdc). The CM RCS LOGIC switch, on MDC-1, must be positioned to CM RCS LOGIC to provide electrical power to the CM RCS HT R switch on MDC-101. When the CM RCS HTR switch is positioned to CM RCS HTRS, relays are energized, which allow electrical power to be provided from the CM HEATERS circuit breakers 1 MNA and 2 MNB on MDC-8, to the direct injector solenoid control valves of the 12 CM RCS engines. The fuel and oxidizer injector solenoid control valve direct coils (of all 12 CM RCS engines) are energized open prior to the pressurization of CM RCS subsystems 1 and 2. A 20-minute maximum heat-up time assures engine injector temperature is at -10 °F m1n1mum. At the end of 20 minutes, the CM RCS HTR switch on MDC-101 is positioned to OFF, allowing the injector solenoid control valve direct coils to de- energize, and the injector solenoid control valves spring-load closed. This will prevent the oxidizer from freezing at the engine injector valves upon pressurization of subsystems 1 and 2 and the 20-minute time factor ensures that the warmer engines will not be overheated.
The CM RCS HEATER switch must be placed to OFF prior to CM RCS pressurization.
The operation of the CM RCS HEATER switch in conjunction with the d-c voltmeter and/or heating time insures all other engine valves reach the acceptable temperature levels.
If the CM RCS HEATER switch on MDC-101 fails to energize the direct coils for the CM RCS preheat, the following backup procedure may be utilized:
a. Place CM RCS HEATER switch on MDC-101 to OFF.
b. Place ROTATION CONTROL POWER DIRECT RCS switch 1 and 2 on MDC-1 to OFF.
c. P lace RCS TRANSFER switch on MDC-2 to CM.
d. Place SC CONT switch on MDC-1 to SCS.
e. Place MANUAL ATTITUDE PITCH, YAW, and ROLL switches on MDC-1 to ACCEL CMD.
f. Place A/C ROLL AUTO RCS SELECT switches on MDC-8 to OFF.
g. Place ROTATION HAND CONTROLS to soft stops for 10 minutes.
h. If a CM RCS engine temperature that is monitored on MDC-101 fails to increase because of a CM RCS engine direct coils failure, follow above steps a through f, and then place ROTATION HAND CONTROL{S) to soft stop(s) of affected engine for 10 minutes.
Engine Thrust ON-OFF Logic
All automatic thrust commands for CM attitude are generated from within the controller reaction jet ON-OFF assembly. These commands may originate at:

  • The rotation controls
  • The stabilization and control subsystem
  • The command module computer.
    In the event the controller reaction jet ON-OFF assembly is unable to provide commands to the automatic coils of the SM RCS engines, a backup method is provided. The backup method consists of two ROT CONT PWR DIRECT RCS switches on MDC-1 and the two rotation controllers. The ROT CONT PWR DIRECT RCS 1 switch supplies power only to rotation control 1. When the ROT CONT PWR DIRECT RCS 1 switch, is positioned to MNA/MNB, main buses A and B supply power only to rotation control 1. When the ROT CONT PWR DIRECT RCS 1 switch is positioned to MNA, main bus A, supplies power only to rotation control 1. The ROT CONT PWR DIRECT RCS 2 switch supplies power only to rotation control 2. When the ROT CONT PWR DIRECT RCS 2 switch is positioned to MNA/MNB, main buses A and B supply power only to rotation control 2. When the ROT CONT PWR DIRECT RCS 2 switch is positioned to MNB, main bus B supplies power only to rotation control 2. When the rotation control is positioned fully to its stops in any direction, the required direct manual coils are energized for the desired maneuver.
    When the CM/SM SEP switches on MDC-2 are placed to CM SM SEP position, the switches automatically energize relays in the RCS control box (SM RCS Functional Flow Schematic) (providing the CM RCS LOGIC switch on MDC-1 is at CM RCS LOGIC) that transfer the controller reaction jet ON-OFF assembly, and direct 1nanual inputs from the SM RCS engine to the CM RCS engines automatically. These same functions occur automatically on any LES ABORT also, providing the CM RCS LOGIC switch on MDC-l is at CM RCS LOGIC.
    The transfer motors in the RCS control box are redundant to ea ch other in tl1at they ensure the direct manual inputs are transferred from the SM RCS engines to the CM RCS engines in addition to providing a positive deadface.
    The RCS transfer motors may also be activated by the RCS T RANS FER switch placed to CM position on MDC-2 whicl1 provides a manual backup to the automatic transfer. The CM RCS L OGIC s witch on MDC- 1 does not have to be on for the manual backup transfer function.
    As an example, in the case of the direct manual inputs only to the RCS engines: If the electrical A RCS transfer motor failed to transfer automatically a t CM/SM SEP (providing the CM RCS LOGIC switch on MDC-1 is at CM RCS LOGIC); or by use of the manual RCS transfer switch on MDC- 2, the electrical B RCS transfer motor would transfer the direct manual inputs from the SM RCS engines to tl1e CM RCS engines in addition to a positive deadfacing to the SM RCS engines.
    Th e CM RCS sub sys terns 1 and 2 may be checked out prior to CM/SM separation by utilization of the RCS transfer switch on MDC-2. Placing the RCS TRANSFER switch to the CM position, the controller reaction jet ON-OFF assembly and direct manual inputs are transferred to the CM permitting a CM RCS checkout prior to CM/SM separation.
    Propellant Jettison
    There are two sequences of propellant jettison. One sequence is employed in the event of an abort while the vehicle is on the launch pad and through the first 42 seconds of flight. The second sequence is employed for all other conditions, whether it be a normal entry or an SPS abort mode of operation.
    The sequence of events before and during a normal entry is as follows:
    a. The CM RCS is pressurized by placing the CM/SM SEP switches on MDC-2 to C.M/SM SEP position or by placing the CM RCS PRESS switch on MDC-2 to the CM RCS PRESS position prior to initiating CMSM separation. The CM RCS PRESS switch or the CM-SM SEP switches initiate the helium isolation squib valves in CM RCS subsystems 1 and 2, thus pressurizing both subsystems {figures 2. 5-11 and 2. 5-13). The CM RCS LOGIC switch on MDC-1 must be placed to CM RCS LOGIC prior to initiating CM/SM separation to provide the automatic RCS transfer function.
    b. The CM RCS provides attitude control during entry. At approximately 24, 000 feet, a barometric switch is activated unlatching the RCS latching relay. This inhibits any further commands from the controller reaction jet ON-OFF assembly {providing the ELS LOGIC switch on MDC-1 is in AUTO) (SM RCS Functional Flow Schematic). The RCS CMD switch MDC-2, positioned to OFF momentarily provides a manual backup to the 24,000 feet barometric switches.
    c. At approximately main parachute line stretch as a normal manual function, the CM RCS PRPLNT-DUMP switch on MDC-1 is placed to the DUMP position. This function initiates the following simultaneously; (CM RCS LOGIC switch on MDC-1 must be placed to CM RCS LOGIC to provide electrical power to the DUMP switch). (See CM RCS Functional Flow Schematic and CM RCS Squib Valve Power Control Diagram.)
    i. Initiates the two helium interconnect squib valves.
    ii. Initiates the fuel interconnect squib valves.
    iii. Initiates the oxidizer interconnect squib valve.
    iv. The fuel and oxidizer injector valve direct manual coils are energized on all of the CM RCS engines excluding the two t pitch engines. The propellants are jettisoned by burning the propellants remaining through 10 of the 12 engines. The length of time to burn the remaining propellants will vary, depending upon the amount of propellants remaining in the fuel and oxidizer tanks at 24, 000 feet. If an entire propellant load remained, as an example, a nominal burn time would be 88 seconds through 10 of the 12 engines. In the worst case of only 5 of the 12 engines {direct manual coils energized), a nominal burn time would be 155 seconds.
    d. Upon completion of propellant burn, the CM P RPLNT PURGE switch on MDC- 1 is placed to the P URGE position as a normal manual function (the CM PRPLNT-DUMP switch supplies electrical power when placed to DUMP position to the PURGE switch). When the PURGE switch is placed to PURGE, the s witch initiates the four helium bypass squib valves. This allows the regulated helium pressure to bypass each fuel and oxidizer tank, purging the lines and manifolds out through 10 of the 12 engines, as well as depleting tl1e heliu1n source pressure. Purging requires approximately 15 seconds (until helium depletion).
    e. In the event of a CM RCS LOGIC switch and/or CM P RPLNT DUMP switch failure on MDC-1, the remaining propellants may be burned by placing ROT CONT PWR DIRECT RCS switch 1 on MDC-1, to either MNA/MNB or MNA, and/or ROT CONT PWR DIRECT RCS switch 2 on M DC- 1, to either MNA/MNB or MNB. Then positioning the two rotation controllers to CCW, CW, -Y, +Y and -P (excluding +P) position. This will energize the direct fuel and oxidizer injector solenoid valve coils of ten of the twelve CM RCS engines and burn the remaining propellants. At the completion of propellant burn the CM RCS HELIUM DUMP pushbutton on MDC-1 would be pressed initiating the four bypass squib valves. This allows the regulated helium pressure to bypass each fuel and oxidizer tank. This purges the lines and manifolds out through ten of the twelve engines a s well as depleting the helium source pressure providing the two rotation controllers are positioned to CCW, CW, -Y, and – P (excluding +P).
    f. In the event the CM RCS LOGIC and Clv1 PRPLNT DUMP switches on MDC-1 function correctly and the P URGE switch fails, the CM R CS HELIUM DUMP pushbutton on MDC-1 would be pressed, initiating the four helium bypass squib valves, allowing the regulated helium pressure to bypass around each fuel and oxidizer tank, purging the lines and manifolds out through 10 of the 12 engines as well a s depleting the helium source pressure.
    g. Upon completion of purging, the direct manual coils of the CM RCS engine injector valves will be de-energized by placing the CM RCS LOGIC switch on MDC- 1 to OFF, or by placing the CM PRPLNT DUMP switch on MDC-1 to OFF. The CM RCS 1 and 2 P RP LNT switches on MDC-2 will also be placed to the OFF position momentarily closing the fuel and · oxidizer propellant isolation valves. These functions will be accomplished prior to impact.
    CM RCS Squib Valve Power Control Diagram

The sequence of events involving an abort from the pad up to 42 seconds are as follows:
a. The ABORT SYSTEM PRPLNT DUMP AUTO switch on MDC-2 is placed to the PRPLNT DUMP AUTO position (CM RCS Functional Flow Schematic and CM RCS Squib Valve Power Control Diagram.) and the CM RCS LOGIC switch on MDC- 1 is placed to the CM RCS LOGIC position at sometime in the countdown prior to T + 0.
b. b. The following events occur simultaneously upon the receipt of the abort signal. The command may be generated automatically by the sequential events control system or by manually rotating the translation control counterclockwise:

  1. When the abort signal is received, the two squib-operated helium isolation valves in each subsystem are initiated open, pressurizing subsystems 1 and 2, Manual backup would be the CM RCS press switch on MDC-2.
  2. The squib-operated helium interconnect valve for the oxidizer and fuel tanks are initiated open. If only one of the two squib helium isolation valves was initiated open, both subsystems are pressurized as a result of the helium interconnect squib valve interconnect,
  3. The solenoid-operated fuel and oxidizer isolation shutoff valves are closed. This prevents fuel and oxidizer from flowing to the thrust chamber assemblies.
  4. The squib-operated fuel and oxidizer interconnect valves are initiated open. If only one of the two oxidizer or fuel overboard dump squib valves was initiated open, the oxidizer and fuel manifolds of each respective system are common as a result of the oxidizer and fuel interconnect squib valve.
    5, The squib-operated oxidizer overboard dump valves are initiated open directing the oxidizer to an oxidizer blowout plug, in the aft heat shield of the CM. The pressure buildup causes the pin in the blowout plug to shear, thus blowing the plug and dumping the oxidizer overboard. The entire oxidizer supply is dumped in approximately 13 seconds.
  5. The RCS latching relay will not energize in the event of an abort from Oto +42 seconds because of the position of the P RPLNT DUMP AUTO switch (CM RCS Functional Flow Schematic and CM RCS Squib Valve Power Control Diagram). Thus, no commands are allowed into the controller reaction jet ON-OFF assembly.
  6. The CM-SM RCS transfer motor-driven switches are automatically driven upon receipt of the abort signal, transferring the logic circuitry from SM RCS engines to CM RCS engines.
  7. Five seconds after abort initiation, the squib-operated fuel overboard dump valves are initiated open and route the fuel to a fuel blowout plug in the aft heat shield of the CM. The pressure buildup causes the pin in the blowout plug to shear, thus blowing the plug and dumping the fuel overboard. The entire fuel supply is dumped in approximately 13 seconds.
  8. Thirteen seconds after the fuel dump sequence was started the fuel and oxidizer bypass squib valves subsystems 1 and 2 are initiated open. This purges the fuel and oxidizer systems out through the fuel and oxidizer overboard dumps, respectively, and depleting the helium source pressure.
    During the prelaunch period the MAIN BUS TIE switcl1es on MDC-5 are in the AUTO position. In the event of a pad abort, electrical power is automatically applied to the main buses. Just prior to lift-off the electrical power is applied to the main buses by manually placing the two MAIN BUS TIE switches on MDC-5 to BAT A/C and BAT B/C positions.
    The sequence of events if an abort is initiated after 42 seconds up to launch escape tower jettison are as follows:
    a. At 42 seconds after lift-off, as a normal manual function the PRPLNT DUMP AUTO switch on MDC-2 is placed to the auto RCS CMD position. This safes the oxidizer, fuel dump, and purge circuitry (CM RCS Functional Flow Schematic and CM RCS Squib Valve Power Control Diagram) and sets up the circuitry for the RCS latching relay.
    b. The CM RCS LOGIC switch MDC-1 was placed to CM RCS LOGIC prior to T + 0.
    c. Initiate both helium isolation squib valves in the CM RCS subsystems 1 and 2. Manual backup would be the CM RCS PRESS switch on MDC- 2; thus, pressurizing CM RCS subsystems 1 and 2.
    d. Automatically drives the CM SM transfer motors from SM RCS engines to CM RCS engines, Manual backup would be the RCS transfer switch on MDC-2 to CM position.
    e. Energize the RCS latching relay one second after receipt of the abort signal. This allows the controller reaction jet ON-OFF assembly to provide electrical commands to the CM RCS. Manual backup would be the RCS CMD switch on MDC-2.
    f. Dependent upon the altitude of abort initiation, the launch escape tower canards orient the CM for descent or the CM RCS orients the CM for descent.
    g. At 24, 000 ft, the barometric switch energizes the RCS latching relay {providing the ELS LOGIC switch on MDC-1 is in AUTO). This removes electrical power from the controller reaction jet ON-OFF assembly, thus the CM RCS engines. Manual backup would be the RCS CMD switch on MDC-2.
    h. At main parachute line stretch, as a normal manual function the CM PRPLNT DUMP switch on MDC-1 is placed to DUMP initiating the following functions:
  9. Same as in a normal entry sequence.
    CM RCS PERFORMANCE AND DESIGN DATA
    Design Data
    The following list contains data on the CM RCS components:
    Helium Tanks (2)
    4150±50 psig at 70 ° ±5 °F during servicing; setting on launch pad 70 ° ±10 °F, Capacity 0.57 lb, inside diameter 8. 84 in., wall thickness 0 .105 in., internal volume of 365±5 cubic inches at 4150±50 psig, and weight 5.25 lb.
    Helium Isolation Squib Valve Filter
    Removes 98 percent of all particles whose two smallest dimensions are greater than 40 microns. Ren1.oves 100 percent of all particles whose two smallest dimensions are greater than 74 microns.
    Regulator Units (4)
    Primary 291±4 psig. Lockup pressure minimum of 287 psig and not to exceed 302 psig.
    Secondary – lockup 287 to 302 psig. Filter 25 microns nominal, 40 microns absolute at inlet of each regulator unit.
    Check Valve Filters
    40 microns nominal, 74 microns absolute. One at each inlet to check valve assembly, one a teach test port.
    Helium Relief Valves (4)
    Diaphragm rupture at 340±8 psi. Filter 10 microns nominal, 25 microns absolute.
    Relieve at 346±14 psig.
    Reseat at no less than 327 psig.
    Flow capacity 0.3 lb/minute at 60°F and 346±14 psig.
    Bleed device closes when increasing pressure has reached no more than 1-79 psig in the cavity, and a helium flow of less than 20 standard cubic centimeters per hour across the bleed device and relief valve assembly combined. The bleed device reopens when decreasing pressure has reached no less than 20 psig.
    Helium Manifold Pressure Transducer (4)
    Illuminates caution and warning lights on M DC-2 (CM R.CS l or 2).
    After helium isolation squib valve actuation:
  • Underpressure 260.psia.
  • Overpressure 330 psia.
    Fuel Tanks (2)
    See SM RCS secondary fuel tanks.
    Valve Isolation Burst Diaphragm (4)
    Rupture at 241 ±1 4 psig within 2 seconds after rupture pressure is reached at any temperature between 40 ° to 105 °F. Filter 7 5 microns nominal, 100 microns absolute.
    Engine
    200-second service life, 3000 operational cycles
    Nominal thrust – 93 pounds
    Expansion ratio – 9 to 1
    Cooling – Ablation
    Injector type – 16 on 1 6 splash plate
    Combustion chamber-refrasil ablative sleeve and graphite base throat insert.
    Automatic and manual coils connected in parallel.
    Weight – 8. 3 lb.
    Length – 11. 65 in. maximum
    Nozzle exit diameter – 2. 13 in.
    Nozzle extensions – ablative refrasil
    Oxidizer Blowout Plug
    Pin shears at approximately 200 psi.
    Fuel Blowout Plug
    Pin shears at approximately 200 psi.
    Performance Data
    Refer to CSM/LM Spacecraft Operational Data Book
    CM RCS Electrical Power Distribution
    See CM RCS Electrical Power Distribution Schematic for electrical power distribution.
    CM RCS Electrical Power Distribution Schematic

CM RCS OPERATION LIMITATIONS AND RESTRICTIONS
Refer to AOH, Volume 2, Malfunction Procedures.

APOLLO 11 OPERATIONS HANDBOOK BLOCK II SPACECRAFT
SEQUENTIAL SYSTEMS
INTRODUCTION
SECS Interface Diagram
Sequential Events Control Subsystem
SECS Controllers Diagrams
MESC, ELSC, LDEC, and PCVB Locations
MESC, ELSC, LDEC, and PCVB Locations Diagram
SMJC Location
SMJC Location Diagram
RCSC Location
RCSC Location Diagram
LSSC Location
LSSC Location Diagram
Origin of Signals
GENERAL DESCRIPTION
Launch Escape Tower Assembly
Launch Escape Tower Assembly Diagram
Probe Passive Tension Tie
Probe Passive Tension Tie Diagram
Docking Probe Retraction
S-IVB/LM Separation
Separation of the CSM From the LV
Normal CSM/LV Separation Diagram
SLA Panel Jettison Diagram
CM-SM Separation and SM Jettison
Normal CM-SM Separation and SM Jettison Diagram
Forward Heat Shield (Apex Cover)
Forward Heat Shield Attachment and Thruster Assembly Diagram
Forward Heat Shield Separation Augmentation System Diagram
ELS Equipment
ELS Equipment Diagram
ELS Parachutes
ELS Parachutes Diagram
Reefing System
Reefing Line Cutter Installation Diagram
Reefing Line Cutter Diagram
Design Criteria
Circuit Concept
Circuit Concept Schematic
FUNCTIONAL DESCRIPTION
Sequential Systems Functional Block Diagram
Normal Mission Functions
Mode IA Abort
Modes 1B and 1C Aborts
Modes 2, 3, and 4 Aborts
OPERATIONAL DESCRIPTION
Sequential Systems Operational/Functional Diagram
Logic Power
Arming Sequential Systems Logic Circuits
Pyro Power
Arming Pyro Buses
SIVB/LM Separation (Zone 39-F)
Main Parachute Release (Zone 37-E)
EDS Bus Changeover. (Zones 36, 37-A, and-B)
Lift-Off
Emergency Detection System
EDS Automatic Abort Activation and Deactivation
Launch Vehicle Status
Abort Request Light
Launch Vehicle Tank Pressure Monitor
LV Auto Abort Logic
MESC Auto Abort Voting Logic
Launch Escape Tower Physically Attached
Auto Abort Enable
Normal Ascent
Event Profile, Normal Ascent S-V LV
Angle of Attack Monitor. (Zones 35 through 37-E and –F)
EDS Q Ball Diagram
EDS Automatic Abort Deactivate
Extinguish LIFT OFF and NO AUTO ABORT Lights
Launch Escape Tower Jettison
Normal Tower Jettison Diagram
Tower Separation System Diagram
Separation of the Spacecraft From the Launch Vehicle
Adapter Separation System Diagram
Enable Automated Control of the SM RCS
Docking Probe Retraction
Separation of LM From S-IVB
LM Docking Ring Separation
Nominal Pre-entry and Descent
CM/SM Separation Control
Event Profile, Nominal Pre-Entry and Descent Diagram
Jettisoning the SM (Zones 19 through 22-E and -F)
Deadfacing the CM-SM Umbilical
CM-SM Electrical Circuit Interrupter Diagram
CM-SM Umbilical Assembly Diagram
Separation of the CM From the SM
CM-SM Separation System Diagram
Pyro Cutout
CM RCS Interface
Main Bus Tie
Arm ELSC
Activate ELSC
24,000 ft Baro Switch Lock Up
Disable CM RCS/SGS
Apex Cover Jettison
Earth Landing System, Normal Sequence Diagram
Deployment of Drogue Parachutes
Deployment of Main Parachutes and Release of Drogues
Burning of the CM RCS Propellants
Release of Main Parachutes
Parachute Disconnect (Flower Pot) Diagram
Aborts
Abort Start. (Zones 27 and 28-C and -D)
LES Abort Start
Mode 1A Abort
Event Profile, Mode 1A Abort Diagram
Canard Deploy and ELSC Arm
ELSC Operation
LES Abort Mode Switchover
Mode 1B Aborts
Event Profile, Mode 1B Abort T+42 Sec to 30,000 Feet
Event Profile, Mode 1B Abort ˜̴ 30,000 Feet to 100,000 Feet Diagram
Mode 1C Abort
Event Profile, Mode 1C Abort Diagram
SPS Abort
Event Profile, SPS Abort Diagram
PERFORMANCE AND DESIGN DATA
Apollo Standard Initiator
Single Bridgewire Apollo Standard Initiator Diagram
Compliance With Design Requirements
Component Selection and Installation
Firing Circuit Protection
Induced Current Protection
Pyro Arm Switch Lock
Pyro Arm Switch Guard Diagram
Tower Jettison Motor
Tower Jettison Motor Diagram
Thrust of TJM
Total Impulse of TJM
Thrust Rise Time of TJM
Thrust Vector Alignment of TJM
Useful Life of TJM
Launch Escape Motor
Launch Escape Motor Diagram
Thrust of LEM
Total Impulse of LEM
Thrust Rise Time of LEM
Thrust Vector Alignment of LEM
Useful Life of LEM
Pitch Control Motor
Pitch Control Motor Diagram
Thrust of PCM
Total Impulse of PCM
Thrust Rise Time of PCM
Thrust Vector Alignment of PCM
Useful Life of PCM
LES Igniter
LES Igniters Diagram
Squib Valves
Squib Valve Diagram
Detonators
Detonator Cartridge Assembly Diagram
LET Frangible Nuts
SLA Separation Ordnance System
LM Separation System
LM Separation System Diagram
CM – SM Seperation System
Pressure Cartridge Assemblies
Pressure Cartridge Assembly Diagram
Electrical Circuit Interrupters
Canard Actuators
Canard Actuator Diagram
Parachute Mortars
Parachute Mortar Assemblies Diagram
Parachute Disconnect
Reefing Line Cutters
Parachute Subsystem
Parachute Design Envelope
OPERATIONAL LIMITATIONS AND RESTRICTIONS
Alternate Selection of Logic Power
Alternate Selection of Pyro Power
Control for Arming Pyro Systems
Status of Logic and Pyro Buses
Utilization of Controls for CSM/LV Separation
Utilization of Controls for CM/SM Separation
Manual Control of ELSC Functions

SEQUENTIAL SYSTEMS
INTRODUCTION
Sequential systems include certain detection and control subsystems of the launch vehicle (LV) and the Apollo spacecraft (SC). They are utilized during launch preparations, ascent, and entry portions of a mission, preorbital aborts, early mission terminations, docking maneuvers, and SC separation sequences. Requirements of the sequential systems are achieve.cl by integrating several subsystems. The SECS Interface Diagram illustrates the sequential events control subsystem (SECS) which is the nucleus of sequential systems and its interface with the following subsystems and structures:

  • Displays and controls
  • Emergency detection (EDS)
  • Electrical power (EPS)
  • Stabilization and control (SGS)
  • Reaction control (RCS)
  • Docking (DS)
  • Telecon1munications (T/C)
  • Earth landing (ELS)
  • Launch escape (LES)
  • Structural
    SECS Interface Diagram

Sequential Events Control Subsystem
The SECS is an integrated subsystem consisting of twelve controllers which may be categorized in seven classifications listed as follows:

  • Two master events sequence controllers (MESC)
  • Two service module jettison controllers (SMJC)
  • One reaction control system controller (RCSC)
  • Two lunar module (LM) separation sequence controllers (LSSC)
  • T wo lunar docking events controllers (LDEC)
  • Two earth landing sequence controllers (ELSC)
  • One pyro continuity verification box (PC VB)
    The relationship of these controllers and their sources of electrical power are illustrated in the SECS Controllers Diagrams. Five batteries and three fuel cells are the source of electrical power. The SMJC is powered by fuel cells; however, battery power is used for the start signal. The RCSC is powered by the fuel cells and batteries. The remaining controllers of the SECS are powered by batteries exclusively.
    SECS Controllers Diagrams

MESC, ELSC, LDEC, and PCVB Locations
Four controllers of the SECS are located in the right-hand equipment bay (RHEB) of the CM. (MESC, ELSC, LDEC, and PCVB Locations Diagram.)
MESC, ELSC, LDEC, and PCVB Locations Diagram

SMJC Location
Installation of the redundant controllers on the forward bulkhead of the SM in sector 2 is illustrated in SMJC Location Diagram. The fuel cells, which supply power for the SMJC, are also located in the SM.
SMJC Location Diagram

RCSC Location
The location of the RCSC in the aft equipment bay of the CM is illustrated in the RCSC Location Diagram .
RCSC Location Diagram

LSSC Location
Redundant controllers are located in the spacecraft LM adapter (SLA) just forward of the LV instrumentation unit (IU); this location is near the attachment point of the LM to the IU. For missions that require dual launchings, the LSSC will be installed on the LV whicl1 is utilized to launch the LM. The LSSC Location Diagram illustrates the location between the hinge line of the SLA and the attachment plane of the IU.
LSSC Location Diagram

Origin of Signals
The SECS receives manual and/or automatic signals and performs control functions for normal mission events or aborts. The manual signals are the result of manipulating switches on the main display console (MDC) or rotating the Commander’s translation hand control counterclockwise, which is the prime control for a manual abort. Automatic abort signals are relayed by the emergency detection system (EDS).
GENERAL DESCRIPTION
In several instances, normal mission events are initiated manually with no provisions for automatic control. In other instances, automatic control is provided with manual control included for backup or override. In addition to the control functions, the sequential systems incorporate visual display s which allow the flight crew to monitor parameters associated with the LV.
Launch Escape Tower Assembly
The apex section of the boost protective cover (BPC) (Launch Escape Tower Assembly Diagram) is attached to the LET legs and also to another section of the BPC which is described in Section 1, Spacecraft. The LET is fabricated from welded titanium tubing which is insulated against heat of rocket motor plumes. Two Saturn V dampers, one of which cannot be illustrated in this perspective, interface with a tower arm of the mobile launcher. Switches in the tower arm are tripped by the dampers, and clamps are mechanized to secure the LET legs to prevent sway caused by wind loads.
Launch Escape Tower Assembly Diagram

Circuits of the SECS integrate the MESC, ELSC, and L DEC providing manual and/ or automated controls for initiating ordnance devices which are utilized in the following:
a. Breaking frangible nuts which retain the LET legs to the CM structure.
b. Igniting the launch escape motor (LEM), tower jettison motor (TJM), and pitch control motor (PCM) as required for nominal mission or abort maneuvers.
c. Deployment of the canards as required to orient the launch escape vehicle (LEV) with the aft heat shield forward during LES aborts. This orientation contributes to efficient parachute deployment.
A Q-ball, which is a customer-furnished item, interfaces with the sequential systems to monitor LV angle of attach: at or near the MAX Q region during ascent.
Ballast is installed to control the CG location of the LEV. The amount of ballast required is contingent on individual LEV weight and balance data.
Probe Passive Tension Tie
A passive tension tie is incorporated on SC that are equipped with a docking probe. The tension tie is illustrated in the Probe Passive Tension Tie Diagram, and attaches the docking probe to the apex section of the boost protective cover. During LES aborts the LET is automatically jettisoned and ordnance which separates the docking ring from the CM is initiated by relay logic of the MESC and LDEC; therefore, in this sequence the docking probe is jettisoned with the LET because of the tension tie. When the LET is jettisoned during a nominal ascent the docking ring ordnance is not initiated and the tension tie is snapped from the docking probe by thrust from the T JM.
Probe Passive Tension Tie Diagram

Docking Probe Retraction
On SC so equipped, docking probe retraction requires pyro power from the SECS. Burst diaphragms are used to contain nitrogen in four high- pressure cylinders which are included within the docking probe. The nitrogen is used to retract the probe, and the diaphragms are ruptured by plungers which are activated by ordnance devices. Mechanization and control of the docking probe is included in Docking and Crew Transfer.
S-IVB/LM Separation
After transposition and docking, the crew will connect the umbilicals which will mate the CM and the LM electrical circuits, in Docking and Crew Transfer section. This electrical interface will enable the utilization of the integrated LDEC and LSSC for S-IVB/LM separation. The LM legs are secured to the SLA by clamps which are unlatched by ordnance devices.
Separation of the CSM From the LV
When the command service module (CSM) is to be separated from the LV either for nominal mission or abort requirements, the MESC and LDEC are utilized (Normal CSM/LV Separation Diagram). Manual controlled or automated circuits, whichever are utilized, will initiate explosive trains that will sever and jettison the SLA panels (SLA Panel Jettison Diagram).
Normal CSM/LV Separation Diagram

SLA Panel Jettison Diagram

CM-SM Separation and SM Jettison
Prior to the entry phase of a nominal mission, the MESC and LDEC will be utilized to separate the CM from the SM and the SMJC will automate jettisoning the SM (Normal CM-SM Separation and SM Jettison Diagram).
Normal CM-SM Separation and SM Jettison Diagram

Forward Heat Shield (Apex Cover)
Section 1 includes a description of the forward heat shield structure; automated and manual controlled circuits for jettisoning this heat shield are included in the integrated MESC, ELSC, and LDEC. Mechanization of apex cover jettison is accomplished by the use of thrusters and a drag parachute. The Forward Heat Shield Attachment and Thruster Assembly Diagram illustrates pressure cartridges installed in a breech. When gas pressure is generated by the pressure cartridges, two pistons will be forced apart and a tension tie will be broken. The lower piston will be forced against a stop and the upper piston will be forced out of its cylinder. The piston rod ends are fastened to forward heat shield fittings and the apex cover is forced away from the CM. Only two of the thruster assemblies have breeches and pressure cartridges installed and plumbing connects the breeches to thrusters mounted on diametrically opposite CM structural members; this constitutes redundancy.
Forward Heat Shield Attachment and Thruster Assembly Diagram

The Forward Heat Shield Separation Augmentation System Diagram illustrates the forward heat shield separation augmentation system. The mortar deployed drag parachute, as the name implies, is used to drag the apex cover out of an area of negative air pressure following the CM and will prevent recontact of the apex cover with the CM. Lanyard-actuated switches are used to initiate mortar pressure cartridges. A lanyard-actuated electrical disconnect will deadface the electrical circuitry involved after the drag parachute has been deployed.
Forward Heat Shield Separation Augmentation System Diagram

ELS Equipment
The apex cover must be jettisoned before the ELS equipment may be utilized. The ELS Equipment Diagram illustrates how the ELS equipment is installed beneath the forward heat shield. All parachutes are n1ortar-deployed to insure that they are ejected beyond boundary layers and turbulent air around and following the CM. An RCS engine protector prevents damage to CM RCS rocket engines by parachute risers. Parachute risers are also protected from damage by parachute riser protectors, which are spring-loaded covers over the LET attachment studs. The LES tower electrical receptacles are used to connect LET interface wiring, and the mating parts of the receptacles are pulled apart when the LET is jettisoned. A sea recovery sling will be removed from stowage by member s of the recovery team. Three uprighting flotation bags are installed under the main parachutes. A switch is provided for the crew to deploy the sea dye marker and swimmer umbilical any time after landing.
ELS Equipment Diagram

ELS Parachutes
Eight parachutes are used in the ELS parachute system (ELS Parachutes Diagram). The drogue and main parachutes are deployed in a reefed condition to prevent damage from transient loads during inflation. The ELSC will automate the deployment of these parachutes when activated by relay logic in the MESC. Switches are provided for the flight crew to disable the automation and deploy the parachutes by direct manual control.
ELS Parachutes Diagram

Reefing System
The drogue and main parachutes are reefed with lines rove through reefing rings, which are sewn to the inside of the parachute skirts and reefing line cutters (Reefing Line Cutter Installation Diagram).
Reefing Line Cutter Installation Diagram

When the suspension lines stretch, a lanyard will pull the sear release from the reefing line c utter, and burning of a time-delay compound will be started (Reefing Line Cutter Diagram). When the compound has burned, a propellant will be ignited and a cutter will be driven through the reefing line.
Reefing Line Cutter Diagram

Each of the drogue parachutes has two reefing lines with two cutters per line to prevent disreefing in case any one reefing line cutter should fail prematurely because a single reefing line cut in one place will disreef a parachute. Each of the three main parachutes has three reefing lines with two cutters per line. The time delay of four of the cutters on each main parachute (two lines) is 6 seconds. At this time the main parachutes will be allowed to open slightly wider than when deployed. The time delay of the remaining two cutters on each main parachute is 10 seconds. At this time the parachutes will be allowed to inflate fully.
Reefing line cutters are also utilized in the deployment of two very high frequency (VHF) antennas and one flashing beacon light during descent. These recovery devices are retained by spring-loaded devices which are secured with parachute rigging cord. The cord is rove through reefing line cutters and the sear releases are pulled by lanyards secured to the main parachute risers.
Design Criteria
Dual redundancy with manual backup has been employed in the design of the sequential system critical circuits. This ensures that in all cases the effects of a component failure, in the prime failure mode, will not:
a. Prevent system operation when required
b. Cause inadvertent system operation.
Circuit Concept
In most Apollo applications, premature operation of an ordnance system is hazardous to the crew and could cause loss of mission objectives. Identification and correction of single points of failure, therefore, are prime objectives in the SECS circuit concept. Elimination of single failures is accomplished by the addition of series contacts (dual) in each fi ring circuit. The probability of premature operation of an ordnance device has been greatly reduced by the utilization of series elements. On the other hand, the reliability of the firing network to· operate has been reduced. The overall firing circuit reliability is enhanced by the use of redundant firing circuits. E ach circuit is independent of the other with each output controlling its own ordnance component. Each of these redundant circuits is contained in independent systems which are designated systems A and B. The Circuit Concept Schematic illustrates one of the redundant systems of a typical firing network. This illustration also shows that some control circuits for sequential events utilize the same circuit concept.
Circuit Concept Schematic

FUNCTIONAL DESCRIPTION
Th e origin of signals and functions of the sequential systems are illustrated in the Sequential Systems Functional Block Diagram. Launch escape system (LES) aborts may be executed from the launch pad, or during a scent, until launch escape tower (LET) jettison. Prior to lift-off, LES abort signals are initiated by manual control only because the automatic abort circuits of the EDS are activated at lift-off. Thereafter LES aborts may be initiated by manual control or by automatic control during the period that the EDS automatic abort circuits are active. LES aborts are categorized as modes 1A, 1B, and 1C aborts. Service propulsion system (SPS) aborts are categorized as modes 2, 3, and 4 aborts and may be initiated after the LET has been jettisoned. No provisions are made to initiate SPS aborts automatically.
Sequential Systems Functional Block Diagram

Normal Mission Functions
In addition to control for aborts, the sequential systems provide for the monitoring of vital LV parameters and control for other essential mission functions as follows:
a. Sensing and displaying LV status:

  1. Thrust OK lights for all booster engines
  2. Angular rates excessive
  3. IU guidance failure
  4. S-II stage second plane separation (S- V launch vehicles only)
  5. LV propellant tank pressures
  6. Angle of attack.
    b. Receiving and displaying abort requests from ground stations.
    c. Jettisoning of the LET:
  7. Initiate ordnance devices that separate the LET from the CM
  8. Ignite T JM.
    d. Separation of the CSM from the S-IVB stage:
  9. Enable controller reaction jet on/ off assembly which provides automatic control of SM RCS engines. ·(Enable SM RCS/SGS. )
  10. Initiate ordnance devices that separate the SLA:
    (a) Initiate cutting and deployment of SLA panels
    (b) Separate SC/ LV umbilical
    (c) Separate LM/GSE umbilical.
    e. LM docking probe retraction on SC so equipped.
    f. Separation of LM from S-IVB stage: 1. Initiate ordnance devices that separate the LM legs from the SLA 2. Deadface LM pyro separation power 3. Initiate SLA/ LM umbilical guillotine.
    g. Separation of the LM docking ring on SC so equipped.
    h. Separation of the CM from the SM.
  11. Start SMJC:
    (a) Lock up fuel cell power to SMJC
    (b) Start -X jets of SM RCS
    (c) Start +roll jets of SM RCS
    (d) Stop +roll jets of SM RCS.
  12. Deadface CM-SM umbilical power.
  13. Pressurize CM RCS
  14. Transfer electrical power from SM RCS engines to CM RCS engines and deadface SMJC start signal
  15. Transfer entry and postlanding battery power to main d-c buses (main bus tie).
  16. Initiate separation ordnance devices:
    (a) CM-SM tension ties
    (b) CM-SM umbilical guillotine
  17. Deadface CM-SM separation pyro power (pyro cutout).
    i. Deployment of ELS parachutes:
  18. Activate ELSC
  19. Disable controller reaction jet on/ off assembly which inhibits automatic control of CM RCS engines (Disable CM RCS/SCS)
  20. Jettison apex cover
  21. Deployment of apex cover drag parachute
  22. Deployment of drogue parachutes
  23. Release of drogue parachutes
  24. Deployment of pilot parachutes -of the main parachutes.
    j. Deployment of recovery devices:
  25. Two VHF antennas
  26. One flashing beacon light.
    k. Burning of CM RCS propellants and pressurant.
    l. Postlanding functions:
  27. Release of main parachutes.
    Mode 1A Abort
    The functions of a mode 1A abort are:
    a. Relay booster engine cutoff (BECO) signal to the IU
    b. Reset and start the commander’s event timer
    c. Separation of the CM from the SM.
  28. Deadface CM-SM umbilical power
  29. Pressurize CM RCS
  30. Transfer electrical control from SM RCS engines to CM RCS engines
  31. Transfer entry and postlanding battery power to main d-c buses (main bus tie)
  32. Initiate separation ordnance devices:
    (a) CM-SM tension ties
    (b) CM-SM umbilical guillotine.
  33. Fire LEM and PCM
  34. Start automated rapid propellant dump (CM RCS propellant and pressurant jettison):
    (a) Initiate oxidizer dump
    (b) Initiate interconnect of A and B fluid systems
    (c) Close propellant shutoff valves
    (d) Initiate fuel dump
    (e) Initiate helium dump (purge).
    d. Deploy canards
    e. Deployment of ELS parachutes:
  35. Activate ELSC
  36. Disable controller reaction jet on/off assembly which inhibits automatic control of CM RCS engines (Disable CM RCS/SCS)
  37. Jettison LET
  38. Separate LM docking ring on spacecraft so equipped
  39. Jettison apex cover
  40. Deployment of apex cover drag parachute
  41. Deployment of drogue parachutes
  42. Release of drogue parachutes
  43. Deployment of pilot parachutes of the main parachutes.
    f. Deployment of recovery devices:
  44. Two VHF antennas
  45. One flashing beacon light.
    g. Postlanding functions: 1. Release of main parachutes.
    Modes 1B and 1C Aborts
    The functions of the modes 1B and 1C aborts are the same as those for a mode 1A abort with the following exceptions;
    a. Firing of the PCM is inhibited
    b. Automated rapid propellant jettisoning is inhibited. Propellants and pressurant of the CM RCS are disposed of as in a nominal entry and landing procedure.
    c. Enable controller reaction jet on/ off assembly which provides automatic control of CM RCS engines (Enable CM RCS/SCS).
    Modes 2, 3, and 4 Aborts
    The functions of the sequential systems portion of an SPS abort are;
    a. Relay BECO signal to the IU
    b. Reset and start commander’s event timer
    c. Initiate CSM direct ullage (+X translation)
    d. Relay signal to SCS to inhibit pitch and yaw rate stabilization
    e. Separate CSM from the LV:
  46. Initiate ordnance devices that separate SLA:
    (a) Initiate severance and deployment of SLA panels
    (b) Separate SC/ L V umbilical
    (c) Separate LM/GSE umbilical.
    f. Enable controller reaction jet on/ off assembly which provides automatic control of SM RCS engines (Enable SM RCS/SCS).
    OPERATIONAL DESCRIPTION
    The Sequential Systems Operational/Functional Diagram illustrates the operation and functions of the integrated sequential systems and zone references to this illustration are used in subsequent paragraphs. This is an operational /functional diagram and should not be misconstrued as an electrical schematic since many details of the electrical system are not included, i.e., ground returns are not shown except for the clarification of unique circuits. Also, initiator firing circuits are not complete in the operational/functional diagram. Circuit Concept Schematic illustrates that normally closed contacts of firing relays are utilized to short the initiator to ground and that all initiator firing circuits are protected with fusistors. All initiators are grounded by relay logic and fusistors are incorporated· even though the operational/functional diagram does not illustrate this feature. Generally, only one of the redundant systems is illustrated, which in this instance is system A; however, the redundant system is included when the two are not identical. Numerous crossover networks are illustrated where vital functions are concerned; in these instances, systems A or B components will activate and/or initiate the discrete requirements. Interface with other systems is limited to the effect the interfacing system has on sequential systems.
    Sequential Systems Operational/Functional Diagram

Logic Power (Zones 43- A and – B)
The source of logic power for the sequential systems is entry and postlanding batteries A, Band C which are described in Electrical Power Section. Utilization of the circuit breakers in these power circuits is also described in the electrical power section.
Arming Sequential Systems Logic Circuits (Zones 38 and 39-C and D)
Tl1ree circuit breakers are utilized in the system A sequential systems logic arming circuits, and their counterparts (not illustrated) are utilized in the system B circuits. The system A circuit breakers are ELS BAT A (CB 45), SEQ EVENTS CONT SYS LOGIC A BAT A (CB 3), and SEQ EVENTS CONT SYS ARM A BAT A (CB 1). The SEQ EVENTS CONT SYSTEM LOGIC switches 1 and 2 (S11 and S15) are two pole lever- lock switches and their function is SECS logic arming. When either of these switches is closed, the MESC LOGIC ARM relays will be energized in systems A and B and the MESC logic buses of both systems will be armed if the breakers of systems A and B have been closed.
Pyro Power (Zones 38 through43 – E and – F)
Normally the source of pyro power is pyro batteries A and B; however, entry and postlanding batteries may be used as backup sources of pyro power. Closure of SEQ A or B circuit breakers, (CB 16 or 17), zone 41 -E, will complete battery power circuits to pyro system A or B. The condition of the pyro batteries may be determined by the use of a d-c voltmeter (M10) and selector switch (S27), zones 40, 41-E, and -F. If the voltage of either of the pyro batteries should be too low for crew safety, entry battery power may be utilized. Opening the appropriate PYRO/SEQ circuit breaker and closing the appropriate BAT BUS TO PYRO TIE circuit breaker (CB 18 or 19), zones 41-D and -E, will execute the selection, of backup power
Arming Pyro Buses (Zones 38 and 39-E and -F)
The system A SECS pyro buses are armed with a motor switch in the LDEC primarily for power conservation. When the motor is driven to either position, power is not required to hold the switch contacts in the selected position. The PYRO ARM s witch (S10), zone 38-C, is used to control the LDEC motor switch (Kl), zones 39, 40-E, and -F. Contacts of the motor switch control power to the LDEC, RCSC, and MESC pyro buses. Pyro power for the ELSC is derived from the MESC pyro bus. ,
SIVB/ LM Separation (Zone 39-F)
Two circuit breakers are incorporated in the pyro power systems that are required to separate the LM from the SIVB stage. When mission requirements include this function, it will be necessary to close the SIVB/ LM SEP, PYRO A, and/ or PYRO B circuit breakers (CB 3 or CB 4).
Main Parachute Release (Zone 37-E)
Two circuit breakers are incorporated in the pyro power systems that are required to release the main parachutes from the CM. This is a design change to eliminate the hazard of main parachute release during descent. Closure of MAIN RELEASE, PYRO A and/ or PYRO B circuit breakers (CB 48 or CB 49), should be accomplished as a postlanding operation only.
EDS Bus Changeover. (Zones 36, 37-A, and-B)
Battery C provides an alternate power source for the automatic initiation of an abort in the EDS and LET separation functions. These circuits are normally powered by batteries A and B. This is accomplished by the EDS bus changeover circuits in each MESC. Closure of the EDS POWER switch (S1), zones 37-A and -B, energizes EDS CHANGEOVER relays. When these relays are energized, battery A is coupled to system A and battery B is coupled to system B. In the event of a power failure in either system A or B, the relay logic will remove the existing battery and couple battery C to the system which had a power failure.
Lift-Off
The lift-off originated in the IU, zones 34 – A and -C, is the result of two L/V events:
a. Thrust commit activates lift-off enable circuitry when the first stage LV engines are producing the required level of thrust.
b. Disconnection of the IU umbilical will drop out lift-off holding circuits, which, in turn will switch the lift-off signal power to the CSM. The umbilical will be disconnected at the instant of actual lift-off.
If the appropriate circuit breakers and switches are in the configuration intended for a nominal launch the lift-off signal will initiate five events, zones 29 through 32-C and -D:
a. Reset and start event and mission timers (two each).
b. Start the automatic PROPELLANT DUMP AND PURGE DISABLE timer
c. Illuminate the white LIFT OFF light
d. Provide power to illuminate the red NO AUTO ABORT light in the event the MESC automatic abort circuits are not enabled
e. Enable the MESC automatic abort circuits by energizing the AUTO ABORT ENABLE relays.
Emergency Detection System
The LV EDS monitors critical parameters associated with LV powered flight. Emergency conditions associated with these parameters are displayed to the crew on the MDC to indicate necessity for abort action. An additional provision of this system is the initiation of an automatic abort in the event of certain extreme time critical conditions, listed as follows:
a. Loss of thrust on two or more engines on the first stage of the LV.
b. Excessive vehicle angular rates in any of the pitch, yaw, or roll planes.
Concurrent with abort initiation (either manual or automatic), the system provides BECO action except for the first 30 seconds of flight in the case of a S-V LV. Range safety requirements impose the time restrictions.
EDS Automatic Abort Activation and Deactivation. (Zones 35 and 36-C through -E)
The EDS automatic abort circuits in the CSM are activated automatically at lift-off and deactivated automatically at LET jettison. Switches are provided on the MDC to deactivate the entire automatic abort capability or the TWO ENGINES OUT and EXCESSIVE RA TES portions of the system independently. Deactivation of the two automatic abort parameters are also accomplished automatically in the IU just prior to inboard engine cutoff (IECO) as a backup to the manual deactivation by the flight crew.
Launch Vehicle Status
The electrical circuits that provide illumination power and control the LV status lights are in the IU. The LV RATE light, zones 24 and 25, will illuminate when LV roll, pitch, or yaw rates are in excess of predetermined limits. To indicate· loss of attitude reference in the IU guidance unit, the red LV GUID and the LV RATE lights illuminate during first stage boost, then only LV GUID will illuminate. The yellow LV ENGINES lights illuminate when a respective LV operating engine is developing less than the required thrust output. The engine lights provide four cues: (1) ignition, (2) cutoff, (3) engine below thrust, and (4) physical stage separation. A red SII SEP light will illuminate at SII first-plane separation and is extinguished at second.-place separation on vehicles launched with an S-V booster. Each of these status lights has an A and. B redundant circuit operation with separate lamps in each circuit.
Abort Request Light (Zone 31-E)
The ABORT light, is a red lamp assembly containing four bulbs that provide high-intensity illumination. Two bulbs are in system A, a n d two are in system B . The ABORT light is illuminated if an abort is requested by launch control center for a pad abort or an abort during lift-off via up-data link (UDL). The ABORT light can be illuminated after lift-off by the range safety officer transmitting a DESTRUCT ARM COMMAND, zone 33-E. An abort may also be requested via UDL from the manned space flight network (MSFN). The ABORT lamps, systems A and/or B may be extinguished by UDL reset commands; however, the flight crew can extinguish the lamps in system B only with the UP TELEMETRY COMMAND switch (S 39), zones 27 through 30-E and -F.
Launch Vehicle Tank Pressure Monitor
A time-shared display is used to indicate LV propellant tank pressures and SPS gimbal position, zones 30 and 3 1-E and -F. The L V/SPS IND selector s witch (S53), zone 32-F, is used to select the parameters to be displayed. Meter movement selector switches and operational power circuits are included in the STABILIZATION AND CONTROL SYSTEM section.
LV Auto Abort Logic
The EDS will automatically initiate an abort signal when two or more first stage engines are out, zone 34-D, or when L\T excessive rates are sensed by gyros in the IU, zones 34-C and -D. These abort signals will energize an ABORT BUS which will energize AUTO ABORT INITIATE relays, zones 33-C and -D. When the AUTO ABORT INITIATE relays in the IU are energized, the auto abort voting relays in the MESC are deenergized, MESC Auto Abort Voting Logic. Three matrices of relay contacts, each of which constitutes 2 of 3 voting logic, are in the abort signals to the ABORT BUS and the function s of these relays are automatic abort deactivate, EDS Automatic Abort Activation and Deactivation, zones 34-C and -D. The source of power to energize the AUTO ABORT DEACTIVATE relays is in the IU, zones 36-C, -D and -E, and may be controlled by switches in the CM. If the 2 ENG OUT switch (S64), zone 36-E, is placed in the OFF position, the 2 ENG OUT AUTO ABORT DEACTIVATE relays will be energized and the 2 engines out signal from the first stage will be inhibited from initiating an automatic abort. If the LV RATES switch (S65), zone 36-D, is placed in the OFF position, the EXCESSIVE RATES AUTO ABORT DEACTIVATE relays will be energized and the abort signals from the IU gyros will be inhibited from initiating an automatic abort.
MESC Auto Abort Voting Logic
When the EDS bus changeover circuits are energized (EDS Bus Changeover. (Zones 36, 37-A, and-B)), three hot wire loops are established between the CM and LV. Power from the EDS buses l, 2, and 3 energize the EDS ABORT relays 1, 2, and 3 in the MESC, zones 31 and 32-A and – B. The three legs of E DS bus power are through three matrices of relay contacts of the AUTO ABORT INITIATE relays (LV Auto Abort Logic), zones 33-A through -D. When an automatic abort is initiated in the IU the EDS ABORT relays in the MESC are de-energized, this constitutes three abort votes in the MESC. The MESC A 2 of 3 voting logic is illustrated with matrices of EDS ABORT relay contacts, zones 30 and 31-A. The automatic abort signal through this voting logic is described in Aborts

Launch Escape Tower Physically Attached
One of the requirements for the automatic abort circuits to be enabled is to have the LET physically attached to the CM (Launch Escape Tower Assembly Diagram). Another requirement is logic power to the circuits associated with tower attachment. The power may be from the EDS bus changeover circuits (EDS Automatic Abort Activation and Deactivation) or from the MESC LOGIC bus (Arming Sequential Systems Logic Circuits). The LET PHYSICAL SEPARATION M0NITOR relays, zone 25-F, have ground wires routed through the tower legs. One pair of contacts of these relays is in the holding circuit to the AUTO ABORT ENABLE relays (Auto Abort Enable), zone 31-D. An automatic abort is impossible after the tower has been jettisoned because the AUTO ABORT ENABLE relays will have been de-energized.
Auto Abort Enable
The last requirement for an abort initiate signal to be automated is to have the MESC automatic abort circuits enabled. If the EDS switch (S67), zone 29-D, is in the AUTO position, a lift-off signal (Lift-Off) from the IU will enable these circuits. Relay logic in the automatic abort enable circuits are designed to establish holding circuits on battery bus power. These holding circuits are required to maintain the automatic abort circuits in an enabled state since the lift-off signals are discontinued from the IU at IECO. For the holding circuits to be established, power must be made available from the SECS LOGIC CB3 (Arming Sequential Systems Logic Circuits), and the LET must be physically attached and electrically mated (Launch Escape Tower Physically Attached). Normally closed contacts of the system B AUTO ABORT ENABLE relays are installed in the negative return of the red NO AUTO ABORT light. Therefore, when the automatic abort circuits are enabled, the red NO AUTO ABORT light will not be illuminated. The LIFT OFF and NO AUTO ABORT lights are combined in an illuminated pushbutton (IPB) which is the only illuminated switch in this group. Illumination of the red light would be tl1e indication that complete enabling of both systems had not been established. If the white LIFT OFF light should not illuminate at lift-off, the most probable cause would be a failure of both lift- off signals in the IU. In this event, the IPB should be depressed momentarily to allow the automatic abort circuits to be enabled from the alternate battery bus power source; neither of the lights would be illuminated in this instance.
Normal Ascent
The Event Profile, Normal Ascent S-V LV illustrates the normal ascent for S-V launch vehicles.
Event Profile, Normal Ascent S-V LV Diagram

At + 42 seconds, the ABORT SYSTEM PRPLNT switch (S63), zone 20-B, will be changed from the DUMP AUTO position to the RCS CMD position. The DUMP AUTO contacts of the switch are in series with contacts of the PROPELLANT DUMP AND PURGE DISABLE timer which was started at lift-off (Lift-Off). Additional information relative to this time delay and procedural switching is included in the RCS section, RCS.
Angle of Attack Monitor. (Zones 35 through 37-E and -F)
A Q-ball (EDS Q Ball Diagram) mounted above the LES motors, provides an electrical signal input to the LV AOA/SPS Pc indicator and an electrical signal input to ground control via telemetry. The Q-ball has eight static ports for measuring ΔP which is a function of angle of attack. The pitch and yaw ΔP signals are electronically vector-summed in the Q-ball and displayed on the indicator. The indicator is monitored for the LV AOA function during ascent when the LV is at or near the max Q region. This is a time-shared instrument with the service propulsion system (SPS), and the 150-percent graduation is because of SPS start transients. Use of the scale during the LV AOA period will be as a trend indicator only with abort limits established in mission rules.
EDS Q Ball Diagram

EDS Automatic Abort Deactivate
The entire automatic abort capability or a portion of the circuits may be deactivated by the flight crew prior to staging (EDS Automatic Abort Activation and Deactivation). If the EDS switch (S67), zone 29-D, is switched to the OFF position, the entire EDS automatic abort capability will be deactivated (Auto Abort Enable). If the 2 ENG OUT switch (S64) and/or LV RATES switch (S65) are switched to the OFF position, the appropriate automatic abort parameter will be deactivated (LV Auto Abort Logic). Automated switching in the IU SWITCH SELECTOR, zone 35-E, will also deactivate the two automatic parameters as a part of the staging sequence.
Extinguish LIFT OFF and NO AUTO ABORT Lights
Just before IECO, the LIFT OFF ENABLE INHIBIT relay contacts in the IU are opened, zones 34-A and -C. This interrupts EDS bus power which is required to illuminate the lamps of the LIFT OFF and NO AUTO ABORT displays; If the EDS switch (S67) is used to deactivate the EDS automatic abort circuits (EDS Automatic Abort Deactivate), the NO AUTO ABORT lamps will have been illuminated and will be extinguished at this time. When the EDS bus power is interrupted by this IU relay logic, the mission and event timers, which were started at lift-off, will continue to operate because of internal holding circuits in these units.
Launch Escape Tower Jettison
After staging, the LET is jettisoned (Normal Tower Jettison Diagram). Normally, both of the TWR JETT switches (S66 and S96), zone 26-F, will be used to initiate this function; however, either one of the switches will initiate systems A and B tower jettison circuits. Each of these switches, No. 1 and 2, are double pole switches and system A logic or EDS changeover power will enable one of the poles of each switch. Moreover, one pole of each switch will activate the circuits of system A and the other pole system B. The frangible nuts which attach the tower legs to the CM are illustrated in the Tower Separation System Diagram. Each nut assembly includes two detonators, one initiated by system A circuits, and the other by system B. The tower jettison circuits will also ignite the TJM. The cue which the flight crew will use when initiating LET jettison is the S- 11 SEP light. Utilization of the event timer in conjunction with the visual light cue will enable the crew to jettison the LET at the correct time. If the TJM should fail to ignite, an alternate method may be used to jettison the LET. The LES MOTOR FIRE switch (S31), zone 19- C, will ignite the LEM which is flight-qualified to jettison the LET. If this alternative should be necessary, it is vital that the detonators of the frangible nuts shall have been initiated before the LES MOTOR FIRE switch is depressed. Th e TWR JETT switches are the only controls that will initiate the detonator s of the frangible nuts.
Normal Tower Jettison Diagram

Tower Separation System Diagram

Separation of the Spacecraft From the Launch Vehicle
The next maneuver that the sequential systems will be utilized to perform is CSM/LV separation (Adapter Separation System Diagram). Closing the CSM/LV SEP switch (S35), zone 10-B, will energize the CSM/LV SEPARATE relays, which will fire initiators of the explosive trains that sever and jettison the SLA panels . The same explosive train will separate the CSM/LV and LM/GSE umbilicals.
Adapter Separation System Diagram

Enable Automated Control of the SM RCS
The CSM-LV SEPARATE relay will, in addition to initiating the explosive train, energize the RCS ENABLE ARM relays, zone 8-A, which, in turn, will energize the latching coils of the RCS ENABLE relays, zone 7-A. This relay logic will enable the controller reaction jet on/off assembly which couples the SCS jet selection logic and SM RCS, RCS section.
Docking Probe Retraction
This system is designed for two retractions with backup for each. Since there are four retraction cylinders, however, four retractions are possible under ideal circumstances.
The DOCK PROBE RETRACT PRIM and/or SEC switches (S2 and S3), zones 13-E and -F, are armed when four conditions are satisfied. These are:
a. The appropriate buses are energized and the appropriate circuit breakers are closed, zones 15-E and -F.
b. The EXTEND/REL switch (S1), zones 14-E and -F, is in the RETRACT position.
c. The latch indicating switches in the docking ring latches are closed (system A and/ or B as required).
d. The capture latches sensing switches are closed (probe head latched in LM drogue).
When these conditions are satisfied, the DOCK PROBE RETRACT switches may be utilized to energize the L M DOCKING PROBE RETRACT No. 1 and 2 relays as required. Contacts of these relays will fire the initiators and retraction will be executed.
Separation of LM From S-IVB
Pyro power circuits to the LSSC include a circuit breaker which is described in SIVB/LM Separation (Zone 39-F). The S-IVB /LM SEP PYRO A circuit breaker (CB3), zone 39-F, must be closed to complete the system A LSSC pyro circuit. The LDEC is also required in this automation.
Closing the S-IVB/LM SEP switch (Sl08), zone 18-E, will start the following sequence:
a. The LM/SLA SEP (LM LEGS) relays of the LSSC, will be energized and their contacts-will fire the initiators of the frangible links which retain the LM legs.
b. The nonlatching relay and the latching coils of the latching relay of the LM/SLA SEP INITIATE relays in the LSSC will be energized after a time delay of 30 milliseconds.
c. The LM/SLA SEP (GUILLOTINE) relays of the LSSC, will be energized after a time delay of 30 milliseconds.
Contacts of the LM/SLA SEP INITIATE relays will deadface LSSC pyro power which was utilized to fire the frangible links of the LM legs. Contacts of the system B LM/SLA SEP INITIATE relays are in the system A deadfacing circuits for series/parallel redundancy; system A contacts are utilized in system B (not illustrated) for the same reason.
LDEC pyro power fires the umbilical guillotine through contacts of the LM/SLA SEP INITIATE relays in the LDEC and the LM/SLA SEP (GUILLOTINE) relays in the LSSC. Deadfacing of LDEC pyro power is accomplished when the switch is allowed to return to its maintain position and the relay coils are de-energized. The contacts of the nonlatching relays will return to their initial state but the contacts of the latching relay will not revert to their initial positions.
LM Docking Ring Separation
Logic power through the momentary contacts of either of the CSM/LM FINAL SEP switches (S109 or S112), zone 26-D, will energize the LM DOCKING RING FINAL SEPARATION relays in the LDEC. These are the firing relays for the ordnance which severs the docking ring from the CM tunnel.
Nominal Pre-entry and Descent
Arming the SECS is the first requirement of the sequential systems preparatory to a nominal entry and descent (Logic Power and Pyro Power). If mission rules require a checkout of the CM RCS prior to CM/SM separation, it is vital that electrical control of the RCS be placed in the SM RCS configuration prior to initiating the separation (Jettisoning the SM (Zones 19 through 22-E and -F)). The Event Profile, Nominal Pre-Entry and Descent Diagram illustrates a nominal pre-entry and descent profile.
Event Profile, Nominal Pre-Entry and Descent Diagram

CM/SM Separation Control
When either of the CM/SM SEP switches (S110 or S111), zones 24-C and -D are closed, logic power will start the automated sequence of CM/SM separation. Each of these switches, No. 1 and 2, is a doublepole switch with one pole controlling system A components and the other pole controlling system B components. When either or both of these switches are utilized for CM/SM separation, they should be held closed for approximately 0.1 of a second to allow the time-delay relay logic to function properly (Pyro Cutout).
Jettisoning the SM (Zones 19 through 22-E and -F)
A manually initiated CM/SM separation signal will start the SMJC with logic battery power through contacts of the RCSC motor switch (S1), z one 23-E. The motor switch must be in the SM control position for the start signal to activate the SMJC (Nominal Pre-entry and Descent). Latching relays are utilized to couple fuel cell electrical power to the SMJC and to energize the manual coils of the SM RCS-X engines. Fuel cell power to the SMJC is through contacts of motor switches, zones 23-E and -F, which are described in Electrical Power Section. The control circuits in the SMJC constitute a crossover network; either system A or B will energize the manual coils of both of the SM RCS redundant engine systems. The +roll engines will be started 2.0 seconds after the SMJC is started and will operate f or 5.5 seconds. The -X translation engines will continue to burn until the propellants are depleted or the fuel cells are expended, whichever occurs first.
Deadfacing the CM-SM Umbilical
Closure of either of the CM/SM SEP switches will energize the CM/SM DEAD FACE relays to the MESC, zone 23-C. These relays are utilized to initiate the ordnance devices of the CM-SM electrical circuit interrupter (CM-SM Electrical Circuit Interrupter Diagram) and the SM circuit interrupter (CM-SM Umbilical Assembly Diagram). These relays may be considered as pilot relays to the automation of other CM-SM separation functions which includes interface with the CM-RCS.
CM-SM Electrical Circuit Interrupter Diagram

CM-SM Umbilical Assembly Diagram

Separation of the CM From the SM
When the CM-SM SEPARATE relays in the MESC are energized after a time delay of 0.1 second, ordnance devices required for CM-SM separation are initiated. These are the guillotine blades of the CM-SM umbilical assembly (CM-SM Umbilical Assembly Diagram) and three tension ties between the CM and SM structures (CM-SM Separation System Diagram). The time delay is required in this circuit so that the guillotine blades will cut wires which were deadfaced (Deadfacing the CM-SM Umbilical).
CM-SM Separation System Diagram

Pyro Cutout
The pyro cutout circuits are incorporated to eliminate the possibility of draining pyro power through wiring which may have one or two strands shorted by umbilical blades, or any other high resistance short. Fusis tors afford protection against “dead shorts” (Circuit Concept and OPERATIONAL DESCRIPTION). The PYRO CUTOUT relays, zone 20- B, are energized 1. 7 seconds after the CM-SM SEPARATE relays. Contacts of the PYRO CUTOUT relays are in the logic circuits to the CM-SM DEADFACE relays, zone 23-D. Contacts of the PYRO CUTOUT relays are also in the pyro circuits to the initiators that are expended in the separation sequence, zones 20 through 23-C and -D. This relay logic is an arc suppression system since electrical energy is removed from initiator firing relay contacts at the time they return to their normal state. When the CM/SM SEP switch is released it will return to its normally open state and all relays in this logic, including the PYRO CUTOUT relays, will be de-energized.
CM RCS Interface
Any time a CM-SM separation signal is initiated in the MESC, a signal is automated for the initiation of two CM RCS functions. These are:
a. Fluid systems pressurization, zones 21 through 23-A and -B. The system 1 CM-RCS PRESS relay logic provides firing circuits to one of the HELIUM SQUIB ISOLATION valves in each of the redundant fluid systems of the CM RCS system.
b. Transfer electrical control from the SM RCS to the CM RCS, zones 18 through 20-A and -B. RCS CM-SM TRANSFER relay logic in the RCSC will drive the transfer motor switch to the SM position. Moreover, contacts of the motor switch are utilized to deadface the SMJC start signal, zone 23-E. There is a time delay of approximately .50 milliseconds in this deadfacing function which is explained as the time it takes the motor switch contacts to change state.
Main Bus Tie
Relay logic of the RCSC, zones 11 through 13-C and -D, will couple ENTRY A ND POSTLANDING batteries A, B and C to the main buses providing certain circuit breakers and switches of the electrical power system are in the correct position for this automation.
Arm ELSC
Closure of the ELS LOGIC switch (S44), zone 10-D, will complete logic power circuits to redundant transistorized switches in the MESC. These solid state switches function as a pair of AND gates, each of which requires two inputs to emit. One of the inputs is satisfied when the logic power circuits are completed.
Activate ELSC
Logic power circuits to the ELSC, including ground returns for the components in this controller, are not completed until the ELSC ACTIVATE relays in the MESC are energized, zone 8-C. The solid state switches (Arm ELSC) control the logic power required to energize these relays. Assuming that the ELS switch (S63), zone 8-E, is in the AUTO position, closure of the 24,000 FT BARO SWITCHES will satisfy the second input to the solid state switches. Logic power in this instance is derived from a point between the ELS LOGIC switch and the solid state switches. It is wired, through a resistor, to a point between the redundant baro switches. Both baro switches will be closed at the same time and the reduced logic power because of the resistor, will be sufficient to trigger the solid state switches; however, the reduced logic power is not sufficient to energize relay coils of the ELSC. When the ELSC ACTIVATE relays are energized, another crossover network is established; system B relay logic will establish holding circuits to the system A relays; moreover, system B relay logic can energize system A relays.
24,000 ft Baro Switch Lock Up
In addition to activating the ELSC (Activate ELSC), closure of the 24,000 FT BARO SWITCHES will energize the 24,000 FT LOCK UP relay in the ELSC, zone 7 -D. This relay logic, together with the system B counterpart, will establish logic power holding circuits which bypass the 24,000 FT BARO SWITCHES.
Disable CM RCS/SGS
A signal is relayed to the unlatching (disable) coils of the R CS/ SCS ENABLE relay, zone 7- A, when the ELSC is activated (Arm ELSC). This relay logic disables the controller reaction jet on/off assembly (RCS Section).
Apex Cover Jettison
When the ELSC has been activated (Activate ELSC), the first function that will be automated is apex cover jettison (Earth Landing System, Normal Sequence Diagram).
Earth Landing System, Normal Sequence Diagram

The APEX COVER JETTISON relays in the MESC are energized after a time delay of O .4 second, zones 5 and 6-E. The holding circuits of these firing relays are one of the numerous crossover networks described in paragraph OPERATIONAL DESCRIPTION. The ordnance devices which are initiated in this function are described in paragraph Forward Heat Shield (Apex Cover). In addition to initiating the ordnance devices, this relay logic will also arm lanyard-actuated switches, zone 5-F, which are used to deploy the apex cover drag parachute. The lanyard pulls holding pins from the switches which, because of spring loading, will close circuits. Closure of these switches will energize the DRAG PARACHUTE DEPLOY relays in the MESC which initiate the drag parachute mortar.
Deployment of Drogue Parachutes
The DROGUE IGNITER relays in the ELSC and PCVB, zones 4 and 5-D, are energized by ELSC ACTIVATE relay logic (Activate ELSC) after a time delay of 2 seconds. Another crossover is established in this relay logic wherein the systems A and B PCVB relays cross-couple each other with holding circuits. Moreover, each system initiates ordnance devices of both systems.
Deployment of Main Parachutes and Release of Drogues
Closure of the 10, 000 F T BARO SWITCHES, zone 6-C, will energize the PILOT CHUTES AND DROGUE RELEASE relays in the ELSC and the PCVB. The PCVB relays in this logic are again cross-coupled, systems A and B, into crossover holding circuits. The ordnance initiator circuits are also arranged into a crossover network.
Burning of the CM RCS Propellants
Switches in the CM RCS, zones 40-C and -D, are used to energize the direct coils of ten CM RCS jets, zones 15 and 16-A. The correct utilization of these switches is described in the RCS Section.
Release of Main Parachutes
Closure of the MAIN.RELEASE switch (S71), zones 4 and 5-C, will energize the MAIN CHUTE RELEASE relays in the PC VB. These relays are used to initiate ordnance which will drive cutter chisels through the main parachute risers (Parachute Disconnect (Flower Pot) Diagram).
Parachute Disconnect (Flower Pot) Diagram

Aborts
Abort signals may be initiated manually by rotating the commander’s translation hand control counterclockwise into a de tent. Two cam-operated micro switches, zone 31-B, are included in the control. Batt. power through these switches will energize the BOOSTER CUTOFF AND LES OR SPS ABORT START RELAYS in the MESC, zone 29-A.
These relays may also be energized by an EDS automatic abort signal (MESC Auto Abort Voting Logic) through 30-millisecond time delays. The reason for the time delays is to insure against spurious signals initiating an abort. EDS bus changeover power (EDS Bus Changeover. (Zones 36, 37-A, and-B)) is utilized to energize the BOOSTER CUTOFF AND LES OR SPS ABORT START relays in the event of an EDS automatic abort. Any ab ort signal will automate two functions which are common to all abort sequences. These are:
a. BECO, zones 27 and 28-A and -B, is inhibited by IU relay logic until T + 30 seconds in the S-V LV configuration because of range safety requirements.
b. Reset and start the commander’s event timer, zone 27-D. It is necessary for the EVENT TIMER START switch (S5 6), zone 32-C, to be in the CENTER ON position for this function to be automated.
Abort Start. (Zones 27 and 28-C and -D)
Two pairs of LET PHYSICAL SEPARATION MONITOR relay contacts (Launch Escape Tower Physically Attached) are in the abort start relay logic. One pair is normally closed and the other is normally open. The state of these contacts at the time an abort is initiated will determine whether an LES or SPS abort is automated in the sequential systems. When the BOOSTER CUTOFF AND LES OR SPS ABORT START relays are energized (Aborts), the LES ABORT relays may or may not be energized; if they are energized, an LES abort will be started if not, an SPS abort will be started.
LES Abort Start
Initially the sequential events of all LES aborts are identical. In addition to the functions that are common to all aborts (Aborts), separation of the CM from the SM is automated. The automated CM/SM separation sequence is the same as the manually initiated separation sequence described under nominal pre-entry, entry, and descent (Nominal Pre-entry and Descent) with two exceptions which are:
a. The SMJC is not started when the separation sequence is started by a LES abort signal, zone 24- D.
b. In an LES ABORT the CM/SM separation sequence includes the firing of the LEM, zones 14 through 21 – C.
Mode 1A Abort
A mode 1A abort (Event Profile, Mode 1A Abort Diagram) is initiated prior to the expiration of the PROPELLANT DUMP AND PURGE DISABLE TIMER (TDl) in the RCSC, zone 18-B. This time-delay relay logic is started.at lift- off (Lift-Off) providing two conditions are satisfied. These are :
a. The RCSC motor switch (S1), zone 19-A, must be in the SM RCS control position (as illustrated).
b. The CM RCS LOGIC switch (S46), zone 40- D, must be in the CM RCS LOGIC position.
Event Profile, Mode 1A Abort Diagram

A pair of latching contacts, which are closed when the timer is reset by GSE, are in series with the PRPLNT DUMP AUTO contacts of the ABORT SYSTEM PRPLNT switch (S63), zone 20-B. When this switch is in the PRPLNT DUMP AUTO position, and before the timer contacts are opened, the requirements peculiar to a mode 1A abort may be automated. These are:
a. The PCM is fired by the same relay logic that ignites the LEM, zone 19-D. Logic power for energizing the PCM firing relays is derived through the closed contacts of the PROPELLANT DUMP AND PURGE DISABLE timer, zone 19-B.
b. The OXIDIZER DUMP RELAYS, zone 17-B, are energized immediately with an abort initiate signal resulting in four CM RCS functions:
(1) closure of the PROPELLANT SHUTOFF valves, zone 14-A;
(2) energization of the INTERCONNECT AND PROPELLANT BURN relays, zones 16 and 17-A;
(3) initiation of the OXID PUMP squib valves, zone 13-B;
(4) initiation of the HELIUM and OXID INTERCONNECT squib valves, zones 13 and 14-A. The FUEL INTERCONNECT squib valve is initiated by the B system relay logic of the SECS.
c. Five seconds after the abort initiate signal, the FUEL DUMP squib valve, zone 14-B, is initiated by time-delay relay logic in the RCSC, zone 16-B.
d. Thirteen seconds later, or 18 seconds after the abort initiate signal, the FUEL AND OXID BYPASS RELAYS are energized, z one 15-B. This tirr1e-delay relay initiates the squib valves which will purge the CM RCS fluid systems in addition to depleting the pressurant, zone 13-A.
Canard Deploy and ELSC Arm
Eleven seconds after the initiation of any LES ABORT, canard deployment is automated, zones 25 and 26-C and -D. This relay logic will also arm the ELSC, zone 10-D. Contacts of the CANARD DEPLOY relay are incorporated parallel to the ELS LOGIC switch (S44) which must be in the OFF position during the launch and ascent phases of a mission. When arming of the ELSC is automated, through 3.0-second time delays, the same functions which are described in Arm ELSC will result.
ELSC Operation
Functions of the ELSC may be initiated by baro switches time delay relay logic or direct manual control. Baro switches are opened and closed by aneroid cells and are calibrated to close at approximately 24,000 and 10,000 feet during a nominal entry. During a nominal launch and ascent the 10, 000-foot baro switches will open at approximately 18,000 feet and the 24,000-foot baro switches will open at approximately 40,000 feet. This is the result of several variables which include spacecraft velocity, attitude, and atmospheric conditions. During a mode 1 A abort, for example, closure of CANARD DEPLOY relay contacts, zone 10-D, will not only arm the ELSC but will also activate it because the 24,000-foot baro switches will be closed in this instance. When the ELS ACTIVATE relays, zone 8-C, are energized, a signal will be relayed from a point starting at zone 7-D to the LET JETTISON AND FRANGIBLE NUTS relays, zone 26-F. This results in automatic LET jettison and, if the spacecraft is equipped with a docking probe, LM docking ring separation, zones 24 through 26-D and – E. Also, when the ELS ACTIVATE relays are energized, a signal will be relayed from a point starting at zone 7-E to the unlatching coils of the RCS ENABLE-DISABLE RELAYS, zone 7-A. This disables automatic control of the CM RCS. Time-delay relay logic is incorporated in the integrated MESC and ELSC, zones 6-C through -E, to automate the required functions at the lower altitudes before the baro switches are opened. The APEX COVER JETTISON relays, z one 5-E, will be energized 0.4 seconds after the ELSC is activated. DROGUE IGNITER relays, zones 4 and 5-D, will be energized 2. 0 seconds after the ELSC is activated, or 1. 6 seconds after the apex cover is jettisoned. PILOT CHUTES & DROGUE RELEASE relays, zone 5-B, will be energized 14. 0 seconds after the ELSC is activated, or 12. 0 seconds after the drogue parachutes are deployed. If the ELS switch (S63), zone 8-E, is placed in the MAN position, the automated functions of the integrated MESC and ELSC will be disabled. This switching inhibits the solid state switches (Arm ELSC) which prevents activation of the ELSC. In the event of a worse case abort, automatic deployment of parachutes could result in landing in an unsafe area and direct manual control of ELS functions would be required. The direct manual switches, zones 6-B through -E, may be used to jettison the apex cover, deploy drogue parachutes, release drogue parachutes, and deploy the pilot parachutes of the main parachutes.
LES Abort Mode Switchover
A configuration change is made in a portion of the SECS when the ABORT SYSTEM PRPLNT switch (S63), zone 20-B, is placed in the RCS CMD position. Normally this switching is concurrent with the expiration of the PROPELLANT DUMP AND PURGE DISABLE timer (Normal Ascent). Requirements peculiar to a mode IA abort (Mode 1A Abort) are inhibited at this time and the requirements of any other mode abort, or a nominal mission, will be automated as a part of the CM/SM separation sequence. When the latching coils of the RCS ENABLE-DISABLE relays are energized, zone 7-A, the controller jet on/off assembly is enabled. This makes automatic control of the CM RCS possible (RCS section).
Mode 1B Aborts
Mode 1B aborts may be categorized according to the altitude at which the abort is initiated. The Event Profile, Mode 1B Abort T+42 Sec to 30,000 Feet illustrates the profile of an abort initiated after abort mode switchover (paragraph 2. 9. 4. 14. 5) and before reaching an altitude of approximately 30, 000 feet. Figure 2. 9-35 illustrates the profile of an abort initiated between the approximate altitudes of 30, 000 and 100, 000 feet. Part of the ELSC functions (items 12 through 17 of the Event Profile, Mode 1B Abort T+42 Sec to 30,000 Feet) are automated by time-delay relay logic (ELSC Operation) during mode 1B aborts initiated at the lower altitudes.
Event Profile, Mode 1B Abort T+42 Sec to 30,000 Feet

All of the ELSC function s are automated by normal baro switch operation (items 13 through 18, of the Event Profile, Mode 1B Abort ˜̴ 30,000 Feet to 100,000 Feet Diagram) during mode 1B aborts initiated at the higher altitudes. Manually initiated requirements during descent and postlanding functions of mode 1B aborts are the same as during a nominal descent (paragraphs 2. 9 . 4. 13. 15 and 2. 9. 4 . 13.1 6).
Event Profile, Mode 1B Abort ˜̴ 3 0,000 Feet to 100,000 Feet Diagram

Mode 1C Abort
Mode 1C aborts (Event Profile, Mode 1C Abort Diagram) are initiated at a time when the velocity of the LV is higher than the trim point of the canards. This is between an approximate altitude of 100,000 feet and normal LET jettison. The crew has the prerogative of jettisoning the LET shortly after the abort is initiated and utilizing the CM RCS for orientation similar to nominal entry maneuvers; or all owing the canards to orient the LEV when the free fall velocity is reduced, to the trim point. If the latter option is elected there is a slight probability of an apex forward capture and violent rotational rates when the canards become effective aerodynamically. This slight probability can be avoided by imparting energy to the falling LEV. The CM RCS may be utilized to maintain a +pitch rate and this should be in excess of 5°/sec. There is no upper limit of rates since the CM RCS is limited under these flight conditions. Automation of ELSC functions during parachute descent and postlanding functions are the same as a nominal descent.
Event Profile, Mode 1C Abort Diagram

SPS Abort
Sequential systems functions during an SPS abort are designed to separate the CSM from the LV with automation conducive to utilization of the SPS as required. Firing the SPS is not a function of the sequential systems. The way this propulsion system is utilized, or if it is utilized, is contingent on time into the mission, and maneuvering requirements for a safe recovery. Sequential systems automation is the same in all SPS aborts, Event Profile, SPS Abort Diagram. This type abort may be initiated any time after the LET is jettisoned until the CSM is separated from the LV. All SPS aborts must be initiated manually because the EDS automatic abort capability is lost when the LET is jettisoned (Launch Escape Tower Jettison). Moreover, jettisoning of the LET results in configuration change in the abort start circuits (Abort Start. (Zones 27 and 28-C and -D)). ULLAGE relays in the MESC, zone 11-B, are energized when the abort is initiated and the +X translation engines of the SM RC-S are fired. The same signal that fires the engines also inhibits pitch and yaw rate stabilization in the SCS. CSM-LV SEPARATE relays, zone 9-B, are energized after a time delay of 3.0 seconds and the SC will be separated from the LV (paragraph Separation of the Spacecraft From the Launch Vehicle). RCS ENABLE ARM relays, zone 8-A, are energized after a time delay of 0. 8 second and automated control of the SM RCS will be enabled (Enable Automated Control of the SM RCS). If the SC is equipped with a docking probe it will be necessary to separate the LM docking ring (LM Docking Ring Separation) at some time conducive to the situation. CM/SM separation and descent operations are the same as during a nominal entry (Nominal Pre-entry and Descent).
Event Profile, SPS Abort Diagram

PERFORMANCE AND DESIGN DATA
The need is apparent in the sequential systems for one- shot, high-energy, quick-response systems for rocket motor ignition, physical separations, and deployment of earth recovery devices. To support these needs, an electrical hot-wire initiator was selected as the standard activation medium for the high-order ordnance systems required to satisfy vehicle requirements. Range safety requirements dictate that electrically activated ordnance components be capable of withstanding one watt and one ampere for 5 minutes at the electrical-explosive interface without firing or without degradation of initiator performance.
Apollo Standard Initiator
The hot bridge-wire initiator, hereinafter referred to as the single bridgewire Apollo standard initiator (SBASI), is illustrated in the Single Bridgewire Apollo Standard Initiator Diagram. This device has a primary ignition charge that is ignited by electrically heating a one-ohm bridgewire. The primary charge ignites the main charge of the initiator, which, in turn, generates high temperature gasses sufficient to initiate the main charge of specialized explosive device. The SBASI is designed to comply with the range safety requirements recapitulated in paragraph PERFORMANCE AND DESIGN DATA. A current of 3 .5 amperes on the bridgewire will cause the SBASI to ignite in 10 milliseconds or less when subjected to a temperature range of -65 to 300 °F. A current of 5.0 amperes on the bridgewire will cause the SBASI to ignite in 15 milliseconds or less from -260 to -65°F.
Single Bridgewire Apollo Standard Initiator Diagram

Compliance With Design Requirements
The basic electrical design criteria for initiators are rigidly specified in the Air Force Eastern Test Range Manual, Range Safety Ma11ual, AFE TRM127-l (1 November 1966). In addition to the design criteria specified in this manual, the following Apollo requirements have been satisfied: ·
a. The electroexplosive devices are electrically shorted until they are fired to prevent inadvertent ignition (Circuit Concept Schematic, OPERATIONAL DESCRIPTION).
b. At least two individually operated switching circuits are incorporated between the initiator s and their pyrotechnic battery terminals. These are “arming” switches and “firing” switches which are illustrated in the Sequential Systems Operational/Functional Diagram.
c. Logic control circuits of ordnance firing circuits receive operating from a source other than pyrotechnic batteries.
d. All logic and pyrotechnic firing circuits are at least dual redundant.
e. All logic timing circuits will fail in the T = ∞ mode.
Component Selection and Installation
A portion of the high reliability achievement of the sequential system is because basic rules in component design, assembly and testing are closely followed. Carefully prepared specifications for components include the expected maxima of shock, vibration, acceleration, temperatures, margins, etc., not only at the time and interval of use, but throughout the whole flight. Relay contact environment has been controlled by hermetically sealed cases and potting. Components are screened 100 percent; that is, each relay is individually tested through repeated cycling prior to acceptance. In the implementation of the series contact circuits, the physical relays are mounted orthogonal to each other to ensure the abnormal vibration or acceleration forces, which may be of sufficient magnitude to prematurely close a given set of contacts, will not be reflected into the same actuation plane of the other relay of the same firing circuit. Verification of circuit integrity is important to ensure that all circuit elements have been properly assembled and installed.
Resistance measurements can validate that circuit continuity is within acceptable limits in order that the required current values to the SBASI can be guaranteed.
Firing Circuit Protection
Fusistors are located in series with the output contacts of the firing relays (Circuit Concept Schematic). Thus individual protection of each pyrotechnic firing circuit will prevent a current leakage path on any given firing line. A continual discharge of pyrotechnic battery power is impossible in this circuit design. These fusistors are specially designed to withstand high acceleration and vibration levels. The resistance value of these devices is 0.95 to 1.10 ohms at 25°C. The time-current operating characteristics are reflected in the following tabulation:
Amperes Seconds
20.0 0.03 to 0.17
10.0 0.20 to 1.20
8.0 0.30 to 8.00
7.0 0.40 to 20.00
Induced Current Protection
Consideration was given to the susceptibility of the firing circuit wiring to other energy sources. Unprotected, the circuits leading to the SBASI could act as receiving antennas, thus funneling more energy to the SBASI than it could pick up by itself. To minimize RF pickup, the electrical leads from the firing relay contacts are twisted (20 twists per 12 inches) and are shielded with the shield grounded at the firing relay interface and at the case of the SBASI. Full 360-degree shielding is provided between the shield and the SBASI case.
Pyro Arm Switch Lock
The Range Safety Manual requires that a positive mechanical lock be used in the ARM/SAFE actuation device to prevent movement from the safe to the armed position. A device developed for this purpose is illustrated in the Pyro Arm Switch Guard Diagram. Removal of the lock .is accomplished by the insertion of a key that is provided to the astronaut during the final prelaunch preparations.
Pyro Arm Switch Guard Diagram

Tower Jettison Motor
The TJM (Tower Jettison Motor Diagram) is intended to provide thrust capability, under normal mission operation, to effect adequate separation of the LES from the CM, while the latter is undergoing acceleration by the second stage booster; and, under abort conditions, to achieve adequate separation of the LES from the CM after LEM burn out. The propellant charge of the T JM consists of a case-bonded, star grain employing a polysulfide ammonium perchlorate formulation.
Tower Jettison Motor Diagram

Thrust of TJM
The average resultant thrust over the burning time when measured at sea level is reflected in the following tabulation:
Motor Temperature (Degrees Fahrenheit) Thrust Range (Pounds Force)
140 31,200 to 36,000
70 29,400 to 33,900
20 28,000 to 32,400
Total Impulse of TJM
Motor Temperature (Degrees Fahrenheit) Thrust Impulse Range (Pounds – Seconds)
140 35,900 to 37,700
70 35,800 to 37,600
20 35,700 to 37,500

Thrust Rise Time of TJM
The thrust rise time over a temperature range of 20 minimum to 140 maximum degrees Fahrenheit is between 75 and 150 milliseconds.
Thrust Vector Alignment of TJM
The resultant thrust vector is in the pitch plan e in the +z direction within ±30 minutes of yaw. It makes an angle of 3 to 4.5 degrees to the motor geometrical centerline.
Useful Life of TJM
The TJM is designed for a storage life of 5 years in a temperature environment from 25 to 105 °F.
Launch Escape Motor
The LEM (Launch Escape Motor Diagram) in conjunction with the PCM, is intended to provide capability for the safe removal of the crew, inside the CM, from a malfunctioning LV at any time from access arm retraction until successful completion of second-stage ignition. The propellant of the LEM consists of a case-bonded, eight-point star grain employing a polysulfide ammonium perchlorate formulation.
Launch Escape Motor Diagram

Thrust of LEM
Resultant thrust of the LEM will fall within the following limits when corrected to a temperature of 70°F and sea-level barometric pressure:
a. Thrust will not be greater than 177,000 pounds force (lbf). (This is equal to 200,000 lbf at 120 ° F in a vacuum.)
b. Thrust between 0. 2 and 2. 0 seconds after firing, current application will not be less than 135,000 lbf. (This is equivalent to 121,000 lbf at 20°F and sea-level barometric pressure.)
Total Impulse of LEM
The minimum delivered total impulse of tl1e LEM is 515,000 pound-seconds. The minimum delivered total impulse between 0.12 and 2.00 seconds is 233,064 pound-seconds.
Thrust Rise Time of LEM
The thrust rise time from the time of firing current application to the time that the thrust reaches 90 percent of ignition thrust is between 50 and 120 milliseconds. These limits apply regardless whether one or two igniter cartridges are used.
Thrust Vector Alignment of LEM
The centerline of each nozzle forms an angle of 35 degree s ±15 minutes with the mean geometric motor centerline. The nozzles located in the pitch plane have off-sized throats to give a resultant thrust vector oriented 2 degrees 45 minutes to the mean geometric motor centerline 1n the -Z direction. The maximum angular deviation of thrust from the nominal thrust centerline during the first 0.20 second of burning is ±15 minutes. During this same time period, the average roll moment induced by nozzle alignment, internal ballistics, or any other cause will not exceed 200 pound-feet.
Useful Life of LEM
The LEM is designed for a storage life of 5 years 1n a temperature environment from 25 to 105 ° F.
Pitch Control Motor
The PCM (Pitch Control Motor Diagram) in conjunction with the LEM, is employed to place the LEV in the correct flight attitude for a successful escape during mode 1A aborts. The propellant of the PCM consists of a case-bonded, 14-point star grain employing a polysulfide ammonium perchlorate formulation.
Pitch Control Motor Diagram

Thrust of PCM
Resultant thrust of the PCM will not exceed 355.0 lbf at 70°F and sea-level barometric pressure. This is equivalent to 4000 lbf at 140°F in a vacuum.
Total Impulse of PCM
The total delivered impulse of the PCM will be 1750 pound- seconds ±3 percent at 70°F and sea-level barometric pressure.
Thrust Rise Time of PCM
The thrust rise time from time of firing current application to the time at which the thrust reaches 80 percent of maximum will be between 60 and 120 milliseconds at 70°F.
Thrust Vector Alignment of PCM
The PCM is designed so that the resultant thrust vector coincides with the centerline of the motor chamber mounting surfaces within ±30 minutes.
Useful Life of PCM
The PCM is designed for a storage life of 5 years in a temperature environment from 25 to 105 °F.
LES Igniter
Two initiators are installed in each LES igniter (LES Igniters Diagram). Boron pellets are ignited and they in turn ignite the main charge of Pyrogen which spews flame into the grain of the rocket motor.
LES Igniters Diagram

Squib Valves
Hot gas pressure generated by the SBASI actuates the squib valve (Squib Valve Diagram). The spool shears the ends of inlet and outlet plumbing which is sealed initially. Sixteen valves of this configuration are incorporated in the fluid systems of the CM RCS (RCS section).
Squib Valve Diagram

Detonators
One of the specialized explosive devices used in some of the Apollo ordnance systems is the detonator cartridge (Detonator Cartridge Assembly Diagram). The SBASI is used in this application to ignite additional explosive charges which are usually composed of lead azide and RDX.
Detonator Cartridge Assembly Diagram

LET Frangible Nuts
In one application, the high-energy concussion of detonators is used to break frangible nuts (Tower Separation System Diagram). Two detonators are installed in each nut and connected to firing circuits A and B. Normally both detonators of each nut will fi r e and the nut will be broken into two parts; however, if one detonator should fail, the nut will be spread enough for thread clearance.
SLA Separation Ordnance System
Confined detonating fuse is used to transmit detonation from detonators to detonating cord which is installed along cutting planes of the SLA (Adapter Separation System Diagram). Two detonators are utilized in this explosive train for redundancy. One detonator is initiated by system A firing circuits and the other by system B. Either of the detonators will activate the entire ordnance system. Umbilical separation disconnect plug assemblies are blown apart disconnecting the electrical wiring between the LV and CSM. An umbilical disconnect swing arm is activated, which is the interface between the LM and the GSE flyaway umbilical on one of the SLA panels. Eight panel thrusters are also activated to start deployment of the SLA panels.
LM Separation System
Frangible links retain the clamps which are used to secure the LM legs to the SLA. Detonators are used to break the links and spring-loading opens the clamps (LM Separation System Diagram). Either of the detonators will break the frangible link. A pair of detonators is also utilized to activate guillotine blades of the lower umbilical; these detonators are not sympathetic and either guillotine blade will cut the wire bundle. Deadfacing in this instance is accomplished by relay logic (Separation of LM From S-IVB).
LM Separation System Diagram

CM-SM Separation System
Redundant linear-shaped charges are used to cut three tension tie straps which constitute the physical bond of the CM and SM (CM-SM Separation System Diagram). A detonator is used to explode each linear-shaped charge which is sympathetic to the other. Either of the linear- shaped charges will cut the tension tie strap it is mounted on; therefore, the sympathetic nature is not required to meet minimum reliability requirements. The electrical-explosive interface wiring to each detonator is also cut by the linear-shaped charges.
Pressure Cartridge Assemblies
Solid propellant pressure cartridges (Pressure Cartridge Assembly Diagram) have several applications in Apollo ordnance systems. The SBASI is used to initiate a propellant charge. The size of the main charge required is contingent on pressure requirements.
Pressure Cartridge Assembly Diagram

Electrical Circuit Interrupters
Two types of circuit interrupters are actuated when the CM and SM are deadfaced during the separation sequence. Two CM-SM circuit interrupters (CM-SM Electrical Circuit Interrupter Diagram) are mechanized by cams. Gas pressure forces a piston to move into a locked position and the piston is connected to cam forks. Inclined planes on the cam forks forces lift plates up which separate the mating parts of electrical receptacles. Two SM circuit interrupters will deadface battery power, together with ground returns, to the SM main buses (CM-SM Umbilical Assembly Diagram). Gas pressure forces pistons against stops and the pins of the electrical receptacles are pulled from the mating part. The piston assemblies include the contact pins.
Canard Actuators
Two gas pressure cartridges are used to actuate canard deployment (Canard Actuator Diagram). Hot gas on one side of a piston will cause the actuator shaft to retract. A closed hydraulic system on the opposite side of the piston dampens transient loads, and check valves in the fluid systems will maintain the piston in its actuated position. The actuator shaft also incorporates a mechanical lock in the actuated position.
Canard Actuator Diagram

Parachute Mortars
Two drogue parachutes, three pilot parachutes of the main parachutes, and one drag parachute of the apex cover augmentation system are deployed by mortar assemblies (Parachute Mortar Assemblies Diagram). Two sympathetically initiated pressure cartridges are mounted on the breech assembly of each mortar. A sabot, which is effectively a fiberglass piston, is incorporated to protect the parachute fabric from hot gas. The covers of the mortars are riveted and, when the gas pressure causes the rivets to shear, the parachutes are ejected with considerable force.
Parachute Mortar Assemblies Diagram

Parachute Disconnect
Five chisels are used to cut the risers of the drogue and main parachutes (Parachute Disconnect (Flower Pot) Diagram). Gas-pressure cartridges are used to drive the chisels through the risers immediately above the point where they are swaged. Two initiators are used on each gas pressure cartridge.
Reefing Line Cutters
Reefing line cutters (Reefing Line Cutter Diagram) are designed to sever any coreless nylon cord with a breaking strength of 2000 pounds or less. The unit is mechanically initiated and provides a time elapse between initiation and the severing of the cord. The primer, time-delay train, and output charge are hermetically sealed. A storage life of 3 years in a temperature environment from 20° to 140°F is designed into the cutter. These cutters will not ignite or fire when subjected to a temperature of 275°F for one hour; however, a cutter is not required to perform after having been exposed to this temperature.
Parachute Subsystem
The para chute subsystem will provide the means to decelerate and safely land the CM, with a 13, 000-pound recovery weight, following entry from terrestrial orbit, lunar flight, or: mission abort conditions. Deployment of the drogue parachutes will reduce the CM attitude to an oscillatory, or stable, aft heat shield forward condition and will reduce velocity to a point that will assure proper deployment and operation of the main landing parachutes within the operational envelope illustrated in the Parachute Design Envelope.
Parachute Design Envelope

OPERATIONAL LIMITATIONS AND RESTRICTIONS
Since the sequential systems include numerous controls for manual backup and/or intervention of automated functions, and since several of the functions are time-critical, certain precautions should be observed. Moreover, considerable versatility has been designed into the systems, such as alternate electrical power selection. Serious damage could result if correct procedures are not followed.
Alternate Selection of Logic Power
It would be possible to couple a defective battery to a good one, and serious damage to the electrical power supply could result if the circuit breakers, described in the Logic Power paragraph, are not utilized properly. The BAT C TO BAT BUS A and B circuit breakers (CB15andCB24), zone42-B are included in the system to enable the utilization of ENTRY AND POST LANDING BATTERY C in the event of a power failure in either of the ENTRY AND POST LANDING BATTERIES A or B. If the contingency of alternate power utilization should occur, the defective battery should be isolated before the appropriate BAT C TO BAT BUS A or B circuit breaker is closed. Additional information on this subject is included in the Electrical Power section.
Alternate Selection of Pyro Power
If the circuit breakers described in the Pyro Power paragraph, are not utilized properly, serious damage to the electrical supply could result. The potential hazard is the same as described in the Alternate Selection of Logic Power paragraph, except in this instance the electrical power of the PYRO Systems, zones 41 through 43-D and -E, is concerned. The BAT BUS A and B TO PYRO BUS TIE circuit breakers (CB 18 and CB 19) are included in the system to be used in the event of a failure of PYRO BATTERY A or B. If such a power failure should occur, the appropriate SEQ A or B circuit breaker (CB16 or CB17) should be opened before coupling the appropriate ENTRY AND POST LANDING battery to the PYRO power system.
Control for Arming Pyro Systems
Battery power is required to arm or safe PYRO buses (EDS Bus Changeover. (Zones 36, 37-A, and-B)). It is therefore necessary to close the SECS ARM BAT A circuit breakers (CBI), and/or its counterpart in system B, zone 39-C, before the motor switch (K1) in the LDEC, zones 39 and 40-E and -F, can be operated to energize or de-energize the PYRO buses. This feature is designed into the system for power conservation during a mission when the docking probe is being used. The procedures for the utilization of battery power for control of PYRO power will consequently differ somewhat during the various phases of a mission.
Status of Logic and Pyro Buses
It will be necessary for the flight crew to verify the status of LOGIC and PYRO buses, i.e., armed or safe, through the MSFN. Displays for this status are not included in the CM.
Utilization of Controls for CSM/LV Separation
When the CSM/LV SEP switch is used (Separation of the Spacecraft From the Launch Vehicle ), it should be held closed for approximately one second (0. 8 second minimum) for the time-delay-relay logic to perform as it was designed.
Utilization of Controls for CM/SM Separation
When the CM/SM SEP switches are used, they must be held closed for 0. 1 of a second for the time-delay- relay logic to perform as it was designed (CM/SM Separation Control).
Manual Control of ELSC Functions
Under certain entry conditions, erratic aerodynamic damping coefficients, wind gusts, and shears, the CM may become un stable. If this should occur, the apex cover and drogue parachutes may be manually deployed early. This will stabilize and keep the CM in the proper descending attitude. See the Parachute Design Envelope for the drogue deployment design envelope. The following precautions should be observed:
a. Manual initiation of drogue parachute deployment should never be accomplished above 40, 000 feet during entry.
b. The CM RCS must be turned off prior to apex cover jettison.
c. Manual initiation of apex cover jettison must not be executed with the L ET attached.
d. Manual initiation of drogue parachute deployment must not be executed with the apex cover on the vehicle.
e. Manual initiation of main parachute deployment must not be executed prior to drogue deployment.
f. Manual initiation of main parachute deployment must be accomplished above 2500 feet.
g. Two circuit breakers are incorporated in MESC PRYO circuits to the main parachute release ordnance devices. These circuit breakers should not be closed until after the CM has landed (paragraph 2.9.3.4 .2.3).
h. It is impossible to release the main parachutes with the ELS switch in the MAN position. This switch must be in the AUTO position and the 14-second time delays in the ELSC (TD 3 and TD 4), zone 6-C, expired before the MAIN RELEASE switch is armed.

APOLLO 11 OPERATIONS HANDBOOK BLOCK II SPACECRAFT
VOLUME l SPACECRAFT DESCRIPTION

SERVICE PROPULSION SYSTEM (SPS)
FUNCTIONAL DESCRIPTION
SPS Functional Flow Diagram
Service Module Sectors Diagram
MAJOR COMPONENT /SUBSYSTEM DESCRIPTION
Pressurization Subsystem (SPS)
Helium Tanks
Helium Pressurizing Valves
Pressure Regulator Assemblies
Check Valve Assemblies
Helium Pressure Relief Valves
Heat Exchangers
Propellant Subsystem
Propellant Tanks
Tank Propellant Feed Lines
Bipropellant Valve Assembly
Gaseous Nitrogen (GN2) Pressure Vessels
Injector Prevalves
GN2 Filters (CSM 108 and Subs)
GN2 Pressure Regulators
GN2 Relief Valves
GN2 Orifices
GN2 Solenoid Control Valves
GN2 Ball Valve Actuators
Bipropellant Ball Valves
Bipropellant Valve Assembly Check Valves
Engine Propellant Lines
Engine Injector
Ablative Combustion Chamber
Nozzle Extension
SPS Electrical Heaters
SPS Heater Installation, Tank Feed Lines Diagram
SPS Heater Installation, Engine Feed Lines Diagram
SPS Electrical Heaters Diagram
SPS Oxidizer Engine Feed-Line Temperature Monitoring Schematic
Thrust Mount Assemblies
Gimbal Actuator
SPS Electromechanical Gimbal Actuator Diagram
SPS Yaw Gimbal Actuator Motor and Clutch Control Diagram
SPS Angles Pitch and Yaw Diagram
SPS Gimbaling Diagram
Propellant Utilization and Gauging Subsystem
SPS Quantity, Sensing, Computing and Indicating System Diagram
Propellant Utilization Valve and Flag Display Schematic
Quantity Sensing, Computing, and Indicating System
SPS Oxidizer Point Sensor Location Diagram
SPS Fuel Point Sensor Location Diagram
Quantity Computing and Indicating System Test
Engine Thrust ON-OFF Control
PERFORMANCE AND DESIGN DATA
Design Data
Helium Tanks
Regulator Units
Check Valves – Filters
Pressure Transducers
Propellant Utilization Valve Control
Quantity Sensing System Accuracy
Helium Relief Valve
Oxidizer Storage Tank # 1
Oxidizer Sump Tank #2
Fuel Storage Tank # 1
Total Propellant (In Tanks)
All Propellant Tanks
Interface Flange Filter (2)
Engine (1)
Heaters (6)
Gimbal Actuators
Overcurrent Relays
Performance Data
SPS Electrical Power Distribution
Electrical Power Distribution Schematic
OPERATIONAL LIMITATIONS AND RESTRICTIONS

SERVICE PROPULSION SYSTEM
FUNCTIONAL DESCRIPTION
The service propulsion subsystem provides the impulse for all X -axis velocity changes (delta Vs) throughout a mission and the SPS abort capability after the launch escape tower is jettisoned. The SPS consists of a helium pressurization system, a propellant feed system, a propellant gauging and utilization system, and a rocket engine. The oxidizer is inhibited nitrogen tetroxide and the fuel is a blended hydrazine (approximately 50 percent unsymmetrical dimethyl hydrazine and 50 percent anhydrous hydrazine). The pressurizing gas is helium. The system incorporates displays and sensing devices to permit earth-based stations and the crew to monitor its operation. (See SPS Functional Flow Diagram.)
SPS Functional Flow Diagram (106-111)

(111-116)

The helium pressure is directed to the helium pressurizing valves which isolate the helium during nonthrusting periods, or allow the helium to pressurize the fuel and oxidizer tanks during thrusting periods. The helium pressure is reduced at the pressure regulators to a desired working pressure. The regulated helium pressure is directed through check valves that permit heliu1n flow in the downstream direction when the pressurizing valves are open, and p r e vent a reverse flow of propellants during nonthrusting periods. The heat exchangers transfer heat from the propellants to the helium gas to reduce any pressure excursions that may result from a temperature differential between the helium gas and propellants in the tanks. The relief valves maintain the structural integrity of the propellant tank systems if an excessive pressure rise occurs.
The total propellant supply is contained within four similar tanks; an oxidizer storage tank, oxidizer sump tank, fuel storage tank, and fuel sump tank (SPS Functional Flow Diagram, and Service Module Sectors Diagram). Th e storage and sump tanks for each propellant system are connected in series by a single transfer line. The regulated helium enters the fuel and oxidizer .storage tank, pressurizing the storage tank propellants, and forces the propellant to an outlet in the storage tank which is directed through a transfer line into the respective sump tank standpipe pressurizing the propellants in the sump tank. The propellant in the sump tank is directed to the exit end into a propellant retention reservoir. Sufficient propellants are retained in the retention reservoir and at the tank outlets to permit engine restart capability in a 0-g condition when the SPS propellant quantity remaining is greater than 22,300 pounds (56.4 %) without conducting an SM RCS ullage maneuver prior to an SPS engine thrusting period. An ullage 1naneuver is mandatory prior to any SPS thrusting period when the SPS propellant quantity remaining is at or less than 22, 300 pounds (56.4 %). An ullage maneuver is also mandatory prior to any SPS thrusting period following all docked LM DPS burns even though the SPS propellant quantity is at or greater than 22, 300 pounds (56.4%). The propellants exit from the respective sump tanks into a single line to the heat exchanger.
A propellant utilization valve is installed in the oxidizer line. The propellant utilization valve is powered only during SPS thrusting periods. The propellant utilization valve aids in achieving simultaneous propellant depletion. The propellant supply is connected from the sump tanks to the engine interface flange.
The propellants flow from the propellant sump tank, through their respective plumbing, to the main propellant orifices and filters, to the bipropellant valve. The bipropellant valve assembly contains pneumatically controlled main propellant valves that distribute the propellants to the engine injector.
The thrust chamber consists of an engine injector, combustion chamber, and exhaust nozzle extension. The engine injector distributes the propellants through orifices in the injector face where the fuel and oxidizer impinge, atomize, and ignite. The combustion chamber is ablatively cooled. The exhaust nozzle extension is radiation cooled.
The engine assembly is mounted to the structure of the SM. It is gimbaled to permit thrust vector alignment through the center of mass prior to thrust initiation and thrust vector control du ring a thrusting period.
Propellant quantity is measured by two separate sensing systems: primary and auxiliary. The sensing systems are powered only during thrust-on periods because of the capacitance and point sensor measuring techniques. The capacitance and point sensor linearity would not provide accurate indications during the 0-g nonSPS thrusting periods.
The control of the subsystem is automatic with provisions for manual backup.
Service Module Sectors Diagram

MAJOR COMPONENT /SUBSYSTEM DESCRIPTION
Pressurization Subsystem (SPS)
The pressurization subsystem consists of two helium tanks, two helium pressurizing valves, two dual pressure regulator assemblies, two dual check valve assemblies, two pressure relief valves, and two heat exchangers. The critical components are redundant to increase reliability.
Helium Tanks
The two helium supply spherical pressure vessels are located in the center section of the SM.
Helium Pressurizing Valves
The helium valves are continuous-duty solenoid-operated. The valves are energized open and spring-loaded closed. The SPS He V LV switches ·on MDC-3 permit automatic or manual control of the valves. With the switches in the AUTO position, the valves are automatically controlled by a thrust ON-OFF signal. The valves are controlled manually by placing the switches to the ON (valve open) and OFF (valve closed) positions.
Each valve contains a position switch which controls a position (talk-back) indicator above each switch. When the valves are closed, the position switch is open and the indicator is barber pole (diagonal lines), the indication during nonSPS thrusting periods. When the valves are open, the position switch is closed and the indicator is powered to gray (same color as the panel) indicating the valve is open, the indication during SPS thrusting periods.
Pressure Regulator Assemblies
Pressure regulation is accomplished by a pressure-regulating assembly downstream of each helium pressurizing valve. Each assembly contains a primary and secondary regulator in series, and a pressure surge damper and filter installed on the inlet to each regulating unit.
The primary regulator is normally the controlling regulator. The secondary regulator is normally open during a dynamic flow condition. The secondary regulator will not become the controlling regulator until the primary regulator allows a higher pressure than normal and allows the secondary regulator to function. All regulator pressures are in reference to a bellows assembly that is vented to ambient.
Only one of the parallel regulator assemblies regulates helium pressure under dynamic conditions. The downstream pressure causes the second assembly to lock up (close). When the regulated pressure decreases below the lockup pressure of the nonoperating assembly, that assembly becomes operational.
Check Valve Assemblies
Each assembly contains four independent check valves connected in a series- parallel configuration for added redundancy. The check valves provide a positive checking action against a reverse flow of propellant liquid and/or vapor, and permit helium pressure to be directed to the propellant tanks. Filters are incorporated in the inlet to each check valve assembly and each test port (SPS Functional Flow Diagram).
Helium Pressure Relief Valves
The pressure relief valves consist of a relief valve, a burst diaphragm, and a filter.
In the event excessive helium and/or propellant vapor ruptures the burst diaphragm, the relief valve opens and vents the applicable system. The relief valve will close and reseal after the excessive pressure has returned to the operating level. The burst diaphragm provides a more positive seal of helium than a relief valve. The filter prevents any fragments from the (nonfragmentation type) diaphragm from entering onto the relief valve seat.
A pressure bleed device is incorporated between the burst diaphragm and relief valve. The bleed valve vents the cavity between the burst diaphragm and relief valve in the event of any leakage from the diaphragm. The bleed device is normally open and will close when the pressure increases to a predetermined pressure.
A protective cover is installed over the relief valve vent port and bleed valve cavity port to prevent moisture accumulation and foreign matter entrance. The covers are left in place at lift-off.
Heat Exchangers
Each unit is a line-mounted, counterflow heat exchanger consisting of the helium pressurization line coiled helically within an enlarged section of the propellant supply line. The helium gas, flowing through the coiled line, approaches the temperature of the propellant prior to entry into the respective storage tanks, thus reducing pressure excursions to a minimum.
Propellant Subsystem
This subsystem consists of two fuel tanks (storage and sump), two oxidizer tanks (storage and sump), and propellant feed lines.
Propellant Tanks
The propellant supply is contained in four hemispherical-domed cylindrical tanks within the service module (SPS Functional Flow Diagram, and Service Module Sectors Diagram). The storage tanks are pressurized by the helium supply. An outlet transfers the propellant and/or helium gas from the storage tanks through their respective transfer lines to the sump tanks. A standpipe in the sump tanks allows the propellant and/ or helium gas from the storage tanks to pressurize the sump tanks. The propellants in the sump tanks are directed into retention reservoirs, to the outlet, and to the engine.
The umbrella retention reservoir, can, and screens are installed in the exit end of the sump tanks. The reservoir retains a quantity of propellants at the exit end of the sump tanks and the engine plumbing during 0-g condition. The reservoir permits engine ignition when the SPS propellant quantity remaining is greater than 22, 300 pounds (56. 4%) without an ullage maneuver. An ullage maneuver is also required prior to any SPS thrusting period following all docked LM DPS burns even if the SPS propellant quantity remaining is at or greater than 22, 3.00 pounds (56.4%). When the SPS propellant quantity remaining is at 22,300 pounds (56.4 %) or less, an ullage maneuver is performed prior to an SPS engine thrusting period to ensure that gas 1s not retained aft of the screens.
Tank Propellant Feed Lines
The propellant feedlines have flexible bellows assemblies installed to permit alignment of the tank feed plumbing to the engine interface plumbing.
Bipropellant Valve Assembly
The bipropellant valve assembly consists of two gaseous nitrogen (GN2) pressure vessels, two injector prevalves, two GN2 regulators, two GN2 relief valves, four solenoid control valves, four actuators, and eight bipropellant ball valves.
Gaseous Nitrogen (GN2) Pressure Vessels
Two GN2 tanks are mounted on the bipropellant valve assembly to supply pressure to the injector prevalves. One GN2 tank is in the primary pneumatic control system A and the remaining GN2 tank is in the secondary pneumatic control system B.
Injector Prevalves
The injector prevalves are two-positive solenoid-operated valves, one for each pneumatic control system, and are identified as A and B. The valve is energized open and spring-loaded closed. The injector prevalves are controlled by the delta V THRUST NORMAL switches on MDC-1. When switch A is placed to NORMAL, injector prevalve A is energized open. If switch B is placed to NORMAL, injector prevalve B is energized open. Th e injector prevalves, when energized open, allow GN2 supply tank pressure to be directed through an orifice, into a regulator, relief valve, and to a pair of solenoid control valves. The solenoid control valves are controlled by the SPS thrust ON-OFF commands. The OFF position of the 6V THRUST switches de-energizes the injector prevalves and springloads closed.
The delta V TRUST NORMAL switch A receives power from SPS HE VALVE A circuit breaker on MDC-8 for control of the injector prevalve A. The delta V T HRUST NORMAL switch B receives power from SPS HE VALVE B circuit breaker on MDC-8 for control of the injector prevalve B (SPS Functional Flow Diagram).
The delta V THRUST NORMAL switches, A and/or B, also provide enabling power for the thrust ON-OFF logic circuitry.
GN2 Filters (CSM 108 and Subs)
A filter is installed between each GN2 pressure vessel and injector prevalve (SPS Functional Flow Diagram). A filter is also installed on each GN2 regulator outlet test port.
GN2 Pressure Regulators
A single-stage regulator is installed in each pneumatic control system between the injector prevalves and the solenoid control valves. The regulator reduces the supply GN2 pressure to a desired working pressure.
GN2 Relief Valves
A pressure relief valve is installed in each pneumatic control system downstream of the GN2 pressure regulators. This limits the pressure applied to the solenoid control valves in the event a GN2 pressure regulator mal functioned open.
GN2 Orifices
The orifice between the injector prevalve and regulator is installed to restrict the flow of GN2 and allow the relief valve to relieve the pressure overboard in the event the regulator malfunctions open, preventing damage to the solenoid control valves and/or actuators.
GN2 Solenoid Control Valves
Four solenoid-operated three-way two-position control valves are utilized for actuator control. Two solenoid control valves are located downstream of the GN2 regulators in each pneumatic control system. The solenoid control valves in the primary system are identified as 1 and 2 and the two in the secondary system are identified as 3 and 4. The solenoid control valves in the primary system control actuator and ball valves 1 and 2. The two solenoid control valves in the secondary system control actuator and ball valves 3 and 4. The SPS thrust ON-OFF command controls the energizing or de-energizing of the solenoid control valves. Solenoid control valves 1 and 2 are energized by the SPS thrust ON-OFF command if delta V THRUST NORMAL switch A is placed to A. Solenoid control valves 3 and 4 are energized by the SPS thrust ON-OFF command if delta V THRUST NORMAL switch B is placed to B.
GN2 Ball Valve Actuators
Four piston-type, pneumatically operated actuators are utilized to control the eight propellant ball valves. Each actuator piston is mechanically connected to a pair of propellant ball valves, one fuel and one oxidizer. When the solenoid control valves are opened, pneumatic pressure is applied to the opening side of the actuators. The spring pressure on the closing side is overcome and the actuator piston moves. Utilizing a rack and pinion gear, linear motion of the actuator connecting arm is converted into rotary motion, which opens the propellant ball valves. When the engine firing signal is removed from the solenoid control valves, the solenoid control valves close, removing the pneumatic pressure source from the opening side of the actuators. The actuator closing side spring pressure now forces the actuator piston to move in the opposite direction, causing the propellant ball valves to close. The piston movement forces the remaining GN2, on the opening side of the actuator, back through the solenoid control valves where it is vented overboard.
Each actuator incorporates a pair of linear position transducers. One supplies ball valve position information to the SPS ENGINE INJECTOR VALVES indicators on MDC-3. The output of the second transducer supplies ball valve position information to telemetry.
Bipropellant Ball Valves
The eight propellant ball valves are used to distribute fuel and oxidizer to the engine injector assembly. Each pair, of four linked pairs, consists of one fuel and one oxidizer ball valve that is controlled by a single actuator. The four linked pairs are arranged in a series-parallel configuration, SPS Functional Flow Diagram. The parallel redundancy ensures engine ignition; the series redundancy ensures thrust termination. When GN2 pressure is applied to the actuators, each propellant ball valve is rotated, aligning the ball to a position that allows propellants to flow to the engine injector assembly. The mechanical arrangement is such that the oxidizer ball valves maintain an 8-degree lead over the fuel ball valves upon opening, which results in smoother engine starting transients.
Bipropellant Valve Assembly Check Valves
Check valves are installed in the vent port outlet of each of the four solenoid control valves, spring pressure vent port of the four actuators, and the ambient vent port of the two GN2 pressure regulator assemblies. Thus, the seals of the components are protected from a hard vacuum in space.
Engine Propellant Lines
Integral propellant lines are utilized on the engine to route each propellant from the interface points, in the gimbal plane area, to the bipropellant valve assembly. The plumbing consists of flexible bellows that permit propellant line flexibility for engine gimbaling, orifices for adjustment of oxidizer /fuel ratio, and screens to prevent particle contaminants from entering the engine.
Engine Injector
The injector is bolted to the ablative thrust chamber attach pad. Propellant distribution through the injector is accomplished through concentric annuli machined orifices in the face of the injector assembly and covered by concentric closeout rings. Propellant distribution to the annuli is accomplished through alternate radial manifolds welded to the backside of the injector body. The injector is baffled to provide combustion stability. The fuel and oxidizer orifices impinge, atomize, and ignite because of hypergolic reaction.
Ablative Combustion Chamber
The ablative combustion chamber material extends from the injector attach pad to the nozzle extension attach pad. The ablative material consists of a liner, a layer of insulation, and integral metal attach flanges for mounting the injector.
Nozzle Extension
The bell- contoured nozzle extension is bolted to the ablative thrust chamber exit area. The nozzle extension is radiant-cooled and contains an external stiffener to provide additional strength.
SPS Electrical Heaters
There are six electrical heaters installed on the tank feed lines fron1 the respective sump tank outlets to the interface flange, on the respective engine feed lines from the interface flange to the bipropellant valve assembly and on the bottom side of the bipropellant valve assembly (SPS Heater Installation, Tank Feed Lines Diagram and SPS Heater Installation, Engine Feed Lines Diagram). Each heater contains a redundant element. These electrical heaters provide h eat to the tank feed lines, engine feed lines and bipropellant valve assembly, thus to the propellants. The heaters are controlled as a normal manual function of the crew on MDC- 3 (SPS Electrical Heaters Diagram) utilizing the SPS LINE HTRS switch. When the switch is placed to position A/B, power is supplied to 12 elements. When the switch is placed to position A, power is supplied to 6 elements. The switch is placed to position A/B or A when the SPS PRPLNT TANKS TEMP indicator on MDC-3 reads +45° F. Temperature is derived from the engine fuel line temperature sensor (SPS Functional Flow Diagram). The switch is placed to OFF when the indicator reads + 75 °F. The red-line markings on the indicator are +27 °F and +100 °F, respectively.
SPS Heater Installation, Tank Feed Lines Diagram

SPS Heater Installation, Engine Feed Lines Diagram

SPS Electrical Heaters Schematics

The engine oxidizer feed-line temperature (SPS Functional Flow Diagram) may be utilized as a back-up to the SPS PRPLNT TANKS TEMP indicator on MDC-3. The engine oxidizer feed-line temperature may be monitored on MDC-101 (SPS Oxidizer Engine Feed-Li ne Temperature Monitoring Schematic).
SPS Oxidizer Engine Feed-Line Temperature Monitoring Schematic

Thrust Mount Assemblies
The thrust mount assembly consists of a gimbal ring, engine-to-vehicle mounting pads, and gimbal ring- to- combustion chamber assembly support struts. The thrust structure is capable of providing ±10 degrees inclination about the Z-axis and ±6 degrees about the Y-axis.
Gimbal Actuator
Thrust vector control of the service propulsion engine is achieved by dual, servo, electromechanical actuators. The gimbal actuators are capable of providing control around the Z – Z axis (yaw) of ±4.5 (+0.5, -0.0) degrees in either direction from a + 1-degree null offset during SPS thrusting periods (0-degree null offset during non SPS thrusting periods), and around the Y – Y axis (pitch) of ±4.5 (+0.5, -0.0) degrees in either direction from a +2-degree null offset during SPS thrusting periods (+1.5-degree null offset during non SPS thrusting periods).
The reason for the + 1-degree null offset to the +Y axis and + 2-degree offset to the +z axis during SPS thrusting periods, is the offset center of mass. The reason for the change in the null offset positions from an SPS non-thrusting period to an SPS thrusting period is due to the structural and engine deflections that occur when thrust-on is provided to the SPS engine.
Each actuator assembly (SPS Electromechanical Gimbal Actuator Diagram) consists of four electromagnetic particle clutches, two d-c motors, a bull gear, jack-screw and ram, ball nut, two linear position transducers, and two velocity generators. The actuator assembly is a sealed unit and encloses those portions protruding from the main housing.
SPS Electromechanical Gimbal Actuator Diagram

One motor and a pair of clutches (extend and retract) are identified as systen1 No. 1, the remaining motor and pair of clutches (extend and retract) are identified as system No. 2 within the specific actuator.
An overcurrent monitor circuit is employed for each primary and secondary gimbal motor. Each gimbal motor and overcurrent monitor circuit is controlled by its own SPS Gll’v1BAL MOTORS switch on MDC- 1. There are four SPS GIMBAL MOTORS switches, PITCH 1 and 2 and YAW 1 and 2. The SPS Yaw Gimbal Actuator Motor and Clutch Control Diagram illustrates the yaw actuator as an example. When the SPS GIMBAL M0TORS YAW 1 (primary) switch is positioned to START, power is applied from the battery bus to the motor-driven switch. The motor- driven switch closes a contact that allows power from the main bus to the gimbal motors. Thus, the gimbal motor is started. When the SPS GIMBAL MOTORS YAW 1 switch is released, it springs back to the center position. The center position activates the overcurrent monitor sensing circuitry. The SPS GIMBAL MOTORS YAW 2 (secondary) switch is then positioned to START. The SPS GIMBAL MO TORS YAW 2 switch activates yaw Z motor-driven switch. The motor-driven switch of YAW 2 functions as with YAW 1. The SPS GIMBAL MOTORS YAW 2 switch released from START, spring loads to center. The center position activates the overcurrent monitor circuit of yaw 2.
SPS Yaw Gimbal Actuator Motor and Clutch Control Diagram

The overcurrent monitor circuits of the primary and secondary system are utilized to monitor the current to the gimbal motors. This is because of the variable current flow during the initial gimbal motor start, normal operation for the main d-c bus, and gimbal motor protection.
Using the No. 1 yaw system as an example, identify the upper motor and clutches in SPS Electromechanical Gimbal Actuator Diagram and SPS Yaw Gimbal Actuator Motor and Clutch Control Diagram as system No. 1. When the overcurrent monitoring senses an overcurrent on gimbal motor No. 1, the following functions occur. The overcurrent monitor circuitry drives the motor-driven switch. This removes power from gimbal motor No. 1, rendering it inoperative. Simultaneously, a signal is sent to illuminate the YAW GMBL DR 1 caution and warning light on MDC-2. This informs the crew the YAW gimbal motor No. 1 has failed due to overcurrent. Simultaneously, a fail sense signal is sent from a contact on the motor driven switch. The fail sense signal is sent through an OR and AND gate to a solid-state switch. This switch provides a ground for relay coils A4K4, A4K5, A4K 6 and A4K8. These relays are energized if the TVC GMBL DRIVE YAW s witch on MDC -1 is in AUTO and the SCS TVC SERVO POWER switch 2 on MDC – 7 is in AC2 /MNB or AC1 /MNA. This allows the upper relay contacts of A4K4 and A4K8 to open and removes the power input to the No. 1 clutches.
Simultaneously, the lower relay contacts of A4K5 and A4K8 close. This applies power inputs to the No. 2 clutches within the same actuator. Simultaneously, the upper contacts of A4K4, A4K5, and A4K6 open and the lower contacts close, allowing thrust vector control monitoring. The SPS GIMBAL MOTORS YAW 1 switch on MDC-1 is then positioned to OFF. Normally, the OFF position is used to shut down the gimbal motor upon completion of a thrusting period.
Using No. 2 yaw system as an example, identify the lower motor and clutches in SPS Electromechanical Gimbal Actuator Diagram and SPS Yaw Gimbal Actuator Motor and Clutch Control Diagram as system No. 2. Then the overcurrent monitoring senses an overcurrent on gimbal motor No. 2, the following functions occur. The overcurrent monitor circuitry will drive the motor-driven switch. This removes power from gimbal motor No. 2, rendering it inoperative. Simultaneously, a signal is sent to illuminate the YAW GMB L DR 2 caution and warning light on MDC-2. This informs the crew the YAW gimbal motor No. 2 has failed due to overcurrent. There is no fail sense signal sent to control relay coil s A4K4, A4K5, A4K6, and A4K8. If the No. 2 gimbal motor has failed as well as No. 1 gimbal motor, that specific actuator is inoperative. The SPS GIMBAL MOTORS YAW 2 switch on MDC- 1 is then positioned to O FF. Normally, the OFF position is used to shut down the gimbal motor upon completion of a thrusting period.
The LV /SPS IND switch on MDC-1 when positioned to GPI de-energizes relay coils A11K3, A11K4, A11K5, and A11K6 (SPS Yaw Gimbal Actuator Motor and Clutch Control Diagram). This allows the relay contact points of A11K3, A11K4, A11K5, and A11K6 to move to the down position. The actuator position transduce r is then allowed to transmit gimbal position information to the SPS GPI on MDC – 1.
The TVC GMB L DRIVE YAW switch on MDC- 1 will also control through the OR and AND gate the solid-state switch (SPS Yaw Gimbal Actuator Motor and Clutch Control Diagram). T he solid-state switch will provide the ground for relay coils A4K4, A4K5, A 4K6, and A4K8. The power input to these relays is provided by positioning the TVC SER VO POWER switch 2 on MDC-7 to AC 2/ MNB or ACl/MNA. When the TVC GMBL DRIVE YAW switch is in AUTO, the primary gimbal motor overcurrent monitor circuitry controls the solid-state-switch. If overcurrent on the primary gimbal motor is sensed, the CMC, SGS or MTVC inputs are switched automatically from the primary to the secondary clutches.
If the TVC GMBL DRIVE YAW switch on MDC – 1 is in position 1, the CMC, SCS, or MTVC inputs are locked into the primary clutches. If overcurrent is sensed on gimbal motor No. 1, or if the translation control is rotated clockwise, there is no automatic switchover from the primary to secondary clutches. The TVC GMB L DRIVE YAW switch positioned to 1 could be utilized to check out gimbal motor No. 1, the primary clutches, and the primary servo loop system.
If the TVC GMBL DRIVE YAW switch on MDC-1 is in position 2 and the T VC SERVO POWER switch 2 on MDC-7 is in AC2/MNB or AC 1 /MNA position. The CMC, SCS or MTVC inputs are locked into the secondary clutches. This position could be utilized to check out gimbal motor No. 2, the secondary clutches, and the secondary servo loop system.
If the TVC GMB L DRIVE YAW switch on MDC-1 is in AUTO and TVC SERVO POWER switch 2 on MDC-7 is in AC2/MNB or AC1 /MNA position. The SCS or MTVC inputs are removed from the primary clutches and switched to the secondary clutches when the translation control is rotated clockwise.
The pitch gimbal actuator operation and control function in the same manner as yaw. The pitch gimbal actuator control circuits has its own PITCH GIMBAL MOTOR switches on MDC-1 and its own TVC GIMBL DR PITCH Switch on MDC- 1. The T VC SERVO POWER switches on MDC-7 will supply power to the pitch clutches as in the case of the yaw, clutches. The LV /SPS IND switch to GPI on MDC -1 allows pitch gimbal position to the GPI. The relay coils, however, will have different numbers in the pitch actuator.
It is noted that the primary yaw and pitch gimbal motor receive power from MN BUS A. The primary pitch and yaw motor-driven switches receive power from BAT BUS A. Th e secondary yaw and pitch gimbal motors receive power from MN BUS B. The secondary pitch and yaw motor-driven switches receive power fron1 BAT BUS A.
The clutches are of a magnetic-particle type. The gimbal motor drive gear meshes with the gear on the clutch housing. The gears on each clutch housing mesh and as a result, the clutch housings counter rotate. The current input is applied to the electromagnet mounted to the rotating clutch housing from the SCS, CMC, or MTVC. A quiescent current may be applied to the electromagnet of the extend and retract clutches when the TVC SERVO POWER switches, on MDC-7, are in AC1/MNA or AC2/MNB, preventing any movement of the engine during the boost phase of the mission with the gimbal motors OFF. The gimbal motors will be turned ON prior to jettisoning the launch escape tower to support the SPS abort after the launch escape tower has been jettisoned and will be turned OFF as soon as possible to reduce the heat that occurs due to the gimbal motor driving the clutch housing with quiescent current applied to the clutch. The friction force in the clutch housing creates heat which if allowed to increase to a high temperature, the electromagnet would loose its magnetism capability, thus rendering that set of clutches inoperative.
Prior to any SCS delta V thrusting period or in MTVC (manual thrust vector control), the thumbwheels on MDC-1 will be used to position the engine. The thumbwheels may be positioned prior to any CMC delta V thrusting period but cannot position the engine. In any thrusting mode, the current input required for a gimbal angle change (to maintain the engine thrust vector through the center of mass) to the clutches will increase above the quiescent current. This increases the current into the electromagnets that are rotating with the clutch housings. The dry powder magnetic particles have the ability to become magnetized very readily, as well as demagnetized just as readily. The magnetic particles increase the friction force between the rotating housing and the flywheel, causing the flywheel to rotate. The flywheel arrangement is attached to the clutch output shaft allowing the clutch output shaft to drive the bull gear. The bull gear drives a ball nut which drives the actuator jackshaft to an extend or retract position, depending upon which clutch housing electromagnet the current input is supplied to. The larger the excitation current, the higher the clutch shaft rotation rate.
Meshed with the ball nut pinion gear are two rate transducers. The transducers are a tachometer type. When the ball nut is rotated, the rate transducer supplies a feedback into the summing network of the thrust vector control logic to control the driving rates of the jackscrew (acting as a dynamic brake to prevent over- or under-correcting). There is one rate transducer for each system.
The jackscrew contains two position transducers, all arranged for linear motion and all connected to a single yoke. The position transducers are used to provide a feedback to the summing network and the visual display on MDC-1. The operating system provides feedback into the summing network reducing the output current to the clutch resulting in proportional rate change to the desired gimbal angle position and returns to a quiescent current in addition to providing a signal to the visual display on MDC-1.
The remaining position transducer provides a feedback to the redundant summing network of the thrust vector logic for the redundant clutches in addition to the visual display on MDC- 1 if the secondary system is the operating system.
The spacecraft desired motion, thumbwheel positioning, rotation control (MTVC), engine nozzle position, thrust vector position, gimbal position display indicator, and actuator ram movement is identified in SPS Angles Pitch and Yaw Diagram and SPS Gimbaling Diagram.
SPS Angles Pitch and Yaw Diagram

SPS Gimbaling Diagram

A snubbing device provides a hard stop for an additional one-degree travel beyond the normal gimbal limits.
Propellant Utilization and Gauging Subsystem (PUGS)
The subsystem consists of a primary and auxiliary sensing system, a propellant utilization valve, a control unit, and a display unit (SPS Quantity, Sensing, Computing and Indicating System Diagram
and Propellant Utilization Valve and Flag Display Schematic).
SPS Quantity, Sensing, Computing and Indicating System Diagram

Propellant Utilization Valve and Flag Display Schematic

Quantity Sensing, Computing, and Indicating System
Propellant quantity is measured by two separate sensing systems, primary and auxiliary. The primary quantity sensors are cylindrical capacitance probes, mounted axially in each tank. In the oxidizer tanks, the probes consist of a pair of concentric electrodes with oxidizer used as the dielectric. In the fuel tanks, a pyrex glass probe, coated with silver on the inside, i s used as one conduct or of the capacitor. Fuel on the outside of the probe i s the other conductor. The pyrex glass itself forms the dielectric. The auxiliary system utilizes point sensors mounted a t intervals along the primary p robes to provide a step Junction impedance change when the liquid level passes their location centerline.
Primary propellant measurement is accomplished by the probes capacitance, being a linear function of propellant height.
Auxiliary propellant measurement is accomplished by locating the propellant level, with point sensors, seven in the storage tanks and eight in the sump tanks. Each point sensor consists of concentric metal rings. The rings present a variable impedance depending on whether the y are covered or uncovered by the propellants. When the propellants are between point sensors, the propellants remaining are integrated by a rate flow generator which integrates the servos at a r ate proportional to the nominal flow rate of the fuel and oxidizer. A mode selector senses when the propellant crosses a sensor and changes the auxiliary servos from the flow r ate generator mode to the position mode, the system moves to the location specified by the digital-to-analog converter for 0. 9 seconds to correct for any difference. The system then returns to the flow rate generator mode until the next point sensor is reached. The SPS Oxidizer Point Sensor Location Diagram and SPS Fuel Point Sensor Location Diagram identify the point sensor locations. The non-sequential pattern detector functions to detect false or faulty sensor signals. If a sensor has failed, the information from that sensor is blocked from the system, preventing disruption of system computation.
SPS Oxidizer Point Sensor Location Diagram

SPS Fuel Point Sensor Location Diagram

When a T HRUST-ON signal is provided with the PUG MODE switch in the PRIMARY or NORMAL position, the crew display digital readouts and unbalance display will not change for 4± 1 seconds to allow for propellant settling. However, TLM will receive the same signal as upon completion of the last firing after approximately one second of SPS THRUST-ON.
When the THRUST- ON signal is provided with the PUG MODE switch in AUXILIARY position, the crew display digital readouts, unbalance display, and TLM will receive a change in information immediately, which is generated from a flow rate integrator that simulates the nominal flow rate and transmits this as quantity information to the crew displays and TLM. The crew digital readouts unbalance display and TLM will not be updated to the propellant from a point sensor for 6.5 ± 1.0 seconds after THRUST-ON. When the THRUST-ON signal is provided plus 6.5 ±1.0 seconds, if a point sensor is uncovered, the crew digital readouts, unbalance display, and T LM will be updated to the propellant remaining at that point sensor. The time delay of 6.5 ± 1.0 seconds is to the point sensor system and not to the auxiliary fuel and oxidizer servos, and is to allow for propellant settling.
Any deviation from the nominal oxidizer to fuel ratio (1.6 : 1 by mass) is displayed by the UNBALANCE indicator in pounds. The upper half of the indicator is marked INC and the lower half is marked DEC to identify the required change in oxidizer flow rate to correct any unbalance condition. The marked or shaded area is a normal unbalance range area.
The crew can determine if a true unbalance of propellant remaining exists. With the PUG mode switch in PRIM or NORM, the crew display percentage readouts would not indicate the ·same percentage value and the unbalance meter would indicate the amount of unbalance in pounds. To verify if a true unbalance condition exists, the PUG mode switch would be positioned to AUX. If the crew display percentage readouts and the unbalance meter now read similar to the readouts when in PRIM, a true unbalance condition exists.
The crew can determine in the case of a malfunction as to what has malfunctioned within the quantity and indicating systems by utilization of the TEST switch. To test the PRIM gauging system, the PUG mode switch must be in PRIM, and to test the AUX gauging system, the PUG mode switch must be in AUX.
By observing the response of each system in conjunction with the test switch on MDC-3, the crew can recognize the malfunction or determine if there is a true unbalance existing.
The crew display readouts and unbalance meter should not be considered accurate until the SPS engine is thrusting for at least 25 seconds. This is to allow complete propellant settling in the SPS tanks before the gauging system is within its design accuracy.
When the THRUST-OFF signal is provided, regardless of the PUG MODE switch position, the visual display fuel and oxidizer percentage readouts and the unbalance meter display will lock at the readings displayed. TLM will not receive any propellant quantity information during THRUST- OFF conditions.
Quantity Computing and Indicating System Test
A test of the sensing systems, excluding the point sensor and probes, can be implemented during THRUST- ON or OFF periods. With the PUG MODE switch in PRIM and the TEST switch in TEST 1 (up) position, the test stimuli is applied to the primary system tank servoamplifiers (4) after a time delay of 4 +/- 1 seconds. At this time, the test stimuli will drive the crew display fuel and oxidizer readouts to an increase reading at different rates. This results in an unbalance and is so indicated on the unbalance meter crew display as an INC (clockwise rotation). TLM would receive an increase in propellant quantity from the prin1ary system tank servoamplifiers TLM potentiorneters. When the TEST switch is released from TEST 1 (up) position, the TEST switch spring loads to the center position. This removes the test stimuli, and the crew displays will lock at the readings that they had been driven to. TLM would not receive any propellant quantity information.
With the PUG MODE switch in PRIM and positioning the TEST switch to the TEST 2 (down) position. The test stimuli is applied to the prirnary system tank servoamplifiers (4) after a time delay of 4+/- 1 seconds. At this time, the test stimuli drives the crew display fuel and oxidizer readouts to a decrease reading at different rates. This returns the crew displays close to the reading displayed prior to TEST 1 (up). Simultaneously TLM would receive the same information. The crew displays would lock at the new readings if the TEST switch is released to center (spring loaded). TLM would not receive any propellant quantity information at this time. If the TEST switch is positioned again to TEST 2 (down), followed by a time delay of 4+1 seconds, the fuel and oxidizer crew display readouts would drive to a decrease reading at different rates. This results in an unbalance condition and is so indicated on the unbalance meter display as a DEC (counterclockwise rotation). TLM would receive a decrease in propellant quantity at this time . Releasing the TEST switch to the center position re111oves the test stimuli and locks the displays at the new reading. TLM would not receive any propellant quantity information a t this time. To return to the reading displayed prior to the second TEST 2 (down) the TEST switch is positioned to TEST 1 (up). After a time delay of 4 +/-1 seconds, the crew displays would drive to an increase reading at different rates. This returns the crew displays close to the reading displayed prior to the second TEST 2 (down). At this time, TLM receives the same information.
To TEST the auxiliary system, the PUG MODE switch i s positioned to AUX and the TEST switch set to TEST 1 (up) and T EST 2 (down) positions. There are no time delays involved with the auxiliary system.
With the PUG MODE switch in AUX, and positioning the TEST switch in the TEST 1 (up) position, the test stimuli is provided to the auxiliary fuel and oxidizer servoamplifiers (2). This drives the fuel and oxidizer displays to an increase reading at approximately the same rates. This results in no or a very small unbalance and is so indicated on the unbalance meter. At this time TLM would receive an increase in propellant quantity from the auxiliary system TLM potentiometers. Releasing the TEST switch to center, removes the test stimuli. The crew displays lock at whatever readings they had been driven to. TLM would not receive any information of propellant quantity at this time.
With the PUG MODE switch in AUX and positioning the TEST switch in the TEST 2 (down) position, the test stimuli is provided to the auxiliary fuel and oxidizer integrators. This drives the fuel and oxidizer displays to a decrease reading at the same rates. ‘.This returns the crew displays close to the readings displayed prior to TEST 1 (up). The result is no or very little unbalance and is so indicated on the unbalance meter crew display. At this time TLM would receive the same information. Releasing the TEST switch to center, the test stimuli is removed. This locks the crew displays, and TLM would not receive any propellant SERVICE quantity information. If the TEST switch is positioned again to TEST 2 (down), the fuel and oxidizer crew displays would drive to a decrease reading at the same rates resulting in no or very little unbalance. TLM would receive a decrease in propellant quantity at the time. Releasing the TEST switch to center will lock the displays to the readings that they had been driven to. TLM would not receive any propellant quantity information at this time. 1’o return to the reading displayed prior to the second TEST 2 (down), the TEST switch is positioned to TEST 1 (up). The crew displays would drive to an increase reading at approximately the same rates. This returns the crew displays close to the reading displayed prior to the second TEST 2 (down). TLM would receive the same information at this time. Releasing the TEST switch to center I will lock the displays at the readings they had been driven to. TLM would receive no information at this time.
Propellant Utilization Valve 2.4.2.9.3
If an unbalance condition exists, which is determined from the INCR, DECR readings on the unbalance meter on MDC-3, the crew may use the propellant utilization valve to return the remaining propellants to a balanced condition. The propellant utilization is not powered until a THRUST-ON command is provided to the propellant utilization gauging control unit (SPS Quantity, Sensing, Computing and Indicating System Diagram and Propellant Utilization Valve and Flag Display Schematic). The propellant utilization valve housing contains two sliding gate valves within one housing. One of the sliding gate valves is the primary, and the remaining valve is the secondary. Stops are provided within the valve housing for the full increase or decrease positions. There are separate stops for the primary and secondary sliding gate valves. The secondary propellant utilization valve has twice the travel of the primary propellant utilization valve. This is to compensate for the primary propellant utilization valve failure in any position.
The propellant utilization valve controls are located on MDC-3. The OXID FLOW PRIM, SEC switch, selects the primary or secondary propellant utilization valve for operation. The normal position of the OXID FLOW VALVE select switch is PRIM. The OXID FLOW VALVE select s witch will not be moved to SEC unless a problem is encountered with the primary valve. The OXID FLOW VALVE INCR, NORM, DECR switch is utilized to position the selected primary or secondary propellant utilization valve. When the OXID FLOW VALVE switch is in NORM and the OXID FLOW VALVE select switch is in PRIM, the sliding gate valves are in a nominal flow position. The upper and lower OXID FLOW VALVE position indicators are gray. When the unbalance meter informs the crew of INCR, the OXID FLOW VALVE switch is positioned to INCR and the OXID FLOW VALVE select switch is in PRIM. The primary sliding gate valve then moves to the increase flow position. The valve movement will take approximately 3. 5 seconds to reach the full increase position. The upper OXID FLOW VALVE position indicator would then indicate MAX and the lower indicator would remain gray. The OXID FLOW VALVE would then be left in the INCR oxidizer flow position. This will increase the oxidizer flow approximately 3 percent above the nominal oxidizer flov1. When the unbalance meter informs the crew of approximately 0 unbalance, the OXID FLOW VALVE switch is then positioned to NORM. The primary sliding gate valve would then return to the nominal flow position. The valve movement will take approximately 3.5 seconds to reach the nominal flow position. The OXID FLOW VALVE upper indicator would then return to gray. The lower indicator would remain gray.
When the unbalance meter informs the crew to DECR the oxidizer flow, the OXID FLOW VALVE switch is then positioned to DECR with the OXID FLOW VALVE select switch in PRIM. The primary sliding gate valve then moves to the decrease flow position. The valve movement will take approximately 3. 5 seconds to reach the decrease flow position. This will decrease the oxidizer flow approximately 3-1/2 per cent below that of the nominal oxidizer flow. When the primary gate valve reaches the DECR position, the upper OXID FLOW VALVE position indicator remains gray and the lower indicator would indicate MIN. The OXID FLOW VALVE would then be left in the DECR position. When the unbalance n1eter informs the crew of approximately O unbalance, the OXID FLOW VA LVE switch is then positioned to NORM. The primary sliding gate valve would then return to the non1inal flow position. The valve movement will take approximately 3. 5 seconds to reach the nominal flow ·position. The OXID FLOW VALVE upper indicator would then return to gray. The lower indicator would remain gray.
The secondary propellant utilization valve is selected by positioning the OXID FLOW VALVE select switch from PRIM to SEC. The SEC position would be selected in the event of a problem with the PRIM. The secondary sliding gate valve would then be controlled and operated by the OXID FLOW VALVE INCR, NORM, DECR switch in the same manner as the primary valve. The position indicators would then operate in the same manner as in the prin1ary, however, now indicating secondary valve position.
The primary and/or secondary sliding gate valves cannot be positioned to block or close off the oxidizer flow completely. This is because the mechanical stops within the sliding gate valves.
Engine Thrust ON-OFF Control
The SPS Functional Flow Diagrams illustrate the THRUST ON- OFF logic in the command module computer (CMC), the stabilization control subsystem (SCS) and the manual SPS THRUST DIRECT ON delta V mode.
The SCS circuit breakers on MDC- 8 supply power to selected switches on MDC-7 and MDC-1. The MDC-7 switches distribute a-c and d-c power to the SCS hardware and d-c logic power to selected switches on MDC-1. The G&N (Guidance and Navigation) IMU (Inertial Measurement Unit} circuit breakers on MDC- 5 supply power to the G/N power switch on MDC-100. When the G/N power switch is positioned to IMU, power is supplied to the SC CONT switch on MDC-1. When the S C CONT Switch is positioned to CMC, a discrete event signal is supplied to the translation control. With the translation control not clockwise (neutral), this allows the discrete event enable to the CMC.
The SPS PILOT VALVE circuit breakers MNA and MNB on MDC- 8 supply power to the respective delta V THRUST NORMAL A and B switches on MDC- 1. The delta V THRUST NORMAL A and B switches on MDC- 1 supply arming power to the SPS relays and solenoid control valves. These switches also provide power to the FCSM SPS A and B Switches on MDC-1 (for CSM 106 through CSM 111, SPS Functional Flow Diagram). The FCSM SPS A and B switches are positioned and locked to the RESET /OVERRIDE position (for CSM 106 through CSM 111, SPS Functional Flow Diagram). The FCSM SPS A and B switches provide enabling power to the THRUST ON-OFF logic (for CSM 106 through CSM 111, SPS Functional Flow Diagram). The FCSM switch nomenclatures are covered with a blank decal on CSM 106 through CSM 111. The FCSM switches are removed on CSM 112 and subs (SPS Functional Flow Diagram).
The SPS engine THRUST-ON command is provided by the THRUST ON-OF F logic in the CMC or SCS delta V modes. The THRUST ON-OFF logic commands the SPS DRIVERS 1 and/or 2 . The SPS DRIVERS provide a ground in THRUST ON to the low side of the SPS solenoids and relays. The SPS DRIVERS provide the removal of the ground in THRUST-OFF conditions to the SPS solenoids and relays. DRIVER 1 provides a ground for the SPS solenoids No. 1 and No. 2 and SPS relays S31A3K1 and S31A3K3. DRIVER 2 provides a ground for SPS solenoids No. 3 and No. 4 and SPS relays S31A3K2 and S31A3K4. The SPS relays when energized provide power to the SPS quantity gauging system and SPS He VLV 1 and 2. The SPS He VLV switches on MDC-3 must be in A UTO and the SPS gauging switch on MDC-4 in AC 1 or AC2. The solenoid control valves when energized allow GN2 pressure to be supplied to the respective bipropellant valve (ball valve} actuators. The respective ball valves when opened, allow propellants to flow into the injector and atomize and ignite (hypergolic).
The SPS THRUST DIRECT ON switch on MDC-1 provides an alternate backup mode to the CMG and/or SGS delta V modes. When the SPS THRUST DIRECT ON switch is positioned to SPS THRUST DIRECT ON, a ground is provided to the low side of the SPS relays and solenoid control valves. The engine is commanded ON (providing the delta V THRUST NORMAL switches are in A and/or B) regardless of the SPS THRUST ON-OFF logic.
The SPS DRIVERS No. 1 and/or No. 2 will remove the ground on the low side of the SPS relays and solenoid control valves, when commanded by the THRUST-OFF logic in the CMG or SGS delta V modes. The THRUST-OFF command allows the SPS relays and solenoid control valves to de-energize. This allows the solenoid control valves to dump overboard the GN2 pressure within the actuator. The actuator spring pressure drives the ball valves closed, thus shutting the engine down.
In the SPS THRUST DIRECT ON mode, the ground on the low side of the SPS relays and solenoid control valves is removed by positioning the SPS THRUST DIRECT ON switch to NORMAL. This allows the solenoid control valves and relays to de-energize and shut the engine down in the same manner as the SPS DRIVERS.
The delta V THRUST NORMAL A switch positioned to A enables the (A bank) logic circuitry, arms the (A bank) SPS relays and solenoid control valves and energizes injector prevalve A. The injector prevalve then allows GN2 pressure to solenoid control valves No. 1 and No. 2. The delta V THRUST NORMAL B switch positioned to B enables the (B bank) logic circuitry, arms the (B bank) SPS relays and solenoid control valves and energizes injector prevalve B. The injector prevalve then allows GN2 pressure to solenoid control valves No. 3 and No. 4.
The CMG commands THRUST-ON in the CMG delta V mode by supplying a logic 0 to the THRUST ON-OFF logic. This is providing that the SC CONT switch is in the CMG position and translation control not clockwise (neutral). The SPS DRIVERS then provide the ground to the SPS relays and solenoid control valves. The delta V THRUST NORMAL A switch is positioned to A for single-bank operation. If double-bank operation is desired, 5 seconds or later after SPS THRUST-ON, the delta V THRUST NORMAL switch B is positioned to B. When the CMG changes the logic signal from a 0 to a 1, THRUST-OFF is commanded. The delta V THRUST NORMAL switch A and/or B are then positioned to OFF.
The SCS delta V mode is obtained by positioning the SC CONT switch to SCS. A thrust enable signal is obtained from the EMS/ delta V display counter if at or above 00000.0. THRUST ON is commanded by a +X translation and by depressing the THRUST-ON pushbutton (MDC-1). The +X command signal is necessary to enable the THRUST-ON logic. The +X command function may be obtained by depressing the DIRECT ULLAGE pushbutton on MDC-1, or positioning the translation control to +X, or positioning the translation control counterclockwise (SPS abort mode). The difference between the commands is that the DIRECT ULLAGE or SPS ABORT commands initiate an SMRCS engine direct coil firing and inhibits the SMRCS engine auto (coil) pitch and yaw solenoid drivers, IGNITION 1 (IGN- 1). The translation control positioned to +X utilizes the SM RCS engine auto coils; thus, attitude hold may be obtained. The SM RCS engine auto coils (pitch and yaw) are then inhibited automatically 1 second after SPS engine THRUST ON by the IGN-1 command. When the ground to the SPS solenoids and relays are provided by the SPS DRIVER or DRIVERS, the THRUST ON pushbutton may be released and the +X command terminated. The SPS engine firing is maintained by the SCS lock-in circuit. The delta V THRUST NORMAL A switch is positioned to A for single-bank operation. If double-bank operation is desired, 5 seconds or later after SPS THRUST ON, the delta V THRUST NORMAL B switch is positioned to B. The +X command function and the THRUST ON pushbutton depressed must be initiated again to supply THRUST-ON to the B bank and B SCS logic. When the EMS/ delta V counter reads . 1, the EMS 1 delta V counter enable signal is removed and THRUST-OFF is commanded. The delta V THRUST NORMAL A and/or B switch are then positioned to OFF.
The SPS THRUST ON-OFF logic may be switched from the CMC to the SCS delta V mode during an SPS engine thrusting period. The translation control may be rotated to the clockwise position or the SC CONT switch to SCS. In either case the THRUST ON-OFF logic is transferred to the SCS delta V mode. The SPS engine would continue thrusting (providing the EMS/ delta V counter is at or above 00000.0) by the presence of the SCS lock-in circuit. THRUST OFF will be commanded as in the normal SCS delta V mode.
If the manual SPS THRUST DIRECT ON mode is desired, the delta V THRUST NORMAL A switch is positioned to A (for single-bank operation) and the SPS THRUST DIRECT switch is positioned to SPS THRUST DIRECT ON. The SPS THRUST DIRECT ON switch positioned to SPS THRUST DIRECT ON provides a ground to the SPS relays and solenoid control valves. If double-bank of operation is desired, 5 seconds (or later) after SPS thrust ON, the delta V THRUST NORMAL B switch is positioned to B. To terminate thrust in the SPS THRUST DIRECT ON mode, the SPS THRUST DIRECT ON switch is positioned to NORMAL. Under certain conditions the SPS THRUST DIRECTION switch positioned to NORMAL will not shut the engine down. The conditions are: with the SGS LOGIC BUS PWR switch on MDC- 7 positioned to 2/3, and with the SC CONT switch in MDC-1 in SGS or SC CONT switch in CMC and translation control clockwise and delta V counter above 0. In the aforementioned condition the SCS 6. V mode has inadvertently paralleled the SPS THRUST DIRECT ON mode. With the SPS TRUST DIRECT ON switch in NORMAL, the EMS/ delta V counter reaching -.1 would provide THRUST OFF as in the normal SCS delta V mode. If the SPS THRUST DIRECT ON switch was positioned to NORMAL when the EMS/delta V counter was below -.1, the SPS THRUST DIRECT ON switch to NORMAL would shut the engine down.
A manual back-up THRUST OFF command for the CMC, SCS, or SPS THRUST DIRECT ON mode is obtained by the delta V THRUST NORMAL A and B switches. If single-bank operation was used, positioning the applicable delta V THRUST NORMAL switch to OFF would shut the engine down. If double-bank operation was used, positioning delta V THRUST NORM AL switches A and B to OFF would shut the engine down. Positioning the delta V THRUST NORMAL switches A and B to OFF removes the arming power from the SPS relays and solenoid control valves.
The SPS THRUST- ON-OFF logic circuitry also provides several output functions. A ground is provided for the illumination of the THRUST-ON lamp on the EMS display. The ground is sensed by SPS ignition logic. It is noted on , SPS Functional Flow Diagram that as long as the EMS MN A and/or MN B circuit breakers on MDC-8 a r e closed, with the delta V THRUST NORMAL switches A and B on M DC- 1 in the OFF position and the FCSM SPS A and B switches on MDC-1 positioned and locked in the RESET /OVERRIDE position on CSM 106 through CSM 111 (SPS Functional Flow Diagram), the SPS THIZUST ON light 0n the EMS MDC-1 will not be illuminated. The FCSM SPS A and B switches are removed on CSM 112 and subs (SPS Functional Flow Diagram). The SPS THRUST ON light on the EMS will illuminate when a ground is provided through the logic circuit d rive r No. 1 and/or No. 2, or when the SPS THRUST DIRECT ON Switch on MDC-1 1s positioned to SPS THRUST DIRECT ON.
The SM RCS auto pitch ·and yaw RCS disabling signal IGN- 1 is not present until one second after SPS ignition in the SCS delta V mode, and is not removed until one second after SPS THRUST-O FF in the SCS delta V mode, IGN-2 logic signal is required for the SCS-TVC and MTVC logic . The IGN-2 logic signal is generated at the same time the SPS solenoids are grounded when in the SCS delta V mode, but is not removed until one second after ground is removed to maintain SC control during SPS thrust-off decay.
The SPS ROUGH ECO caution and warning light on MDC- 2 for CSM 106 through CSM 111 is covered with a blank decal. The flight combustion stability 1nonitor system is rendered inoperative on CSM 106 through CSM 111 by stowing the power input wires to the FCSM, SPS Functional Flow Diagram. The FCSM SPS A and SPS B switch nomenclatures are covered by a blank decal on CSM 106 through CSM 111. The FCSM SPS A and SPS B switches are positioned and guarded to the RESET /OVERRIDE position on CSM 106 through CSM 111 (SPS Functional Flow Diagram). The SPS RO UGI-I ECO caution and warning light, the FCSM SPS A and SPS B switches, the SPS READY signal to the CMC and the FCSM components are physically removed on CSM 112 and subs (SPS Functional Flow Diagram).
PERFORMANCE AND DESIGN DATA
Design Data
The following list contains specific data on the components in the SPS:
Helium Tanks (2)
3600±50- psia nominal fill pressure, 4400-maximum I operating pressure. Capacity 19. 4 cubic ft each, inside diameter 40 in., and a wall thickness of 0.46 in. Weight 393 lbs. each.
Regulator Units (2)
Working regulator, primary 186±4 psig, secondary 191±4 psig. Primary lockup 195 psig. Secondary lockup 200 psig. Inlet filter 10 microns nominal, 25 microns absolute. Normally locked- up (closed) regulators, primary 181±4 psig, secondary 191±4 psig. Prin1ary lockup 195 psig. Secondary lockup 205 psig.
Check Valves – Filters
Inlet port 40-micron nominal, 74-micron absolute. Test ports 50- micron nominal and 74-micron absolute. One at inlet to check valve assembly; one at each test port.
Pressure Transducers (2)
Fuel and oxidizer underpressure setting (SPS PRESS light, MDC-2), 157 psia. Fuel and oxidizer overpressure setting (SPS PRESS light MDC-2), 200 psia.
Propellant Utilization Valve Control (2)
Increase position, approximately 3% more than nominal flow.
Norm al position, nominal flow. Decrease position, approximately 3.53% less than the nominal flow.
Response time, normal to increase or vice versa, or normal to decrease or vice versa, is 3.5 seconds.
Quantity Sensing System Accuracy
Indicators – Difference between actual quantity and total indicated quantity for each propellant shall not exceed ±0. 35% of full tank plus +O. 35% of propellant remaining separately to total fuel and oxidizer separately.
T LM – Difference between actual quantity in each tank and that represented to TLM be within ±0.35 % of full tank plus +0.35 % of propellant remaining.
Helium Relief Valve (2)
Diaphragm rupture, 219±6 psig. Filter, 10 microns nominal, 25 microns absolute. Relief valve relieves at 212 minimum to 225 psig maximum, reseats at 208 psig minimum. FLOW capacity 3 lbs/minute maximum at 60° F and 225 psig. Bleed device closes when increasing pressure reaches no greater than 150 psig in cavity, and reopens when decreasing pressure has reached no less than 20 psig.
Oxidizer Storage Tank # 1
Total tank capacity 11284. 69 lbs.
Fill pressure 110 psia.
Height 154. 47 in.
Inside diameter 45 in., wall thickness 0.054 in.

  1. 52 cubic feet
    Oxidizer Sump Tank #2
    Total tank capacity 13923. 72 lbs. = 57. O %
    Fill pressure 110 psia.
    Height 153.8 in., diameter 51 in., wall thickness 0. 054 in.
  2. 48 cubic feet
    Fuel Storage Tank # 1
    Total tank capacity 7058. 36 lbs.
    Fill pressure 110 psia.
    Height 154. 47 in., diameter 45 in.
    Wall thickness 0. 054 in.
  3. 52 cubic feet
    Fuel Sump Tank #2
    Total tank capacity 8708. 10 lbs. – 57. 0%.
    Fill pressure 110 psia.
    Height 153. 8 in., diameter 51 in.
    Wall thickness 0. 054 in.
  4. 48 cubic feet
    Total Propellant (In Tanks)
    Total oxidizer 25208. 41 lbs = 103. 4%.
    Total fuel 15766. 46 lbs = 103. 4%.
  5. 9% oxidizei gaugeable 24389. 10 lbs.
  6. 9% fuel gaugeable 15252. 70 lbs.
    All Propellant Tanks
    Pressurized to 10±5 psig of helium when empty to prevent collapsing of tanks (negative pressure of 0.5 psig will collapse tanks).
    Interface Flange Filter (2)
    500 microns absolute.
    GN2 Bipropellant Valve Control Systems (2)
    GN2 storage vessel pressure 2500±50 psi at 68 °F, 2900 psi at 130°F. Support 43 valve actuations. 120 – cubic inch capacity, each. Inside diameter 4. 65 in., length 9, 6 in.
    Regulator – single stage, dynamic 187 psig minimum. Lockup pressure 195 to 225 psig. Relief valve relieves at 350± 15 psi, reseats, at not less than 250 psi.
    GN2 filters, one between each GN2 supply tank and injector prevalve, 5 microns nominal and 18 microns absolute. One at each GN2 regulator outlet test port, 5 microns nominal and 18 microns absolute.
    Engine (1)
    750-second service life. Support 36 restarts minimum.
    Expansion ratio = 6 to 1 at ablative chamber exit area = 62. 5 to l at nozzle extension exit area.
    Chamber cooling, ablation and film cooled. Nozzle extension, radiation cooled.
    Injector type, baffled, unlike impingement.
    Oxidizer lead 8 degrees
    Length 159. 944 in. maximum Nozzle extension exit diameter 98. 4 in. inside diameter
    Weight approximately 650 lbs.
    Injector flange temperature, illuminates SPS FLANGE TEMP HI caution and warning light on MDC-2 at 480°F. (Light disconnected and covered with decal on CSM 108 and subs.)
    SPS Pc transducer, Pc displayed on MDC-1 through SPS Pc theta switch to SPS Pc theta, indicator on MDC- 1.
    Green range on indicator is 65 to 125% (psia). Normal 95 to 105 % (psia).
    Heaters (6)
    6 heaters, 2 elements on each heater, 3 elements in series on the fuel side rated at 15 watts, 9. 4 watts, and 18.8 watts; 3 elements in series on the oxidizer side rated at 15 watts, 9. 4 watts, and 18. 8 watts. SPS heater Switch position A/B on MDC-3 supplies 28 vdc to 12 elements. SPS heater switch position A on MDC-3 supplies 28 vdc to 6 elements.
    Gimbal Actuators
    Structural mounting pad offset 4 degrees to +Y. About Z-Z axis ±4.5 (+0. 5, -0. 0) degrees with additional 1 degree for snubbing (yaw), null 1 degree to + Y (thrust vector) during SPS thrusting periods, 0 degree during non SPS thrusting periods. About Y-Y axis ±4 .5 (+0.5, – 0.0) degrees with additional 1 degree for snubbing (pitch), null 2 degrees to +Z (thrust vector) during SPS thrusting periods, + 1.5 to +Z during non SPS thrusting periods.
    Overcurrent Relays (4)
    Overcurrent dependent upon temperature during start transient and steady state. Quiescent current of 60 milliamps ± 10 percent. Pressurized to 3 to 5 psi of dry air. Deflect ion rate 0.12 radians per second (low side, 6.87° per second) to 0. 132 radians per second (high side, 7.56° per second).
    Performance Data
    Refer to CSM/LM Spacecraft Operational Data Book
    SPS Electrical Power Distribution
    Electrical Power Distribution Schematic (CSM 106 Through CSM 111)

(CSM 112 and Subs)

OPERATIONAL LIMITATIONS AND RESTRICTIONS
a. Propellant quantity gauging subsysten1 is operational only during engine thrusting periods. A 4±1-second SPS thrusting period is required before the primary capacitance system provides updated information to telemetry and crew displays with the PUG MODE switch in PRIM or NORM. In addition, with the PUG mode switch in PRIM, NORM, or AUX position, the crew display readouts and unbalance meter should not be considered accurate until the SPS engine is tl1rusting for at least 25 seconds. The delays plus the previous statement are to allow the propellant to settle and stabilize within the SPS tanks before the gauging system is within its accuracy.
b. Pitch and yaw gimbal actuator limitations:

  1. Allow one – half second between actuation of the GMBL MOTOR switches on MDC – 1 to minimize power transients.
  2. The secondary gimbal motors should be in operation in the pitch and yaw gimbal actuator for any SPS engine firing for back-up modes of operation.
  3. The TVC SERVO PWR switch 1 on MDC-7 should not be positioned to AC1/MNA and TVC SERVO PWR switch 2 on MDC-7 positioned to AC2/MNB or switch 1 to AC2/MNB and switch 2 to AC1/MNA in excess of one hour prior to an SPS engine firing. This would result in some preheating of the pitch and yaw gimbal actuator clutches which could result in a degradation of actuator clutch performance.
  4. Do not operate the pitch and yaw ·gimbal actuator motors without applying power to the thrust vector control servo amplifiers as the pitch and yaw gimbal actuators have a natural tendency to extend or retrace (depending on altitude and pressure) and may drive the SPS engine from snub to snub resulting in vehicle motion.
  5. The pitch and yaw gimbal actuator operating time should be held to a minimum. The pitch and yaw gimbal actuator clutches with gimbal motors operating are capable of holding the SPS engine at a given position during the boost phase of the mission (820 seconds) followed by a 100 – second SPS engine abort firing without degradation. If no SPS abort firing is required the gimbal motors are shutdown at earth orbit acquisition. The gimbal motors are placed into operation 1 minute prior to S- IVB translunar injection with clutches holding the SPS engine at a given position, followed by a 5 -1/2-minute S – IVB firing (t rans lunar injection), followed with CSM separation from the S-IVB, followed by a 6 14-second SPS engine firing, and followed by 1 minute idle post fire before gimbal motors are turned off and the clutches not degraded.
    c. Engine design minimum impulse control limit is 0.4 second; however, mission minimum impulse may be longer.
    d. For other operational limitations and restrictions, refer to Volume 2 of the AOH SPS malfunction procedures.

APOLLO 11 OPERATIONS HANDBOOK BLOCK II SPACECRAFT
VOLUME l SPACECRAFT DESCRIPTION

I

STABILIZATION AND CONTROL SYSTEM (SCS) (SC 106 AND SUBS UNLESS OTHERWISE NOTED)
INTRODUCTION
CONTROLS, SENSORS, AND DISPLAYS
SCS Hardware
SCS Flight Hardware Diagram
Controls and Displays
Rotation Control
Rotation Control Diagram
Rotation Control Interfaces Schematic
Translation Control
Translation Control Diagram
Attitude Set Control Panel
Attitude Set Control Panel Diagram
Gimbal Position and Fuel Pressure Indicator
Gimbal Position and Fuel Pressure Indicator Diagram
Flight Director Attitude Indicator
Flight Director Attitude Indicator Diagram
ARS Switching Diagram
Functional Switching Concept
Display Switching Interfaces
Spacecraft Control Switching Interfaces
ATTITUDE REFERENCE SUBSYSTEM
SGS Attitude Reference Overview
Gyro Display Coupler (GDC)
GDC Configurations
FDAI Attitude Select Logic Schematic
FDAI Display Sources
FDAI Rate Select Logic Schematic
Total Attitude and Error Display Sources
ATTITUDE CONTROL SUBSYSTEM
Introduction
Hardware Function
Gyro Assembly – 1
BMAG Logic and Outputs Schematic
Gyro Assembly -2
Rotational Controllers
Breakout Switches
Transducer
Direct Switches
Translation Controller
Translation Control Interfaces Schematics
Translation Commands
Clockwise Switches
Counterclockwise Switch
Electronics Control Assembly
Reaction Jet Engine Control
Auto RCS Enabling Power Schematic
Reaction Control Subsystem Interface
General
SM Jet Functions Diagram
Automatic Coil Commands
Power
Auto RCS Signal Flow Schematic
Auto RCS Logic Schematic
Direct Coil Commands
ACCEL CMD Selection
MIN IMP Selection
Direct Coil Commands
Direct Control Loop Schematic
Direct Rotational Control
Direct Ullage
Separation Ullage
SM/CM Separation
CM PROPELLANT JETT-DUMP Control
Attitude Configurations
General
Automatic Control
SCS Attitude and Thrust Vector Control System Schematic
Attitude Deadband Switch Position Table
Manual Control
Proportional Rate
Max Prop. Rate CMD
Minimum Impulse
Acceleration Command
Direct
SCS D-C Power Distribution Schematic
Translation Control
ACS Control Capabilities Diagram
THRUST VECTOR CONTROL
Introduction
TVC Panel Configurations
TVC Signal Flow Schematic
TVC Switching Table
GPI Signal Flow
GPI Signal Flow Schematic
SCS Auto TVC
Manual Thrust Vector Control
Engine Ignition, Thrust On- Off Logic
Engine Ignition-Thrust On-Off Logic Schematic
POWER DISTRIBUTION
SCS D-C Power Distribution Schematics
ENTRY MONITOR SYSTEM
Entry Functions
Threshold Indicator (. 05 G)
EMS Block Diagram
Roll Stability Indicator
Corridor Verification Indicators
EMS Corridor Evaluation Diagram
Delta V /Range-To-Go Indicator
Scroll Assembly
Delta Velocity Functions
SPS thrust-on indicator
Delta Velocity Indicator
SPS Thrust-Off Command
EMS Switches
Mode Switch
FUNCTION Switch
OFF
EMS Test 1
EMS Test 2
EMS Test 3
EMS Test 4
EMS Test 5
RNG SET
Vo SET
ENTRY
Delta V Test
Delta SET / VHF RNG
Delta V
Delta V / EMS SET Switch
GTA Switch
Entry Scroll
EMS Scroll Format Diagram
EMS ln-Flight Instructions for delta V, VHF Ranging, Self-Test and Entry Diagram
EMS Lunar Non-Exit Range Limit Pattern
EMS Lunar 3500 NM Range Limit Pattern
EMS Functional Data Flow
EMS Functional Block Diagram
Accelerometer
Threshold and Corridor Verification Circuits
Scroll Assembly G Axis Drive Circuits
Scroll Assembly Velocity Axis Drive Circuits
Delta V/RANGE Display Circuits
Roll Stability Indicator Drive
Thrust-Off Function

STABILIZATION AND CONTROL SYSTEM (SCS) (SC 106 AND SUBS UNLESS OTHERWISE NOTED)
INTRODUCTION
The stabilization and control subsystem (SCS) provides a capability for controlling rotation, translation, SPS thrust vector, and displays necessary for man in the loop control functions.
The SGS is divided into three basic subsystems: attitude reference, attitude control, and thrust vector control. These subsystems contain the elements which provide selectable functions for display, automatic and manual attitude control, and thrust vector control. All control functions are a backup to the primary guidance navigation and control subsystem (PGNCS). The SGS provides two assemblies for interface with the propulsion subsystem; these are common to SCS and PGNCS for all control functions. The main display and controls panel contains the switches used 1n selecting the desired display and control configurations.
The SGS interfaces with the following spacecraft subsystems:
Telecommunications Subsystem-Receives all down-link telemetering from SCS.

  • Electrical Power Subsystem-Provides primary power for SCS operation.
  • Environmental Control Subsystem-Transfers heat from SCS electronics.
  • Sequential Events Control Subsystem-Provides abort switching and separation enabling of SCS reaction control drivers and receives manual abort switch closure from the SCS.
  • Orbital Rate Drive Electronics for Apollo and LM-Interfaces with the pitch axis of the FDAI ball to give a local vertical referenced display.
  • Guidance Navigation and Control Subsystem:
  • Provides roll, pitch, and yaw total attitude and attitude error inputs for display.
  • Provides RCS on-off commands to the SCS interface assembly for attitude control.
  • Provides TVC servo commands to the SCS interface assembly for automatic thrust vector· control
  • Provides automatic SPS on-off command to SCS interface assembly for Delta V control
  • Receives switch closure signals from the SCS translation and rotation controls.
  • Entry monitor subsystem: the EMS provides SPS enabling/disabling discretes to the SCS thrust on-off logic for tl1e SPS.
  • Propulsion subsystem:
    o The service propulsion subsystem receives thrust vector direction commands and thrust on- off commands from the SCS that can originate in the PGNCS or the SCS.
    o The reaction control subsystem receives thrust on-off commands from the SCS that can originate in the PGNCS or the SCS.
    Detailed descriptions of the SCS hardware, attitude reference subsystem, attitude control subsystem, and thrust vector control subsystem are contained in the following paragraphs.
    CONTROLS, SENSORS, AND DISPLAYS
    As an introduction to the stabilization and control system (SCS) a brief description is given of the hardware comprising one complete system. A more detailed discussion follows for the hand controls, displays, and gyro assemblies. The configurations within the SCS resulting from panel 1 switch positions are also presented.
    SCS Hardware
    The function of the SCS hardware shown in the SCS Flight Hardware Diagram as follows:
    Electronic Control Assembly (ECA) – Contains the circuit elements required for summing, shaping, and switching of the r ate and attitude error signals and manual input signals necessary for stabilization and control of the thrust vector and the spacecraft attitude.
  • Reaction Jet and Engine ON-OFF Control (RJ/EC) – Contains the solenoid drivers and logic circuits necessary to control both the RCS automatic solenoid coils and SPS solenoid control-valves.
  • Electronic Display Assembly (EDA) – Provide s the interface between the signal sources to be displayed and the FDAIs and GPI. The EDA also provides signal conditioning for telemetry of di splay signals.
  • Attitude Set Control Panel (ASCP) – Interfaces with either of the total attitude sources to enable manual alignment of the SGS total attitude. Provides an attitude error for display.
  • Thrust Vector Servoamplifier (TVSA) – Provides the electrical interface between the command electronics and the gimbal actuator for positioning the SPS engine.
  • Gyro Display Coupler (GDC) – Provides the interface between the body rate sensors and displays to give an accurate readout of spacecraft attitude relative to a given reference coordinate system.
  • Gimbal Position and Fuel Pressure Indicator (GP/ FPI) – Provides a redundant display of the SPS pitch and yaw gimbal angles and a means of manually trimming the SPS before thrusting. The indicator has the alternate capability of providing a display of launch vehicle (S-II and S-IVB) propellant tank ullage pressures.
  • Rotation Controls (RC) (2) – Provides a means of exercising manual control of spacecraft rotation in either direction about each axis. Also the RC may be used for manual thrust vector control. It provides the capability to control spacecraft communications with a push- to – talk trigger switch.
  • F light Director Attitude Indicator (FDA!) (2 Only) – Provides to the crew a display of spacecraft attitude, attitude error, and angular rate information from the PGNCS or SCS.
  • Translation Control (TC) – Provides a means of exercising manual control over rectilinear motion of the spacecraft in both directions along the three spacecraft axes. It also provides the capability for manual abort initiation during launch by ccw rotation. Transfer of SC control from PGNCS to SCS is accomplished by cw rotation.
  • Gyro Assemblies (GA) (2) – Each gyro assembly contains three bodymounted attitude gyros (BMAG) together with the electronics necessary to provide output signals proportional to either angular rate or to angular displacement.
    SCS Flight Hardware Diagram

Controls and Displays
The SGS controls and displays consist of the following assemblies:

  • Rotation control (RC) – 2 units
  • Translation control (TC)
  • Attitude set control panel (ASCP)
  • Gimbal position and fuel pressure indicator (GP/ FPI)
  • Flight director attitude indicator (FDAI) – 2 assemblies
    Rotation Control
    Two identical rotation controls (RCs) are provided. The controls are connected in parallel so that they operate in a redundant fashion without switching. Pitch commands are commanded about a palm-centered axis, yaw commands about the grip longitudinal axis, while roll commands result from a left-right motion (Rotation Control Diagram). Within the RC there are three command sources per axis:
  1. Breakout Switches (±BO) – A switch closure occurs whenever the RC is moved 1. 5 degrees from its null position. Separate switches are provided in each axis and for each direction of rotation. These six breakout switches are used to provide: command signals to the command module computer (CMG), SGS minimum impulses, acceleration commands, BMAG cage signals, and proportional rate command enabling.
  2. Transducers – Transducers produce a-c signals proportional to the rotation control displacement from the null position. These signals are used to command spacecraft rotation rates during SGS proportional rate control and to command SPS engine gimbal position during manual thrust vector control (MTVC ). One, two, or all three transducers can be used simultaneously, generating corresponding command signals.
  3. Direct Switches – Redundant direct switches will close whenever the control is moved a nominal 11 degrees from its null position (hardstops limit control movement to ±11. 5 degrees from null in all axes). Separate switches are provided in each axis and for each direction of rotation. Direct switch closure will produce acceleration commands through the RCS direct solenoids.
    Rotation Control Diagram

The rotation control is provided with a tapered female dovetail on each end of the housing. This dovetail mates with mounting brackets on the couch armrests. When attached to the armrests, the input axes are approximately parallel with spacecraft body axes. The Rotation Control Interfaces Schematic illustrates control motions about its axis and the resulting commands to the RCS, PGNCS, or SCS. A trigger-type push-to-talk switch is also located in the control grip. Redundant locking devices are provided on each control.
Rotation Control Interfaces Schematic

Translation Control
The translation control provides a means of accelerating along one or more of the spacecraft axes. The control is mounted with its axes approximately parallel to those of the spacecraft. The spacecraft will accelerate along the X-axis with a push-pull motion, along the Y-axis by a left-right motion, and along the Z-axis by an up-down command (Translation Control Diagram). Redundant switches close for each direction of control displacement. These switches supply discrete commands to the CMG and the RJ /EC. A mechanical lock is provided to inhibit these commands. In addition the T -handle may be rotated about the longitudinal axis:
a. The redundant clockwise (CW) switches will transfer spacecraft control from CMG to SCS. It may also transfer control between certain submodes within the SGS.
b. The redundant counterclockwise (CCW) switches provide for a manual abort initiation during the launch phase. A discrete signal from switch closure is fed to the master events sequence controller (MESC) which initiates other abort functions.
Translation Control Diagram

Neither the CW or CCW functions are inhibited by the locking switch on the front of the controller. The T-handle will remain in the CW or CCW detent position without being held, once it is rotated past approximately plus or minus 12 degrees.
Attitude Set Control Panel (ASCP)
The ASCP (Attitude Set Control Panel Diagram) provides, through thumbwheels, a means of positioning differential resolvers for each of the three axes. The resolvers are mechanically linked with indicators to provide a readout of the dialed angles. The input signals to these attitude set resolvers are from either the IMU or the GDC. The inertial (Euler) attitude error output signals are sine functions of the difference angles between the desired attitude, set by the thumbwheels, and’ the input attitude from the GDC or IMU. The GDC Euler output can be used to either align the GDC or to provide fly- to indications on the FDAI attitude error needles.
Attitude Set Control Panel Diagram

Characteristics of the counters are:
a. Indicates resolver angle in degrees from electrical zero, and allows continuous rotation from 000 through 359 to 000 without reversing the direction of rotation.
b. Graduation marks every 0.2 degree on the units digit.
c. Pitch and roll are marked continuously between O and 359. 8 degrees. Yaw is marked continuously from Oto 90 degrees a nd from 270 to 359. 8 degrees.
d. Readings increase for an upward rotation of the thumbwheel s. One revolution of the thumbwheel produces a 20-degree change in the resolver angle and a corresponding 20-degree change i n the counter reading.
The counter readouts are floodlighted and the nomenclature (ROLL, PITCH, and YAW) is backlighted by electroluminescent lighting.
Gimbal Position and Fuel Pressure Indicator (GP/ FPI)
The GP/FPI (Gimbal Position and Fuel Pressure Indicator Diagram) contains redundant indicators for both the pitch and yaw channels. During the boost phases, the indicators display S-II and S-IVB propellant tank ullage pressures. S-II fuel pressure (or S-IVB oxidizer pressure depending on the launch vehicle configuration) is on the redundant pitch indicators while S-IVB fuel pressure is on the two yaw indicators. The gimbal position indicator consists of two dual servometric meter movements, mounted within a common hermetically sealed case. Scale illumination uses electroluminescent lighting panels.
Gimbal Position and Fuel Pressure Indicator Diagram

For an SCS del ta V mode, manual SPS engine gimbal trim capability is provided. Desired gimbal trim angles are set in with the pitch and yaw t rim thumbwheels. The indicator displays SPS engine position relative to actuator null and not body axes. The range of the engine pitch and yaw gimbal displays are ±4.5 degrees. This range is graduated with m arks at each 0.5 degree and reference numeral at each 2 -degree division. The range of the fuel pressure scale is O to 50 psi with graduations at each 5 – psi division, and reference numerals at each 10-psi division. A functional description of the GPI display circuitry which shows the redundancy is in GPI Signal Flow.
.
Flight Director Attitude Indicator (FDAI)
The FDAIs provide displays to the crew of angular velocity (rate), attitude error, and total attitude (Flight Director Attitude Indicator Diagram). The body rate (roll, yaw, or pitch) displayed on either or both FDAIs is derived from the BMAGs in either gyro assembly 1 or 2. Positive angular rates are indicated by a downward displacement of the pitch rate needle and by leftward displacement of the yaw and roll rate needles. The angular rate displacements are “fly-to” indications as related to rotation control direction of 1notion required to reduce the indicated rates to zero. The angular rate scales are marked with graduations at null and ±full range, and at ±1/5, ±2/5, ±3/5, and ±4/5 of full range. Full-scale deflection ranges are obtained with the FDAI SCALE switch and are:

  • Pitch rate: ±1 deg per sec, ±5 deg per sec, ±10 deg per sec
  • Yaw rate: ±1 deg per sec, ±5 deg per sec, ±10 deg per sec
  • Roll rate: ±1 deg per sec, ±5 deg per sec, ±50 deg per sec
    Flight Director Attitude Indicator Diagram

Servometric meter movements are used for the three rate indicator needles. The FDAI attitude error needles indicate the difference between the actual and desired spacecraft attitude. The attitude error signal ca n be derived from several sources: The uncaged BMAGs from GA-1, the CDU s (PGNCS), or the ASCP-GDC/IMU (ARS Switching Diagram). Positive attitude error is indicated by a downward dis placement of the pitch error needle, and by a leftward displacement of the yaw and roll error needles. The attitude error needle displacements are “fly-to” indications as related to rotation control direction of motion, required to reduce the error to zero. The ranges of the error needles are ±5 degrees or ±50 degrees for full- scale roll error, and ±5 degrees or ±15 degrees for pitch and yaw error. The error scale factors are selected by the FDAI SCALE switch that also establishes the rate scales. The pitch and yaw attitude error scales contain graduation n1arks at null and ±full scale, and at ±1 /3 and ±2/3 of full scale. The roll attitude scale contains marks at null, ±1 / 2, and ±full scale. 1′ he attitude error indicators utilize servometric meter movements.
ARS Switching Diagram

Spacecraft orientation, with respect to a selected inertial reference frame, is also displayed on the FDAI ball. This display contains three servo control loops that are used to rotate the ball about three independent axes. These axes correspond to inertial pitch, yaw, and roll. The control loops can accept inputs from either the IMU gimbal resolvers or tl1e GDC resolvers. Selecting the source is covered in Functional Switching Concept
.
The control loops are proportional. servos; therefore, the angles of rotation of the ball must correspond to the resolver angles of the source. The FDAI, illustrated in figure 2. 3- 6, has the following markings:
a. Pitch attitude i s represented on the ball by great semicircles. The semicircle (as interpolated), displayed under the FDAI inverted wing symbol, is the inertial pitch at the time of readout. The two semicircles that make up a great circle correspond to pitch attitude s of Q and G+ 180 degrees.
b. Yaw attitude is represented by minor circles. The display readout is similar to the pitch readout. Yaw attitude circles are restricted to the intervals – 270 to 360 degrees (0°) and O (360°) to 90 degrees.
c. Roll attitude is the angle between the wing symbol and the pitch attitude circle. The roll attitude is more accurately displayed on a scale attached to the FDAI mounting, under a pointer attached to the roll (ball) axis.
d. The last digits of the circle markings are omitted. Thus, for example, 3 corresponds to 30, and 33 corresponds to 330.
e. The ball is symmetrically marked (increment wise) about the 0-degree yaw and 0/ 180-degree pitch circles. The following comments provide clarification for areas of the ball not shown in Flight Director Attitude Indicator Diagram.
i. Marks at I -degree increments are provided along the entire yaw 0-degree circle.
ii. The pitch 180-degree semicircles has the same marking increments as the 0-degree semicircle.
iii. Numerals along the 300- and 60-degree yaw circles are spaced 60-pitch degrees apart. Note that numerals along the 30-degree yaw circle are spaced 30-pitch degrees apart.
f. f. The red areas of the ball, indicating gimbal lock, are defined by 270 < yaw < 285 degrees and 75 < yaw < 90 degrees.
Functional Switching Concept
The Block II SCS utilizes functional switching concepts as opposed to “mode select” switching mechanized in the Block I system.
Functional switching requires manual switching of numerous independent panel switches in order to configure the SCS for various mission functions (e.g., midcourse, delta Vs, entry, etc.). Mode switching would, for example, employ one switch labeled “midcourse” to automatically accomplish all the necessary system gain changes, etc., for that mission phase. Thus mode selection simplifies the crew tasks involved, but limits system flexibility between various mode configurations.
Function select switching, on the other hand, requires more crew tasks, but offers flexibility to select various gains, display scale factors, etc., as independent system capabilities. Function select switching also allows flexibility to “switch out” part of a failed signal path without affecting the total signal source (e.g., SCS in control of the vehicle with GN displays still presented to the crew).
Display Switching Interfaces
The FDAI switches determine the source of display data, the FDAI selected, and the full-scale deflections of the attitude error and rate needles. The source of rate information for display will always be from BMAG 2 unless BMAG 1 is put into a backup rate configuration. Other switches also modify the data displayed and these will be pointed out as they are discussed. Both FDAIs are also assumed to be properly energized from the power switching panel.
Spacecraft Control Switching Interfaces
There are two sources of vehicle controls selectable from the SC main display console: SCS or CMC. CMC is the primary method of control and the SCS provides backup control. The vehicle attitude control is obtained from the reaction control engines and the thrust vector control from the service propulsion engine.
ATTITUDE REFERENCE SUBSYSTEM
SGS Attitude Reference Overview

Gyro Display Coupler (GDC)
The purpose of the GDC is to provide a backup attitude reference system for accurately displaying the spacecraft position relative to a given set of reference axes. Spacecraft attitude errors can be displayed on an FDAI using the ASCP-GDC difference. This error signal provides a means of aligning the attitude reference system to a fixed reference while monitoring the alignment process on the error needles; or it could be used in conjunction with manual maneuvering of the spacecraft with the error needles representing fly-to-commands.
The GDC can be configured for the following configurations:
GDC align – Provides a means of aligning the GDC to a given reference.

  • Euler – Computes total i11ertial attitude from body rate signal inputs.
  • Non-Euler – Converts analog body rate signals to digital body rate pulses.
  • Entry (. 05 G) – Provides redundant outputs of attitude changes with respect to the roll stability axis.
    GDC Configurations
    Panel switch positions necessary to obtain each particular GDC function are discussed below.
    a. The GDC align mode is used when aligning the GDC Euler angles (shafts) to the desired inertial reference selected by the ASCP thumb wheels (resolvers). This is done by interfacing the GDC resolvers with the ASCP resolvers (per axis) to generate error signals which are proportional to the sine of the difference between the resolver angles. (See FDAI Attitude Select Logic Schematic.) When the GDC ALIGN switch is pressed, these error signals are fed back to the GDC input to drive the GDC /ASCP resolver angular difference to zero. During the align operation all other inputs and functions for the GDC are inhibited. When the EMS ROLL switch is up and the GDC ALIGN switch is pressed, the RSI pointer rotates (open loop) in response to yaw ASCP thu1nbwheel rotations.
    b. In the Euler configuration, the GDC accepts pitch, yaw, and roll d-c body rate signals from either gyro assembly and transforms them to Euler angles to be displayed on either FDAI ball. The GDC Euler angles also interface with the attitude set control panel (ASCP) to provide Euler angular errors, which are transformed to body angular errors for display on either FDAI attitude error indicators.
    c. c. With the CMC A TT switch in the GDC position, pitch, yaw, and roll d – c body rate signals from either gyro assembly are converted to digital body rate signals and sent to the G&N command module computer. Power is not only removed from both FDAI ball-drive circuits when this configuration is selected, but ASCP-generated errors are also removed.
    d. In the entry mode (>/= . 05 G), the GDC accepts yaw and roll d-c rate signals from:
  1. Either gyro assembly, and computes roll attitude with respect to the stability axis to drive the RSI on the entry monitor system.
  2. Gyro assembly 1, and computes roll attitude with respect to the stability axis to drive either FDAI 1 or FDAI 2 in roll only.
    FDAI Attitude Select Logic Schematic

FDAI Display Sources
The two FDAI s display total attitude and attitude errors that may originate within the SCS or PGNCS. They also display angular rate from the SCS. The flight crew establishes the FDAI sources by panel switch selection. (See FDAI Rate Select Logic Schematic and ARS Switching Diagram.)
FDAI Rate Select Logic Schematic

Total Attitude and Error Display Sources
The total attitude and attitude error display selections result from combinations of panel switch positions (FDAI Attitude Select Logic Schematic). When both FDAIs are selected, the platform gimbal angles will always be displayed on FDAI 1 while GDC Euler angles will be displayed on FDAI 2. In order to select the source of attitude display to a particular FDAI, that FDAI and source (G&N or SCS) must be selected (figure ARS Switching Diagram). The other FDA I will be inactive. It should be noted that any time total attitude is to be displayed on either FDAI, the CMC ATT Switch must be in the IMU position.
The FDAI attitude display may be modified by a NASA-supplied Orbital Rate Display-Earth and Lunar (ORDEAL) unit. The ORDEAL unit is inserted electrically in the pitch channel between the electronic display assembly and FDAI to provide a local-vertical display in the pitch axis of either (or both) FDAIs. Control s on the unit permit selection of earth or lunar orbits and orbital altitude adjustment.
The FDAI attitude error display source can be either the SCS or the G&N, with two sources per system. The attitude error sources are as follows:
a. The BMAG 1 error display is an indication of gimbal precession about its null point, assuming the gyro is uncaged, and may only be displayed when the SOURCE switch is in the GDC position or when the FDAI SELEG T switch is in the 1 / 2 position.
b. Euler angles from the GDC interface with the ASCP to provide an Euler angle error (GDC -attitude set difference signal) which is then transformed to body angle errors for display on either FDAI. This display source facilitates manual maneuvering of the spacecraft to a new inertial attitude that was dialed in on the attitude set thumbwheels.
c. Inertial gimbal angles from the IMU interface with the ASCP to generate inertial error (IMU-attitude set difference signal) which may be displayed on either FDAI. Thus, if the error needles were nulled using the thumbwheels on the ASCP, the ASCP indicators would then indicate the same inertial reference as the platform.
d. The CMC generates attitude errors that are a function of the program. These will be displayed when the SOURCE switch is in the CMC position, or when the FDAI SELECT switch is in the 1/2 position.
The rate display sources (FDAI Attitude Select Logic Schematic and ARS Switching Diagram) will always be from either of the two gyro assemblies on a per-axis basis. The nor mal source for rate display will be the BMAG 2 gyros, and is selected by having the BMAG MODE switches in the A TT 1 /RATE 2 or the RATE 2 position. The backup source is selected when the BMAG MODE switch is in the RATE 1 position. This will rate cage the BMAG 1 gyros and switch their outputs to the FDAI rate needles. When the ENTRY – . 05 G switch is placed up, the roll rate gyro output is modified by the tangent 21 degrees and summed with the yaw rate. This summation results in a cancellation of the yaw rate sensed due to the CM rolling about the stability axis. Since this is a summation of a-c rate signals and since the gyro assemblies are supplied from separate a-c buses, selecting backup rate (BMAG 1) in yaw will automatically select the backup rate gyro (BMAG 1) in roll and vice versa. This prevents any phase difference from the two buses from affecting the summation of the two rate signals.
ATTITUDE CONTROL SUBSYSTEM (ACS)
Introduction
The SCS hardware used in controlling the spacecraft attitude and translation maneuvers include the gyro assemblies, rotation and translation controls, and two electronic assemblies. The electronic control assembly (ECA) provides commands as a function of both gyro and manual control (RC and TC) inputs to fire the RCS via the reaction jet/ engine control assembly (RJEC). Alternate spacecraft attitude control configurations provide several means of both manually and automatically controlling angular rates and displacements about spacecraft axes. Accelerations along spacecraft axes are provided via the T C. The crew uses this control for both docking and delta V maneuvers.
Hardware Function (ACS)
While a description of each SCS component was given in SCS Hardware, this description considers those functions and interfaces used in the ACS.
Gyro Assembly – 1 (GA- 1)
GA -1 contains three BMAGs that can provide pitch, yaw, and roll attitude error signals. These error signals are used when SCS automatic attitude hold is desired. The signals interface with the electronics control assembly (ECA). The BMAGs can be rate caged independently by control panel switching to provide backup rate information, or held in standby. The GA – 1 BMAGs can be uncaged independently (by axis) during SCS attitude hold if the MANUAL ATTITUDE switch is in RA TE CMD, the BWAG MODE switch in ATT 1 RATE 2, the ENTRY . 05 G switch is OFF and no RC breakout switch is closed (BMAG Logic and Outputs Schematic).
BMAG Logic and Outputs Schematic

Gyro Assembly – 2 (GA – 2)
GA – 2 contains three BMAGs that are always rate caged. These BMAGs normally provide pitch, yaw, and roll rate damping for SGS automatic control configuration and proportional rate maneuvering. The rate signals interface with the ECA. When backup rate by axis is selected (RATE 1), the GA-2 signal(s) is not used.
Rotational Controllers (RC – 1 and RC -2)
The RCs provides the capability of controlling the spacecraft attitude simultaneously in three axes. Either controller provides the functions listed below for each axis (pitch, yaw, roll) and for each direction of rotation (plus or minus).
Within the RC are six breakout switches, three transducers, and twelve direct switches. (See Rotation Control Interfaces Schematic.)
Breakout Switches
A breakout switch, closed at a nominal 1 .5 degree RC deflection, routes a 28-vdc logic signal to both the PGNCS and the SCS for attitude control inputs as follows:
a. Rotation Command to CMC. If the spacecraft is under CMG control, the signal commands rotations through the CMG input to the RJ /EC.
b. Acceleration Command. The signal is sent to the RJ/EC and commands rotational acceleration whether in CMG or SCS control.
c. Minimum Impulse Command. If the spacecraft is under SCS control, the logic signal goes to the ECA which provides a single minimum impulse command to the RJ /EC each time that a breakout switch is closed.
d. Proportional Rate Enable. The logic signal is used in the EGA to enable the manual proportional rate capability and to rate cage the BMAGs in GA – 1.
Transducer
The transducer is used for proportional rate maneuvers. It provides a signal to the EGA that is proportional to the stick deflection. The signal is summed in the ECA with the rate BMAG signal in such a way that the final spacecraft rate is proportional to the stick (RC) deflection.
Direct Switches
At 11 degrees of controller deflection a direct switch closes. If direct power is enabled, the direct switches route 28 vdc to the direct coils on the appropriate RCS engines and disable the auto coil solenoid drivers in that axis (or axes).
Translation Controller
The translation controller provides the capability of manually commanding simultaneous accelerations along the spacecraft X-, Y-, and Z-axes. (See Translation Control Interfaces Schematics) It is also used to initiate several transfer commands. These functions ar5e described below.
Translation Control Interfaces Schematics

Translation Commands
a. CMG Control. If the spacecraft is under CMC control, a translation command results in a logic signal ( 28 vdc) being sent to the CMG. The CMC would provide a translation command to the RJ /EC.
b. SGS Control. If the spacecraft is under SCS control, the translation command is sent to the RJ /EC.
Clockwise Switches (CW).
A clockwise rotation of the T-handle will disable CMC inputs to the RJ /EC. A logic signal (CW) is sent to the CMC when the T-handle is at null.
Counterclockwise Switch (CCW).
A counterclockwise rotation of the T-handle during launch, will close switches which route 28 vdc (battery) power) to the MESC. Th e MESC, in turn, may enable the RCS auto coil solenoid drivers in the RJ /EC.
Electronics Control Assembly (ECA)
The ECA contains the electronics used for SCS automatic attitude hold, proportional rate, and minimum impulse capabilities. It also contains the attitude BMAG(s) uncage logic. It receives control inputs from the gyro assemblies and the rotational controller- transducers and breakout switches (MIN IMP). The ECA provides rotational control co1nmands to the RCS logic in the RJ /EC.
Reaction Jet Engine Control (RJ/EC)
The RJ/EC contains the auto RCS logic and the solenoid drivers (16) that provide commands to the RCS automatic coils. The auto RCS logic receives control signals from the CMC, ECA, RC, and TC. The RCS solenoid drivers receive enabling logic power from the AUTO RCS SELECT switches on MPC – 8. The MESC supplies the 28 vdc to the AUTO RCS SELECT switches (Auto RCS Enabling Power Schematic)
Auto RCS Enabling Power Schematic

Reaction Control Subsystem Interface
General
The RCS provide s the rotation control torques and translation thrusts for all ACS functions. Prior to CM/SM separation, the SM RCS engines are used for attitude control. The CM RCS is used after separation for control during entry (SM Jet Functions Diagram and Auto RCS Enabling Power Schematic). The CM has only 12 RCS engines and does not have translational capability via the TC. After CM/SM separation, the A/CROLL AUTO RCS SELECT switches have no function, as the 12 CM engine s need only 12 AUTO RCS SELECT switches (Auto RCS Enabling Power Schematic).
SM Jet Functions Diagram

An RCS engine is fired by applying excitation to a pair {fuel and oxidizer) of solenoid coils; the pair will be referred to in the singular as a solenoid coil. Each engine has two solenoid coils. One coil is referred to as the automatic coil, the other as the direct coil. Only the automatic coils receive commands from the RJ / EC. The direct commands are routed directly from the RC direct switches (or other switches). The automatic and direct commands are discussed in the following paragraphs.
Automatic Coil Commands
Power.
The automatic (auto) coils are supplied 28-vdc power via one set of contacts of the AUTO RCS SELECT switches (Auto RCS Enabling Power Schematic). The solenoid is operated by switching a ground to the coil through the appropriate solenoid driver in the RJ /EC. T h e auto coil power is obtained from the STABILIZATION/CONTROL SYSTEM A/C ROLL, B/D ROLL, PITCH and YAW circuit breakers on panel 8. The 28 vdc lines to the auto coils on SM engines (jets) except A1, A2, C1, and C2 are switched at CM/SM transfer to CM coils. The wires from the A/C ROLL AUTO RCS SELECT switches to SM engines A 1, A2, C1, and C2 are open-ended after transfer. These switches have no function for the CM configuration. Enabling power for the RCS solenoid drivers is supplied to the second set of contacts of the AUTO RCS SELECT switches through the MESC (A and B) from the SCS CONTR/AUTO MNA and MNB circuit breakers (MDC-8).
The CM jets are supplied from two separate propellant systems, 1 and 2. The jets are designated by the propellant system. Each propellant system supplies half the CM jets, distributed such that one jet for each direction (plus and minus) and for each axis (pitch, yaw, and roll) is supplied from the 1 system and the other from the 2 system. When the RCS TRNFR switch is placed from SM to CM, motor switch contacts transfer auto coil power from SM engines to CM engines. Each motor switch contact transfers six engines.
Auto RCS Logic.
Commands to the RCS engines are initiated by switching a ground, through the solenoid driver, to the low voltage side of the auto coils. The solenoid drivers receive commands from the auto RCS logic circuitry contained in the RJ /EC. The auto RCS logic performs two functions:
a. Enables the command source selected based on logic signals received from the control panel 01′ manual controls.
b. Commands those solenoid drivers necessary to perform the desired maneuver.
The logic receives RCS commands from the following sources:

  • CMG (provides rotational and translational commands).
  • EGA (provides rotational commands for either automatic attitude hold, proportional rate, or minimum impulse control).
  • RC-1 and/or RC-2 (breakout sw1tches (BO) provide continuous rotational acceleration).
  • TC (provides transIational acceleration commands).
    The auto RCS logic (Auto RCS Signal Flow Schematic) is represented by four modules: one module each for pitch and yaw and two for roll (B /D and A /C). The solenoid drivers (four) associated with each module (shown as numbered triangles) correspond to the RCS engine solenoid drivers. The command sources (listed above) are shown as separate inputs to the modules, while enable/ disable logic is represented as a single line to each module.
    Auto RCS Signal Flow Schematic

A detailed functional drawing of the pitch auto RCS logic shows how the command priorities are mechanized in the RJ/EC. (See Auto RCS Logic Schematic)
Auto RCS Logic Schematic

Direct Coil Commands.
At the initiation of direct coil commands, all command input channels to the auto RCS logic module(s) in that axis (axes) are inhibited. Pitch and yaw auto con1.1nand s are inhibited during SPS thrusting (IGN 1). This prevents auto coil commands from firing the RCS during SPS thrusting.
ACCEL CMD Selection.
If a MANUAL ATTITUDE switch(es) is placed in the ACCEL CMD position, the CMC and ECA inputs to the auto RCS logic module(s) in that axis (axes) are inhibited. Commands to fire auto coils are enabled from the RC breakout switches. (See bottom “and” gates in Auto RCS Logic Schematic)
MIN IMP Selection.
The ECA inputs to the auto RCS logic modules (SM Jet Functions Diagram) provide both the 1ninimum impulse commands, as well as automatic attitude hold, automatic rate damping, and proportional rate co1n1nand. When MIN IMP is selected on a MANUAL ATITUDE switch, the EGA is configured to accept RC breakout commands and supply output pulses. All other outputs of the EGA are inhibited in the EGA.
Direct Coil Commands
The RCS engines can be operated by applying 28 vdc to the direct coils, as the other side of the direct coils is hard wired to ground. The coils receive commands from the sources described in the following paragraphs (shown in Direct Control Loop Schematic).
Direct Control Loop Schematic

Direct Rotational Control.
The direct switches in the rotation controllers (RCs) are enabled when the ROT CONTR PWR-DIRECT 1 & 2 switches on MDC – 1 are up or down. The RCS commands are initiated when the RC is deflected a nominal 11 degrees about one or more of its axes. At this displacement a switch (direct) closure occurs, routing 28 vdc to the appropriate direct coils and to the auto RCS logic (Automatic Coil Commands). The signal to the auto RCS logic disables the solenoid drivers in the channel(s) under direct control.
Direct Ullage
An ullage is performed prior to an SPS thrust maneuver. Direct ullage is a backup to TC +X translation. Pressing the DIRECT ULLAGE pushbutton routes 28 vdc to the SM direct coils on the pitch and yaw RCS engines used for +X translations. (See SM Jet Functions Diagram) A signal (28 vdc) is sent to the auto RCS logic that disables the pitch and yaw solenoid drivers. The ullage signal is also sent to the SPS ignition logic in the RJ/E.C. (Manual Thrust Vector Control.)
Separation Ullage
The SECS (MESC) can command an ullage to enable separation of the CSM spacecraft from the S-IVB adapter. The ullage uses the same RCS engines as the direct ullage command and disables the pitch and yaw solenoid drivers. The enabling logic for this function is shown in SM Jet Functions Diagram
SM/CM Separation.
The SM JETTISON CONTROLLER sends commands to SM direct coils for -X translation and +roll rotation.
CM PROPELLANT JETT-DUMP Control
This function is used after the RCS capability is no longer required. Actuation of the CM PROPELLANT DUMP switches will provide commands to the direct coils on all CM engines, except 13 and 23.
At CM-SM separation the lines from the RC direct switches are transferred from SM direct coils to CM direct coils. This is similar to the automatic coil transfer described in paragraph Automatic Coil Commands, except that either of the two transfer motors transfers power to all CM direct coils. The lines for direct or separation ullage (steps b and c), are open ended at CM-SM separation.
Attitude Configurations
General
The SCS hardware can be placed in various configurations for attitude control. These configurations, described briefly in the preceding paragraphs, are categorized as automatic and manual configurations. The automatic control capabilities are described in Automatic Coil Commands and the manual capabilities in Direct Coil Commands.
Automatic Control
The automatic capabilities of the ACS are rate damping and attitude hold. The rate damping configuration provides the capability of r educing large spacecraft rates to within small limits (rate deadband) and holding the rate within these limits. The attitude hold configuration provides the capability of keeping angular deviations about the body axes to within certain limits (attitude deadband). If attitude hold is selected in pitch, yaw, and roll, the control can be defined as maintaining a fixed inertial reference. The rate damping function is used together with the attitude hold configuration; therefore, the description of the rate control loop is included in the following attitude hold discussion.
Attitude hold uses the control signals provided by the rate and attitude BMAGs which are summed in the ECA. (See SCS Attitude and Thrust Vector Control System Schematic.) The control loops are summed at the input to a switching amplifier which provides the on-off engine commands to the auto RCS logic. E ach of the three switching amplifiers (pitch, yaw, and roll) has two outputs that provide clockwise and counterclockwise rotation commands. The polarity of the d-c input voltages to the switching amplifiers determines the commanded direction of rotation.
SCS Attitude and Thrust Vector Control System Schematics

If the switching amplifier input signal is smaller than a specific value, neither output is obtained. This input threshold required to obtain an output is the switching amplifier deadband. Manually-selectable gain authority provides flexibility in the selection of the attitude hold deadband width, the rate damping sensitivity and proportional r ate command authority. The RATE switch controls both the rate damping threshold and the proportional rate command authority, which is discussed in paragraphs to follow. Since the attitude hold configuration utilizes the attitude and r ate loops, the switching arr1plifiers will switch on when the summation of attitt1de err or and rate signals equals the voltage deadband. Attitude error signals are scaled (20:1) as a function of the RATE switch. In addition, a deadband limiter circuit may be switched into the attitude error loops. This is accomplished by having the ATT DEADBAND switch in MAX, which, in effect, blocks the first four degrees of attitude error. The rate and attitude error deadbands are summarized in the following table.
Attitude Deadband Switch Position Table

During attitude hold it is desirable to maintain minimum rotation rates to conserve propellants. This capability is provided by the pseudo-rate circuit. Pseudo-rate feedback around the switching amplifier is enabled via the LIMIT CYCLE switch. Placing the LIMIT CYCLE up causes the switching amplifier output to pulse off and .on when the input level approaches the threshold.
When the pseudo-rate mode is used, the pulse duration from the switching amplifier may be insufficient to insure proper operation of the solenoid valves in the RCS. This applies for operation near the deadband limits. To insure a sufficiently-long pulse to the solenoids, a one-shot circuit is connected downstream from the switching amplifier. The one shot provides a single minimum-impulse command (on-time) for each switching amplifier output pulse. When the switching amplifier pulse width exceeds the one shot on-time, the longer RCS command is initiated. The output pulse width of the one shot is a function of the d-c bus voltage; the pulse width increases as the bus voltage decreases. This is because the solenoid valve pickup time increases as the bus voltage decreases; therefore, a longer RCS “on” command is required. Thus, the one-shot circuit provides compensation for bus voltage variations: the pulse width varies approximately from 13 msec to 17 msec over a bus voltage range of 30 to 25 vdc. The one-shot circuit is also used in manual minimum impulse control. This configuration is described in the next paragraph.
An additional rate control loop is used for the yaw axis only. This loop is enabled during entry, after .05 G, and is used to cancel unwanted yaw rate BMAG signals. The unwanted yaw BMAG signals are those signals resulting from roll maneuvers about the stability X-axis. The 21-degree offset between this axis and the X-axis causes the yaw BMAG to sense a component of the entry roll rate.
Manual Control
Following are the manual attitude control capabilities.

  • DIRECT
  • ACCELERATION CMD
  • MINIMUM IMPULSE
  • PROPORTIONAL RATE
    The commands listed are initiated by manual inputs to either rotation controller with the exception of direct, the RC commands rotations through the RCS auto coils.
    The manual rotation control capabilities are discussed further in the following paragraphs.
    Proportional Rate.
    Proportional rate provides the capability to command spacecraft rates that are proportional to the RC deflection. The RC transducer output is summed (by axis) through the breakout switch logic path (SCS Attitude and Thrust Vector Control System Schematic) with the rate signal from the BMAG. Initially, the RC output (commanded rate) will be larger than the BMA G output (actual rate) so that the summed signals will be greater than the switching amplifier threshold. The RCS engines will fire until the summation of the r ate and commanded rates are within the switching amplifier deadband. When the RCS engines stop firing, the spacecraft will continue to rotate at a constant rate until a new r ate is commanded.
    Since the MANUAL ATTITUDE switch must be in RATE CMD for proportional rate, the spacecraft will be under automatic control when the RC is released.
    The rate commanded by a constant stick deflection is a function of the ratio of the control loop gains. The ratio has two possible values which are selected by the RATE switch. The nominal rate commanded at maximum stick deflection (soft stop), for both rate switch positions, are I shown in the following list.
    Max Prop. Rate CMD
    The switching chart shows the LIMIT CYCLE switch in the OFF position. Performing a proportional rate maneuver with pseudo-rate enabled (switch-on), required more RCS fuel than the same maneuver without pseudo -rate feedback.
    Minimum Impulse.
    Minimum impulse provides the capability of making small changes in the spacecraft rate. When minimum impulse is enabled, the switching amplifier output is inhibited. Thus, the spacecraft (attitude) is in free drift in the axis where minimum impulse is enabled, if direct control is not being used.
    Minimum impulse control is commanded by the RC break out switch. This switch provides a 28-vdc logic signal to the one-shot circuit in the EGA. The one shot (Automatic Control) provides a command to the auto RCS logic for a nominal 15 ms. Additional minimum impulse commands are obtained each time a breakout switch is closed (by repeated opening and c losing of the breakout switch).
    Acceleration Command.
    When acceleration command is enabled and a -breakout switch is closed, continuous commands are sent to the appropriate RCS auto coils. The SC CONT switch has no function in enabling the acceleration command capability, which is second in priority only to direct coil operations. (Refer to Automatic Coil Commands)
    Direct
    Direct control is similar to acceleration command except that the direct RCS coils are used. Also, instead of a breakout switch providing the firing command, the RC direct switch is used to provide 28 vdc straight to the direct coils (SCS Attitude and Thrust Vector Control System Schematic). Power to the RC direct switches is controlled by the two ROT CONTR PWR DIRECT switches on MDC-1, one switch controlling the 28 vdc for each RC. (See SCS D-C Power Distribution Schematic.) During direct control in an axis, all auto coil commands i n that axis are inhibited in the auto RCS logic (Auto RCS Logic Schematic).
    CS D-C Power Distribution Schematic

Translation Control
When power is supplied to the translation control (TC), a manual translational command fires auto coils to give acceleration(s) along an axis (or axes). The TRANS CONTR PWR switch on MDC -1 supplies 28 vdc to the T C translational switches (SCS D-C Power Distribution Schematic).
TC inputs are routed as logic inputs to the auto RCS logic when the spacecraft i s under SCS control. However, during CMG control, TC commands arrive at the auto RCS logic via the CMG. (Auto RCS Logic Schematic) Since the TC uses only SM RCS engines, after CM/SM separation the T C has no translation function.
Other translational control is possible from inputs other than the TC. These are direct ullage, CSM/LV separation ullage, and CM/ SM minus -X I translation (SM JETT CONT). These translation commands utilize direct coils. (See Direct Control Loop Schematic)
Certain panel switch combinations are necessary for each ACS capability that has been discussed. For a summary, see ACS Control Capabilities Diagram
ACS Control Capabilities Diagram

THRUST VECTOR CONTROL (TVC)
Introduction
The spacecraft attitude is controlled during a delta V by positioning the engine gimbals (TVC) for pitch and yaw control while maintaining roll attitude with the attitude control subsystem. The SCS electronics can be configured to accept attitude sensor inputs for automatic control (SCS auto TVC) or rotational controller (RC) inputs for manual thrust vector control (MTVC). Manual TVC can be selected to utilize vehicle rate feedback signal s summed with the manual inputs; this comprises the MTVC /RATE CMD configuration. Selecting MTVC without rate feedback describes the MTVC/ACCEL CMD configuration. A different configuration can be selected for each axis; for example, one axis can be controlled manually while the other is controlled automatically.
The following paragraphs present the characteristics of the SCS/TVC configurations. A switching table, specifying the panel switching and logic signals required for enabling each configuration, is included. The operation of the engine ignition/thrust on- off logic is also described.
TVC Panel Configurations
On the simplified TVC signal flow diagram shown in the TVC Signal Flow Schematic functional enabling switches are used for reference. The TVC switching table (TVC Switching Table) relates the functional switching and panel switching to the TVC configuration desired. Both figures are applicable to either the pitch or yaw TVC channel.
TVC Signal Flow Schematic

TVC Switching Table

In general, it is possible to enable a functional switch through several (alternate) panel configurations. The alternate configurations usually require the CW logic signal which is obtained from a clockwise rotation of the translation controller (TC) T -handle. This provides a convenient means of transfer ring from one TVC configuration to another during tl1e thrusting maneuver. The CW signal will also enable transfer from servo No. l to servo No. 2 (TVC Switching Table) under certain conditions. Thus, it is possible to transfer to a completely redundant configuration by using the TC clockwise switch.
The gimbal servo control loop consists of a servoamp that drives two magnetic clutch coils; one coil extends the actuator; the other retracts the actuator. Gimbal rate and position transducers provide feedback for closed loop control. Two servo control channels are provided in each axis, pitch and yaw. The active channel is selected through functional s witch servo 2 enable (TVC Signal Flow Schematic). Primary control utilizes servo No. 1. Servo No. 2, in an axis, can be engaged either by selecting 2 position on the TVC GMBL DR switch or by automatic transfer. Automatic transfer will occur, if the TVC GMBL DR switch is in the AUTO position and either the FS (fail sense) or CW logic signal is present. The CW logic will enable transfer to servo No. 2 in both axes, whereas, the FS logic will enable transfer only in the axis where i t is present. The fail sense signal is generated in tl1e motor excitation circuitry of servoactuator No. 1, occurring when an overcurrent is sensed. The transfer logic described is included in the switching table (TVC Switching Table).
GPI Signal Flow
The gimbal position display (Gimbal Position and Fuel Pressure Indicator Diagram) is used as a monitor of SPS pitch and yaw gimbal deflections from actuator null during CMC and SCS control of a delta V. Prior to an SCS Delta V, the SPS engine must be positioned with the trim thumbwheels on the GPI. In this case, the GPI will display the trim gimbal angles that are set with the thumbwheels.
Since there is only one display panel of gimbal position, there are redundant indicators, servometric meter drivers, and power supplies associated with both the pitch and yaw position displays. (See GPI Signal Flow Schematic.) When servo channel No. 1 is controlling the SPS actuator, the position input to both GPI indicators (pitch and yaw) is supplied from the No. 1 position transducer. If actuator control is transferred to the No. 2 servo, then the No. 2 position transducer drives both indicators in that axis. If the FDAI/GPI P OWER switch is in BOTH position then all four indicators are powered. With the switch in position 1, the first and third indicators are enabled. The second and fourth indicators are energized with the switch in position 2.
GPI Signal Flow Schematic

SCS Auto TVC
In order to configure the SCS electronics for an SCS auto TVC, certain panel switches must be positioned. In addition, other manual or automatic logic switching will affect the control signals and servo loops.
Since SCS auto TVC requires attitude error signals from GA-1, the gyro uncage logic must be satisfied (BMAG Logic and Outputs Schematic). This requires that the BMAG MODE switches be in ATT 1 RATE 2, the ENTRY -. 05 G switch be OFF, and that the SPS ignition signal (IGN 2) be present. For attitude hold (Gyro Assembly – 1), the IGN 2 logic was not needed as GA-1 can be uncaged by placing the MANUAL A TTITUDE switches to RATE CMD while having no breakout switch input.
The attitude error signal (in pitch and yaw) i s summed with the SPS gimbal position and GPI trim at the input to an integrator (TVC Switching Table). The integrator output is summed with attitude error and rate, filtered for body-bending, and then applied as an input to the servo amplifiers (primary and secondary). During a delta V the integrator output insures that the thrust vector stays inertially fixed even though the cg shifts as the propellants are consumed. The signal path requires that the delta V is under SCS control with the SCS TVC switch in AUTO.
Though the control signal is applied to both servo amplifiers, only one will be positioning the SPS gimbal actuators. Selection logic controlling which servo amplifier is energized is represented by the SERVO 2 ENABL E functional switch. The TVC GIMBAL DRIVE switches on MDC – 1 have AUTO positions which provide an automatic transfer from servo 1 to servo 2 if either a TC-CW switch is closed or an over-current logic signal is sent from the SPS. Positioning the TVC GIMBAL DRIVE switches to 1 or 2 selects the desired servo loop, but overrides the T C -CW or over-current transfer.
Pre-thrust gimbal trim is accomplished by manually turning the trim wheels on the gimbal position indicator (GPI) to obtain the desired indicator readout. The trim wheel in each axis is mechanically connected to two potentiometers. As shown in TVC Signal Flow Schematic, one potentiometer is associated with servo No. 1 and the second with servo No. 2. It is desirable to pretrim before an SCS delta V, to minimize the transient duration I and the accompanying quadrature accelerations. It is also desirable to set the trim wheels properly before a CMC delta V if the SCS AUTO configuration is to serve as a backup. This will enable the SCS to relocate the desired thrust direction if a transfer is required after engine ignition.
Manual Thrust Vector Control
Manual control of the thrust vector utilizes crew commands via the RC to position the gimbaled SPS. There are two types of MTVC: M T VC with rate damping (rate command) and MTVC without rate damping (acceleration command). Either mode of MTVC is selectable by panel switching. In addition, TC-CW logic provides either an automatic transfer from a PGNCS-controlled delta V or from an SCS auto delta V. (TVC Switching Table)
In order to provide ease of manual control, a proportional plus integral amplifier is incorporated in the MTVC signal flow path. The operation of this circuit can be described by considering the response to a step input; the output will initially assume a value determined by the proportional gain and the input amplitude. It will then increase, from this value, as a straight-line function of time. The slope of the line is a function of the input amplitude and the integrator constant. When the input is removed, the output will then drop by the initial value. With no additional inputs the output will theoretically remain constant (in practice, it will slowly decay). The circuit (integrator) provides the following capabilities:
a. Maintain a gimbal deflection after returning the RC to rest.
b. Make corrections with the RC about its rest position, rather than holding a large displacement.
c. With no manual inputs, SC r ate is damped out in the RATE CMD configuration.
The selection between the RA TE CMD and ACCEL CMD configurations is made by enabling rate signals in the RATE CMD mode with the IGN 2 logic signal p resent (thrust on). This enables rate BMAG signals to be summed with RC inputs. The position of the BMAG MODE switch determines which rate source (BMAG 1 or 2) is summed, through its associated functional switch. Placing the SCS TVC switch in the ACCEL CMD position disables the rate command mode.
The RATE CMD configuration is analogous to the proportional rate capability described in the ACS (ATTITUDE CONTROL SUBSYSTEM) except there is no deadband. With no manual input, the thrust vector is under rate BMAG control. If there is an initial gimbal cg misalignment, an angular acceleration will develop. The rate BMAG, through the proportional gain, will drive the gimbal in the direction necessary to cancel this acceleration. With no integrator, a steady-state rate would be required to hold the necessary gimbal deflection (through cg). However, due to the integrator, the rate is driven to zero. When an RC input (manual) is present, a steady-state vehicle rate will be established so that the integrator input goes to zero when the output value is sufficient to place the thrust vector through the c g. When the manual input is removed the rate is driven to zero.
When rate feedback is inhibited by selecting ACCEL CMD, the RC input must be properly trimmed to position the thrust vector through the cg. However, positioning the thrust vector through the cg only drives the rotational acceleration to zero. Additional adjustments (RC trimming) are necessary to cancel residual rates and obtain the desired attitude and positioning vector.
Engine Ignition, Thrust On- Off Logic
This section describes the configurations available for ignition on- off control. Panel switch positions and/or logic signals necessary for a particular configuration are considered. The functions of outpt1t (logic) signals are given.
Redundant d-c power is supplied to redundant SPS coils and solenoid drivers (as shown in the Engine Ignition-Thrust On-Off Logic Schematic) via the delta V THRUS1- (A and B) switches.
Engine Ignition-Thrust On-Off Logic Schematic

With the switch positions shown in the Engine Ignition-Thrust On-Off Logic Schematic, engine ignition is commanded by placing a ground on the low side of SPS coil No. 1. Thrustoff is commanded when the ground is removed. The ground switching can be accomplished in two basic ways. One method is to position the SPS THRUST switch from the NORl’v1AL to the DIRECT ON position for engine turn-on, and later placing the delta V T HRUST A and B from NORMAL to OFF to terminate thrust. The second method is to switch the ground through the solenoid driver as commanded by the thrust on-off logic.
Engine ignition will be commanded by the thrust on- off logic when any one of the thrust-on logic equations shown in the Engine Ignition-Thrust On-Off Logic Schematic is satisfied. The CMC commands thrust-on (equation 1) by supplying a logic 0 to the thrust on-off logic when the SC CONT switch is in the Civ1C position and the translation controller (TC) is not clockwise (CW). When the CMC changes the logic signal from a 0 to a 1, thrust-off is commanded.
For the SGS control configuration the SC CONT sw must in the SC S position or the TC handle clockwise (CW). A thrust – on enabling signal is obtained from the EMS/ delta V display. Thrust-on is then commanded by commanding a +X-axis acceleration and pressing the T HRUST ON pushbutton. When the ground to the SPS coil has been sensed by the ignition sense logic, the THRUST ON and +X -axis commands can be removed and engine ignition will be maintained by the SPS latch up signal. When the delta V counter on the entry monitor system (EMS) display reads zero, the EMS enabling signal is removed and thrust-off is commanded.
If TVC control is transferred from the CMC to the SCS (by SC CONT switch to SCS or TC to CW) after engine ignition, thrusting will be maintained by the presence of the SCS latch up signal. Thrust-off will be commanded as in a normal SCS control configuration. A backup thrust-off command, for any control configuration, is obtained by placing the 6,.V T HRUST (A and B) switches to the OFF position.
The +X logic signal which is necessary to enable thrust-on in the SCS configuration, can be obtained from either the DIRECT ULLAGE pushbutton or the TC +X contacts. The difference between the two commands are:
a. Direct ullage uses the direct coils and inhibits the pitch and yaw solenoid drivers; thus, attitude hold cannot be maintained in these axes. Ullage-ignition overlap time is completely under manual control.
b. When commanding A+X with the T-C, attitude hold can be maintained. Ullage-ignition overlap time is automatically limited to one second.
The circuitry provides several output functions. A ground is provided for the SPS THRUST lamp on the EMS display. The ground is also sensed by the ignition sense logic, which generates signals for both disabling the RCS pitch and yaw auto commands and also for configuring the SCS electronics for thrust vector control.
The RCS disabling signal, IGN 1 on the Engine Ignition-Thrust On-Off Logic Schematic, is not present until one second after engine ignition and is not removed until one second after engine turn- off. This provides adequate time for engine thrust buildup and decay. The IGN 2 logic signal is required in the logic for the functional switches in the SCS-TVC signal flow paths. There are separate IGN 2 signals generated for SCS auto TVC and for MTVC. These signals are generated at the same time the ground is switched to the SPS coil, but are not removed until one second after the ground· is removed. The delayed OFF enables the TVC electronics to maintain spacecraft control during thrust decay.
POWER DISTRIBUTION
The SCS circuit breakers (panel 8) supply electrical power to both panels 1 and 7 power switches and also to the SCS panel 1 switches for logic signals. The panel 7 SCS switches distribute a-c and d-c power to the SCS hardware (SCS D-C Power Distribution Schematic) and route the SCS logic bus power to panel 1 switches. (SCS D-C Power Distribution Schematic) The power switching for the two rotation hand controllers and the translation hand controller is on panel 1. (See SCS D-C Power Distribution Schematic.)
The SCS performance data is included in the CSM Spacecraft Operational Data Book (SNA-8-D- 2 7). For the SCS operational limitations and restrictions refer to AOH, Volume 2, including the Malfunction Procedures.
ENTRY MONITOR SYSTEM
The entry monitor system (EMS) provides a visual monitor of automatic primary guidance navigation and control system (PGNCS) entries and delta velocity maneuvers. The EMS also provides sufficient display data to permit manual entries in the event of PGNCS malfunctions together with a command sent to the SCS for SPS engine cutoff. The delta velocity display can also be used as the cue to initiate manual thrust-off commands if the automatic-off commands malfunction. During rendezvous the EMS provides a display of VHF ranging information.
Self- test provisions are provided by a function switch for the three operational modes (entry, delta V, and VHF ranging) to provide maximum system confidence prior to actual use.
The EMS performance data is included in the CSM Spacecraft Operational Data Book (SNA- 8- D- 27). For the E MS operational limitations and restrictions refer to AOH, Volume 2, including the Malfunction Procedures.
Entry Functions
The EMS provides five displays and/ or indications that are used to monitor an automatic entry or to aid in performing a manual entry.
Threshold Indicator (. 05 G)
The threshold indicator, labeled. 0 5 G, illuminate s when the atmospheric deceleration is sensed. The altitude a t which this indicator is illuminated is a function of the entry angle (velocity vector with respect to local horizontal), the magnitude of the velocity vector, geographic location and heading, and atmospheric conditions. Bias comparator circuits and timers (EMS Block Diagram) are used to initiate this indicator. The signal used to illuminate the indicator is also used internal to the EMS to start the corridor evaluation timer, scroll velocity drive, and range- to-go circuits.
EMS Block Diagram

Roll Stability Indicator
The roll stability indicator (RSI) provides an indication of lift vector position throughout entry. With the ATT SET switch in the GDC position, the RSI will be aligned prior to 0. 05G by rotating the yaw thumbwheel on the attitude set control panel with the EMS ROLL switch in the entry position while pressing the GDC A LIGN button. During entry, stability axis roll attitude will be supplied to the RSI by the gyro display coupler. There are no degree markings on the display, but the equivalent readout will be zero I when the RSI points toward the top of the control panel. During the entry RSI rotates in the opposite direction to the spacecraft roll.
Corridor Verification Indicators
The corridor verification indicators are located above and below the RSI. They consist of two lights which indicate the necessity for lift vector up or down for a controlled entry. The indicators will be valid only for vehicles which utilize lunar entry velocities (approximately 35, 000 FPS) and entry angles. The corridor comparison test is performed approximately 10 seconds after the .05 G indicator is illuminated. The lift vector up light (top of RSI) indicates 11G 11 greater than approximately 0. 262G. The lift vector down light (bottom of RSI) indicates “G” less than approximately 0. 262G. EMS Corridor Evaluation Diagram is a typical example of the corridor evaluation function. An entry angle is the angular displacement of the CM velocity vector with respect to local horizontal at 0. 05G, The magnitude of the entry angles that determines the capture and undershoot boundaries will be a function of CM lift-to-drag (L/D) ratio. The angles shown are for a L/D of 0. 3 to 0. 4. The EMS positive lift overshoot boundary is that entry angle that produces approximately 0. 262G at approximately 10 seconds after the .05 G indicator is illuminated. An entry angle greater than the EMS positive lift overshoot boundary will cause the upper corridor verification light to be illuminated. Conversely, an entry angle less than the positive overshoot boundary will light the lower corridor light. Entry angles less than the capture boundary will result in noncapture regardless of lift orientation. Noncapture would result in an elliptical orbit which will re-enter when perigee is again approached. The critical nature of this would depend on CM consumables: power, control propellant, life support, etc. The command module and crew will undergo excessive Gs (greater than 10G) with an entry angle greater than the undershoot boundary, regardless of lift orientation.
EMS Corridor Evaluation Diagram

Delta V /Range-To-Go Indicator
The delta V /range-to-go indicator is an electronic numeric readout which has three functions. During entry the inertial flight path distance in nautical miles to predicted splashdown after 0 . 05G is displayed. The predicted range will be obtained from the PGNCS or ground stations and inserted into the range display during EMS range set prior to entry. For a delta V the display will indicate the 6V (ft/sec) remaining. For rendezvous the display will indicate the distance to the LM.
Scroll Assembly
The scroll assembly provides a scribed trace of G versus inertial velocity during entry. The mylar scroll has printed guideline s which provide monitor (or control) information during aerodynamic entry. The entry trace is generated by driving a scribe in a vertical direction as a function of G level, while the mylar scroll is driven from right to left proportional to tl1e CM inertial velocity change.. Monitor and control information for safe entry and range potential can be observed by comparing the slope of the entry trace to the slope of the nearest guidelines (G onset, G offset and range potential).
Delta Velocity Functions
In addition to entry functions, the EM S provides outputs related to delta velocity maneuvers during SPS or RCS thrusting along the CSM X axis. Both the “SPS THRUST” lamp and the 6.V numeric counter display information during a delta V. In addition, an automatic thrust-off command signal is supplied to the SCS when the delta counter reaches zero.
SPS Thrust-On Indicator
T h e SPS thrust-on indicator will be illuminated any time a ground is pre sent on the low side of either of the SPS bi propellant solenoid control valve s if either of the EMS circuit breakers on panel 8 are set. None of the EMS or MDC switches will inhibit this circuit.
Delta Velocity Indicator
The electro-luminescent (EL) numeric readout displays the delta velocity remaining along the CSM X-axis. The numeric display has the capability of displaying a maximum of 14,000.0 fps down to a -1000.0 fps. The readout is to 1/10 foot per second. The delta V / EMS SET rocker switch will be used to set in the desired delta V for all SPS thrusting maneuvers. The delta V display will count up or down with the EMS MODE switch in the NORMAL position. The display counts down with SPS or RCS thrusting along the CSM +X-axis or up with RCS thrusting along the CSM -X-axis. The BACKUP /VHF RNG position of the MODE switch permits only a decreasing readout during thrusting.
SPS Thrust-Off Command
During SGS- controlled SPS thrusting a thrust- off command is supplied by the EMS. This thrust- off logic signal is supplied to the SPS engine on off circuit when the delta V display reads minus values of delta V. Consequently, the THRUST ON button will not turn on the SPS engine unless the delta V display reads zero or greater.
EMS Switches
There are four switches to activate and select the desired function in the EMS. They are MODE switch, FUNCTION switch, delta V /EMS SET switch, and GTA switch .
MODE Switch
The MODE switch has three positions: NORMAL, STBY, and BACKUP/VHF RNG. The STBY position applies power to the EMS circuits; it inhibits system operation but does not inhibit set functions. The NORMAL position permits the self-tests to function. It also is the normal position for operations when the FUNCTION switch is in the ENTRY and delta V positions. The BACKUP /VHF RNG position is used as a backup in the entry and delta V operations and is the proper position during VHF ranging. The BACKUP /VHF RNG position will be used as a backup to initiate the scroll velocity drive and the range display countdown in the event of failure of the ,05 G circuits. The BACKUP /VHF RNG position energizes the .05 G light, but does not activate the corridor verification circuits for a display.
FUNCTION Switch
The FUNCTION switch is a 12-position switch which is used to select the desired function in the EMS. Three positions are used for delta V operations. Eight positions are used for entry, entry set and self- test. The remaining position if OFF. One position is used for VHF ranging.
OFF
Deactivates the EMS except the SPS THRUST ON light and the roll stability indicator.
EMS Test 1
Tests lower trip point of 0. 05 G – threshold comparator and enables slewing of the scroll.
EMS Test 2
Tests the high trip point of the .05 G threshold comparator.
EMS Test 3
Tests lower trip point of the corridor verification comparator and enables slewing of the delta V/RANGE display for EMS test 4 operations.
EMS Test 4
Tests the range-to-go integrator circuits, G servo circuits, G-V plotter and range-to-go circuits.
EMS Test 5
Tests the range-to-go integrator circuits, G servo circuits, G-V plotter and range-to-go circuits.
RNG SET
Establishes circuitry for slewing the delta V / RANGE display.
Vo SET
Establishes circuitry for slewing the scroll to the predicted inertial velocity at 0.05G.
ENTRY
Operational position for monitoring the CM earth atmosphere entry mode.
Delta V Test
Operational position for self-test of delta V circuits.
Delta SET / VHF RNG
Establishes circuitry for slewing the delta V / RANGE display. Enables VHF ranging display.
Delta V
Operational position for accelerometer to drive the delta V/RANGE display for X-axis accelerations.
Delta V / EMS SET Switch
The delta V /EMS SET switch, a five-position rocker switch, is used to drive either the delta V /RANGE display or the EMS scroll. With the FUNCTION switch in the delta V SET /VHF RNG, RNG SET, and EMS TEST 3, depressing the delta V /EMS SET switch from null to a soft stop (either INCR or DECR) will change the display readout at 0.25 unit per second. Depressing the delta V /EMS SET switch through a soft stop to a hard stop results in a change of 127.5 units per second. With the FUNCTION switch in the Vo SET, EMS TEST 1, and TEST 5 position, depressing the delta V/EMS SET switch results in driving the EMS scroll. Depressing the delta V / EMS SET switch to the soft stop drives the scroll at approximately 0. 0164 inch per second (30 fps per second). Depressing through to the hard stop drives the scroll at approximately 0.263 inch per second (480 fps per second). The scroll mechanism puts a constraint on the reverse slewing of the scroll (delta V /EMS SET switch INCR). The scroll may be slewed only one inch to the right after scroll slewings to the left of at least three inches.
GTA Switch
The GTA switch provides a ground test capability. With the cover plate removed, the GTA switch will be placed up to simulate 0G in the vertical stack configuration of the SC. An adjustment pot is available to calibrate OG when the GTA switch is on and the EMS is operating. For the coverplate to be closed, the GTA switch must be off which removes the simulated OG function for ground test.
Entry Scroll
The EMS mylar scroll, contained i n the EMS scroll assembly, contain s four entry patterns together with entry in-flight test patterns and the instruction s for entry, delta V and VHF ranging. (See EMS Scroll Format Diagram.)
EMS Scroll Format Diagram

There are four sets of delta V and VHF ranging instructions that are alternated with four entry in-flight self-test patterns. (See EMS ln-Flight Instructions for delta V, VHF Ranging, Self-Test and Entry Diagram.) Following the fourth in-flight self-test patterns on the scroll is the first set of entry instructions. Entry instructions precede each of the four entry patterns. Lunar-return non-exit entry patterns are alternated with lunar-return 3500 NM exit patterns, a non-exit pattern appearing first on the scroll.
EMS ln-Flight Instructions for delta V, VHF Ranging, Self-Test and Entry Diagram

Each entry pattern (EMS Lunar Non-Exit Range Limit Pattern and EMS Lunar 3500 NM Range Limit Pattern) has velocity increments from 37,000 to 4,000 fps together with entry guidelines. These lines are called G on-set, G off- set, and range potential guidelines. The G on-set and G off-set lines are solid lines and tl1e range potential lines are broken.
EMS Lunar Non-Exit Range Limit Pattern

EMS Lunar 3500 NM Range Limit Pattern

The G on-set lines slope downward, while the Goff-se t lines r ay upward and terminate at 24, 000 fps just to the right of the vertical line at 25, 500 fps (minimum velocity for earth orbit). Below 24, 000 fps the G on-set lines slope downward from the full-lift profile line which represents the steady-state minimum G entry profile. During entry the scribe trace should not become parallel to either the nearest G on-set or G off-set line. If the slope of the entry trace becomes more negative than the nearest G on-set line, the CM should be oriented such that a positive lift vector orientation (lift vector up) exists in order to prevent excessive G buildup. However, if the entry trace slope becomes more positive than the nearest G off-set line then the CM should be oriented to produce negative lift (lift vector down) for entry.
The G on-set and G off-set lines are designed to allow a 2-second crew response time with a single system RCS/SCS 180-degree roll maneuver should the entry trace become parallel to the tangent of the nearest guideline.
The range potential lines, shown in hundreds of nautical miles, indicate the ranging potential of the CM at the pre sent G level. The crew will compare the range displayed by the range-to-go counter with the range potential indicated by the entry trace. The slope and position of the entry trace relative to a desired ranging line indicates the need for lift vector up or down.
EMS Functional Data Flow
The following functional discussion of the EMS relates system mechanization to the EMS operation. (See EMS Functional Block Diagram.)
EMS Functional Block Diagram

Accelerometer
The accelerometer, which is aligned to within ±2 degrees of the SC X-axis, is the only sensor in the EMS. It has three outputs: low level G to threshold and corridor circuits, high level G to the flight monitor G axis during entry, and an output to the AID converter which is used to d rive the delta /RANGE display and mylar scroll. The difference i n the low and high level G outputs is scale factor.
Threshold and Corridor Verification Circuits
The threshold and corridor verification circuits use the accelerometer low level G output. The .05 G comparator will trigger and illuminate the threshold light (.05 G) if a G level of 0.05G ± 0.005G is present for 1 ± 0.5 seconds. If the G level drops to 0.02G ± 0.005G, the light will be extinguished. The corridor evaluation will occur 10.053 ± 0.025 seconds after the .05 G threshold lamp is illuminated. The lift vector up light will illuminate if the G force is greater than approximately 0.262 ± 0.009G. The lift vector down light will be illuminated if the G force is less than approximately 0.262 ± 0.009G. There will be only one corridor verification light turned ON for corridor evaluation. The corridor lights will be turned off when the flight monitor G axis drive passes the 2G level.
Scroll Assembly G Axis Drive Circuits
The scroll assembly G axis drive circuits receive the accelerometer high G level output signal and position the G axis scribe in vertically. The scribe drive is a normal closed-loop servo circuit with velocity and position feedback. The loop is biased from zero by the magnitude of the accelerometer input.
Scroll Assembly Velocity Axis Drive Circuits
The scroll assembly velocity axis drive circuits use the accelerometer A /D converter output to drive the scroll from right to left. The A/D converter output is about one pulse for each 0. 1 fps of velocity change. The motor control circuits and stepper motor cause the scroll to move from right to left and the present inertial velocity is read on the scroll. Before entry scroll is initialized to the inertial velocity by setting the FUNCTION switch to the Vo SET position and using the delta V/EMS SET switch to slew the scroll to the predicted inertial velocity value a t 0.05G.
Delta V/RANGE Display Circuits
The delta V / RANGE electronics directly controls the numeric display value except during VHF ranging operations. The display will be initialized by a combination of the FUNCTION switch and delta V /EMS SET switch, except during VHF ranging operations. During AV operations, the accelerometer A/D converter output pulses are used to increment or decrement I display value. When the display decreases to a value of -0.1 fps, a signal is supplied to the SCS for an automatic SCS control SPS OFF command. For entry, the display will read range to go, being decremented by the range integrator. The output of the range integrator will decrease as a function of the inertial velocity stored in it at any time. The range integrator is decremented to that it contains the CM present inertial range to-go if properly initialized. The divider network sends pulses to the flight monitor velocity axis d rive in order to drive the scroll from right I to left after 0. 05G is sensed. If the 0. 05G function should fail, placing the MODE switch to the BACKUP /VHF RNG position will initiate the divider network operation to drive the range-to-go display and the flight monitor scroll from right to left as a function of G level.
Roll Stability Indicator Drive
The RSI drive function, controlled by the yaw axis of the GDC in the SGS, requires the correct positive of the two ENTRY switches (.05G and EMR ROLL) for its correct operation during entry. This function is described as a normal GDC function in paragraph GDC Configurations.
Thrust-Off Function
Tl1e thrust-off function will provide a logic function for a SCS thrustoff command any time the delta V /RANGE counter goes to -0.1 fps. During a delta V mode operation, a relay energizes and provides a ground to the SCS. This function operates in conjunction with the delta V and delta V TEST positions of the FUNCTION switch.

APOLLO 11 OPERATIONS HANDBOOK BLOCK II SPACECRAFT

TELECOMMUNICATION SYSTEM
INTRODUCTION
FUNCTIONAL DESCRIPTION
Telecommunications System Schematic
Intercommunications Equipment
General
Equipment
Data Equipment
General
Equipment
Radio Frequency Equipment
General
Equipment
Antenna Equipment
Antenna Equipment Switching Schematic
Intercommunication Equipment
Personal Communications Assembly (Comm Carrier)
Personal Communications Assembly Diagram
T-Adapter Cable
Communications Cable Diagram
Communications Cable (Electrical Umbilical Assembly)
Audio Center Equipment
Audio Center Schematic
Swimmers Umbilical Cable
Intercommunication System Interfaces
Audio Interfaces Diagram
Data Equipment
Instrumentation Equipment Group
Operational and Flight Qualification Instrumentation
Data Equipment Interfaces
Data Interfaces Diagram
Central Timing Equipment (CTE)
Central Timing Equipment Diagram
CTE OUTPUTS Chart
Signal Conditioning Equipment (SCE)
Signal Conditioning Equipment Diagram
Pulse-Code Modulation Telemetry (PCM TLM) Equipment
PCM Block Diagram
Television (TV) Equipment
Television Camera Location Diagram
Television Camera Diagram
Color TV and Monitor Locations Diagram
Color Television Camera and Monitor Diagram
Data Storage Equipment
Data Storage Equipment Diagram
Electrical Power Requirements
Tape Transport Characteristics
Channels
Digital Channels
Channel Operation Capabilities Chart
Operational Switching
Up- Data Link Equipment Diagram
RF Electronics Equipment Group
VHF/ AM Transmitter-Receiver Equipment
VHF-AM Block Diagram
Unified S-Band Equipment (USBE)
Unified S-Band Equipment Diagram
S-Band Receiver Schematic
S-Band PM Transmitter Schematic
S-Band FM Transmitter Schematic
Unified S-Band Switching Schematic
S-Band Power Amplifier Equipment
S -Band Power Amplifier Control and Power Switching Schematic
Premodulation Processor Equipment
S-Band Operational Spectrums Diagrams
Voice
Command Module Normal S-Band Down Voice
Voice Conference Between LM or EVA/CSM/MSFN
Command Module Backup S-Band Down Voice
Recorded CSM Intercom/LM Voice
MSFN to CSM S-Band Normal Up-Voice
MSFN to CM S-Band Backup Up-Voice
CSM INTERCOM/LM Voice Playback
Command Module Television
Real-Time Telemetry
Command Module PCM Data
EVA Biomedical Data Relay Via S-Band
Recorded Telemetry
CM PCM Stored Data
LM Stored Data
Scientific Stored Analog Data
CM to MSFN Emergency Key
Redundancy
CM Backup S-Band. Down Voice
MSFN to CMS-Band Backup Up-Voice
Auxiliary Power Supply
PMP Operational Modes and Output Levels
PMP Data Modulation Levels Diagrams
Primary Power Control
Scientific Data Output to DSE
Intercom/LM Voice Output to DSE
Up-Voice and Up-Data Output
Television Signal Output
FM Output
PM Output
PMP Block Diagram
VHF Recovery Beacon Equipment
VHF Recovery Beacon Equipment Diagram
Rendezvous Radar Transponder
RRT Block Diagram
Performance Characteristic
Range
Range Accuracy
Angular Coverage
Acquisition
Mode Activation
Signal Search Mode
Transponder Mode
Self-Test Mode
Standby Mode
Antenna Characteristics
Coverage
Polarization
Transmit Energy Characteristics
Power
Frequencies
Received Signal Characteristics
Frequency
Signal Level
Self Test
Self-Test Oscillator
Self-Test Enable
Self-Test Enable Supply
Electrical Requirements
Power Requirements
Antenna Equipment Group
Antenna Locations Diagram
VHF Omniantenna Equipment
Scimitar Antenna Diagram
S-Band High-Gain Antenna
High Gain Antenna Diagram
S-Band Omniantennas
VHF Recovery Antenna Equipment
VHF Recovery Antenna No. 1 Diagram
VHF Recovery Antenna No. 2 Diagram
Electrical Power Distribution
Telecommunications Power Distribution Diagram
OPERATIONAL LIMITATIONS AND RESTRICTIONS
VHF-AM
PMP
DSE
USBE

TELECOMMUNICATION SYSTEM
INTRODUCTION
The communications subsystem is the only link between the spacecraft and the manned space flight network (MSFN). In this capacity, the corr1munications subsystem provides the MSFN flight controllers with data through the pulse code modulated (PCM) telemetry system for monitoring spacecraft parameters, subsystem status, crew biomedical data, event occurrence, and scientific data. As a voice link, the communications subsystem gives the crew the added capability of comparing and evaluating data with MSFN computations. The communications subsystem, through its MSFN link, serves as a primary means for the determination of spacecraft position in space and rate of change in position. CM-LM rendezvous is facilitated by a ranging transponder and active ranging system. Through the use of the television camera, crew observations and public information can be transmitted in real time to MSFN. A means by which CM and L M telemetry and voice can be stored in the spacecraft for later playback, to avoid loss because of an interrupted communications link, is provided by the communications subsystem in the for1n of the data storage equipment (DSE). Direction finding aids are provided for postlanding location and rescue by ground personnel.
The following list summarizes the general teleco1nm functions:
Provide voice communication between

  • Astronauts via the intercom
  • CSM and MSFN via the unified S-band equipment (USBE) and in orbital and recovery phases via the VHF/ AM
  • CSM and extravehicular astronaut (EVA) via VHF/AM
  • CSM and LM via VHF/ AM
  • CSM and launch control center (LCC) via PAD COMM
  • CSM and recovery force swimmers via swimmers umbilical
  • Astronauts and the voice log via intercomm to the data storage equipment
    Provide data to the MSFN of
  • CSM system status
  • Astronaut biomedical status
  • Astronaut activity via television,
  • EVA personal life support system (PLSS) and biomed status
  • LM system status recorded on CSM data storage equipment
    Provide update reception and processing of
  • Digital information for the command module computer (CMC)
  • Digital time-referencing data for the control timing equipment (CTE)
  • Real time commands to remotely perform switching functions in three CM systems
    Facilitate ranging between
  • MSFN and CSM via the USBE transponder
  • LM and CSM via the rendezvous radar transponder (RRT)
  • CSM and LM via the VHF/ AM ranging system
    Provide recovery aid
  • VHF beacon for location
    Provide a time reference for all time-dependent spacecraft subsystems except the guidance and navigation subsystem.
    FUNCTIONAL DESCRIPTION
    The functional description of the T/C system is divided into four parts: intercommunications equipment, data equipment, radio frequency equipment, and antenna equipment. All of these functional groups of equipment interface with each other to perform the system tasks. In the functional descriptions of these parts, such interfaces will be apparent. The equipment that falls into each group is shown in the Telecommunications System Schematic.
    Telecommunications System Schematic

Intercommunications Equipment
General
The functions performed by the intercommunications equipment can be summarized as providing the means for each astronaut to interface or isolate himself to or from the

  • Intercomm for astronaut-to-astronaut communications
  • Pad communications for astronaut-to- launch control center communications
  • VHF/ AM for astronaut-to-MSFN, EVA, or LM communications
  • USBE for astronaut- to-MSFN communications
  • Data storage equipment for a voice log (via intercomm)
  • Swimmers umbilical during recovery (via intercomm).
    Equipment
    The equipment that falls into the intercommunications grouping 1s listed as follows:
  • Personal communications assembly
  • T-adapter cable
  • Communications cable
  • Audio control panels (MDC-6, -9, -10)
  • Audio center
  • Swimmers umbilical cable.
    Data Equipment
    General
    The functions of the data equipment can be summarized as providing
  • Information gathering and encoding (telemetering) of critical spacecraft and astronaut parameters
  • Conditioning of instrumentation inputs for compatibility with the telemetry equipment
  • Storage and playback capabilities of CSM and LM telemetering data, voice log, and scientific parameters
  • Decoding and distributing of up-data to the proper switching or information receiving systems
  • Frequency and/or time code signals to other spacecraft equipment
    Equipment
    The equipment that falls under the data grouping is as follows:
  • Central timing equipment (CTE)
  • Signal conditioning equipment (SCE)
  • Pulse code modulation (PCM) telemetering equipment
  • Television (TV) camera
  • Data Storage Equipment
  • Up-data link (UDL) equipment
    Radio Frequency Equipment
    General
    The functions performed by the RF equipment can be summarized as the transmission and reception of
  • Voice information between
    o CM and MSFN
    o CM and LM
    o CM and EVA
    o CM and recovery forces
  • Telemetering data
    o Between CM and MSFN
    o From LM to CM to MSFN
    o From EVA to CM to MSFN
  • Television from CM to MSFN
  • Ranging and beacon (BCN) information
    o Pseudo-random noise ranging signals from MSFN to CM to MSFN
    o Double doppler ranging signals from MSFN to CM to MSFN
    o X-band radar signals from LM to CM to LM
    o VHF ranging signals from CM to LM to CM
    o VHF beacon signals from CM to recovery forces.
    Equipment
    As shown in figure Telecommunications System Schematic, the equipment that falls into the rad.io frequency grouping is
  • VHF/ AM transceivers A & B
  • Digital ranging generator
  • Unified S -band equipment (primary and secondary xponders and FM xmitter)
  • S-band power amplifiers (primary and secondary)
  • VHF beacon
  • X-band xponder (rendezvous radar)
  • Premodulation processor
    Antenna Equipment
    The antenna equipment can be divided into three groups: VHF antennas and ancillary equipment, S-band antennas and ancillary equipment, and. beacon antenna. Their overall function is to propagate and receive RF signals from and to the RF equipment. The ancillary equipment includes two RF switches, 2 triplexers, and the servo-drive system for the high-gain antenna (figure 2. 8-2).
    Antenna Equipment Switching Schematic

Intercommunication Equipment
Personal Communications Assembly (Comm Carrier)
As shown in Personal Communications Assembly Diagram the personal communications assembly (comm carrier) contains redundant earphones and microphones. The comm carrier can be worn with the space suit, flight coveralls, or constant wear garment. When used with the space suit, the comm carrier is interfaced with an integral wiring harness in the suit. A T-adapter cable is required when the comm carrier is worn with the flight coveralls or just the constant wear garment to interface to headset with the comm cable.
Personal Communications Assembly Diagram

Three lightweight headsets are also available for use in the CM. They have a single earphone and microphone with a lightweight head clamp and connecting cable.
T-Adapter Cable Communications Cable Diagram
The T-adapter cable is used when the astronaut is wearing his flight coveralls or just his constant w ear garment to connect the personal communications assembly and biomed preamplifiers to the comm cable. An integral cable assembly performs this function when the astronaut is in his space suit so no T-adapter is necessary. Besides handling the audio signals to and from the comm carrier, the T – adapter must handle 16. 8 volts needed by the microphone preamps and biomed preamps. The output of the biomed preamps is also routed to the comm cable.
Communications Cable Diagram

Communications Cable (Electrical Umbilical Assembly)
The comm cable has several functions not the least of which is providing the path for audio signals to and. from the comm carrier. It also provides the necessary path for the 16.8 volts required by the microphone preamps in the comm carrier and the biomed preamps. The output from the biomed preamps also is carried by the comm cable.
Separate from, but related to, the audio signals from the comm carrier are the control functions of the comm cable control head. This control head contains a self-centering rocker switch which, when depressed on one side or the other, initiates specific functions in the intercommunications equipment. The I’COM side of the rocker s witch is depressed when the intercommunications equipment is configured in the manual (PTT) mode of operation and communications over just the intercom is desired. The XMIT side of the rocker switch can be used for two different functions. Normally it is used to enable communications over the intercom and. RF equipment in any of the three operational modes of the intercommunications equipment. The XMIT side of the rocker switch can also be used as a sending key in the S-band key mode of operation.
The Communications Cable Diagram shows the comm cables interface with the connectors on the left-hand forward equipment bay (below panel 301) and the T-adapter cable.
Audio Center Equipment
The audio center equipment accomplishes the necessary aud.io signal amplification and switching to provide the capability of the following:

  • Intercommunication between the three astronauts
  • Communication between one or more astronauts and extravehicular personnel in conjunction with any or all of three associated radio frequency links, or two external intercom hardlines
  • Recording of audio signals in conjunction with tape recording equipment
  • Relaying of audio signals.
    The audio center equipment consists of three electrically identical sets of circuitry which provide parallel selection, isolation, gain control, and. amplification of all voice communications. Each set of circuitry contains the following components (Audio Center Schematic):
  • Isolation pad, diode switch, and gain control for each receiver input, and intercom channel.
  • Isolation pad and diode switch for each transmitter modulation output and intercom channel.
  • An earphone amplifier and a microphone amplifier.
  • Voice-operated relay (VOX) circuitry with externally controlled sensitivity.
    Audio Center Schematic

The equipment operates with three remote control panels to form three audio stations, each providing an astronaut with independent control of all common functions. Each station has the capability of accommodating a second astronaut for emergency operation. Provision is made in each station to enable voice transmission over any or all transmitters by means of a voice-operated relay (VOX) circuit or push-to-talk (PTT) circuit. A “hot mike” is so incorporated as to maintain continuous intercrew communication using the INTERCOM/PTT mode, and to require PTT operation for eternal transmission. Enabling a TRANSMIT function also enables the corresponding RECEIVE function. Sidetone is provided in all transmit modes.
Audio signals are provided to and from the VHF/ AM transmitter receiver equipment. USBE (via the PMP), the PAD COMM, and. intercom bus. The PAD COMM, intercom bus, and all transmitter-receiver equipments are common to all three stations.
Inputs and outputs are controlled by the VHF/AM, S-BAND, PAD COMM, and INTERCOM switches on the audio control panels. Each of these switches has three positions: T/R, OFF, and RCV. Setting any of the switches to T/R permits transmission and reception of voice signals over its respective equipment, RCV permits reception only, and OFF disables the input and the output. The POWER switch of each station, in either AUDIO/TONE or AUDIO, energizes the earphone amplifier to permit monitoring. The AUDIO/TONE position also enables the audible crew alarm to be heard, if triggered, at the respective SC station. Each SC station can be isolated from the alarm by selecting the AUDIO or OFF position. The operation of the microphone amplifier in each station is controlled by the VOX keying circuit or the PTT pushbutton on the comm cable or on the rotation controller. The VOX circuit is energized by the VOX position of the MODE switch on each audio control panel. When energized, the VOX circuit will enable both the intercom and accessed transmitter keying circuits. The INTERCOM/PTT position permits activation of the PAD COMM, VHF/AM, and S – band voice transmission circuits by the PTT key while the intercom is on continuously. The PTT position permits manual activation of the intercom or intercom and. transmitter keying circuits by depression of the I’COM or XMIT side of the communication cable switch, respectively.
Six potentiometer controls are provided on each audio control panel: VOX SENS, PAD COMM, S-BAND, INTERCOM, VHF/AM and MASTER VOLU1′-1E. The VOX SENS control is used, to adjust the sensitivity of the VOX circuitry, determining the amplitude of the voice signal necessary to trigger the VOX keying circuit. The PAD COMM, S-BAND, VHF/ AM, and INTERCOM volume controls are used to control the signal levels from the respective units to the input of the earphone amplifier. The MASTER VOLUME controls the level of the amplified signal going to the earphones.
The intercom bus connects to the recover y interphone (swimmer umbilical), and the premodulation processor which in turn routes the signal to the data storage equipment for recording.
An AUDIO SE LECT switch on each audio control panel allows the astronaut to access himself to the normal audio center circuits for that station, or through a selection of the BACKUP position, access himself to the audio control panel and audio center of another station. In the BACKUP position the commander is accessed to the LM pilot’s panel and audio c enter, while BACKUP for the CM pilot accesses hi1n to the commander is panel and audio center. The LM pilot is accessed to the CM pilot’s panel and audio center if he selects the BACKUP mode.
A SUIT POWER switch on each panel controls application of power to the respective astro11auts personal communications assembly microphone preamplifiers and the biomed preamplifiers contained in his constant wear garment.
It is important to note that most signal processing done by the audio center is of preparatory nature. In order for any audio signal to be transmitted or received, the RF equipment must be in the proper operational mode.
Swimmers Umbilical Cable
The swimmer s umbilical cable is deployed with the dye marker in the recovery phase of the mission. It provides a hard-line connection to the spacecraft intercom bus for the recovery force swimmers. Actual deployment is accomplished by activating the guarded DYE MARKER switch on MDC-8 which provides 28 vdc to a pyrotechnic actuator.
Intercommunication System Interfaces
The Audio Interfaces Diagram illustrates the interfaces between the intercommunications group and the other, telecommunications equipment. One interface shown that is not readily apparent is the signal path used in the relay mode of operation. This mode of operation ties the VHF AM and S -band equipment together to provide a three-way conference capability between the MSFN, CM and LM, or EVA. The intercommunications equip1nent enters this process when the received MSFN voice signal (S-band or voice) is routed to the microphone input of the CM pilot. Then, through proper switching, this signal is routed to the VHF AM transmitter for relaying to the LM or EVA. In the relay mode, the CM pilot’s microphone is not usable. The return relay is accomplished by adding the VHF/ AM received voice to the normal S-Band down voice channel.
Audio Interfaces Diagram

Another function not too obvious is voice log recording and playback. The intercomm bus of the audio center is connected through the premodulation processor to the data storage equipment (DSE). Any time the DSE is recording, the conversation on the intercomm bus will be recorded as well, in some instances, as the received voice from the VHF/ AM equipment. There are no provisions to monitor this recorded voice in the SC.
Data Equipment
Instrumentation Equipment Group
The SC instrumentation equipment consists of various types of sensors and transducers for providing environ1nental, operational status, and performance measurements of the SC structure, operational systerr1s, and experimental equipment. The outputs from these sensors and transducers are conditioned into signals suitable for utilization by the SC displays, presentation to the PCM TLM equipment, or both. In addition, various digital signals are presented to the PCM 1’LM equipment, including event information, guidance and navigation data, and a time signal from the CTE.
Many of the signals emanating from the instrumentation sensors are of forms or levels which are unsuitable for use by the SC displays or PCM T LM equipment. Signal conditioners are used to convert these signals to forms and levels which can be utilized. Some signals are conditioned at or near the sensor by individual conditioners located throughout the SC. Other signals are fed to the signal conditioning equipment (SCE), a single electronic package located in the lower equipment bay. (Refer to Signal Conditioning Equipment (SCE) section for signal conditioning equipment.) In addition to conditioning many of the signals, the SCE also supplies 5-volt d-c excitation power to some sensors. The SCE can be turned on or off with tl1e POWER-SCE switch on MDC-3. This is the only control that the crew can exercise over instrumentation equipment for operational and flight qualification measurements. These two instrumentation groups are discussed in Operational and Flight Qualification Instrumentation and Data Equipment Interfaces sections.
Operational and Flight Qualification Instrumentation
Operational measurements are those which are normally required for a routine mission and include three categories: in- flight management of the SC, mission evaluation and system performance, and preflight checkout of the SC. The operational instrumentation sensors and transducers are capable of making the following types of measurements: pressure, temperature, flow, rate, quantity, angular position, current, voltage, frequency, RF power, and. ”on-off” type events.
Flight qualification measurements may vary between SC, depending on mission objectives and. state of hardware development. These measurements will be pulse-code modulated along with the operational measurements and transmitted to the MSFN.
Data Equipment Interfaces
The Data Interfaces Diagram illustrates the major interfaces between the units that make up the data equipment and their interfaces with the RF equipment group.
Data Interfaces Diagram

Central Timing Equipment (CTE)
The CTE provides precision square-wave timing pulses of several frequencies to time-correlate all SC time-sensitive functions. It also generates and stores the real-time day, hour, minute, and second mission elapse time (MET), in binary-coded decimal (BCD) format for transmission to the MSFN. (See the Central Timing Equipment Diagram )
Central Timing Equipment Diagram

In the primary or normal mode of operation, the command module computer (CMC) provides a 1024-kc sync pulse to the CTE. This automatically synchronizes the CTE with the CMC and provides a stability of ±2 x 10⁻⁶ parts in 14 days. In the event of sync pulse failure, the CTE automatically switches to the secondary mode of operation with no time lapse and operates using its own crystal oscillator at a stability reduced to ±2.2 x 10⁻⁶ parts in 5 days.
The CTE requires approximately 20 watts of 28-vdc power for its two redundant power supplies. Each one is supplied from a different power source and through separate circuit breakers. These circuit breakers, CENTRAL TIMING SYS-MN A and – MN B on MDC-225, provide the only external means of control for the CTE. The two power supplies provide paralleled 6-volt d-c outputs, either one of which is sufficient to power the CTE.
The timing signals generated by the CTE, and their applications, are listed in the CTE outputs charts.
CTE OUTPUTS Chart
Signal Destination Purpose
512-kc sq wave PCM SYNC of internal clock
512-kc sq wave PMP Modulating signal for S-band emergency key transmission
6 4-kc sq wave EPS inverters (3) Sync of 400-cycle a-c power
10-cps sq wave Digital event timer Pulse digital clock
1-cps sq wave PCM PCM frame sync
1 pulse per 10 minutes ECS Discharge water from astronaut suit
25-bit parallel time code output PCM Time correlation of PCM data
Serial time code output (3) Scientific data equipment Time correlation of data
Signal Conditioning Equipment (SCE)
The signal conditioning equipment (SCE) is contained in a single electronics package located in the LEB. (See the Signal Conditioning Equipment Diagram.) Its functions are to convert various kinds of unconditioned signals from the instrumentation equipment into compatible 0- to 5-volt d-c analog signals, and to provide excitation voltages to some of the instrumentation sensors and transducers.
Signal Conditioning Equipment Diagram

The SCE contains the following modules:

  • DC differential amplifier assembly
  • DC differential bridge amplifier assemblies
  • AC to DC converter assembly
  • DC active attentuator assembly
  • Power supply +20 vdc, -20 vdc, +10 vdc, +5 vdc
  • Redundant power supply – +20 vdc, -20 vdc, +10 vdc, +5 vdc.
    The only external control “for the SCE is the 3-position SCE switch on MDC-3. The NORMAL position energizes the primary power supply and an error detection circuit. If the primary power supply voltages go out of tolerance, the error detection circuit automatically switches the SCE to the redundant power supply. The SCE will not automatically switch back to the primary once it has switched to the redundant unless power is interrupted.
    The AUX position provides for manual switching between the power supplies. This is accomplished by repeated selection of the AUX position.
    The SCE requires 28-volt d-c power input and consumes about 35 watts.
    The Signal Conditioning Equipment Diagram shows graphically the input and outputs of the SCE and its redundant power supply.
    Pulse-Code Modulation Telemetry (PCM TLM) Equipment
    The function of the PCM TLM equipment (PCM Block Diagram) is to convert TLM data inputs from various sources into one serial digital output signal. This single-output signal is routed to the PMP for transmission to the MSFN or to the DSE for storage. The PCM TLM equipment is located in the lower equipment bay. Input signals to the PCM TLM equipment are of three general types: high-level analog, parallel digital, and serial digital.
    PCM Block Diagram

Two modes of operation are possible: the l1igh (normal) bit-rate mode of 51.2 kilobits per second (kbps) and the low (reduced) bit-rate mode of 1. 6 (kbps). Operational mode is selected by placing the TLM INPUTS-PCM switch on MDC – 3 to HIGH or LOW, as applicable. When the switch is in the LOW position, the high-PCM bit-rate can be commanded by the MSFN via the UDL equipment. The PCM requires about 21 watts of 3-phase 115/200′-volt 400-cps a – c power. Internal signal flow of the PCM 1s shown in the PCM Block Diagram.
The analog multiplexer can handle 365 high-level analog inputs in the high-bit-rate mode. Four of these signals, 22Al – 4, are sampled at 200 SPS; 16 signals, 12Al-16, are sampled at 100 SPS; 15 signals, 51Al-15, are sampled at 50 SPS; 180 signal s, llAl-180, are sampled at 10 SPS; and 150 signals, 10Al – 150, are sampled at lSPS.
These analog signals are gated througl1 the multiplexer, the highspeed gates, and are then fed to the coder. In the coder, the 0-to 5 -volt analog signal is converted to an 8-bit binary digital representation of the sample value. This 8 -bit word is parallel-transfer red into the digital multiplexer where it is combined with 38 external 8-bit digital parallel inputs, and 5 internal ones, to form the majority of the output format.
The external digital parallel inputs fall into three groups. The first group contains two 8-bit word inputs sampled at 200 S/S at the high-bit rate only. The second group contains a single 8- bit word input sampled at 50 S/S at the high bit rate and 10 S/S at the low bit rate. Th e third, and largest, group contains 35 eight- bit word inputs sampled at 10 S/S at the high-bit rate and one S/S at the low-bit rate. The remaining inputs to the digital multiplexer are internal and come from the coder, sync format, and programmer of the PCM.
This digital parallel information is parallel-transferred into, the output register where it is combined with the digital serial input, and then outputted serially into the data transfer buffer. From here the information is passed on to the premodulation processor for preparation for transmission over the RF equipment.
The PCM receives 512-kc and 1-cps timing signals from the central timing equipment. If this source fails, the PCM programmer uses an internal timing reference. The timing source being used is telemetered. Two calibration voltages are also telemetered as a confidence check of the PCMs overall operation.
The PCM requires about 21 watts of 3-phase 400-cycle power for its redundant power supplies.
Television (TV) Equipment
The TV equipment consists of a small, portable TV camera that can be hand-held, or mounted in the locations shown in the Television Camera Location Diagram. Its function is to acquire real-time video information for transmission to the MSFN. The camera is connected to a 12-foot cable for use throughout the CM. The cable is connected to the power connector J395 and coax connector J122 on the aft side of the right-hand forward equipment bay. See the Television Camera Diagram for physical dimensions.
Television Camera Location Diagram

The camera is controlled by an ON /OFF switch on the camera handle and an automatic light control switch on the back. Power is supplied to the cameras ON/OFF switch through CB13 located on RHEB-225 when the S-BAND AUX TAPE/VOICE B4 switch (MDC-3) is in the OFF position and the S-BAND AUX TV/SCI switch (MDC-3) is in the TV position. Power required by the camera is 6.75 watts at 28 volts de.
The composite video signal is sent from the camera to the premodulation processor where it is then sent to the S-band FM transmitter and its associated power amplifier for transmission to the MSFN and to the SM umbilical for hardline communications before lift-off.
The color TV equipment consists of a small, portable color TV camera that can be hand-held, or mounted in the locations shown in the Color TV and Monitor Locations Diagram. One of the camera functions is to acquire real-time color video information for transmission to the MSFN. The camera’s primary function is its use during rendezvous and docking operations. During this period of operation it will be mounted at the right-hand rendezvous window. A TV monitor is used with the color TV camera for astronaut viewing of TV operations. See the Color Television Camera and Monitor Diagram for details of camera and monitor. The color TV camera is compatible with the present black and white TV system in relation to power connections and switch controls.
Television Camera Diagram

Color TV and Monitor Locations Diagram

Color Television Camera and Monitor Diagram

Data Storage Equipment Data Storage Equipment Diagram
The data storage equipment provides for the storage of data for delayed playback and/or recovery with the spacecraft. Information is recorded during powered flight phases, and when out of communication, is then played back (dumped) when over selected S-band stations.
Data Storage Equipment Diagram

  • Location: lower equipment bay.
    Electrical Power Requirements
  • Voltage input: 115 -vac 3-phase 400-cp s and/or 28-vdc
  • Power input: 40 watts nominal, 70 watts maximum (3 seconds).
    Tape Transport Characteristics
  • Tape speeds: 3. 75, 15, and 120 ips
  • Operational stability: Stable in less than 5 seconds
  • Single directional: A rewind mode is provided.
  • Automatic selection: Tape speed determined by data rate.
  • Remote control: Complete remote operation possible via Up Data Link
  • 2250 feet of tape giving record times of 2 hours at 3-3/4 ips and 30 minutes at 15 ips
    Channels
    Fourteen parallel tracks: four CM PCM digital data, and one of digital clock, one LM PCM data, one CM-LM voice, three scientific data, and four spare tracks. Spare tracks are available for flight qualification data.
    Digital Channels
    a. In put parameters, serial to parallel conversion of the digital input is performed by the data storage equipment electronics:
  • Single serial NRZ, 51. 2 kbs data train, and one 51.2-kc digital timing signal, recorded speed at 15 inches per second
  • Single serial NRZ, 1. 6 kbs data train, and one 1.6-kc digital time signal, recorded at 3.75 inches per second
    b. Output parameters, parallel to serial conversion of the digital output is performed by the data storage equipment electronics.
    c. The playback rate of CM PCM is 51.2 kbs for data recorded at 3.75 ips or 15 ips. Playback speeds are 120 ips and 15 ips respectively.
    The various operational capabilities and attendant switching positions are shown in the following list.
    Channel Operation Capabilities Chart

Operational Switching
External +28 vdc from the FLT BUS is applied to the TAPE RECORDER – F ORWARD/REWIND switch. With this switch in the REWIND position, the tape transport will reverse at 120 ips. The FORWA RD position of this switch will also run the tape transport in the forward direction at 120 ips if PLAY or RECORD is not selected. The FORWARD position of the TAPE RECORDER – F ORWARD/REWIND switch supplies the excitation to the RECORD/PLAY switch in the FORWARD position. In the RECORD position, the record and erase circuitry is enabled and power is applied to the PCM- HIGH/LOW switch. The recording speed in the HIGH position is 15 ips and in the LOW position the speed is 3.75 ips. In the PLAY position, the reproduce circuitry is enabled and power is applied to the PCM/ANLG/ LM PCM switch. The play speed in the PCM/ ANLG position is internally selected, whereas the play speed in the LM PCM position is only at 120 ips.
All of the preceding switching functions may be accomplished by the use of real-time commands from the MSFN through the up-data (UDL) equipment.
Up-Data Link (UDL) Equipment 2.8.3.3.9
The function of the UDL equipment is to receive, verify, and distribute digital updating information sent to the SC by the MSFN at various times throughout the mission to update or change the status of operational systems. The UDL (Up- Data Link Equipment Diagram) consists of detecting and decoding circuitry, a buffer storage unit, output relay drivers, and a power supply. The UDL provides the means for MSFN to update the CMC, the CTE, and to select certain vehicle functions. Up-data information is transmitted to the SC as part of the 2-kmc S-band signal. When this signal is received by USBE receiver, the 70-kc subcarrier containing the up-data information is extracted and sent to the up-data discriminator in the PMP. The resulting composite audio frequency signal is routed to the sub-bit detector in the UDL which converts it to a serial digital signal. The digital output from the sub-bit detector is fed to the remaining UDL circuitry, which checks and stores the digital data, determines the proper destination of the data, and transfers it to the appropriate SC system or equipment. The UDL has three controls: two are on MDC-3 under the UP-TLM bracket and the third on MDC-2. The first, a two-position switch, is the DATA-VOICE BU switch. In the DATA position, the 70- kc subcarrier information is routed to the UDL equipment for normal processing. The VOICE BU position routes the 70-kc subcarrier information to the UDL equipment and audio centers, thus providing an alternate path for voice information to be sent in case of failure of the 30-kc subcarrier discriminator.
Up-Data Link Equipment Diagram

The second switch is the CMD RESET/NORMAL/OFF switch. The center, NORMAL, position applies power to the UDL and permits nor1nal operation. The upward position performs a real-time command reset function and keeps power applied to the power supply. This resets all RTC relays except those relays affecting the system A abort light and the crew alarm, so the affected equipment will resume the operational mode dictated by their control switches on the MDC-3. The OFF position removes the power from the UDL equipment. The UDL consumes about 12 watts of 28-vdc power.
The third control, on MDC-2 by the DSKY, is labeled UP-TLM ACCEPT-BLOCK. Th is two-position switch blocks or routes the UDL message in the command module computer.
The following list gives the real-time commands and their functions. Some functions require two separate commands.
BLOCK II UDL REAL- T IME COMMANDS
Real-Time Commands Functions
01 Abort Light (System A) On
00 Abort Light (System A) Off
07 Abort Light (System B) On
06 Abort Light (System B) Off
05 Crew Alarm On
04 Crew Alarm Off
02, 17 Spare
03, 12 Spare
03, 13 Spare
02, 16 * Spare
22, 27 S-Band Ranging On
23 S – Band Ranging Off
22, 26 *Astronaut Control (S – Band Ranging)
32, 37 S – Band PCM Mode On
33, 37 S – Band PCM Mode Off
32, 36 * Astronaut Control (S-Band PCM M ode)
42, 47 S-Band P.A. High On
43, 46 S-Band By-Pass Mode
43, 47 S-Band P.A. Low On
42, 46 *Astronaut Control (S-Band P.A. Mode)
52, 57 Tape Playback PCM/ Analog Mode
53 Tape Playback, LEM/PCM Mode
52, 56 *Astronaut control (Tape Playback Mode)
62, 67 Tape Recorder – Record Mode
63, 66 Tape Recorder – Off Mode
63, 67 Tape Recorder – Playback Mode
62, 66 *Astronaut Control (Tape Recorder Playback/Record Selection)
72, 77 Tape Recorder – Transport Forward
73, 76 Tape Recorder – Power Off
73, 77 Tape Recorder – Transport Rewind
72, 76 *Astronaut Control (Tape Transport)
65 PCM Data Rate Low
64, 71 PCM Data Rate High
64, 70 *Astronaut Control (PCM Data l’.{ate)
41, 45 S-Band Tape Mode
41, 44 S-Band Tape Off
40, 51 S-Band Back-Up Down Voice
40, 50 *Astronaut Control (S-Band)
75 D OMNI Antenna ON
74 Astronaut Control (S – Band Antenna)
*Resets previously set relays so that equipment returns to mode shown on control panels.
RF Electronics Equipment Group
The RF electronics equipment group includes all T/C equipment which functions as RF transmitters or receivers. The antennas used by this equipment are mentioned only briefly in this paragraph. Refer to paragraph 2.8.3.5 for more information on the antennas.
VHF/ AM Transmitter-Receiver Equipment (VHF-AM Block Diagram)
VHF-AM Block Diagram

The VHF/AM transmitter-receiver equipment provides the capability for the following:

  • Two-way voice communications with MSFN, LM, E VA, and recovery forces.
  • Relay of two- way voice from either LM or EVA to MSFN (via S-band/MSFN link)
  • Ranging with the LM
  • Reception of PCM data from LM
  • Reception of biomed from EVA.
    The equipment is contained in a single enclosure consisting of 11 subassemblies, 2 coax relays, and 2 bandpass filters mounted within a three piece hermetically sealed case in the lower equipment bay.
    The equipment group provides two independent VHF/ AM transmitters and two independent VHF/ AM receivers. One transmitter and receiver will provide for transmission and reception of voice communications on a preassigned frequency of 296.8 me. One transmitter and receiver will provide for transmission of voice communications or reception of voice communications and data on a preassigned frequency of 259.7 me. Complete isolation of the receiver circuits up to the final common outputs is provided. A short or open on any output will not degrade the other outputs.
    Various modes of operation are possible in both the simplex and duplex configurations:
  • Simplex A – Transmit and receive on 296. 8 me for voice only
  • Simplex B – Transmit and receive on 259. 7 me for voice only
  • Duplex A – Transmit on 296. 8 me and receive on 259. 7 me for voice and biomed data
  • Duplex B – Transmit on 259. 7 me and receive on 296. 8 me for voice and ranging
  • Receive A – Receive on 296. 8 me only
  • Receive B – Receive LM data on 259. 7 me only
  • Relay – Interfaces with S-band system for relay to MSFN.
    These modes may also be used as a backup VHF recovery beacon transmitting on 296.8 or 259.7 me.
    The VHF/AM transmitter-receiver is controlled by the VHF-AM controls on panel No. 3 of the main display console (S43, S44, and S71). The DUPLEX-off-SIMPLEX switches activate the receivers and transmitters by applying 28-volt d-c power. About 6 watts of power are required in these modes with the transmitter in standby and about 36 watts when keyed. In the OFF position, no power will be supplied to the equipment. The RCV ONLY B DATA/OFF/A switch activates the receivers only. When the A position is selected, about 2 watts of 28-volt d-c power are supplied to the 296.8-mc receiver. When the B DATA position is selected, about 2 watts of 28-volt d-c power are supplied to the 259.7-mc receiver and the LM data amplifier.
    After being selected, the VHF/ AM transmitters can be enabled either by voice-operated relay (VOX) or by manually depressing the XMIT switch on the comm cable or rotational controller. The squelch control varies the level of squelch sensitivity and is located on panel 3 of the main display console.
    The transmitters and receivers interface with the main display console (power control), the audio center (audio inputs, outputs and PTT functions), and the triplexer (RF inputs and outputs). The equipment is connected through the triplexer and antenna control switch to either of the VHF omniantennas in the service module or the VHF recovery antenna No. 2 in the command module.
    Digital Ranging Generator (VHF Ranging) 2.8.3.4.2
    The function of the VHF ranging system is to aid lunar rendezvous of the CSM with the LM, This is a backup system and. will be needed only if the LM radar fails, or the LM propulsion system would prove incapable of effecting rendezvous. This system uses the existing VHF /AM equipment, and incorporates the use of a digital ranging generator (DRG).
  • Location: Lower Equipment Bay
  • Electrical Power Requirements
    o Voltage input: 28 vdc
    o Power input: 25 watts
  • Mechanical Characteristics
    o Weight: 7.0 pounds
    o Volume: 200 cubic inches (approximately)
    The DRG generates a tone for transmission over the VHF’/AM 259. 7-mc transmitter, and receives the turn-around range tone from the LM via the VHF/AM 296.8-mc receiver. A range tracker, in the DRG, will compute the range by comparing the difference between the transmitted and received tone, and display this range, real-time, on the entry monitoring system (EMS). In addition, the range data will also be sent to the command module computer (CMC), at a rate of once a minute, initiated by a command from the CMC. This information will be displayed on the DSKY. Both di splays will be shown in units of 1/100-nautical mile.
    This system is activated by turning on the VHF RANGING switch, on MDC-3. This switch applies +28-vdc power to the DRG, as well as applying a ground to the keying circuit to key the VHF/AM 259. 7-mc transmitter, for ranging tone transmission. If the TRACKER alarm light on the DSKY comes ON, ‘this indicates that the data on the DSKY is incorrect. At the same time the display on the EMS will be reset to read zero. To restart ranging, the VHF RANGING-RESET-NORMAL switch, on the commander’s audio center panel, is put to RESET, the acquisition phase is started, and tracking will be established.
    Unified S-Band Equipment (USBE)
    The USBE (Unified S-Band Equipment Diagram) consists of two transponders, an FM transmitter, and power supply contained in a single electronic package in the lower equipment bay. The USBE will be used for voice communications, tracking and ranging, transmission of PCM data, and reception of up-data. The USBE also provides the sole means for transmission of TV.
    Unified S-Band Equipment Diagram

The USBE tracking method employed is the two-way or double-doppler method. In this technique, a stable carrier of known frequency is transmitted to the SC where it is received by the phase-locked receiver, multiplied by a known ratio, and then re- transmitted to the MSFN for comparison. Because of this capability, the USBE is also referred to as the S-band transponder.
For determining SC range, the MSFN phase-modulates the transmitted carrier with a pseudo-random noise (PRN) binary ranging code. This code is detected by the SC USBE receiver and used to phase-modulate the carrier transmitted to the MSFN. The MSFN receives the carrier and measures the amount of time delay between transmission of the code and reception of the same code, thereby obtaining an accurate measurement of range. Once established, this range can be continually updated by the double-doppler measurements discussed earlier. The MSFN can also transmit up-data commands and voice signals to the SC USBE by means of two subcarriers: 70 kc for up- data and 30 kc for up-voice.
The USBE transponder is a double-superheterodyne phase-lock loop receiver that accepts a 2106.4-mc, phase-modulated RF signal containing the up-data and up-voice subcarriers, and a pseudo-random noise (PRN) code when ranging is desired. This signal is supplied to the receiver (S-Band Receiver Schematic) via the triplexer in the S-band power amplifier equipment and presented to three separate detectors: the narrow band loop phase detector, the narrow band coherent amplitude detector, and the wide band phase detector. In the wide band phase detector, the 9.531-mc IF is detected; and the 70-kc up-data and 30-kc up-voice subcarriers are extracted, amplified, and routed to the up-data and up-voice discriminators in the PMP equipment. Also, when operating in a ranging mode, the PRN ranging signal is detected, filtered, and routed to the USBE transmitter as a signal input to the phase modulator. In the loop-phase detector, the 9. 531-mc IF signal is filtered and detected by comparing it with the loop reference frequency. The resulting d-c output is used to control the frequency of the 19.0625-mc voltage-controlled oscillator (VCO). The output of the VCO is used as the reference frequency for receiver circuits as well as for the transmitter.
S-Band Receiver Schematic

The coherent amplitude detector (CAD) provides the automatic gain control (AGC) for receiver sensitivity control. In addition, it detects the amplitude modulation of the carrier introduced by the high-gain antenna system. This detected output is returned to the antenna control system to point the high-gain antenna to the earth station. An additional function of the CAD is to select the auxiliary oscillator to provide a stable carrier for the transmitter, whenever the receiver loses lock. The AGC circuitry also supplies a signal to the S-BAND ANTS-meter located on the lower right on MDC-2. A received relative signal strength is indicated by this meter.
The USBE transponders are capable of transmitting a 2287.5-mc phase-modulated signal. The initial transmitter frequency is obtained from one of two sources: the VCO in the phase-locked USBE receiver or the auxiliary oscillator in the transmitter. Selection of the excitation is controlled by the CAD. If ranging has been selected, the up-link information is routed from the receiver wide band detector to the phase modulator in the transponder transmitter (S-Band PM Transmitter Schematic). The phase modulator also can receive premodulated CSM voice and PCM data from the PMP in a normal mode or backup voice in event of a malfunction. The phase modulator signal is amplified to 3 watts by a power amplifier and sent into a X30 variactor multiplier, where much of this power is dissipated. The final power output through the power combiner is about 250 mw. About 20 watts of 3-phase 400-cycle a-c power and 2 watts of 28-vdc power are required by each transponder.
S-Band PM Transmitter Schematic

The USBE also contains a separate FM transmitter which operates at 2272.5 mc (S-Band FM Transmitter Schematic). This separate S-band transmitter permits time-shared scientific, television, or playback data to be sent to the MSFN while voice, real-time data, and ranging are being sent simultaneously via the transponder. The transmitter VCO receives modulation from the FM mixer or TV output of the PMP. The frequency modulator signal passes through two stages of amplification and then is sent through three multipliers, X2, X3, and X5 respectively. A ferrite circulator is used on the output of the final multiplier to preclude reflected power from feeding back and degrading the signal. The output power is approximately 100 mw. The USBE FM transmitter requires about 8 watts of 3-phase 400-cycle a-c power and 1 watt of 28-vd.c power.
S-Band FM Transmitter Schematic

Operational configurations of the USBE are controlled by the S-band switches on MDC-3. Individual functions are described in the Controls and Displays, section 3, while control circuits involved with the USBE are shown in the Unified S-Band Switching Schematic.
Unified S-Band Switching Schematic

S-Band Power Amplifier Equipment
The S-band power amplifier (PA) equipment (S -Band Power Amplifier Control and Power Switching Schematic) is used to amplify the RF output from the USBE transmitters when additional signal strength is required for adequate reception of the S-band signal by MSFN. The amplifier equipment consists of a triplexer, two traveling-wave tubes for amplification, power supplies, and the necessary switching relays and control circuitry. The S-band PA is contained in single electronics package located in the lower equipment bay. Each power amplifier requires about 15 watts of warm-up, 45 watts at low-power and 90 watts at high-power of 3-phase 400-cycle a-c power and about 2. 5 watts of 28-vdc power.
S-Band Power Amplifier Control and Power Switching Schematic

All received and transmitted S-band signals pass through the S-band PA triplexer. The 2106.4-mc S-band carrier, received by the SC, enters the S-band PA triplexer from the S-band antenna equipment. The triplexer passes the signal straight through to the USBE receiver. The 2287.5-mc output signal from the USBE transponder enters the S-band PA where it is either bypassed directly to the triplexer and. out to the S-band antenna equipment, or amplified first and then fed to the triplexer. There are two power amplifier modes of operation: low power and high power. The high-power mode is automatically chosen for the power amplifier connected to the F M transmitter.
Power for the power a1nplifier comes from the telecomm group circuit breakers 1 and 2. Separate 3-phase 115-volt 400-cps power sources are employed to drive each traveling wave tube and its attendant power supply. The S -Band Power Amplifier Control and Power Switching Schematic shows the controlling circuits involved with power distribution to the power amplifier.
Premodulation Processor Equipment
The premodulation processor (PMP) equipment provides the interface connection between the airborne data-gathering equipment and the RF electronics. The PMP accomplishes signal modulation and demodulation, signal mixing, and the proper switching of signals so that the correct intelligence corresponding to a given mode of operation is transmitted.
These modes, which are listed in this section, are shown on the· S-band operational spectrum (S-Band Operational Spectrums Diagrams). The PMP uses a maximum power of 12. 5-watt at 28-volt d-c.
S-Band Operational Spectrums Diagrams

Voice
Command Module Normal S-Band Down Voice
The input voice signal from the audio center equipment is pre-emphasized, clipped, and frequency modulates the 1250-kc voice VCO. The voice subcarrier may be frequency- multiplexed with the PCM/PM 1024-kc subcarrier for PM transmission via the USBE (unified S -band equipment).
Voice Conference Between LM or EVA/CSM/MSFN
The received VHF/AM LM or EVA voice is amplified and linearly mixed (time-shared) with the real-time CSM voice for frequency modulating the 1250- kc voice VCO. The received S-band up-voice 30-kc subcarrier is demodulated and parallel outputs are provided for input to the aud.io center equipment and for the navigator 1s mike input to the navigator1s audio c enter. With the navigator’s audio control panel positioned for VHF/ AM VOX transmission to EVA or LM, the relay of MSFN voice may be accomplished. The above provisions give a conference capability between LM or EVA, CSM, and MSFN.
Command Module Backup S-Band Down Voice
The input voice signal from the audio center equipment is pre-emphasized and. clipped. The voice signal is then routed directly to the USBE, bypassing the voice modulator, for base band phase-modulation (PM) on the S-band carrier transmission to MSFN.
Recorded CSM Intercom/LM Voice
An AGC circuit is provided to process LM voice which is linearly mixed with the input voice signal from the CSM intercom bus. An isolation amplifier is used at the CSM INTERCOM/LM voice output for recording in the DSE (data storage equipment).
MSFN to CSM S-Band Normal Up-Voice
The MSFN up-voice is PM/FM voice via S-band. The received, frequency-modulated 30-kc subcarrier from the USBE is bandpass- filtered and demodulated in the PMP. The output voice signal is low-pass filtered and routed to the aud.io center equipment input.
MSFN to CM S-Band Backup Up-Voice
The MSFN backup up-voice is PM/FM voice via S-band·. The MSFN voice is switched from the 30-kc subcarrier to the 70-kc subcarrier and linearly mixed with the up-data. This bypasses the up-voice detector in the PMP.
CSM INTERCOM/ LM Voice Playback
The playback-to-record ratio may be either 32:1 or 1:1 dependent upon the CSM PCM recorded bit rate. The input signal from the DSE is limited, filtered, and frequency-multiplexed with the three scientific subcarriers and stored PCM data on the 1024-kc subcarrier for FM transmission via the USBE.
Command Module Television
The CSM television camera input signal is a direct de-coupled output signal to the USBE for FM base band transmission. An additional isolation amplifier attenuator circuit is provided for ac-coupled output to the spacecraft umbilical.
Real-Time Telemetry
Command Module PCM Data
The CSM PCM data input signal biphase modulates the 1024-kc subcarrier. The subcarrier is filtered and frequency-multiplexed with the voice 1250-kc subcarrier. The output signal phase-modulates (PM) the carrier for transmission via the USBE.
EVA Biomedical Data Relay Via S-Band
The relay of EVA biomed will be accomplished simultaneously with CSM or EVA voice in the same manner as described in the voice conference mode.
MSFN to CSM S-Band Up-Data
The up-data signal is processed the same as up-voice except the subcarrier c enter frequency is 70 kc and the output is routed to the up- data link decoder.
Scientific Analog Data
Three real-time scientific analog telemetry inputs frequency-modulate three subcarrier oscillators. The three rea l-time subcarrier signals are mixed and the composite signal frequency modulates the S-band carrier for FM transmission via the USBE.
Recorded Telemetry
CM PCM Stored Data
The CSM stored PCM TLM data biphase modulates the auxiliary 1024 -kc sine wave subcarrier. This subcarrier is frequency-multiplexed with the playback of scientific data and LM/INTERCOM voice for modulation of the S-band FM modulator and transmission to MSFN.
LM Stored Data
The LM stored data is played back at 32:1, linearly attenuated and directly modulated base band on the S-band FM carrier .
Scientific Stored Analog Data
The stored scientific analog data frequency-modulates three subcarrier oscillators (SCO). The SCOs are frequency-multiplexed with the stored PCM/ T LM 1024 -kc subcarrier and the LM/ INTERCOM voice playback signal. The composite signal frequency modulates the S-band equipment.
CM to MSFN Emergency Key
To provide a keyed output for emergency key communications, the 512-kc CTE clock input may be keyed by depressing the XMIT side of the rocker switch located on the astronaut’s comm cable. The key closure controls a gated amplifier from which the keyed signal is routed to the USBE. A 400-cps sidetone is also keyed by the PTT. This signal is mixed into the PMP up-voice output circuitry and routed through the audio center to the earphones. The S-BAND-T/R switch on the audio control panel is set to T/R or REC.
Redundancy
CM Backup S-Band Down Voice
The CM voice input is pre-emphasized, clipped, and routed directly to the S-band for PM transmission, bypassing the PMP voice modulator.
CM Auxiliary PCM Telemetry Subcarrier Modulator
The real-time PCM T LM input may be switched by S54 (AUX position) to the auxiliary bi phase modulator with the output being switched to the PMP PM MIXER output for S-band PM transmission and to the FM mixer output for S-band FM transmission.
MSFN to CMS-Band Backup Up-Voice
The MSFN voice is placed on the 70-kc up-data subcarrier. This enables the use of the 70-kc subcarrier for time-shared voice and data.
Auxiliary Power Supply
The PMP has redundant switchable regulators to provide power to all PMP circuitry. When switch S54 is in the AUX position, the auxiliary +18-volt d-c regulator is in use. Also the auxiliary 1. 024-mc biphase modulator which normally handles stored CM PCM data is switched to handle real-time CM PCM data.
PMP Operational Modes and Output Levels
Output signals are provided in combinations and levels as described in the following. Control panel switches, used to achieve the various modes are illustrated in the block diagram (PMP Data Modulation Levels Diagrams).
PMP Data Modulation Levels Diagrams

Primary Power Control
When S54 switch is in the NORMAL position, power is supplied to all PMP circuitry from the normal +18-volt regulator. When switch S54 is in AUX position, auxiliary +18-volt regulator is used. Also the auxiliary 1.024-mc biphase modulator which normally handles stored CM/PCM data is switched to handle real-time CM/PCM data.
Scientific Data Output to DSE
The three R/T scientific analog data signals are supplied to the DSE through the PMP except when switch S37 is in the SCI position.
When S37 is in the SCI position, the three R/T scientific analog data signals are applied directly to the FM mixer in the PMP for transmission via the S-band FM transmitter.
Intercom/LM Voice Output to DSE
The intercom and LM voice output i s supplied for DSE recording at all times power is applied to the PMP.
Up-Voice and Up-Data Output
When switch S38 is in the DATA position, the up-voice signal from the 30-kc demodulator is supplied as an output to the audio center. The 70-kc demodulator supplies an up-data output to the up-data link decoder.
When switch S38 is placed in the BU VOICE position, the 70-kc demodulator output is switched to the up-voice output terminals, as an output to the audio center
Television Signal Output
The television signal input is provided as a direct output. Coaxial terminals having 100-ohm ±5 percent impedance are used. This channel will pass frequencies from dc to 500 kc with no more than 0.5-db attenuation.
A TV umbilical output is also provided through an isolation amplifier. Output voltage is no greater than the TV input signal and is no less than one volt peak-to-peak, for a 1.9-volt peak-to-peak input signal at 1000 cps. Frequency response in the band from 10 cps to 500 kc is no more than 3 db below the peak response. This output is protected against open or short circuit conditions.
FM Output
Signals supplied to the FM terminals for trans1nission on USBE are:

  • Real-time scientific data
  • Stored CM LM voice
  • Stored LM PCM
  • Stored scientific data
  • Stored CM PCM data
  • Television
  • Auxiliary real-time CM PCM data.
    These signals are selected by appropriate combinations of switches S36, S37, and S49.
    PM Output
    Subcarriers are selected by suitable configurations of switches. Subcarriers selected for phase modulation of the USBE are:
  • 1. 024-mc biphase modulated by real-time CM PCM data
  • 1. 25-mc VCO frequency modulated by:
    o CM voice, or
    o CM voice and. LM/ EVA voice and biomedical data
  • 512-kc emergency key signal.
    These signals are selected by appropriate combinations of switches S33, S34, S 36, and S44. Switch positions and. the output level of each subcarrier are shown on the PMP Data Modulation Levels Diagrams.
    The overall functions of the PMP are summarized in the PMP Block Diagram .
    PMP Block Diagram

VHF Recovery Beacon Equipment
The VHF recovery beacon equipment (VHF Recovery Beacon Equipment Diagram) provides line-of-sight direction-finding capabilities to aid in locating the SC during the recovery phase of the mission. The 3-watt beacon signal emitted is an interrupted 243-mc carrier, modulated by a 1000- cps square wave. The signal is transmitted for 2 seconds, then interrupted for 3 seconds.
VHF Recovery Beacon Equipment Diagram

Manual control of the equipment is provided by the RECOVERY VHF-BCN, two-position ON/OFF switch on MDC -3. The beacon requires a maximum of 10-watt of 28-vdc power.
The output of the VHF recover y beacon equipment is fed to VHF recovery antenna No. 1, which i s deployed automatically when the main chutes are deployed.
Rendezvous Radar Transponder
The transponder (RRT Block Diagram) is located in the command and service module (CSM) and. performs the function of receiving the LM rendezvous radar (RR) X-band CW signal, and retransmitting (back to the LM) a phase-coherent signal.
RRT Block Diagram

The 240-milliwatt return signal is offset in fundamental carrier frequency from the received signals and contains the same modulation components phase-related with respect to the received signal.
The transponder is a part of the LM radar subsystem which consists of a rendezvous radar in the LM, the transponder in the CSM, and a landing radar mounted in the descent stage of the LM. The landing radar and the descent stage are left on the lunar surface when the lunar exploration is completed.
During the descent to the lunar surface, the LM and CSM maintain continuous radar contact through the rendezvous radar-transponder link. During the latter part of the descent phase, the landing radar measures the altitude and velocity of the LM with respect to the lunar surface.
At the end of the lunar stay, the rendezvous radar in the LM is used to track the transponder in the orbiting CSM to obtain orbital parameters, which are used to calculate the launching of the LM into a rendezvous trajectory.
In the rendezvous phase, the LM and CSM again maintain radar contact to obtain information needed for midcourse correction, rendezvous, and docking operations. By accepting the weak rendezvous radar transmitted signal, as discussed in preceding paragraphs, and by retransmitting (back to the LM) the phase-coherent return signal, the range capabilities are greatly increased.
Performance Characteristic
Range
Operates with the rendezvous radar (RR) in a closed loop tracking system at LOS range between 50 feet and 400 NM.
Range Accuracy
The transponder will retransmit each of the range tones received from the rendezvous radar at the following maximum phase shifts:
Tone Frequency Max. Deg. Phase Shift
200 cps ±0.69°
6.4 kcs ±1.0°
204.8 kcs ±3°
Range Rate Accuracy
1 /4 percent or 1 foot per second (whichever is greater) based on an LGC sampling period of 100 milliseconds.
Angular Coverage
Angular coverage over a solid angle of 160 ° by 105 °.
Acquisition
Acquires the rendezvous radar with a detection probability of 98 percent in a period of 1.3 seconds with a signal ·’equal to or greater than -123 dbm at the transponder antenna.
Mode Activation
Signal Search Mode
The transponder will be in the signal search mode at all times that the transponder is in an ON condition and no signal is being received from the rendezvous radar.
Transponder Mode
The transponder will be in its transponder mode at all times that a signal is being received from the rendezvous radar. Signals equal to or greater than -123 dbm which fall within the transponder frequency range are automatically detected and acquired by the transponder.
Self-Test Mode
The transponder will be in the self-test mode when the self-test enable signal is applied to the transponder assembly.
Standby Mode
The transponder will be in standby mode when the heater position is selected for the 24 minutes it takes to warm the filters to 160°±1°F.
Antenna Characteristics
Coverage
Gain is maintained over a solid angle of 160° x 105°.
Polarization
Linear with cross-polarized components 20 db down from the main component.
Transmit Energy Characteristics
Power
Greater than 240 milliwatts.
Frequencies
Signal search, 9792.0 mc ±25 kcs and. swept ±104 kc minimum.
Transponder mode equal to the received frequency times 240/241.
Received Signal Characteristics
Frequency

  1. 8 mc ±30 kc offset by a doppler frequency within the range of ±49 kc with maximum rate of change of 500 cps2.
    Signal Level
    At antenna terminals, -123 dbm to -18 dbm.
    Self Test
    Self-Test Oscillator
    Provides 40.8 mc for receiver testing and is coupled into the receiver preamplifier.
    Self-Test Enable
    From control/display +12 vdc ±10 percent and current of 20 ma ±10 percent.
    Self-Test Enable Supply
    From transponder to the control/ display assembly self-test switch +25 volts ±10 percent.
    Receiver Self-Test Output
    From transponder to the control/ display monitor meter, panel 101.
    Monitor outputs to the control/display panel:
    AGC monitor 0 to 4.5 volts
    Frequency lockup search 0±0.4 volts dc
    Transponder mode 4.5 volts dc ±10 percent
    Transmitter Power
    2.5±0. 4 volts de for specified minimum power (5 volts dc maximum).
    Electrical Requirements
    Operating voltage Normal 25 to 31.5 volts
    Emergency periods not exceeding 5 seconds +20 to +25 volts dc +31.5 to +32 volts dc
    Transients limits not exceeding 5 minutes +50 volts for 10 usec at 10 pps repetition rate.
    -100 volts for 10 usec at 10 pps repetition rate.
    Power Requirements
    Maximum input power excluding heater 60 watts at +28 vdc
    Antenna Equipment Group
    The antenna equipment group contains all the SC antennas and ancillary equipment used in the T/C system. For the antenna locations, see the Antenna Locations Diagram.
    Antenna Locations Diagram

VHF Omniantenna Equipment
The VHF omniantennas and ancillary equipment consist of two VHF scimitar antennas, a VHF triplexer, a VHF antenna switch, and the necessary signal and control circuits. The function of this equipment is to provide capabilities for radiation and pickup of RF signals in the VHF spectru1n. The VHF/AM transceivers, which work through this equipment, operate at 296.8 mc and 259.7 mc. Provisions are also made for the checkout of the PLSS com1nunicati on equipment through this equipment.
The VHF triplexer is a passive, three-channel filtering device which enables three items of VHF transmitting and receiving equipment to utilize one VHF antenna simultaneously. The three-channel filters are composed of two tuned cavities each, which function as bandpass filters. No power is required by the device and there are no external controls.
The VHF scimitar antennas, shown in the Scimitar Antenna Diagram, are omni-antennas with approximately he1nispherical radiation patterns. Because of its characteristic shape, this type of VHF antenna is called a scimitar.
Scimitar Antenna Diagram

These two VHF antennas are located on opposite sides of the service module. One is located near the + Y axis and is called the right VHF antenna; the other is located near the -Y axis and is called the left VHF antenna. Because of their approximate hemispherical radiation patterns, full omnidirectional capabilities can be obtained only by switching from one antenna to the other. This is accomplished with the VHF ANTENNA remote control switch on MDC-3 for VHF communications.
S-Band High-Gain Antenna
The high-gain antenna is provided for use with the unified S-band equipment to provide sufficient gain for two-way communications at lunar distances. To accomplish this, the antenna can be oriented manually or automatically toward the MSFN stations for maximum operational efficiency.
The antenna also has three modes of operation for transmission and two for reception. The nominal gain and beam widths of these modes are listed as follows:
Mode Gain Beam Width
Wide-Transmit 9.2 db 40°
Wide-Receive 3.8 db 40°
Medium-Transmit 20. db 11.3 °
Medium-Receive 22.8 db 4.5 °
Narrow-Transmit 26.7 db 3.9 °
Narrow-Receive 23.3 db 4.5°

The High Gain Antenna Diagram shows the antenna in both the deployed and nondeployed state. Actual deployment takes place during transposition and. docking phase of the mission when the SLA panels are opened. After deployment, the positioning circuitry is enabled. Manual controls, position readouts, and. a signal strength meter are provided on MDC-2 to allow normal positioning of the antenna for initial signal acquisition. After acquisition, the antenna is capable of automatically tracking the RF signal within the travel limits of its gimbaling system. The propagation and reception mode is selectable on the same panel.
High Gain Antenna Diagram

The antenna itself is made up of a four-parabolic dish array whose attendant feed horns are offset 10 degrees for the desired propagation pattern and a cluster of four feed horns enclosed in the center enclosure. In the wide mode, the center feed horns are used for transmission and reception of signals. In the medium mode, one of the parabolic dish-reflector antennas is used for transmission and all four of the dish antennas are used for reception of S-band signals. The narrow mode employs the four parabolic dish antennas for transmission and reception of S-band signals.
S-Band Omniantennas
The function of the four S-band omniantennas is to transmit and receive all S-band signals during the near-earth operational phase, with a backup capability to support the high-gain S-band antenna in the lunar sequence. Locations are shown in the Antenna Locations Diagram at Xc=20.766 and 45 degrees off the +Z, – Y, -Z and +Y axis.
The antennas are flush-mounted, right-hand polarized helical, and in a loaded cavity. They are rated at 15 watts cw at 2100 to 2300 mc.
VHF Recovery Antenna Equipment
There are two VHF recovery antennas, No. 1 and No. 2, stowed in the forward compartment of the SC. Each antenna consists of a quarter-wave stub, 11 inches long, and. a ground plane. They are automatically deployed 8 seconds after main parachute deployment, during the descent phase of the mission. (See the VHF Recovery Antenna No. 1 Diagram and the VHF Recovery Antenna No. 2 Diagram.)
VHF Recovery Antenna No. 1 Diagram

VHF Recovery Antenna No. 2 Diagram

VHF recovery antenna No. 1 is connected to the VHF recovery beacon equipment. VHF recovery antenna No. 2 is to be used with the VHF/AM transmitter-receiver equipment and is connected to the VHF antenna switch with a coaxial cable. An access hatch is provided to allow either of the VHF recovery antennas to be used with the GFE survival transceiver. This requires that the coaxial cable from one of the antennas be manually disconnected at the triplexer and reconnected to the survival transceiver.
Electrical Power Distribution
Electrical power distribution for the intercommunication, data, instrumentation, RF and antenna equipment is summarized on the Telecommunications Power Distribution Diagram. In most cases, the power circuit for each piece of equipment was covered in the respective functional description. The majority of the circuit breakers for the telecommunication system are located on MDC-225.
Telecommunications Power Distribution Diagram

OPERATIONAL LIMITATIONS AND RESTRICTIONS
VHF-AM
a. Simultaneous selection of DUPLEX A and B gives the same operation as selection of SIMPLEX A and. B.
b. Only LM PCM telemetering data can be received only on RCV B DATA.
PMP
a. When UP TLM/VOICE BU is chosen, the output of the data discriminator is sent to both the audio center and the up-data link equip1nent.
b. Low-bit rate P CM data can be transmitted with down VOICE BU. If only VOICE transmission is desired, the PCM switch must be at OFF and the TLM INPUT PCM switch must be at HIGH for the best circuit margins.
c. Selection of the AUX PMP power supply precludes tl1e trans1nission of recorded data from the data storage equipment. Real-time PCM is available for transmission over both the S-band transponder and FM transmitter in this mode.
d. To transmit real-time PCM over the FM transmitter, S-BAND AUX TAPE and PMP AUX POWER should be selected.
DSE
a. Selection of the record speed in the DSE is made by the PCM HIGHLOW switch. If PCM HIGH is selected, the record speed witl1 be 15 ips. A PCM LOW selection changes the record speed to 3- 3/4 ips.
b. Selection of the DUMP speed is automatically made by the DSE electronics through monitoring of the bit rate on the recorded CM PCM CLOCK track. High – bit rate PCM is dumped at 15 ips (1:1) while low- bit rate PCM is dumped at 120 ips (32:1). A failure of the speed select electronics causes automatic dumping at 120 ips.
c. The DUMP speed of recorded LM PCM is always 120 ips. If the LM PCM was recorded. With LBR CM PCM, it can be dumped at a 32:1 ratio. An 8:1 dump ratio is used if LM PCM was recorded With H BR CM PCM.
USBE
The S-BAND NORMAL-XPONDER switch, when switched between PRI and SEC, should be held momentarily in the center, off, position to allow the internal power relay to follow the desired configuration change.

ABBREVIATIONS AND SYMBOLS
A / B / C / D / E / F / G / I / J / K / L / M / N / O / P / Q / R / S / T / U / V / W / X / Z / SYMBOLS
A
AB Aft bulkhead
AC Alternating current
A/C Audio center
A/C A and C quads (RCS)
ACCEL Accelerometer
ACCUM Accumulator
ACE Acceptance checkout equipment
ACK Acknowledge
ACS Attitude control subsystem
ACTY Activity
A/D Analog to digital
ADA Angular differentiating accelerometer
ADAP Adapter
ADJ Adjust
AESB Aft equipment stowage bay
AF Audio frequency/atmospheric flight
AGC Automatic gain control
AH Ampere-hours
AM Amplitude modulation
AMPL Amplifier
AMPS Amperes
AMS Apollo mission simulator
ANAL Analyzer
ANLG Analog
ANT Antenna
AOA Angle of Attack
AOH Apollo Operations Handbook
ARS Attitude reference subsystem
ASA Abort sensor assembly
ASCP Attitude set control panel
ASD Apollo standard detonator
AS/GPI Attitude set/gimbal position indicator
ATT SET Attitude set
ATT Attenuator/attitude
AUTO Automatic
AUX Auxiliary
AVC Automatic volume control

B
BARO Barometric
BAT Battery
BCD Binary-coded decimal
BCN Beacon
B/D Band D quads (RCS)
BECO Booster engine cutoff
BIOINST Bioinstrumentation
BIOMED Biomedical
BLWR Blower
BMAG Body-mounted attitude gyro
B.O. Breakout switches
BPC Boost protective cover
bps Bits per second
BRT Bright
Btu British thermal unit
BU Backup
BUR Backup rate
BURR Backup rate roll
BURP Backup rate pitch
BURY Backup rate yaw

C
CAB Cabin
CA (OH)2 Calcium hydroxide
CAMR Camera
CB Circuit breaker
cc Cubic centimeter
CCW Counterclockwise
C&D Controls and displays
CDF Confined detonating fuse
CDH Constant delta altitude
CDU Coupling data unit
CF Coasting flight
CFE Contractor-furnished equipment
CFP Concentric flight plan
cfm Cubic feet per minute
CG Center of gravity
CHAN Channel
CHGR Charger
CLR Clear
CM Command module
CMC Command module computer
CMD Command
COAS Crewman optical alignment sight
COI Contingency orbit insertion
COMM Communications
COMP Compressor, computing
COND Condenser/conditioner
CONT Control
CONTR Control
CO2 Carbon dioxide
CPC Cold plate clamp
cps Cycles per second
CRYO Cryogenic
CSC Cosecant computing amplifier
CSI Coelliptic sequence initiation
CSM Command and service module
CSS Computer subsystem
CTE Central timing equipment
CTS Computer test set
CW Clockwise/continuous wave
CW Not clockwise
C/W Caution and warning
CWG Constant wear garment
C&WS Caution and warning system

D
DA Detector assembly
D/A Digital-to-analog
DAG Digital to analog converter
DAP Digital auto pilot
db Decibel
DB Deadband
DC Direct current
D&C Displays and controls
DCT Docked configuration transfer
D&CT Docking and crew transfer
DDP Data distribution panel
DEA Display electronic assembly
DEC Decrease
DECR Decrease
DEG Degree
DEMOD Demodulate
DET Digital event timer/detector
DISCH Discharge
DLH Docking lock handle
Dn Down
DPST Double-pole single-throw
DRG Digital ranging generator
DS Docking subsystem
DSE Data storage equipment
DSIF Deep Space Instrumentation Facility
DSKY Display and keyboard
DU Direct ullage
DUP Duplex

E
E Elevation angle
ECA Electronic control assembly
EC&L Error counter and logic
ECG Electrocardiograph
ECO Engine combustion/ engine cutoff
ECS Environmental control system
EDA Electronic display assembly
EDS Emergency detection system
Eig Voltage-inner gimbal
EL Electroluminescent
ELEC Electronics
ELS Earth landing subsystem
ELSC Earth landing sequence controller
EMER Emergency
Emg Voltage-middle gimbal
EMS Entry monitor system
ENC Encode
ENG Engine
ENTR Enter
Eog Voltage-outer gimbal
EOS Emergency oxygen system
EPS Electrical power subsystem
EQUIP Equipment
ERR Error
ESS Essential
EV Extravehicular
EVT Extravehicular transfer
EVA Extravehicular activities
EVAP Evaporator
EVCT Extravehicular crew transfer
E VISOR Extravehicular visor assembly
EXCH Exchanger
EXH Exhaust
EXT Extension
EXTD Extended

F
FL Flash
FC (F/C) Fuel Cell
FCD Fecal containment system
FCSD Flight Crew Support Division (MSC)
FCSM Flight combustion stability monitor
FDAI Flight director attitude indicator
FE Fecal emesis
FLSC Flexible linear-shaped charge
FM Frequency modulation
FOV Field of view
FPS Feet per second/frame per second
FQR Flight qualification recorder
FQTR Flight qualification tape recorder
FS Fail sense
FST Free space transfer
FUNCT Functional
FWD Forward

G
GA Gyro assembly
G&C Guidance and control
g Gravity
g/v Gravity vs velocity
GDC Gyro display coupler
GET Ground elapse time
GFP Government-furnished property
GLY Glycol
GMBL Gimbal
GMT Greenwich Mean Time
G/N (G&N) Guidance and navigation
GN2 Gaseous nitrogen
GPI/FPI Gimbal position indicator and fuel pressure indicator
GPI Gimbal position indicator
GSE Ground support equipment
GSOP Guidance system operations plan
GTA Ground test access
GUID Guidance

H
ha Apogee altitude
HBR High-bit rate
He Helium
HEX Hexagonal
HF High frequency
HGA High gain antenna
HI High
hp Perigee altitude
HR Hour
HT EXCH Heat exchanger
HTRS Heaters
H2 Hydrogen
H2O Water
Hz Hertz (cps)

I
ICDU Inertial coupling data unit
ICS Intercommunication system
IECO Inboard engine cut-off
IF Intermediate frequency
IGA Inner gimbal angle
IGN Ignition
IMP Impulse
IMU Inertial measurement unit
INCR (INC) Increase
IND Indicator
INST (INSTR) Instrument
INV Inverter
IPB Illuminated pushbutton
ips Inches per second
IRIG Inertial rate integrating gyro
ISOL Isolation
ISS Inertial subsystem
IU Instrument units

J
JETT Jettison

K
KBS (KBPS) Kilo bits per second
kc Kilocycle
KHz Kilo Hertz (kilocycles)
kmc Kilomegacycle
KmHz Kilomega Hertz
KOH Potassium hydroxide

L
LAT Latitude
lb/hr Pounds per hour
lb min Pounds per minute
LBR Low-bit rate
LCC Launch control center
LCG Liquid cooled garment
LDEC Lunar decking events controller
LDG Landing
LEA Launch escape assembly
LEB Lower equipment bay
LEM Launch escape motor
LES Launch escape system
LEV Launch escape vehicle
LGS LM guidance computer
LHEB Left-hand forward equipment bay
LIO Liquid
LLOS Landmark line of sigh
LM Lunar module
LMK Landmark
LO Low
LOC Lunar orbit coast
LOI Lunar orbit insertion
LONG Longitude
LOR Lunar orbit rendezvous
LOS Line of sight
LPH Legrest pin handle
LSB Least significant bit
LSC Linear shaped charge
LSSC Lunar module separation
LT Light
LTG Lighting
LV Launch vehicle

M
MAN Manual
MANF Manifold
MAX Maximum
mc Megacycles
MC Midcourse correction
MCC Mission Control Center
MCT Memory cycle time
MDA Motor drive amplifier
MDC Main display console
MDF Mild detonating fuse
MERU Milli earth rate unit
MESC Master event sequence controller
MGA Middle gimbal angle
MGMT Management
MHz Mega Hertz
MIN Minimum/minute
MMH Monomethylhydrazine
Mm Hg Millimeters of mercury
MN A Main bus A
MN B Main bus B
MSC Manned Spacecraft Center
MSD Monitor selection decoder
MSFC Marshall Space Flight Center
MSFN Manned space flight network
MSN Mission
MT Mission timer
MTVC Manual thrust vector control
MULTI Multiplexer

N
NAV Navigation
NB Navigation base
NON None
NORM Normal
NPDS Nuclear particle detection system
NR North American Rockwell Corporation
NRZ Non-return to zero
N2 Nitrogen
N2B Gaseous nitrogen
N2H4 Hydrazine (fuel)
N2O4 Nitrogen tetroxide (oxidizer)

O
OCDU Optical coupling data unit
OECO Outboard engine cutoff
OGA Outer gimbal angle
OI Orbit insertion
OMNI Omnidirectional
OPR Operator
ORDEAL Orbit rate drive electronics Apollo LM
OSC Oscillator
OSS Optics subsystem
OVLD Overload
OXID Oxidizer
O2 Oxygen

P
p Roll control axis
PA Power amplifier
PAM Pulse amplitude modulation
PB Pushbutton
P/B Playback
PCM Pulse code modulation/pitch control motor
PCVB Pyro continuity verification box
PF Powered flight
PGA Pressure garment assembly
PGNCS Primary guidance, navigation and control system
PH Phase
pH Alkalinity to acidity content (hydrogen ion concentration)
PIPA Pulsed integrating pendulous accelerometer
PKG Package
PL Postlanding
PLSS Portable life support system
PV Postlanding ventilation
PVC Postlanding ventilation control
PM Phase modulation
PMP Premodulation processor
POT Potable
PP Partial pressure
PPK Pilot’s preference kit
pps Pulses-per-second
PRD Personnel radiation dosimeter
PRESS Pressure – pressurize pressurization
PRF Pulse repetition frequency
PRIM (PRI) Primary
PRN Pseudo-random noise
PROG Program
PROP Propellant
PRPLNT Propellant
PRR Pulse repetition rate
PSA Power servo assembly
PSC Pressure suit circuit
PSI Pounds per square inch
PSIA Pounds per square inch absolute
PSID Pounds per square inch differential
PSIG Pounds per square inch gauge
PSO Pad safety officer
PTT Push to talk
PU Propellant utilization
PUGS Propellant utilization and gauging system
PWR Power
PYRO Pyrotechnic

Q
q Pitch control axis
QTY Quantity

R
r Yaw control axis
RAD Radiator
RAI Roll attitude indicator
RC Rotation control
RCDR Recorder
RCS Reaction control system
RCSC Reaction control system controller
RCV (RCVR) Receive/Receiver
REACQ Reacquire
REACS Reactants
REC Receive
RECT Rectifier
RECY Recovery
REFSMMAT Ref-to-stable member matrix
REG Regulator
REL Release
RESVR Reservoir
REV Reverse
RF Radio frequency
RHC Rotational hand control
RHEB Right-hand equipment bay
RHFEB Right-hand forward equipment bay
RJD Reaction jet driver
RJEC Reaction jet engine ON-OFF control
R/L Right/Left
RLSE Release
RLVDT Rotary linear variable differential transformer
RLY Relay
R-M Reference and measurement
RNDZ Rendezvous
RNG Ranging
ROT Rotation
R/R Remove/replace
RRT Rendezvous radar transponder
RSET Reset
RSI Roll stability indicator
RSM Radiation survey meter
RSO Range safety officer
R/T Real time
RTC Real-time commands
RUPT Interrupt
RZ Return to zero

S
SA Signal analyzer assembly
SBASI Single bridgewire Apollo standard initiator
SC Spacecraft
SCE Signal conditioning equipment
SCI Scientific
SCIN Scimitar-notch
SCT Scanning telescope
SCO Sub-carrier oscillator
SCS Stabilization and control system
SEC Secondary
SECO SIVB engine cutoff
SECS Sequential events control system
SEL Select
SENS Sensitivity
SEP Separation
SEQ Sequencer/sequential
SIG Signal
SIM Simplex
SLA Spacecraft lunar module adapter
SLOS Star line of sight
SM Service module
SMJC Service module jettison controller
SMRD Spin motor rotation detector
SNSR Sensor
SOV Shutoff valve
SPEC Specification
SPLH Seat pin lock handle
SPS Service propulsion system/ sample per second
SQ Square
SSA Space suit assembly
SSB Single side-band
S/S Samples per second
STA Station
STAB Stabilization
STBY Standby
STD Standard
SU Separation ullage
SUP Supply
SW Switch
SXT Sextant
SYNC Synchronize
SYS System

T
TB Talkback
TBD To be determined
TC Translation control
TELCOM (T/C) Telecommunications
TEC Transearth coast
TEI Transearth injection
TEMP Temperature
TFF Time of freefall
TFL Time-from-launch
THC Translation hand control
TIG Time of ignition
TJM Tower jettison motor
TK Tank
TLC Translunar coast
TLI Translunar injection
TLM Telemetry or telemetered
TMG Thermal meteoroid garment
TPAC Telescope Precision Angle Counter
TPF Transfer phase final
TPI Terminal phase initiation
T/R Transmit/receive
TRGT Target
TRNFR Transfer
TTE Time-to-event
TTINT Time to intercept
TV Television
TVC Thrust vector control
TVSA Thrust vector position servo amplifier
TWR Tower
TWT Traveling wave tube

U
UCD Urine collection device
UDL Up-data link
UDMH Unsymmetrical dimethyl hydrazine (fuel)
UHF Ultra-high frequency
ULL Ullage
UNBAL Unbalance
UPTL Up-link telemetry
USBE Unified S-band equipment
USBS Unified S-band system

V
V Velocity
VABD Van Allen belt dosimeter
VAC Vacuum/volts alternating current
Vc Circular velocity
VCO Voltage control oscillator
VDC Volts direct current
VHF Very-high frequency
VLV Valve
VM Velocity measured
Vo Initial velocity
VOX Voice-operated relay/ voice-operated transmission

W
W/G Water-glycol
WMS Waste management system

X
XCVR Transceiver
XDUCER Transducer
XFMR Transformer
XLATION Translation
XLUNAR Translunar
XMTR Transmitter
XPNDR (XPONDER) Transponder

Z
ZN Zinc

SYMBOLS
ΔP Differential pressure
ΔV Differential velocity
Φ Roll axis designation/phase
Θ Pitch axis designation
ψ Yaw axis designation
ά Entry pitch attitude
ɣ Angle between local horizontal and velocity vector

Image Index©

Bonus Interactive Panoramic Image of the Interior of Apollo 11(Courtesy of NASA and the Smithsonian Air and Space Museum)

Copyright © 2017 Proactive Information Corporation
All rights reserved. No part of this book or its Trademarks may be used or produced in any manner whatsoever without prior written permission of the author/publisher; except in the case of brief quotations embodied in reviews.
Thanks to NASA for getting the first Human to and back from the Moon safely and documenting how it was done. We hope to honor their work for all posterity by making it available to all humanity and make it easier for interested people to find out the awesome technology used in the Apollo Program.
Images and Information Curtesy of NASA

This iManual™ was created to make it easy for anyone to get any piece of information on any component of the Apollo 11 Spacecraft. The table of contents, as well as references within the text, are hyperlinked to the source information.
This e-book also comes with an Image Table of Contents™ that allows users to find information on parts of the spacecraft without knowing the name of the components, (internet connection needed). Just click on the image to activate, pinch and zoom on the component, and then click to find out all its information.
There are also more some detailed enhanced images which allow for large memory pictures to be shown on the device. Click on diagram to go to an enhanced image that allows pinch and zoom. (web connection needed)